So implementieren Sie die Nginx-Hot-Bereitstellung
Schließen Sie die Firewall, damit auf den Nginx-Dienst lokal über den Browser zugegriffen werden kann. Nginx服务。
[root@localhost ~]# systemctl stop firewalld

信号量
查看信号量:
[root@localhost ~]# kill -l
 1) SIGHUP	 2) SIGINT	 3) SIGQUIT	 4) SIGILL	 5) SIGTRAP
 6) SIGABRT	 7) SIGBUS	 8) SIGFPE	 9) SIGKILL	10) SIGUSR1
11) SIGSEGV	12) SIGUSR2	13) SIGPIPE	14) SIGALRM	15) SIGTERM
16) SIGSTKFLT	17) SIGCHLD	18) SIGCONT	19) SIGSTOP	20) SIGTSTP
21) SIGTTIN	22) SIGTTOU	23) SIGURG	24) SIGXCPU	25) SIGXFSZ
26) SIGVTALRM	27) SIGPROF	28) SIGWINCH	29) SIGIO	30) SIGPWR
31) SIGSYS	34) SIGRTMIN	35) SIGRTMIN+1	36) SIGRTMIN+2	37) SIGRTMIN+3
38) SIGRTMIN+4	39) SIGRTMIN+5	40) SIGRTMIN+6	41) SIGRTMIN+7	42) SIGRTMIN+8
43) SIGRTMIN+9	44) SIGRTMIN+10	45) SIGRTMIN+11	46) SIGRTMIN+12	47) SIGRTMIN+13
48) SIGRTMIN+14	49) SIGRTMIN+15	50) SIGRTMAX-14	51) SIGRTMAX-13	52) SIGRTMAX-12
53) SIGRTMAX-11	54) SIGRTMAX-10	55) SIGRTMAX-9	56) SIGRTMAX-8	57) SIGRTMAX-7
58) SIGRTMAX-6	59) SIGRTMAX-5	60) SIGRTMAX-4	61) SIGRTMAX-3	62) SIGRTMAX-2
63) SIGRTMAX-1	64) SIGRTMAX
有64种信号量,以下是几种常用的信号量:
SIGINT、SIGTERM:快速关闭。SIGQUIT:从容关闭(优雅的关闭进程,即等请求结束后再关闭)。SIGHUP:平滑重启,重新加载配置文件 (平滑重启,修改配置文件之后不用重启服务器)。SIGUSR1:重新读取日志文件,在切割日志文件时用途较大。SIGUSR2:平滑升级可执行程序 ,nginx升级时候用。SIGWINCH:从容关闭工作进程。
Nginx热部署
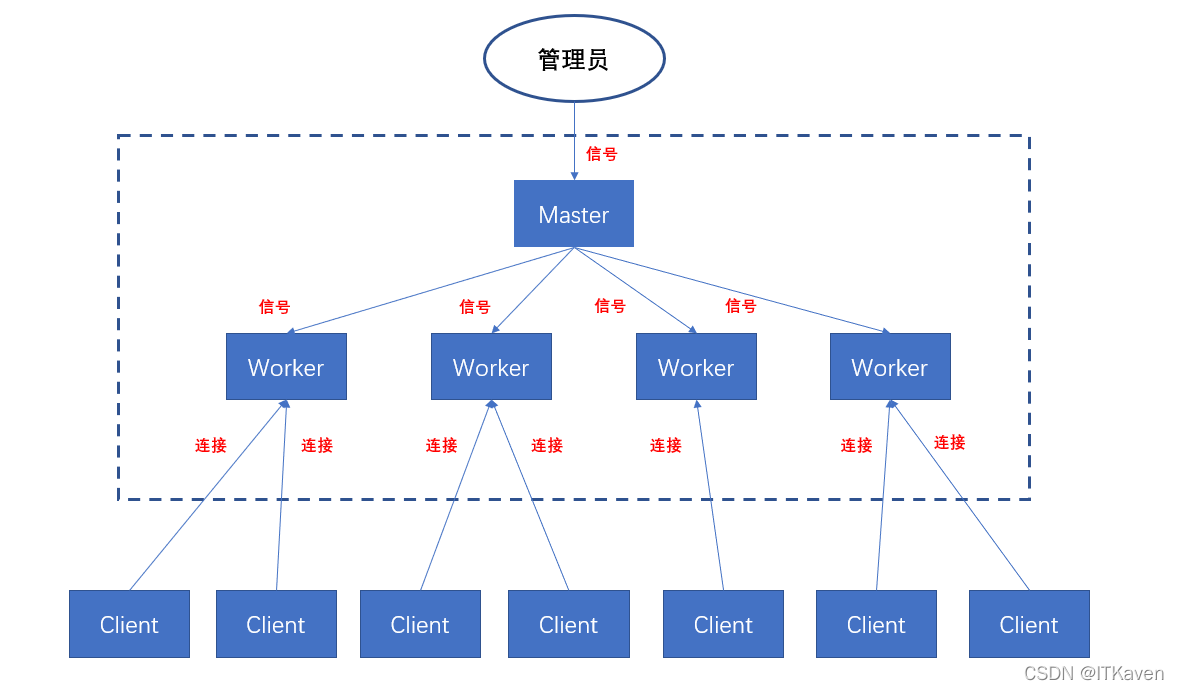
Nginx是一个多进程的高性能反向代理服务器,包含一个master进程和多个worker进程(worker进程的数量可以通过nginx.conf配置文件中的worker_processes参数进行设置,默认1个),这样可以充分利用多核处理器。

默认1个worker进程。

并且master进程和worker进程是父子进程关系。

Nginx工作模式为多进程,Nginx在启动之后会有一个master进程和多个worker进程(默认1个),多个worker子进程将监听master父进程监听的端口(参考父子进程的关系),并行处理请求。master父进程主要用来管理worker子进程(管理真正提供服务的worker进程,向worker进程发送信号,监控worker进程的运行状态,当worker进程异常退出后,会重新启动新的worker进程),读取并验证配置信息,master进程不会对用户请求提供服务,而用户请求是由worker进程进行处理。
Nginx是通过信号量来控制,比如停止和重启Nginx。信号量是进程间通信的一种机制,master主进程控制多个worker子进程,也是通过信号量。

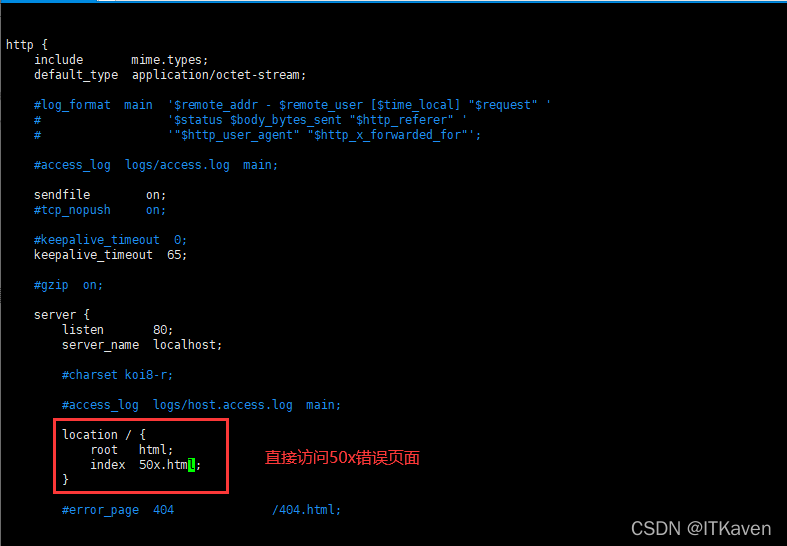
现在来演示Nginx是怎么实现热部署的,博主通过修改Nginx的配置文件来模拟Nginx的升级(先copy一份副本)。
[root@localhost ~]# cd /usr/local/nginx/conf/
[root@localhost conf]# ll
总用量 68
-rw-r--r--. 1 root root 1077 12月 20 20:24 fastcgi.conf
-rw-r--r--. 1 root root 1077 12月 20 20:24 fastcgi.conf.default
-rw-r--r--. 1 root root 1007 12月 20 20:24 fastcgi_params
-rw-r--r--. 1 root root 1007 12月 20 20:24 fastcgi_params.default
-rw-r--r--. 1 root root 2837 12月 20 20:24 koi-utf
-rw-r--r--. 1 root root 2223 12月 20 20:24 koi-win
-rw-r--r--. 1 root root 5231 12月 20 20:24 mime.types
-rw-r--r--. 1 root root 5231 12月 20 20:24 mime.types.default
-rw-r--r--. 1 root root 2656 12月 20 21:26 nginx.conf
-rw-r--r--. 1 root root 2656 12月 20 20:24 nginx.conf.default
-rw-r--r--. 1 root root  636 12月 20 20:24 scgi_params
-rw-r--r--. 1 root root  636 12月 20 20:24 scgi_params.default
-rw-r--r--. 1 root root  664 12月 20 20:24 uwsgi_params
-rw-r--r--. 1 root root  664 12月 20 20:24 uwsgi_params.default
-rw-r--r--. 1 root root 3610 12月 20 20:24 win-utf
[root@localhost conf]# cp nginx.conf nginx_old.conf
[root@localhost conf]# vim nginx.conf

由于还没有给Nginx进行热部署,现在访问http://192.168.1.199/还是原来的Nginx页面。

查看Nginx的进程:
[root@localhost conf]# ps -ef | grep nginx
root     14964     1  0 22:25 ?        00:00:00 nginx: master process ./nginx
nobody   14965 14964  0 22:25 ?        00:00:00 nginx: worker process
root     15016  1521  0 23:07 pts/0    00:00:00 grep --color=auto nginx
给master进程发送SIGUSR2信号,让Nginx平滑升级可执行程序。可以看到Nginx重新启动了一组master进程和worker进程,而新master进程是旧master进程的子进程(通过父子进程的继承关系,新master进程可以很方便地继承旧master进程的相关资源)。
[root@localhost conf]# kill -s SIGUSR2 14964
[root@localhost conf]# ps -ef | grep nginx
root     14964     1  0 22:25 ?        00:00:00 nginx: master process ./nginx
nobody   14965 14964  0 22:25 ?        00:00:00 nginx: worker process
root     15019 14964  0 23:18 ?        00:00:00 nginx: master process ./nginx
nobody   15020 15019  0 23:18 ?        00:00:00 nginx: worker process
root     15022  1521  0 23:19 pts/0    00:00:00 grep --color=auto nginx
并且Nginx在日志目录中存储了新旧pid文件(保存了新旧master进程的ID)。
[root@localhost conf]# ll ../logs
总用量 16
-rw-r--r--. 1 root root 2729 12月 20 23:20 access.log
-rw-r--r--. 1 root root  708 12月 20 23:18 error.log
-rw-r--r--. 1 root root    6 12月 20 23:18 nginx.pid
-rw-r--r--. 1 root root    6 12月 20 22:25 nginx.pid.oldbin
[root@localhost conf]# cat ../logs/nginx.pid
15019
[root@localhost conf]# cat ../logs/nginx.pid.oldbin
14964
给旧master进程发送SIGWINCH信号,让旧master进程关闭旧worker进程。
[root@localhost conf]# kill -s SIGWINCH 14964
[root@localhost conf]# ps -ef | grep nginx
root     14964     1  0 22:25 ?        00:00:00 nginx: master process ./nginx
root     15019 14964  0 23:18 ?        00:00:00 nginx: master process ./nginx
nobody   15020 15019  0 23:18 ?        00:00:00 nginx: worker process
root     15030  1521  0 23:27 pts/0    00:00:00 grep --color=auto nginx
现在访问http://192.168.1.199/,会响应404。

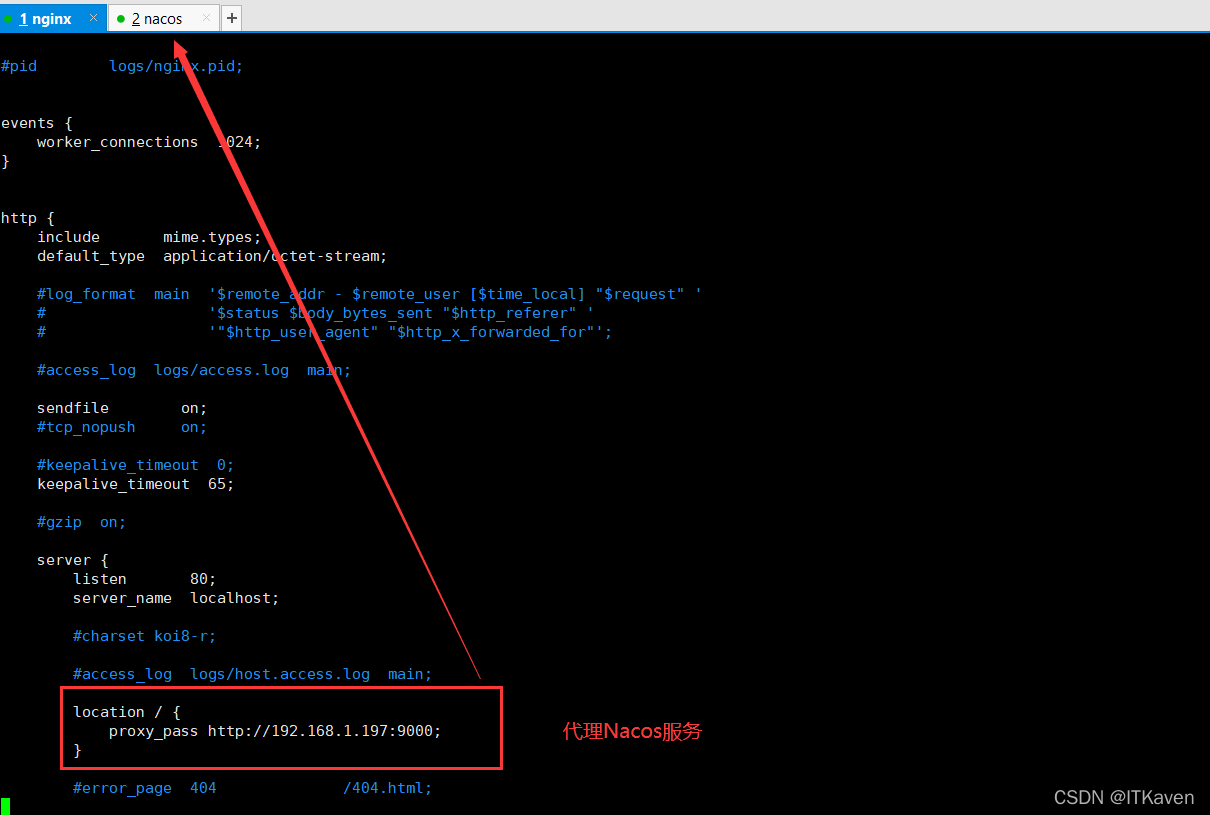
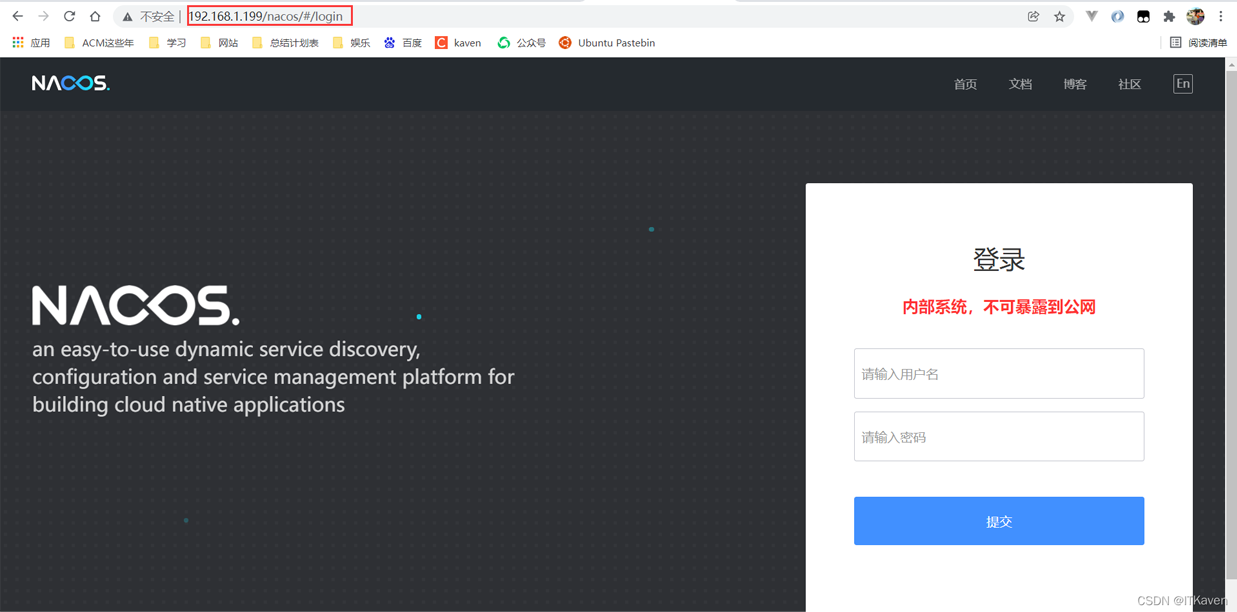
而访问http://192.168.1.199/nacos,会访问到Nacos
[root@localhost conf]# kill -s SIGQUIT 14964
[root@localhost conf]# ps -ef | grep nginx
root     15019     1  0 23:18 ?        00:00:00 nginx: master process ./nginx
nobody   15020 15019  0 23:18 ?        00:00:00 nginx: worker process
root     15034  1521  0 23:31 pts/0    00:00:00 grep --color=auto nginx

Semaphore< /h3>
Semaphore anzeigen: 
[root@localhost conf]# kill -s SIGHUP 15084
[root@localhost conf]# ps -ef | grep nginx
root     15084     1  0 12月20 ?      00:00:00 nginx: master process ./nginx
root     15106 15084  0 12月20 ?      00:00:00 nginx: master process ./nginx
nobody   15107 15106  0 12月20 ?      00:00:00 nginx: worker process
nobody   15131 15084  0 00:02 ?        00:00:00 nginx: worker process
root     15141  1521  0 00:09 pts/0    00:00:00 grep --color=auto nginx
Es gibt
64 Arten von Semaphoren. Im Folgenden sind einige häufig verwendete Semaphoren aufgeführt: - 🎜 < code>SIGINT,
SIGTERM: Schnelles Herunterfahren. 🎜 - 🎜
SIGQUIT: ordnungsgemäß herunterfahren (den Prozess ordnungsgemäß schließen, d. h. warten, bis die Anforderung abgeschlossen ist, und dann herunterfahren). 🎜 - 🎜
SIGHUP: Sanfter Neustart, Konfigurationsdatei neu laden (sanfter Neustart, kein Neustart des Servers nach Änderung der Konfigurationsdatei erforderlich). 🎜 - 🎜
SIGUSR1: Lesen Sie die Protokolldatei erneut, was beim Ausschneiden der Protokolldatei nützlicher ist. 🎜 - 🎜
SIGUSR2: Reibungsloses Upgrade ausführbarer Programme, wird beim Upgrade vonnginxverwendet. 🎜 - 🎜
SIGWINCH: Beenden Sie den Arbeitsprozess ordnungsgemäß. 🎜
Nginx Hot Deployment
🎜Nginx ist ein leistungsstarker Reverse-Proxy-Server mit mehreren Prozessen, einschließlich eines Masters</code > Prozess und mehrere <code>worker-Prozesse (die Anzahl der worker-Prozesse kann über den Parameter worker_processes in der nginx.conf</ übergeben werden code> Konfigurationsdatei festlegen (Standard <code>1), damit Sie Mehrkernprozessoren voll ausnutzen können. 🎜🎜 🎜🎜🎜Default
 1 worker Prozesse. 🎜🎜🎜 🎜🎜🎜und
 Der Master--Prozess und der Worker-Prozess haben eine Eltern-Kind-Prozessbeziehung. 🎜🎜🎜 🎜🎜
🎜🎜Nginx Der Arbeitsmodus ist Multiprozess. Nachdem Nginx gestartet wurde, gibt es einen Master-Prozess und mehrere Worker-Prozesse (Standard). 1 ), mehrere untergeordnete worker-Prozesse lauschen auf den Port, der vom übergeordneten master-Prozess überwacht wird (siehe die Beziehung zwischen übergeordneten und untergeordneten Prozessen). und Anfragen parallel bearbeiten. Der übergeordnete master-Prozess wird hauptsächlich zur Verwaltung des untergeordneten worker-Prozesses verwendet (verwaltet den worker-Prozess, der dem worker tatsächlich Dienste bereitstellt). -Prozess Senden Sie ein Signal und überwachen Sie den Ausführungsstatus des worker-Prozesses. Wenn der worker-Prozess abnormal beendet wird, entsteht ein neuer worker-Prozess wird neu gestartet), lesen und überprüfen Sie die Konfigurationsinformationen. Der master-Prozess bedient keine Benutzeranfragen, aber Benutzeranfragen werden vom worker-Prozess verarbeitet. 🎜🎜Nginx wird durch Semaphoren gesteuert, wie z. B. das Stoppen und Neustarten von Nginx. Semaphoren sind ein Mechanismus für die Kommunikation zwischen Prozessen. Der Master-Hauptprozess steuert mehrere untergeordnete Worker-Prozesse auch über Semaphoren. 🎜🎜🎜 🎜🎜🎜Lass es uns jetzt demonstrieren < Wie implementiert Code>Nginx die Hot-Bereitstellung? Der Blogger simuliert das Upgrade von
 Nginx, indem er die Konfigurationsdatei von Nginx ändert (erste Kopie</ Code> > eine Kopie). 🎜<div class="code" style="position:relative; padding:0px; margin:0px;"><div class="code" style="position:relative; padding:0px; margin:0px;"><pre class='brush:php;toolbar:false;'>[root@localhost conf]# kill -s SIGQUIT 15106
[root@localhost conf]# ps -ef | grep nginx
root 15084 1 0 12月20 ? 00:00:00 nginx: master process ./nginx
nobody 15131 15084 0 00:02 ? 00:00:00 nginx: worker process
root 15159 1521 0 00:25 pts/0 00:00:00 grep --color=auto nginx</pre><div class="contentsignin">Nach dem Login kopieren</div></div><div class="contentsignin">Nach dem Login kopieren</div></div>🎜<img src="/static/imghw/default1.png" data-src="https://img.php.cn/upload/article/000/465/014/168491854224781.png" class="lazy" alt="So implementieren Sie die Nginx-Hot-Bereitstellung" />🎜🎜Da dies nicht der Fall ist wurde bereits angegeben< code>Nginx führt eine Hot-Bereitstellung durch. Besuchen Sie nun http://192.168.1.199/ oder die ursprüngliche Nginx-Seite. 🎜🎜🎜 🎜🎜🎜View
 Nginx-Prozess: 🎜[root@localhost conf]# cp -f nginx_old.conf nginx.conf cp:是否覆盖"nginx.conf"? y
SIGUSR2-Signal an den master-Prozess, damit Nginx das ausführbare Programm reibungslos aktualisieren kann. Sie können sehen, dass Nginx eine Reihe von Master-Prozessen und Worker-Prozessen neu gestartet hat und der neue master-Prozess ist der alte master-Prozess erben die zugehörigen Ressourcen des alten master-Prozesses). 🎜[root@localhost conf]# kill -s SIGHUP 15084
Nginx speichert die alten und neuen pid-Dateien im Protokollverzeichnis (speichert die ID des neuen und alten master). Prozesse ). 🎜rrreee🎜Senden Sie das SIGWINCH-Signal an den alten master-Prozess und lassen Sie den alten master-Prozess den alten worker schließen Verfahren. 🎜rrreee🎜Besuchen Sie jetzt http://192.168.1.199/ und es wird mit 404 geantwortet. 🎜🎜🎜 🎜🎜🎜 beim Besuch von < Code >http://192.168.1.199/nacos greift auf den
 Nacos-Dienst zu. 🎜🎜🎜🎜🎜🎜如果升级版本没有问题,就可以给旧master进程发送SIGQUIT信号,让旧master进程关闭,这样就只剩下新master进程和新worker进程,实现了Nginx的热部署。
[root@localhost conf]# kill -s SIGQUIT 14964 [root@localhost conf]# ps -ef | grep nginx root 15019 1 0 23:18 ? 00:00:00 nginx: master process ./nginx nobody 15020 15019 0 23:18 ? 00:00:00 nginx: worker process root 15034 1521 0 23:31 pts/0 00:00:00 grep --color=auto nginx
如果升级版本有问题,需要回滚到之前的版本,就可以给旧master进程发送SIGHUP信号,因为博主重新进行了测试,所以进程号都变了,但很显然旧master进程重新创建了旧worker进程,并且进行版本升级的master和worker进程没有被关闭。
[root@localhost conf]# kill -s SIGHUP 15084 [root@localhost conf]# ps -ef | grep nginx root 15084 1 0 12月20 ? 00:00:00 nginx: master process ./nginx root 15106 15084 0 12月20 ? 00:00:00 nginx: master process ./nginx nobody 15107 15106 0 12月20 ? 00:00:00 nginx: worker process nobody 15131 15084 0 00:02 ? 00:00:00 nginx: worker process root 15141 1521 0 00:09 pts/0 00:00:00 grep --color=auto nginx
给新master进程发送SIGQUIT信号,让新master进程关闭,这样就只剩下旧master进程和新创建的旧worker进程,实现了回滚。
[root@localhost conf]# kill -s SIGQUIT 15106 [root@localhost conf]# ps -ef | grep nginx root 15084 1 0 12月20 ? 00:00:00 nginx: master process ./nginx nobody 15131 15084 0 00:02 ? 00:00:00 nginx: worker process root 15159 1521 0 00:25 pts/0 00:00:00 grep --color=auto nginx
回滚成功。

还需要对版本回滚(即博主这里的配置文件回滚,不然下次重启就会出问题)。
[root@localhost conf]# cp -f nginx_old.conf nginx.conf
cp:是否覆盖"nginx.conf"? y
为什么给旧master进程发送SIGHUP信号,旧master进程重新创建的worker进程没有重新读取配置文件?下面是官方的说明:
Send the HUP signal to the old master process. The old master process will start new worker processes without re-reading the configuration. After that, all new processes can be shut down gracefully, by sending the QUIT signal to the new master process.
向旧
master进程发送SIGHUP信号。旧master进程将启动新worker进程,而无需重新读取配置。之后,通过向新master进程发送SIGQUIT信号,所有新进程都可以正常关闭。
如果不存在新进程的情况下(只有一组master、worker进程),修改配置文件,再向master进程发送SIGHUP信号,看是否会重新加载配置文件。

[root@localhost conf]# kill -s SIGHUP 15084
很显然配置文件被重新加载了,由于博主还没有看源码,只能猜测Nginx的实现(如果说错了,请大家评论补充),Nginx应该是根据当前是否在进行热部署(存在新master进程),来决定SIGHUP信号是否需要重新加载配置文件。

Das obige ist der detaillierte Inhalt vonSo implementieren Sie die Nginx-Hot-Bereitstellung. Für weitere Informationen folgen Sie bitte anderen verwandten Artikeln auf der PHP chinesischen Website!

Heiße KI -Werkzeuge

Undresser.AI Undress
KI-gestützte App zum Erstellen realistischer Aktfotos

AI Clothes Remover
Online-KI-Tool zum Entfernen von Kleidung aus Fotos.

Undress AI Tool
Ausziehbilder kostenlos

Clothoff.io
KI-Kleiderentferner

Video Face Swap
Tauschen Sie Gesichter in jedem Video mühelos mit unserem völlig kostenlosen KI-Gesichtstausch-Tool aus!

Heißer Artikel

Heiße Werkzeuge

Notepad++7.3.1
Einfach zu bedienender und kostenloser Code-Editor

SublimeText3 chinesische Version
Chinesische Version, sehr einfach zu bedienen

Senden Sie Studio 13.0.1
Leistungsstarke integrierte PHP-Entwicklungsumgebung

Dreamweaver CS6
Visuelle Webentwicklungstools

SublimeText3 Mac-Version
Codebearbeitungssoftware auf Gottesniveau (SublimeText3)

Heiße Themen
 1389
1389
 52
52
 So konfigurieren Sie den Namen des Cloud -Server -Domänennamens in Nginx
Apr 14, 2025 pm 12:18 PM
So konfigurieren Sie einen Nginx -Domänennamen auf einem Cloud -Server: Erstellen Sie einen Datensatz, der auf die öffentliche IP -Adresse des Cloud -Servers zeigt. Fügen Sie virtuelle Hostblöcke in die NGINX -Konfigurationsdatei hinzu, wobei der Hörport, Domänenname und das Root -Verzeichnis der Website angegeben werden. Starten Sie Nginx neu, um die Änderungen anzuwenden. Greifen Sie auf die Konfiguration des Domänennamens zu. Weitere Hinweise: Installieren Sie das SSL -Zertifikat, um HTTPS zu aktivieren, sicherzustellen, dass die Firewall den Verkehr von Port 80 ermöglicht, und warten Sie, bis die DNS -Auflösung wirksam wird.
 So überprüfen Sie die Nginx -Version
Apr 14, 2025 am 11:57 AM
Die Methoden, die die Nginx -Version abfragen können, sind: Verwenden Sie den Befehl nginx -v; Zeigen Sie die Versionsrichtlinie in der Datei nginx.conf an. Öffnen Sie die Nginx -Fehlerseite und sehen Sie sich den Seitentitel an.
 So starten Sie den Nginx -Server
Apr 14, 2025 pm 12:27 PM
Das Starten eines Nginx-Servers erfordert unterschiedliche Schritte gemäß verschiedenen Betriebssystemen: Linux/UNIX-System: Installieren Sie das NGINX-Paket (z. B. mit APT-Get oder Yum). Verwenden Sie SystemCTL, um einen Nginx -Dienst zu starten (z. B. sudo systemctl start nginx). Windows -System: Laden Sie Windows -Binärdateien herunter und installieren Sie sie. Starten Sie Nginx mit der ausführbaren Datei nginx.exe (z. B. nginx.exe -c conf \ nginx.conf). Unabhängig davon, welches Betriebssystem Sie verwenden, können Sie auf die Server -IP zugreifen
 So überprüfen Sie den Namen des Docker -Containers
Apr 15, 2025 pm 12:21 PM
Sie können den Namen des Docker -Containers abfragen, indem Sie den Schritten folgen: Alle Container auflisten (Docker PS). Filtern Sie die Containerliste (unter Verwendung des GREP -Befehls). Ruft den Containernamen ab (befindet sich in der Spalte "Namen").
 So überprüfen Sie, ob Nginx gestartet wird
Apr 14, 2025 pm 01:03 PM
So bestätigen Sie, ob Nginx gestartet wird: 1. Verwenden Sie die Befehlszeile: SystemCTL Status Nginx (Linux/Unix), Netstat -ano | FindStr 80 (Windows); 2. Überprüfen Sie, ob Port 80 geöffnet ist; 3. Überprüfen Sie die Nginx -Startmeldung im Systemprotokoll. 4. Verwenden Sie Tools von Drittanbietern wie Nagios, Zabbix und Icinga.
 So konfigurieren Sie Nginx in Windows
Apr 14, 2025 pm 12:57 PM
Wie konfiguriere ich Nginx in Windows? Installieren Sie NGINX und erstellen Sie eine virtuelle Hostkonfiguration. Ändern Sie die Hauptkonfigurationsdatei und geben Sie die Konfiguration der virtuellen Host ein. Starten oder laden Nginx neu. Testen Sie die Konfiguration und sehen Sie sich die Website an. Aktivieren Sie selektiv SSL und konfigurieren Sie SSL -Zertifikate. Stellen Sie die Firewall selektiv fest, damit Port 80 und 443 Verkehr.
 So bereitstellen Sie das JAR -Programm in Nginx bereit
Apr 14, 2025 pm 12:09 PM
Um ein JAR -Programm auf Nginx bereitzustellen, müssen sieben Schritte befolgt werden: 1) Installieren Sie JRE, 2) Installieren von Nginx, 3) Konfigurieren von Nginx, 4) JAR bereitstellen, 5) Ausführungsberechtigungen zu Gewähren, 6) Nginx neu starten, 7) Überprüfen Sie die Bereitstellung.
 So führen Sie Nginx Apache aus
Apr 14, 2025 pm 12:33 PM
Um Nginx dazu zu bringen, Apache auszuführen, müssen Sie: 1. Installieren von Nginx und Apache; 2. Konfigurieren Sie den Nginx -Agenten; 3.. Starten Sie Nginx und Apache; 4. Testen Sie die Konfiguration, um sicherzustellen, dass Sie den Apache -Inhalt nach dem Zugriff auf den Domänennamen sehen können. Darüber hinaus müssen Sie auf andere Angelegenheiten wie die Anpassung der Portnummer, die virtuelle Hostkonfiguration und die SSL/TLS -Einstellungen achten.


