Wie SpringBoot die Redis-Cache-Implementierung integriert
Von SpringBoot unterstützte Cache-Komponenten
In SpringBoot basiert die Cache-Verwaltung und Speicherung von Daten auf den Cache-bezogenen Cache-Manager-Schnittstellen org.springframework.cache.Cache und org.springframework.cache.CacheManager im Spring-Framework.
Wenn im Programm keine Bean-Komponente vom Typ CacheManager oder ein CacheResolver-Cache-Resolver namens „cacheResolver“ definiert ist, versucht SpringBoot, die folgenden Cache-Komponenten auszuwählen und zu aktivieren (in der angegebenen Reihenfolge):
(1) Generisch
( 2) JCache (JSR-107) (EhCache 3, Hazelcast, Infinispan usw.)
(3) EhCache 2.x
(4) Hazelcast
(5) Infinispan
(6) Couchbase
(7 ) Redis
(8) Koffein
(9) Einfach
Oben werden 9 von SpringBoot unterstützte Cache-Komponenten entsprechend der Ladereihenfolge der SpringBoot-Cache-Komponenten aufgeführt. Nach dem Hinzufügen einer Cache-Verwaltungskomponente (z. B. Redis) zum Projekt. Das SpringBoot-Projekt wählt den entsprechenden Cache-Manager aus und aktiviert ihn. Wenn dem Projekt mehrere Cache-Komponenten gleichzeitig hinzugefügt werden und kein Cache-Manager oder Cache-Resolver (CacheManager oder CacheResolver) angegeben ist, aktiviert SpringBoot die erste der mehreren in der oben genannten Reihenfolge hinzugefügten Cache-Komponenten Cache-Verwaltung (wenn beispielsweise die beiden Cache-Komponenten Couchbase und Redis gleichzeitig hinzugefügt werden, wird zuerst die Couchbase-Komponente aktiviert).
In der im vorherigen Artikel SpringBoot Cache Management (1) Standard-Cache-Verwaltung vorgestellten Standard-Cache-Verwaltung fügte das von uns erstellte Projekt keine Cache-Verwaltungskomponenten hinzu, die Cache-Verwaltung wurde jedoch dennoch implementiert. Dies liegt daran, dass SpringBoot nach dem Einschalten der Cache-Verwaltung in der Reihenfolge der oben genannten Cache-Komponenten nach gültigen Cache-Komponenten sucht. Wenn keine Cache-Komponente vorhanden ist, wird standardmäßig die letzte einfache Cache-Komponente für die Verwaltung verwendet. Die einfache Cache-Komponente ist die Standard-Cache-Verwaltungskomponente von SpringBoot. Sie verwendet standardmäßig ConcurrentMap im Speicher, sodass die Cache-Verwaltung im Speicher weiterhin ohne das Hinzufügen von Cache-Komponenten von Drittanbietern erreicht werden kann . Annotationsbasierte Redis-Cache-ImplementierungStellen Sie die Redis-Cache-Komponente vor, die auf dem von SpringBoot Cache Management (1) Default Cache Management erstellten Projekt basiert, und verwenden Sie annotationsbasierte Methoden, um die spezifische Implementierung der SpringBoot-Integration des Redis-Caches zu erläutern.
(1) Spring Data Redis-Abhängigkeitsstarter hinzufügen
Fügen Sie einen Spring Data Redis-Abhängigkeitsstarter im Pom hinzu. Führen Sie Cache-bezogene automatische Assembly-Klassen aus (zuvor die Standardeinstellung SimpleCacheConfiguration). Der im Container verwendete Cache-Manager wurde in RedisCacheManager geändert. (zuvor der Standard-CacheManager), der von diesem Cache-Manager erstellte Cache ist RedisCache und steuert dann Redis, um Daten zwischenzuspeichern.
(2) Redis-Server-Verbindungskonfiguration
Fügen Sie die Verbindungskonfiguration der Redis-Datenbank in der globalen Konfigurationsdatei application.properties des Projekts hinzu. Der Beispielcode lautet wie folgt:
<dependency>
  <groupId>org.springframework.boot</groupId>
  <artifactId>spring-boot-starter-data-redis</artifactId>
</dependency>
(3) Ändern Sie die Methode im CommentService Klasse
Verwenden Sie die Annotationen @ Cacheable, @CachePut und @CacheEvict für die Cache-Verwaltung und führen Sie jeweils Vorgänge wie Cache-Speicherung, Cache-Aktualisierung und Cache-Löschung aus:
# Redis服务器地址
spring.redis.host=127.0.0.1
# Redis服务器连接端口
spring.redis.port=6379
# Redis服务器连接密码(默认为空)
spring.redis.password=
Im obigen Code sind @Cacheable, @ CachePut- und @CacheEvict-Annotationen werden bei der Datenabfrage verwendet. Die Cache-Verwaltung erfolgt für Datenaktualisierungs- und Datenlöschmethoden.
Unter diesen gibt es keinen markierten Schlüsselwert in der @Cacheable-Anmerkung des Abfragecaches, und der Standardparameterwert comment_id wird als Schlüssel zum Speichern von Daten verwendet. Bei der Aktualisierung des Caches muss derselbe Schlüssel verwendet werden Die @Cacheable-Annotation für den Abfragecache, die definiert ist, sofern nicht = „#result==null“ bedeutet, dass das Abfrageergebnis nicht zwischengespeichert wird, wenn es leer ist.
(4) Fügen Sie zwei neue Schnittstellen zur CommentController-Klasse hinzu.
Aktualisierungs- und Löschschnittstellen hinzufügen:
package com.hardy.springbootdatacache.service;

import com.hardy.springbootdatacache.entity.Comment;
import com.hardy.springbootdatacache.repository.CommentRepository;
import org.springframework.beans.factory.annotation.Autowired;
import org.springframework.cache.annotation.CacheEvict;
import org.springframework.cache.annotation.CachePut;
import org.springframework.cache.annotation.Cacheable;
import org.springframework.stereotype.Service;

import java.util.Optional;

/**
 * @Author: HardyYao
 * @Date: 2021/6/19
 */
@Service
public class CommentService {

    @Autowired
    private CommentRepository commentRepository;

    /**
     * 根据评论id查询评论
     * @Cacheable:将该方法的查询结果comment存放在SpringBoot默认缓存中
     * cacheNames:起一个缓存命名空间,对应缓存唯一标识
     * @param id
     * @return
     */
    @Cacheable(cacheNames = "comment", unless = "#result==null")
    public Comment findCommentById(Integer id){
        Optional<Comment> comment = commentRepository.findById(id);
        if(comment.isPresent()){
            Comment comment1 = comment.get();
            return comment1;
        }
        return null;
    }

    /**
     * 更新评论
     * @param comment
     * @return
     */
    @CachePut(cacheNames = "comment",key = "#result.id")
    public Comment updateComment(Comment comment) {
        commentRepository.updateComment(comment.getAuthor(), comment.getaId());
        return comment;
    }

    /**
     * 删除评论
     * @param comment_id
     */
    @CacheEvict(cacheNames = "comment")
    public void deleteComment(int comment_id) {
        commentRepository.deleteById(comment_id);
    }

}(5) Annotationsbasierter Redis-Abfrage-Cache-Test.
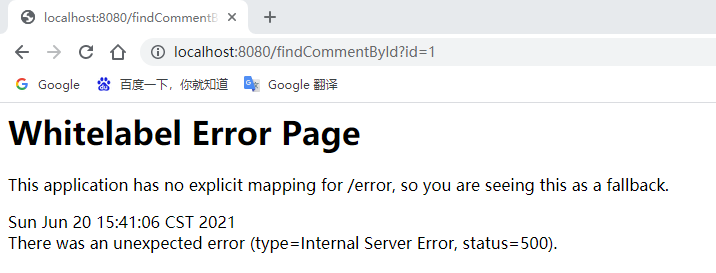
Geben Sie im Browser ein: http://localhost:8080/findCommentById ?id=1 für den Zugriff:
Die Seite hat einen Fehler gemeldet. Überprüfen Sie die Konsoleninformationen:

在浏览器中输入:http://localhost:8080/findCommentById?id=1 进行访问(连续访问三次):


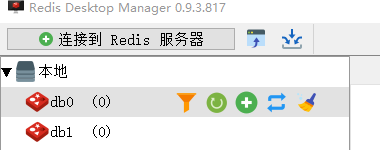
打开Redis客户端可视化工具Redis Desktop Manager,连接本地启用的Redis服务,查看具体的数据缓存效果:

执行findById()方法查询出的用户评论信息Comment正确存储到了Redis缓存库中名为comment的名称空间下。
其中缓存数据的唯一标识key值是以“名称空间comment::+参数值(comment::1)”的字符串形式体现的,而value值则是经过JDK默认序列格式化后的HEX格式存储。这种JDK默认序列格式化后的数据显然不方便缓存数据的可视化查看和管理,所以在实际开发中,通常会自定义数据的序列化格式,这方面的内容在后面会介绍。
(8)基于注解的Redis缓存更新测试
先通过浏览器访问:http://localhost:8080/updateComment?id=1&author=hardy;
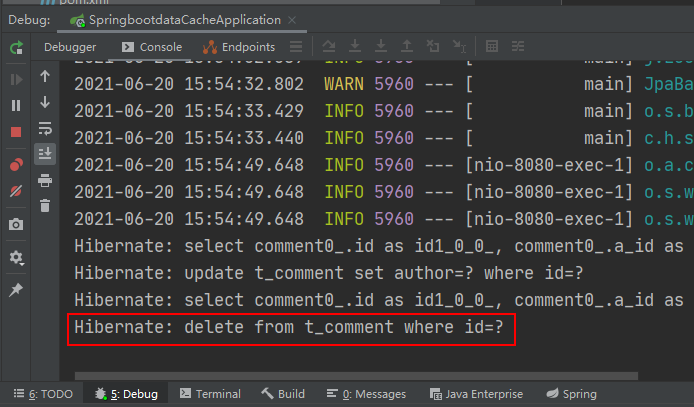
接着在访问:http://localhost:8080/findCommentById?id=1,查看浏览器返回信息及控制台打印信息:


可以看到,执行updateComment()更新id为1的数据时执行了一条更新的SQL语句,后续调用findById()方法查询id为1的用户评论信息时没有再次执行查询的SQL语句,且浏览器返回了更新后的正确结果,这说明@CachePut缓存更新配置成功。
(9)基于注解的Redis缓存删除测试
通过浏览器访问:http://localhost:8080/deleteComment?id=1 和 http://localhost:8080/findCommentById?id=1


执行deleteComment()方法删除id为1的数据后查询结果为空,查看Redis缓存数据库:

可以看到之前存储的comment相关数据被删除掉了,这表明@CacheEvict注解缓存删除成功实现。
通过上面的案例可以看出:使用基于注解的Redis缓存实现只需要添加Redis依赖、并使用几个注解在对应的方法上,就可以实现对数据的缓存管理。
另外,还可以在SpringBoot全局配置文件中配置Redis有效期,示例代码如下:
# 对基于注解的Redis缓存数据统一设置有效期为1分钟,单位毫秒
spring.cache.redis.time-to-live=60000
上述代码中,在SpringBoot全局配置文件中添加了“spring.cache.redis.time-to-live”属性统一设置Redis数据的有效期(单位为毫秒),但这种方式不够灵活,因此一般不用。
基于API的Redis缓存实现
在SpringBoot整合Redis缓存实现中,除了基于注解形式的Redis缓存形式外,还有一种开发中更常用的方式——基于API的Redis缓存实现。这种基于API的Redis缓存实现,需要在某种业务需求下通过Redis提供的API调用相关方法实现数据缓存管理。同时,这种方法还可以手动管理缓存的有效期。
下面,通过Redis API的方式讲解SpringBoot整合Redis缓存的具体实现。
(1)使用Redis API进行业务数据缓存管理
在 com.hardy.springbootdatacache.service 包下新建一个 ApiCommentService:
package com.hardy.springbootdatacache.service;

import com.hardy.springbootdatacache.entity.Comment;
import com.hardy.springbootdatacache.repository.CommentRepository;
import org.springframework.beans.factory.annotation.Autowired;
import org.springframework.cache.annotation.CacheEvict;
import org.springframework.cache.annotation.CachePut;
import org.springframework.cache.annotation.Cacheable;
import org.springframework.data.redis.core.RedisTemplate;
import org.springframework.stereotype.Service;

import java.util.Optional;
import java.util.concurrent.TimeUnit;

/**
 * @Author: HardyYao
 * @Date: 2021/6/19
 */
@Service
public class ApiCommentService {

    @Autowired
    private CommentRepository commentRepository;

    @Autowired
    private RedisTemplate redisTemplate;

    /**
     * 根据评论id查询评论
     * @param id
     * @return
     */
    public Comment findCommentById(Integer id){
        // 先查Redis缓存
        Object o = redisTemplate.opsForValue().get("comment_" + id);
        if (o != null) {
            return (Comment) o;
        } else {
            // 如果缓存中没有,则从数据库查询
            Optional<Comment> dbComment = commentRepository.findById(id);
            if (dbComment.isPresent()) {
                Comment redisComment = dbComment.get();
                // 将查询结果存储到缓存中,并设置有效期为1天
                redisTemplate.opsForValue().set("comment_"+id, redisComment,1, TimeUnit.DAYS);
                return redisComment;
            } else {
                return null;
            }
        }

    }

    /**
     * 更新评论
     * @param comment
     * @return
     */
    public Comment updateComment(Comment comment) {
        commentRepository.updateComment(comment.getAuthor(), comment.getId());
        // 更新数据库数据后进行缓存更新
        redisTemplate.opsForValue().set("comment_" + comment.getId(), comment);
        return comment;
    }

    /**
     * 删除评论
     * @param comment_id
     */
    public void deleteComment(int comment_id) {
        commentRepository.deleteById(comment_id);
        // 删除数据库数据后进行缓存删除
        redisTemplate.delete("comment_" + comment_id);
    }

}(2)编写Web访问层ApiCommentController
package com.hardy.springbootdatacache.controller;

import com.hardy.springbootdatacache.entity.Comment;
import com.hardy.springbootdatacache.service.ApiCommentService;
import org.springframework.beans.factory.annotation.Autowired;
import org.springframework.web.bind.annotation.RequestMapping;
import org.springframework.web.bind.annotation.RestController;

/**
 * @Author: HardyYao
 * @Date: 2021/6/19
 */
@RestController
@RequestMapping("api")  // 改变请求路径
public class ApiCommentController {

    @Autowired
    private ApiCommentService apiCommentService;

    @RequestMapping(value = "/findCommentById")
    public Comment findCommentById(Integer id){
        Comment comment = apiCommentService.findCommentById(id);
        return comment;
    }

    @RequestMapping(value = "/updateComment")
    public Comment updateComment(Comment comment){
        Comment oldComment = apiCommentService.findCommentById(comment.getId());
        oldComment.setAuthor(comment.getAuthor());
        Comment comment1 = apiCommentService.updateComment(oldComment);
        return comment1;
    }

    @RequestMapping(value = "/deleteComment")
    public void deleteComment(Integer id){
        apiCommentService.deleteComment(id);
    }

}(3)测试基于API的Redis缓存实现
输入:http://localhost:8080/api/findCommentById?id=2(连续输入三次)、http://localhost:8080/api/updateComment?id=2&author=hardy、http://localhost:8080/deleteComment?id=2进行访问:


Konsolenmeldungen und Redis-Datenbank anzeigen:


Verwandte Konfigurationen für die API-basierte Redis-Cache-Implementierung: Für die API-basierte Redis-Cache-Implementierung ist die Annotation @EnableCaching nicht erforderlich, um annotationsbasiertes Caching zu ermöglichen Unterstützung: Hier können Sie die der Projektstartklasse hinzugefügte Annotation @EnableCaching löschen oder mit Anmerkungen versehen, was sich nicht auf die funktionale Implementierung des Projekts auswirkt.
Das obige ist der detaillierte Inhalt vonWie SpringBoot die Redis-Cache-Implementierung integriert. Für weitere Informationen folgen Sie bitte anderen verwandten Artikeln auf der PHP chinesischen Website!

Heiße KI -Werkzeuge

Undresser.AI Undress
KI-gestützte App zum Erstellen realistischer Aktfotos

AI Clothes Remover
Online-KI-Tool zum Entfernen von Kleidung aus Fotos.

Undress AI Tool
Ausziehbilder kostenlos

Clothoff.io
KI-Kleiderentferner

AI Hentai Generator
Erstellen Sie kostenlos Ai Hentai.

Heißer Artikel

Heiße Werkzeuge

Notepad++7.3.1
Einfach zu bedienender und kostenloser Code-Editor

SublimeText3 chinesische Version
Chinesische Version, sehr einfach zu bedienen

Senden Sie Studio 13.0.1
Leistungsstarke integrierte PHP-Entwicklungsumgebung

Dreamweaver CS6
Visuelle Webentwicklungstools

SublimeText3 Mac-Version
Codebearbeitungssoftware auf Gottesniveau (SublimeText3)

Heiße Themen
 1381
1381
 52
52
 So erstellen Sie den Redis -Clustermodus
Apr 10, 2025 pm 10:15 PM
Der Redis -Cluster -Modus bietet Redis -Instanzen durch Sharding, die Skalierbarkeit und Verfügbarkeit verbessert. Die Bauschritte sind wie folgt: Erstellen Sie ungerade Redis -Instanzen mit verschiedenen Ports; Erstellen Sie 3 Sentinel -Instanzen, Monitor -Redis -Instanzen und Failover; Konfigurieren von Sentinel -Konfigurationsdateien, Informationen zur Überwachung von Redis -Instanzinformationen und Failover -Einstellungen hinzufügen. Konfigurieren von Redis -Instanzkonfigurationsdateien, aktivieren Sie den Cluster -Modus und geben Sie den Cluster -Informationsdateipfad an. Erstellen Sie die Datei nodes.conf, die Informationen zu jeder Redis -Instanz enthält. Starten Sie den Cluster, führen Sie den Befehl erstellen aus, um einen Cluster zu erstellen und die Anzahl der Replikate anzugeben. Melden Sie sich im Cluster an, um den Befehl cluster info auszuführen, um den Clusterstatus zu überprüfen. machen
 So löschen Sie Redis -Daten
Apr 10, 2025 pm 10:06 PM
So löschen Sie Redis -Daten: Verwenden Sie den Befehl Flushall, um alle Schlüsselwerte zu löschen. Verwenden Sie den Befehl flushdb, um den Schlüsselwert der aktuell ausgewählten Datenbank zu löschen. Verwenden Sie SELECT, um Datenbanken zu wechseln, und löschen Sie dann FlushDB, um mehrere Datenbanken zu löschen. Verwenden Sie den Befehl del, um einen bestimmten Schlüssel zu löschen. Verwenden Sie das Redis-Cli-Tool, um die Daten zu löschen.
 So verwenden Sie den Befehl Redis
Apr 10, 2025 pm 08:45 PM
Die Verwendung der REDIS -Anweisung erfordert die folgenden Schritte: Öffnen Sie den Redis -Client. Geben Sie den Befehl ein (Verbschlüsselwert). Bietet die erforderlichen Parameter (variiert von der Anweisung bis zur Anweisung). Drücken Sie die Eingabetaste, um den Befehl auszuführen. Redis gibt eine Antwort zurück, die das Ergebnis der Operation anzeigt (normalerweise in Ordnung oder -err).
 So verwenden Sie ein einzelnes Gewinde -Redis
Apr 10, 2025 pm 07:12 PM
Redis verwendet eine einzelne Gewindearchitektur, um hohe Leistung, Einfachheit und Konsistenz zu bieten. Es wird E/A-Multiplexing, Ereignisschleifen, nicht blockierende E/A und gemeinsame Speicher verwendet, um die Parallelität zu verbessern, jedoch mit Einschränkungen von Gleichzeitbeschränkungen, einem einzelnen Ausfallpunkt und ungeeigneter Schreib-intensiver Workloads.
 So lesen Sie den Quellcode von Redis
Apr 10, 2025 pm 08:27 PM
Der beste Weg, um Redis -Quellcode zu verstehen, besteht darin, Schritt für Schritt zu gehen: Machen Sie sich mit den Grundlagen von Redis vertraut. Wählen Sie ein bestimmtes Modul oder eine bestimmte Funktion als Ausgangspunkt. Beginnen Sie mit dem Einstiegspunkt des Moduls oder der Funktion und sehen Sie sich die Codezeile nach Zeile an. Zeigen Sie den Code über die Funktionsaufrufkette an. Kennen Sie die von Redis verwendeten Datenstrukturen. Identifizieren Sie den von Redis verwendeten Algorithmus.
 So implementieren Sie die zugrunde liegenden Redis
Apr 10, 2025 pm 07:21 PM
Redis verwendet Hash -Tabellen, um Daten zu speichern und unterstützt Datenstrukturen wie Zeichenfolgen, Listen, Hash -Tabellen, Sammlungen und geordnete Sammlungen. Ernähren sich weiterhin über Daten über Snapshots (RDB) und appendiert Mechanismen nur Schreibmechanismen. Redis verwendet die Master-Slave-Replikation, um die Datenverfügbarkeit zu verbessern. Redis verwendet eine Ereignisschleife mit einer Thread, um Verbindungen und Befehle zu verarbeiten, um die Datenatomizität und Konsistenz zu gewährleisten. Redis legt die Ablaufzeit für den Schlüssel fest und verwendet den faulen Löschmechanismus, um den Ablaufschlüssel zu löschen.
 So lesen Sie Redis -Warteschlange
Apr 10, 2025 pm 10:12 PM
Um eine Warteschlange aus Redis zu lesen, müssen Sie den Warteschlangenname erhalten, die Elemente mit dem Befehl LPOP lesen und die leere Warteschlange verarbeiten. Die spezifischen Schritte sind wie folgt: Holen Sie sich den Warteschlangenname: Nennen Sie ihn mit dem Präfix von "Warteschlange:" wie "Warteschlangen: My-Queue". Verwenden Sie den Befehl LPOP: Wischen Sie das Element aus dem Kopf der Warteschlange aus und geben Sie seinen Wert zurück, z. B. die LPOP-Warteschlange: my-queue. Verarbeitung leerer Warteschlangen: Wenn die Warteschlange leer ist, gibt LPOP NIL zurück, und Sie können überprüfen, ob die Warteschlange existiert, bevor Sie das Element lesen.
 So verwenden Sie Redis Lock
Apr 10, 2025 pm 08:39 PM
Um die Operationen zu sperren, muss die Sperre durch den Befehl setNX erfasst werden und dann den Befehl Ablauf verwenden, um die Ablaufzeit festzulegen. Die spezifischen Schritte sind: (1) Verwenden Sie den Befehl setNX, um zu versuchen, ein Schlüsselwertpaar festzulegen; (2) Verwenden Sie den Befehl Ablauf, um die Ablaufzeit für die Sperre festzulegen. (3) Verwenden Sie den Befehl Del, um die Sperre zu löschen, wenn die Sperre nicht mehr benötigt wird.


