
 Betrieb und Instandhaltung
Nginx
So installieren Sie den Nginx-Server und konfigurieren den Lastausgleich in der CentOS6.5-Umgebung
Betrieb und Instandhaltung
Nginx
So installieren Sie den Nginx-Server und konfigurieren den Lastausgleich in der CentOS6.5-Umgebung
So installieren Sie den Nginx-Server und konfigurieren den Lastausgleich in der CentOS6.5-Umgebung

1、下载pcre, 是一个用c语言编写的正则表达式函数库
[root@localhost pcre-8.36]# cd /tmp/download/
[root@localhost download]# wget http://nchc.dl.sourceforge.net/project/pcre/pcre/8.37/pcre-8.37.tar.gz
[root@localhost download]# tar zxvf pcre-8.36.tar.gz
2、下载zlib库
[root@localhost pcre-8.36]# cd /tmp/download/
[root@localhost download]# wget http://ncu.dl.sourceforge.net/project/libpng/zlib/1.2.8/zlib-1.2.8.tar.gz
[root@localhost download]# tar -zxvf zlib-1.2.8.tar.gz cd zlib-1.2.8
4、下载ssl
[root@localhost zlib-1.2.8]# cd ..
[root@localhost download]# wget http://www.openssl.org/source/openssl-1.0.1p.tar.gz
[root@localhost download]# cd openssl-1.0.1c
[root@localhost openssl-1.0.1c]# tar -zxvf openssl-1.0.1c.tar.gz
5、下载nginx
[root@localhost download]# wget http://nginx.org/download/nginx-1.2.8.tar.gz
[root@localhost download]# tar -zxvf nginx-1.2.8.tar.gz
6、安装
[root@localhost download]mv pcre-8.36 /usr/local/
[root@localhost download]mv zlib-1.2.8 /usr/local/
[root@localhost download]mv openssl-1.0.1c /usr/local/
[root@localhost download]mv nginx-1.2.8 /usr/local/
[root@localhost download]cd /usr/local/
[root@localhost local]# cd pcre-8.36
[root@localhost pcre-8.36]# ./configure&&make&&make install
[root@localhost pcre-8.36] cd ../zlib-1.2.8
[root@localhost zlib-1.2.8]# ./configure && make && make install
[root@localhost zlib-1.2.8]# cd ../openssl-1.0.1c
[root@localhost openssl-1.0.1c]# ./config && make && make install
[root@localhost openssl-1.0.1c]# cd ../nginx-1.2.8
[root@localhost nginx-1.2.8]# ./configure --prefix=/usr/local/nginx && make && make install
7、启动nginx
[root@localhost nginx]# /usr/local/nginx/sbin/nginx -c /usr/local/nginx/conf/nginx.conf
8、测试
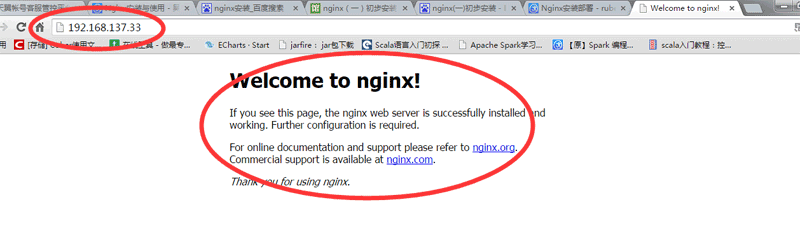
在确保可以连接到服务器的电脑上,浏览器输入装了nginx的机器的ip地址,会看到welcome to nginx!的提示说明安装配配置成功了。
9、设置开机自动启动(shell脚本处理)
[root@localhost logs]# vi /etc/init.d/nginx
添加以下shell脚本。
#!/bin/bash
# nginx startup script for the nginx http server
# it is v.0.0.2 version.
# chkconfig: - 85 15
# description: nginx is a high-performance web and proxy server.
#       it has a lot of features, but it's not for everyone.
# processname: nginx
# pidfile: /var/run/nginx.pid
# config: /usr/local/nginx/conf/nginx.conf
nginxd=/usr/local/nginx/sbin/nginx
nginx_config=/usr/local/nginx/conf/nginx.conf
nginx_pid=/var/run/nginx.pid
retval=0
prog="nginx"
# source function library.
. /etc/rc.d/init.d/functions
# source networking configuration.
. /etc/sysconfig/network
# check that networking is up.
[ ${networking} = "no" ] && exit 0
[ -x $nginxd ] || exit 0
# start nginx daemons functions.
start() {
if [ -e $nginx_pid ];then
  echo "nginx already running...."
  exit 1
fi
  echo -n $"starting $prog: "
  daemon $nginxd -c ${nginx_config}
  retval=$?
  echo
  [ $retval = 0 ] && touch /var/lock/subsys/nginx
  return $retval
}
# stop nginx daemons functions.
stop() {
    echo -n $"stopping $prog: "
    killproc $nginxd
    retval=$?
    echo
    [ $retval = 0 ] && rm -f /var/lock/subsys/nginx /var/run/nginx.pid
}
# reload nginx service functions.
reload() {
  echo -n $"reloading $prog: "
  #kill -hup `cat ${nginx_pid}`
  killproc $nginxd -hup
  retval=$?
  echo
}
# see how we were called.
case "$1" in
start)
    start
    ;;
stop)
    stop
    ;;
reload)
    reload
    ;;
restart)
    stop
    start
    ;;
status)
    status $prog
    retval=$?
    ;;
*)
    echo $"usage: $prog {start|stop|restart|reload|status|help}"
    exit 1
esac
exit $retval保存后,设置权限让所有人可以操作。
[root@localhost ~]# chmod a+x /etc/init.d/nginx
[root@localhost logs]# /etc/init.d/nginx status
nginx (pid 2417 2416) is running...
[root@localhost logs]# /etc/init.d/nginx stop
stopping nginx: [ ok ]
[root@localhost logs]# /etc/init.d/nginx start
starting nginx: [ ok ]
[root@localhost logs]# /etc/init.d/nginx status
nginx (pid 2454 2452) is running...
[root@localhost ~]# vi /etc/rc.local
添加:
/etc/init.d/nginx start
重启电脑就会生效。
注意:脚本里面关于启动目录的,如果你的安装地址不一样,要进行修改。
负载均衡配置:
现有两部服务器:
192.168.137.197 (按照以上操作安装有nginx,作为转发机,虚拟机)
192.168.137.33 (无安装nginx,运行有测试用的web工程,虚拟机)
10.10.33.59 (无安装nginx,运行有测试用的web工程,本地电脑地址)
,运行有测试用的web工程
127.0.0.1 web_app
[root@a conf]# vi /usr/local/nginx/conf/nginx.conf
配置如下展示:
worker_processes 8;
pid /usr/local/nginx/nginx.pid;
worker_rlimit_nofile 102400;
events
{
use epoll;
worker_connections 102400;
}
http
{
 include    mime.types;
 default_type application/octet-stream;
 fastcgi_intercept_errors on;
 charset utf-8;
 server_names_hash_bucket_size 128;
 client_header_buffer_size 4k;
 large_client_header_buffers 4 32k;
 client_max_body_size 300m;
 sendfile on;
 tcp_nopush   on;
 keepalive_timeout 60;
 tcp_nodelay on;
 client_body_buffer_size 512k;
 proxy_connect_timeout  5;
 proxy_read_timeout    60;
 proxy_send_timeout    5;
 proxy_buffer_size    16k;
 proxy_buffers      4 64k;
 proxy_busy_buffers_size 128k;
 proxy_temp_file_write_size 128k;
 gzip on;
 gzip_min_length 1k;
 gzip_buffers   4 16k;
 gzip_http_version 1.1;
 gzip_comp_level 2;
 gzip_types    text/plain application/x-javascript text/css application/xml;
 gzip_vary on;
###2012-12-19 change nginx logs
log_format main '$http_x_forwarded_for - $remote_user [$time_local] "$request" '
       '$status $body_bytes_sent "$http_referer" '
       '"$http_user_agent" $request_time $remote_addr';
upstream web_app {
server 192.168.137.197:8080 weight=1 max_fails=2 fail_timeout=30s;
server 192.168.137.33:8080 weight=1 max_fails=2 fail_timeout=30s;
server 10.10.33.59:8080 weight=1 max_fails=2 fail_timeout=30s;
}
####chinaapp.sinaapp.com
server {
  listen 80;
  server_name chinaapp.sinaapp.com;
  index index.jsp index.html index.htm;
  #发布目录/data/www
  root /data/www;
  location /
  {
  proxy_next_upstream http_502 http_504 error timeout invalid_header;
  proxy_set_header host $host;
  proxy_set_header x-real-ip $remote_addr;
  proxy_set_header x-forwarded-for $proxy_add_x_forwarded_for;
  proxy_pass http://web_app;
  expires   3d;
  }
 }
}设置host:
[root@a conf]# vi /etc/hosts
添加hosts:
127.0.0.1 web_app
启动nginx
[root@localhost nginx]# /usr/local/nginx/sbin/nginx -c /usr/local/nginx/conf/nginx.conf
启动三部服务器的web应用:
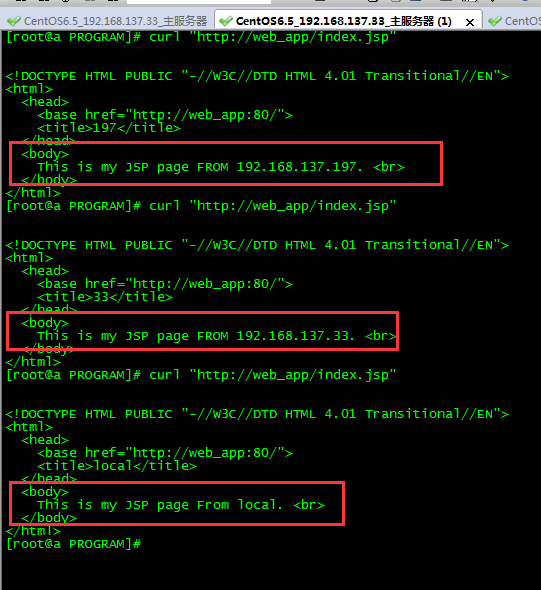
在192.168.137.197执行指令:
[root@a program]# curl "http://web_app/index.jsp"
测试结果如下:
常见问题及解决办法:
1、安装pcre时提示configure: error: you need a c++ compiler for c++ support.
原因是没有安装c++编译器,采用下面的命令安装:
[root@localhost pcre-8.37]# yum install -y gcc gcc-c++
2、启动nginx失败
[root@localhost nginx]# /usr/local/nginx/sbin/nginx -c /usr/local/nginx/conf/nginx.conf
/usr/local/nginx/sbin/nginx: error while loading shared libraries: libpcre.so.1: cannot open shared object file: no such file or directory
原因是64bit的系统,但是默认取了/usr/local/lib里面的包
检查方法:
[root@localhost nginx]# cd /usr/local/
[root@localhost local]# ls /lib64/ |grep pcre
libpcre.so.0
libpcre.so.0.0.1
[root@localhost local]# ls /lib/ |grep pcre
说明缺失的包在lib64
设置软连接来解决:
[root@localhost local]# ln -s /lib64/libpcre.so.0.0.1 /lib64/libpcre.so.1
[root@localhost local]# cd nginx
[root@localhost nginx]# /usr/local/nginx/sbin/nginx -c /usr/local/nginx/conf/nginx.conf
3、启动报错:
报错:nginx: [emerg] bind() to 0.0.0.0:80 failed (98: address already in use)
解决办法:sudo fuser -k 80/tcp
端口被占用,关闭占用端口
Das obige ist der detaillierte Inhalt vonSo installieren Sie den Nginx-Server und konfigurieren den Lastausgleich in der CentOS6.5-Umgebung. Für weitere Informationen folgen Sie bitte anderen verwandten Artikeln auf der PHP chinesischen Website!

Heiße KI -Werkzeuge

Undresser.AI Undress
KI-gestützte App zum Erstellen realistischer Aktfotos

AI Clothes Remover
Online-KI-Tool zum Entfernen von Kleidung aus Fotos.

Undress AI Tool
Ausziehbilder kostenlos

Clothoff.io
KI-Kleiderentferner

AI Hentai Generator
Erstellen Sie kostenlos Ai Hentai.

Heißer Artikel
Heiße Werkzeuge

Notepad++7.3.1
Einfach zu bedienender und kostenloser Code-Editor

SublimeText3 chinesische Version
Chinesische Version, sehr einfach zu bedienen

Senden Sie Studio 13.0.1
Leistungsstarke integrierte PHP-Entwicklungsumgebung

Dreamweaver CS6
Visuelle Webentwicklungstools

SublimeText3 Mac-Version
Codebearbeitungssoftware auf Gottesniveau (SublimeText3)
Heiße Themen
 1384
1384
 52
52

 So optimieren Sie die CentOS -HDFS -Konfiguration
Apr 14, 2025 pm 07:15 PM
So optimieren Sie die CentOS -HDFS -Konfiguration
Apr 14, 2025 pm 07:15 PM
Verbesserung der HDFS -Leistung bei CentOS: Ein umfassender Optimierungshandbuch zur Optimierung von HDFs (Hadoop Distributed Dateisystem) auf CentOS erfordert eine umfassende Berücksichtigung der Hardware-, Systemkonfigurations- und Netzwerkeinstellungen. Dieser Artikel enthält eine Reihe von Optimierungsstrategien, mit denen Sie die HDFS -Leistung verbessern können. 1. Hardware -Upgrade und Auswahlressourcenerweiterung: Erhöhen Sie die CPU-, Speicher- und Speicherkapazität des Servers so weit wie möglich. Hochleistungs-Hardware: Übernimmt Hochleistungs-Netzwerkkarten und -Schalter, um den Netzwerkdurchsatz zu verbessern. 2. Systemkonfiguration Fine-Tuning-Kernel-Parameteranpassung: Modify /etc/sysctl.conf Datei, um die Kernelparameter wie TCP-Verbindungsnummer, Dateihandelsnummer und Speicherverwaltung zu optimieren. Passen Sie beispielsweise den TCP -Verbindungsstatus und die Puffergröße an
 CentOS stoppt die Wartung 2024
Apr 14, 2025 pm 08:39 PM
CentOS stoppt die Wartung 2024
Apr 14, 2025 pm 08:39 PM
CentOS wird 2024 geschlossen, da seine stromaufwärts gelegene Verteilung RHEL 8 geschlossen wurde. Diese Abschaltung wirkt sich auf das CentOS 8 -System aus und verhindert, dass es weiterhin Aktualisierungen erhalten. Benutzer sollten eine Migration planen, und empfohlene Optionen umfassen CentOS Stream, Almalinux und Rocky Linux, um das System sicher und stabil zu halten.
 CentOS Shutdown -Befehlszeile
Apr 14, 2025 pm 09:12 PM
CentOS Shutdown -Befehlszeile
Apr 14, 2025 pm 09:12 PM
Der Befehl centOS stilldown wird heruntergefahren und die Syntax wird von [Optionen] ausgeführt [Informationen]. Zu den Optionen gehören: -h das System sofort stoppen; -P schalten Sie die Leistung nach dem Herunterfahren aus; -r neu starten; -t Wartezeit. Zeiten können als unmittelbar (jetzt), Minuten (Minuten) oder als bestimmte Zeit (HH: MM) angegeben werden. Hinzugefügten Informationen können in Systemmeldungen angezeigt werden.
 Unterschied zwischen CentOS und Ubuntu
Apr 14, 2025 pm 09:09 PM
Unterschied zwischen CentOS und Ubuntu
Apr 14, 2025 pm 09:09 PM
Die wichtigsten Unterschiede zwischen CentOS und Ubuntu sind: Ursprung (CentOS stammt von Red Hat, für Unternehmen; Ubuntu stammt aus Debian, für Einzelpersonen), Packungsmanagement (CentOS verwendet yum, konzentriert sich auf Stabilität; Ubuntu verwendet apt, für hohe Aktualisierungsfrequenz), Support Cycle (Centos) (CENTOS bieten 10 Jahre. Tutorials und Dokumente), Verwendungen (CentOS ist auf Server voreingenommen, Ubuntu ist für Server und Desktops geeignet). Weitere Unterschiede sind die Einfachheit der Installation (CentOS ist dünn)
 So überprüfen Sie die CentOS -HDFS -Konfiguration
Apr 14, 2025 pm 07:21 PM
So überprüfen Sie die CentOS -HDFS -Konfiguration
Apr 14, 2025 pm 07:21 PM
Vollständige Anleitung zur Überprüfung der HDFS -Konfiguration in CentOS -Systemen In diesem Artikel wird die Konfiguration und den laufenden Status von HDFS auf CentOS -Systemen effektiv überprüft. Die folgenden Schritte helfen Ihnen dabei, das Setup und den Betrieb von HDFs vollständig zu verstehen. Überprüfen Sie die Hadoop -Umgebungsvariable: Stellen Sie zunächst sicher, dass die Hadoop -Umgebungsvariable korrekt eingestellt ist. Führen Sie im Terminal den folgenden Befehl aus, um zu überprüfen, ob Hadoop ordnungsgemäß installiert und konfiguriert ist: Hadoopsion-Check HDFS-Konfigurationsdatei: Die Kernkonfigurationsdatei von HDFS befindet sich im/etc/hadoop/conf/verzeichnis, wobei core-site.xml und hdfs-site.xml von entscheidender Bedeutung sind. verwenden
 Was sind die Backup -Methoden für Gitlab auf CentOS?
Apr 14, 2025 pm 05:33 PM
Was sind die Backup -Methoden für Gitlab auf CentOS?
Apr 14, 2025 pm 05:33 PM
Backup- und Wiederherstellungsrichtlinie von GitLab im Rahmen von CentOS -System Um die Datensicherheit und Wiederherstellung der Daten zu gewährleisten, bietet GitLab on CentOS eine Vielzahl von Sicherungsmethoden. In diesem Artikel werden mehrere gängige Sicherungsmethoden, Konfigurationsparameter und Wiederherstellungsprozesse im Detail eingeführt, um eine vollständige GitLab -Sicherungs- und Wiederherstellungsstrategie aufzubauen. 1. Manuell Backup Verwenden Sie den GitLab-RakegitLab: Backup: Befehl erstellen, um die manuelle Sicherung auszuführen. Dieser Befehl unterstützt wichtige Informationen wie GitLab Repository, Datenbank, Benutzer, Benutzergruppen, Schlüssel und Berechtigungen. Die Standardsicherungsdatei wird im Verzeichnis/var/opt/gitlab/backups gespeichert. Sie können /etc /gitlab ändern
 CentOS -Konfiguration IP -Adresse
Apr 14, 2025 pm 09:06 PM
CentOS -Konfiguration IP -Adresse
Apr 14, 2025 pm 09:06 PM
Steps to configure IP address in CentOS: View the current network configuration: ip addr Edit the network configuration file: sudo vi /etc/sysconfig/network-scripts/ifcfg-eth0 Change IP address: Edit IPADDR= Line changes the subnet mask and gateway (optional): Edit NETMASK= and GATEWAY= Lines Restart the network service: sudo systemctl restart network verification IP address: ip addr
 Welche Dateien müssen Sie in HDFS -Konfigurations -CentOS ändern?
Apr 14, 2025 pm 07:27 PM
Welche Dateien müssen Sie in HDFS -Konfigurations -CentOS ändern?
Apr 14, 2025 pm 07:27 PM
Beim Konfigurieren von Hadoop-Distributed Dateisystem (HDFS) auf CentOS müssen die folgenden Schlüsselkonfigurationsdateien geändert werden: Core-Site.xml: Fs.DefaultFs: Gibt die Standarddateisystemadresse von HDFs an, wie z. B. HDFS: // localhost: 9000. Hadoop.tmp.dir: Gibt das Speicherverzeichnis für Hadoop -temporäre Dateien an. Hadoop.proxyuser.root.hosts und Hadoop.proxyuser.ro
