Wie verwende ich den Warndialog in ReactNative?
警报组件有助于显示一个对话框,即向用户弹出一个带有标题、消息、按钮的弹出窗口,以便根据显示的消息了解用户的确认。
基本组件警报如下 -
Alert.alert('yourtile', 'yourmessage', [yourbuttons], ‘options’)
要使用警报组件,您需要按如下方式导入它 -
import { Alert } from 'react-native';要获取弹出窗口,您只需调用 Alert.alert() 函数。 Alert() 有四个参数,分别是标题、消息、按钮和选项。标题是强制参数,其余参数是可选的。
这是一个关于如何使用 Alert.alert() 的简单示例 -
Alert.alert(
   "Hi",
   "Do you want to continue?",
   [
      {
         text: "Later",
         onPress: () => console.log("User pressed Later")
      },
      {
         text: "Cancel",
         onPress: () => console.log("Cancel Pressed"),
         style: "cancel"
      },
      { text: "OK",
         onPress: () => console.log("OK Pressed")
      }
   ],
   { cancelable: false }
);这里的标题是“嗨”,消息是“你想继续吗”,我想在对话框中显示的按钮是“稍后”、“取消”和“确定”。对于添加的每个按钮 onPress 事件,该事件显示一条控制台消息。最后是选项参数,它可以用来控制弹出窗口的行为。在 Android 上,默认情况下,如果在弹出窗口边界外单击,弹出窗口将关闭。要禁用它,您可以使用 { cancelable: false } 作为选项参数。当您点击弹出区域之外时,由于可取消设置为 false,它不会关闭。
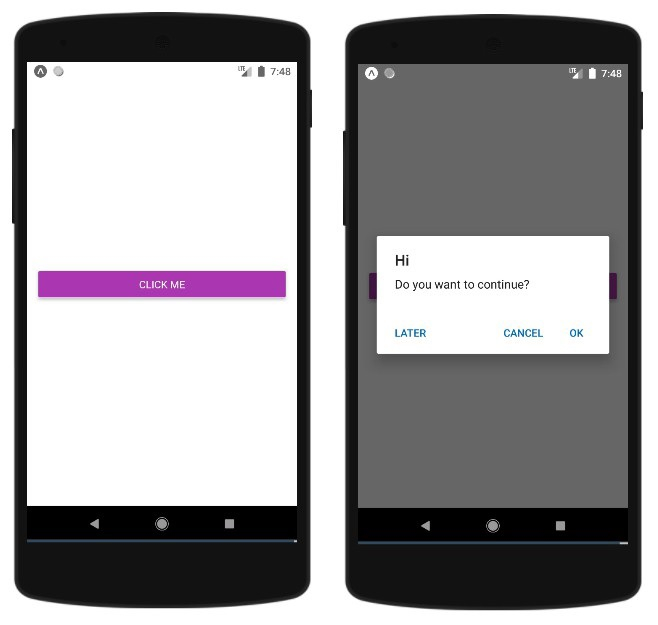
在 iOS 中,您可以指定任意数量的按钮,但在 Android 中,您可以使用三个按钮。 Android 中的三个按钮具有中性、消极和积极按钮的概念 -
如果指定一个按钮,它将类似于“积极” ' 例如“确定”。
如果有两个按钮,第一个为“负”,第二个为“正”。例如“取消”和“确定”。< /p>
如果是三个按钮,则为“中性”、“消极”、“积极”。例如“稍后”、“取消”和“确定”
< /li>
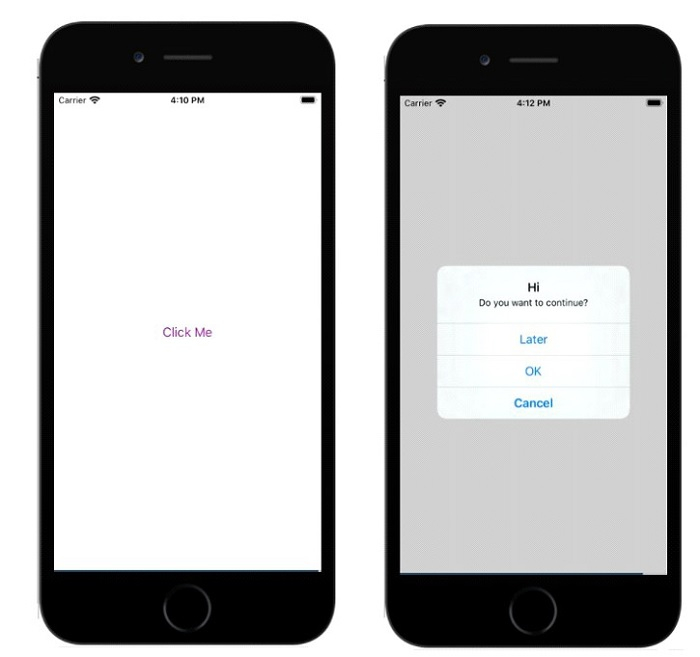
这是一个显示警报组件工作原理的工作示例 -
示例 1:警报框的显示
import React from 'react';
import { Button, View, Alert } from 'react-native';
const App = () => {
const testAlert = () =>
Alert.alert(
"Hi",
"Do you want to continue?",
[
{
text: "Later",
onPress: () => console.log("User pressed Later")
},
{
text: "Cancel",
onPress: () => console.log("Cancel Pressed"),
style: "cancel"
},
{ text: "OK",
onPress: () => console.log("OK Pressed")
}
],
{ cancelable: false }
);
return (
<View style={{flex :1, justifyContent: 'center', margin: 15 }}>
<Button
title="Click Me"
color="#9C27B0"
onPress={testAlert}
/>
</View>
);
}
export default App;输出

示例 2:在 Android 中使用 {cancelable: true }
在下面的示例中,{cancelable: true } 与标题、消息和按钮一起使用。所以警报框将如下所示 -
Alert.alert(
   "Hi",
   "Do you want to continue?",
   [
      {
         text: "Later",
         onPress: () => console.log("User pressed Later")
      },
      {
         text: "Cancel",
         onPress: () => console.log("Cancel Pressed"),
         style: "cancel"
      },
      { text: "OK",
         onPress: () => console.log("OK Pressed")
      }
   ],
   { cancelable: true }
);完整的工作示例如下 -
import React from 'react';
import { Button, View, Alert } from 'react-native';
const App = () => {
const testAlert = () =>
Alert.alert(
"Hi",
"Do you want to continue?",
[
{
text: "Later",
onPress: () => console.log("User pressed Later")
},
{
text: "Cancel",
onPress: () => console.log("Cancel Pressed"),
style: "cancel"
},
{ text: "OK",
onPress: () => console.log("OK Pressed")
}
],
{ cancelable: true }
);
return (
<View style={{flex :1, justifyContent: 'center', margin: 15 }}>
<Button
title="Click Me"
color="#9C27B0"
onPress={testAlert}
/>
</View>
);
}
export default App;当您点击弹出区域之外时,它将关闭。
输出

Das obige ist der detaillierte Inhalt vonWie verwende ich den Warndialog in ReactNative?. Für weitere Informationen folgen Sie bitte anderen verwandten Artikeln auf der PHP chinesischen Website!

Heiße KI -Werkzeuge

Undresser.AI Undress
KI-gestützte App zum Erstellen realistischer Aktfotos

AI Clothes Remover
Online-KI-Tool zum Entfernen von Kleidung aus Fotos.

Undress AI Tool
Ausziehbilder kostenlos

Clothoff.io
KI-Kleiderentferner

AI Hentai Generator
Erstellen Sie kostenlos Ai Hentai.

Heißer Artikel

Heiße Werkzeuge

Notepad++7.3.1
Einfach zu bedienender und kostenloser Code-Editor

SublimeText3 chinesische Version
Chinesische Version, sehr einfach zu bedienen

Senden Sie Studio 13.0.1
Leistungsstarke integrierte PHP-Entwicklungsumgebung

Dreamweaver CS6
Visuelle Webentwicklungstools

SublimeText3 Mac-Version
Codebearbeitungssoftware auf Gottesniveau (SublimeText3)

Heiße Themen
 1376
1376
 52
52
 Ersetzen Sie Stringzeichen in JavaScript
Mar 11, 2025 am 12:07 AM
Detaillierte Erläuterung der Methode für JavaScript -Zeichenfolge und FAQ In diesem Artikel werden zwei Möglichkeiten untersucht, wie String -Zeichen in JavaScript ersetzt werden: Interner JavaScript -Code und interne HTML für Webseiten. Ersetzen Sie die Zeichenfolge im JavaScript -Code Die direkteste Möglichkeit ist die Verwendung der Ersatz () -Methode: str = str.replace ("find", "ersetzen"); Diese Methode ersetzt nur die erste Übereinstimmung. Um alle Übereinstimmungen zu ersetzen, verwenden Sie einen regulären Ausdruck und fügen Sie das globale Flag G hinzu:: STR = Str.Replace (/fi
 Wie erstelle ich meine eigenen JavaScript -Bibliotheken?
Mar 18, 2025 pm 03:12 PM
In Artikel werden JavaScript -Bibliotheken erstellt, veröffentlicht und aufrechterhalten und konzentriert sich auf Planung, Entwicklung, Testen, Dokumentation und Werbestrategien.
 Wie optimiere ich den JavaScript -Code für die Leistung im Browser?
Mar 18, 2025 pm 03:14 PM
In dem Artikel werden Strategien zur Optimierung der JavaScript -Leistung in Browsern erörtert, wobei der Schwerpunkt auf die Reduzierung der Ausführungszeit und die Minimierung der Auswirkungen auf die Lastgeschwindigkeit der Seite wird.
 Was soll ich tun, wenn ich auf den Codendruck auf Kleidungsstücke für Front-End-Thermalpapier-Quittungen stoße?
Apr 04, 2025 pm 02:42 PM
Häufig gestellte Fragen und Lösungen für das Ticket-Ticket-Ticket-Ticket in Front-End im Front-End-Entwicklungsdruck ist der Ticketdruck eine häufige Voraussetzung. Viele Entwickler implementieren jedoch ...
 Wie debugge ich den JavaScript -Code effektiv mithilfe von Browser -Entwickler -Tools?
Mar 18, 2025 pm 03:16 PM
In dem Artikel werden effektives JavaScript -Debuggen mithilfe von Browser -Entwickler -Tools, der Schwerpunkt auf dem Festlegen von Haltepunkten, der Konsole und der Analyse der Leistung erörtert.
 10 Möglichkeiten, Ihre JQuery -Leistung sofort zu erhöhen
Mar 11, 2025 am 12:15 AM
Dieser Artikel beschreibt zehn einfache Schritte, um die Leistung Ihres Skripts erheblich zu steigern. Diese Techniken sind unkompliziert und für alle Fähigkeiten anwendbar. Bleiben Sie auf dem Laufenden: Verwenden Sie einen Paketmanager wie NPM mit einem Bundler wie Vite, um sicherzustellen
 Verwenden Sie den Pass mit Folge und MySQL
Mar 11, 2025 am 11:04 AM
FECKERIZE ist ein vielversprechender node.js orm. Es kann mit Postgresql, MySQL, Mariadb, SQLite und MSSQL verwendet werden. In diesem Tutorial werden wir die Authentifizierung für Benutzer einer Web -App implementieren. Und wir werden Passport verwenden, die beliebte Authentifizierung Middlew
 So bauen Sie einen einfachen JQuery Slider
Mar 11, 2025 am 12:19 AM
In diesem Artikel werden Sie mit der JQuery -Bibliothek ein einfaches Bildkarousel erstellen. Wir werden die BXSLIDER -Bibliothek verwenden, die auf JQuery basiert und viele Konfigurationsoptionen zum Einrichten des Karussells bietet. Heutzutage ist Picture Carousel zu einem Muss auf der Website geworden - ein Bild ist besser als tausend Wörter! Nachdem Sie sich entschieden haben, das Bild -Karussell zu verwenden, ist die nächste Frage, wie Sie es erstellen. Zunächst müssen Sie hochwertige, hochauflösende Bilder sammeln. Als nächstes müssen Sie ein Bildkarousel mit HTML und einem JavaScript -Code erstellen. Es gibt viele Bibliotheken im Web, die Ihnen helfen können, Karussell auf unterschiedliche Weise zu erstellen. Wir werden die Open -Source -BXSLIDER -Bibliothek verwenden. Die BXSLIDER -Bibliothek unterstützt reaktionsschnelles Design, sodass das mit dieser Bibliothek gebaute Karussell an alle angepasst werden kann


