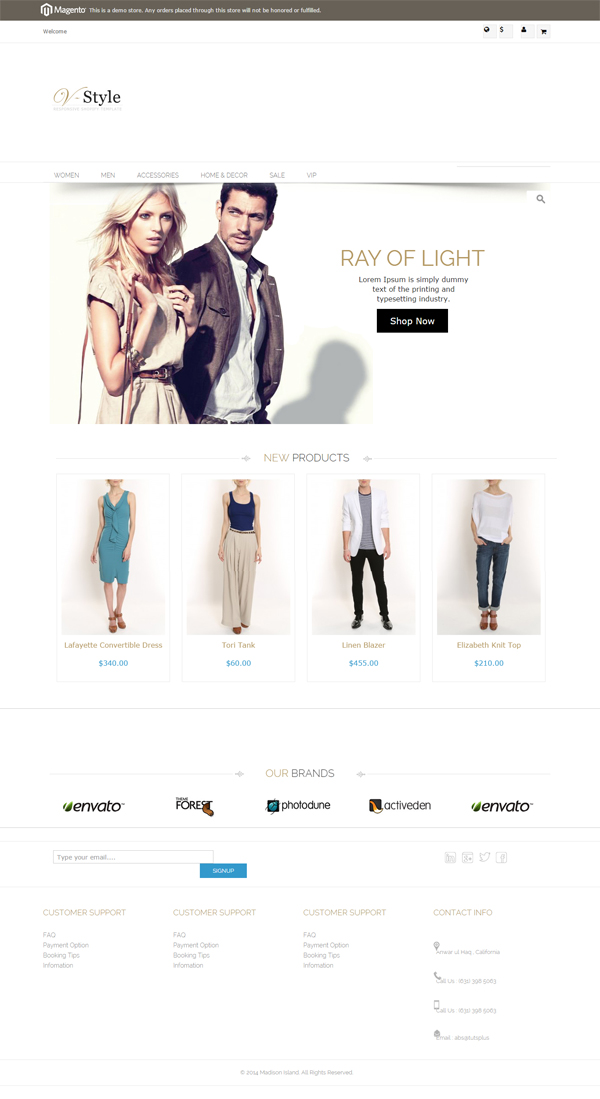
现在我们已经完全定制了前半部分 主页,接下来我们需要修改主页的内容。如果我们看看我们的 HTML设计,首页内容部分只有一个标题和最新的轮播 产品。有一个 Magento 小部件,我们可以使用它来显示最新的产品 主页。实际上,如果我们查看当前的主页部分,它已经有 其上启用了最新的产品小部件,但我们需要修改它以匹配我们的 设计要求。
如果我们通过管理面板查看主页内容 > CMS > 页面 > Madison Island > 内容,我们会看到只有一行PHP代码 (除了一些样式标签),即:
{{widget type="catalog/product_widget_new" display_type="new_products" products_count="5" template="catalog/product/widget/new/content/new_grid.phtml"}}
所以,基本上所有的首页内容都来自于此
模板(这只是展示新产品的模板)。我们将复制这个
文件从 RWD 主题到我们的新主题,位于 catalog/product/widget/new/content/new_grid.phtml,
并开始编辑它,使其看起来像我们的 HTML 设计。如果我们看一下
该文件的当前代码是:
<?php if (($_products = $this->getProductCollection()) && $_products->getSize()): ?>
<div class="widget widget-new-products">
    <div class="widget-title">
        <h2><?php echo $this->__('New Products') ?></h2>
    </div>
    <div class="widget-products">
        <?php echo $this->getPagerHtml() ?>
        <?php $_columnCount = $this->getColumnCount(); ?>
        <?php $i=0; ?>
        <ul class="products-grid products-grid--max-<?php echo $_columnCount; ?>-col">
            <?php foreach ($_products->getItems() as $_product): ?>
                <li class="item<?php if(($i-1)%$_columnCount==0): ?> first<?php elseif($i%$_columnCount==0): ?> last<?php endif; ?>">
                    <?php $_imgSize = 210; ?>
                    <a href="<?php echo $_product->getProductUrl() ?>" title="<?php echo $this->stripTags($_product->getName(), null, true) ?>" class="product-image">
                        <img  src="/static/imghw/default1.png"  data-src="images/products/small/products-02.jpg"  class="lazy"catalog/image')- alt="Entdecken Sie weiter: Homepage-Design für Magento-Theme-Entwicklung, Teil drei" >init($_product, 'small_image')->resize(85) ?>" alt="<?php echo $this->stripTags($_product->getName(), null, true) ?>" />
                    </a>
                    <div class="product-info">
                        <h3 class="product-name"><a href="<?php echo $_product->getProductUrl() ?>" title="<?php echo $this->stripTags($_product->getName(), null, true) ?>)"><?php echo $this->helper('catalog/output')->productAttribute($_product, $_product->getName() , 'name') ?></a></h3>
                        <?php echo $this->getPriceHtml($_product, true, '-widget-new-grid') ?>
                        <?php echo $this->getReviewsSummaryHtml($_product, 'short') ?>
                        <div class="actions">
                            <?php if ($_product->isSaleable()): ?>
                                <button type="button" title="<?php echo $this->__('Add to Cart') ?>" class="button btn-cart" onclick="setLocation('<?php echo $this->getAddToCartUrl($_product) ?>')"><span><span><?php echo $this->__('Add to Cart') ?></span></span></button>
                            <?php else: ?>
                                <p class="availability out-of-stock"><span><?php echo $this->__('Out of stock') ?></span></p>
                            <?php endif; ?>
                            <ul class="add-to-links">
                                <?php if ($this->helper('wishlist')->isAllow()) : ?>
                                    <li><a href="<?php echo $this->getAddToWishlistUrl($_product) ?>" class="link-wishlist"><?php echo $this->__('Add to Wishlist') ?></a></li>
                                <?php endif; ?>
                                <?php if($_compareUrl=$this->getAddToCompareUrl($_product)): ?>
                                    <li><span class="separator">|</span> <a href="<?php echo $_compareUrl ?>" class="link-compare"><?php echo $this->__('Add to Compare') ?></a></li>
                                <?php endif; ?>
                            </ul>
                        </div>
                    </div>
                </li>
            <?php endforeach; ?>
        </ul>
    </div>
</div>
<?php endif; ?>
当我们查看本部分的 HTML 代码时,它看起来 像这样:
<div class="container_fullwidth">
    <div class="container">
        <h3 class="title"><strong>Hot</strong> Products</h3>
        <div class="clearfix"></div>
    	<div id="owl-demo" class="owl-carousel">
            <div class="item">
                <div class="products">
                    <div class="main">
                        <div class="view view-eighth">
                            <img  src="/static/imghw/default1.png"  data-src="images/products/small/products-02.jpg"  class="lazy" / alt="Entdecken Sie weiter: Homepage-Design für Magento-Theme-Entwicklung, Teil drei" >
                            <div class="mask">
                                <a href="#" class="info">Add to Cart</a>
                            </div>
                            <div class="productname">Iphone 5s Gold 32 Gb 2013</div>
                            <h4 class="price">$451.00</h4>
                        </div>
                    </div>
                </div>
            </div>
</div>
因此,我们首先在此 HTML 中插入动态标签。我的原因是 向您显示该文件的当前代码,以便您可以找到所需的 该代码中的动态标记,并将它们放入 HTML 中。
我们不必对 div 结构进行任何更改,因此第一行
需要更改的是 h3 标记:
<h3 class="title"><strong>Hot</strong> Products</h3>
我们需要将 Hot 和 Products 的静态文本替换为 Magento $this
标签,以便 Magento 稍后可以根据用户偏好翻译这些标签。
因此,这一行将变成这样:
<h3 class="title"><strong><?php echo $this->__('New') ?></strong><?php echo $this->__(' Products') ?></h3>
下一行需要更改的是 image 标记,我们需要在其中更改
relevant path of the image source. Currently it looks 像这样:
<img src="/static/imghw/default1.png" data-src="images/products/small/products-02.jpg" class="lazy" / alt="Entdecken Sie weiter: Homepage-Design für Magento-Theme-Entwicklung, Teil drei" >
我们将其更改为:
<img src="/static/imghw/default1.png" data-src="https://img.php.cn/upload/article/000/887/227/169477303543177.png" class="lazy"catalog/image')- alt="Entdecken Sie weiter: Homepage-Design für Magento-Theme-Entwicklung, Teil drei" >init($_product, 'small_image')->resize(236, 357) ?>"/>
这里这个动态标签将获取产品的实际小图像
236 x 357 像素大小。接下来,我们需要更改这个 Add to Cart 链接:
<a href="#" class="info">Add to Cart</a>
我们将其更改为:
<a href="<?php echo $_product->getProductUrl() ?>" class="info">
    <?php if ($_product->isSaleable()): ?>
        <?php echo $this->__('Add to Cart') ?>
    <?php else: ?>
        <?php echo $this->__('Out of stock') ?>
    <?php endif; ?>
</a>
它有一个产品详细信息页面的动态 URL,并且仅显示“添加到” 购物车”(如果产品可用)。否则会显示“缺货”。最后, 我们将通过替换此行来更新产品价格和名称:
<div class="productname">Iphone 5s Gold 32 Gb 2013</div>
<h4 class="price">$451.00</h4>
有了这个:
<div class="productname"><?php echo $this->helper('catalog/output')->productAttribute($_product, $_product->getName() , 'name') ?></div>
<h4 class="price"><?php echo $this->getPriceHtml($_product, true, '-widget-new-grid') ?></h4>
这将使我们的单一产品视图准备就绪,但要迭代它 新产品,我们必须将 item div 包含在循环中,因此我们将添加这一行 在它的顶部:
<?php foreach ($_products->getItems() as $_product): ?>
最后的这一行用于终止循环:
<?php endforeach; ?>
So the full code for that file will become 像这样:
getProductCollection()) && $_products->getSize()): ?>
<h3 class="title"><strong><?php echo $this->__('New') ?></strong><?php echo $this->__(' Products') ?></h3>
<?php foreach ($_products->getItems() as $_product): ?>
<img src="/static/imghw/default1.png" data-src="https://img.php.cn/upload/article/000/887/227/169477303543177.png" class="lazy"catalog/image')- alt="Entdecken Sie weiter: Homepage-Design für Magento-Theme-Entwicklung, Teil drei" >init($_product, 'small_image')->resize(236, 357) ?>"/>
helper('catalog/output')->productAttribute($_product, $_product->getName() , 'name') ?>
getPriceHtml($_product, true, '-widget-new-grid') ?>
<?php endforeach; ?>
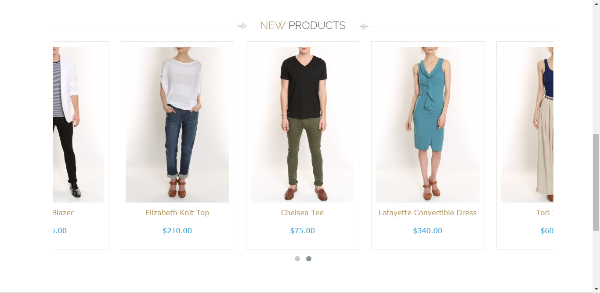
立即刷新您的主页。它应该有一个完美的工作和风格 new products section, which would look 像这样:

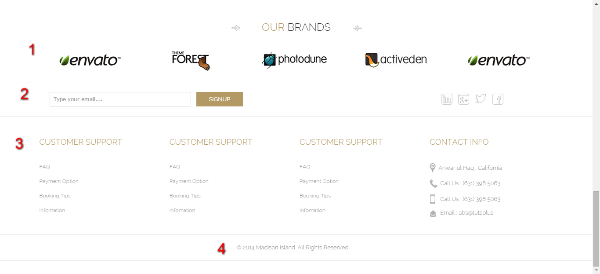
现在我们需要在完成主页之前修改页脚。如果 我们看看我们的 HTML 设计,页脚有四个部分。第一个显示“我们的 品牌,第二个显示订阅框和社交媒体链接,第三个 显示一些 URL,第四个只是版权声明。

第四部分已经存在于我们的主题中,所以我们只需 必须修改内容和样式,但其他三个组件我们必须添加到主题中。
要添加组件,我们将创建一个新的 来自管理面板的静态块并将我们的内容放在那里。那么,我们将前往 管理面板 > 静态块 > 添加新块 阻止,并为我们的 品牌部分。我们将块标题更改为“我们的品牌”,设置 标识符为“our_brands”,选择“All Store Views”的商店视图,然后输入 内容部分:
<h3 class="title"><strong>Our </strong> Brands</h3>
<div class="control"><a id="prev_brand" class="prev" href="#"><</a><a id="next_brand" class="next" href="#">></a></div>
<ul id="braldLogo">
<li>
<ul class="brand_item">
<li><a href="#">
<div class="brand-logo"><img src="/static/imghw/default1.png" data-src="https://img.php.cn/upload/article/000/887/227/169477303564679.jpg" class="lazy"wysiwyg/myuploads/envato.png"}}" alt="" /></div>
</a></li>
<li><a href="#">
<div class="brand-logo"><img src="/static/imghw/default1.png" data-src="https://img.php.cn/upload/article/000/887/227/169477303564679.jpg" class="lazy"wysiwyg/myuploads/themeforest.png"}}" alt="" /></div>
</a></li>
<li><a href="#">
<div class="brand-logo"><img src="/static/imghw/default1.png" data-src="https://img.php.cn/upload/article/000/887/227/169477303564679.jpg" class="lazy"wysiwyg/myuploads/photodune.png"}}" alt="" /></div>
</a></li>
<li><a href="#">
<div class="brand-logo"><img src="/static/imghw/default1.png" data-src="https://img.php.cn/upload/article/000/887/227/169477303564679.jpg" class="lazy"wysiwyg/myuploads/activeden.png"}}" alt="" /></div>
</a></li>
<li><a href="#">
<div class="brand-logo"><img src="/static/imghw/default1.png" data-src="https://img.php.cn/upload/article/000/887/227/169477303564679.jpg" class="lazy"wysiwyg/myuploads/envato.png"}}" alt="" /></div>
</a></li>
</ul>
</li>
</ul>
如果你仔细观察,它与我们在 HTML 中的代码相同 部分 - 我们刚刚更改了图像的相对路径,同时手动 从所见即所得编辑器中上传新图像。保存块,并且 开始为注册部分创建另一个块。
对于第二个块,我们将使用“页脚上方”的块标题。对于标识符,我们将使用“above_footer”,对于内容,我们将输入以下代码:
<div class="col-md-5">
    <form class="newsletter">
        <input type="text" name="" placeholder="Type your email....">
        <input type="submit" value="SignUp" class="button">
    </form>
</div>
<div class="col-md-6">
    <ul class="social-icon">
        <li><a href="#" class="linkedin"></a></li>
        <li><a href="#" class="google-plus"></a></li>
        <li><a href="#" class="twitter"></a></li>
        <li><a href="#" class="facebook"></a></li>
    </ul>
</div>
现在我们必须以类似的方式创建链接块。我们将创建一个 新块的块标题为“页脚链接”,标识符为“footer_links”,并将以下代码放入其中:
<div class="col-md-3 col-sm-6">
    <h4 class="title">Customer<strong> Support</strong></h4>
    <ul class="support">
        <li><a href="#">FAQ</a></li>
        <li><a href="#">Payment Option</a></li>
        <li><a href="#">Booking Tips</a></li>
        <li><a href="#">Infomation</a></li>
    </ul>
</div>
<div class="col-md-3 col-sm-6">
    <h4 class="title">Customer<strong> Support</strong></h4>
    <ul class="support">
        <li><a href="#">FAQ</a></li>
        <li><a href="#">Payment Option</a></li>
        <li><a href="#">Booking Tips</a></li>
        <li><a href="#">Infomation</a></li>
    </ul>
</div>
<div class="col-md-3 col-sm-6">
    <h4 class="title">Customer<strong> Support</strong></h4>
    <ul class="support">
        <li><a href="#">FAQ</a></li>
        <li><a href="#">Payment Option</a></li>
        <li><a href="#">Booking Tips</a></li>
        <li><a href="#">Infomation</a></li>
    </ul>
</div>
<div class="col-md-3 col-sm-6">
    <h4 class="title">Contact <strong>Info</strong></h4>
    <p><span><img src="/static/imghw/default1.png"  data-src="https://img.php.cn/upload/article/000/887/227/169477303564679.jpg"  class="lazy"wysiwyg/myuploads/placeIcon.jpg"}}" alt="" /></span>Anwar ul Haq , California</p>
    <p><span><img src="/static/imghw/default1.png"  data-src="https://img.php.cn/upload/article/000/887/227/169477303564679.jpg"  class="lazy"wysiwyg/myuploads/phoneIcon.jpg"}}" alt="" /></span>Call Us : (123) 398 5063</p>
    <p><span><img src="/static/imghw/default1.png"  data-src="https://img.php.cn/upload/article/000/887/227/169477303564679.jpg"  class="lazy"wysiwyg/myuploads/mobileIcon.jpg"}}" alt="" /></span>Call Us : (123) 398 5063</p>
    <p><span><img src="/static/imghw/default1.png"  data-src="https://img.php.cn/upload/article/000/887/227/169477303564679.jpg"  class="lazy"wysiwyg/myuploads/mailIcon.jpg"}}" alt="" /></span>Email : abs@tutsplus</p>
</div>
所有这些链接现在都没有链接,但您可以稍后修改它们。 图像链接再次使用所见即所得的上传功能动态生成 编辑。所有其余代码只是从 HTML 复制并粘贴。
也保存这个块,然后查看主页,但仍然看不到这些
三个街区出现。这是因为你必须明确告诉 Magento
在哪里显示这些新块,我们可以从布局部分做到这一点。为了
为此,转到 layout/local.xml 文件,并在 default 标记结束之前添加这些行。
<reference name="footer">
    <block type="cms/block" name="footer_links ">
        <action method="setBlockId"><block_id>footer_links</block_id></action>
    </block>
    <block type="cms/block" name="above_footer">
        <action method="setBlockId"><block_id>above_footer</block_id></action>
    </block>
    <block type="cms/block" name="our_brands">
        <action method="setBlockId"><block_id>our_brands</block_id></action>
    </block>
</reference>
这个
XML 代码基本上是告诉 Magento 将这两个新块添加到 Magento 中
页脚部分。最后,我们需要从页脚 phtml 调用这些块
文件。为此,我们将在此位置创建一个新的 footer.phtml 文件:template/page/html/footer.phtml。
在此 footer.phtml 文件中添加此代码:
<div class="container_fullwidth">
    <div class="container">
        <div class="our-brand">
            <?php echo $this->getChildHtml("our_brands") ?>
        </div>
    </div>
    <div class="clearfix"></div>
    <div class="footer">
        <div class="copyright-info">
            <div class="container">
                <div class="row">
                    <?php echo $this->getChildHtml("above_footer") ?>
                </div>
            </div>
        </div>
        <div class="footer-info">
            <div class="container">
                <div class="row">
                    <?php echo $this->getChildHtml("footer_links_sm") ?>
                    <?php // echo $this->getChildHtml() ?>
                </div>
            </div>
        </div>
        <div class="copyright-info">
            <div class="container">
                <div class="row">
                    <div class="col-md-12">
                        <p><?php echo $this->getCopyright() ?></p>
                    </div>
                </div>
            </div>
        </div>
    </div>
    </div>
这个 is again just HTML code taken, where all the section codes are 替换为静态块的相关链接。版权部分是 替换为版权动态标签。
现在检查主页,它现在应该显示这些新创建的静态 Blocks, and should look 像这样:

我们的主页现已完成。唯一剩下的就是一些风格修正, 我们将在下一篇文章中做到这一点。
Das obige ist der detaillierte Inhalt vonEntdecken Sie weiter: Homepage-Design für Magento-Theme-Entwicklung, Teil drei. Für weitere Informationen folgen Sie bitte anderen verwandten Artikeln auf der PHP chinesischen Website!
 Was sind die Parameter des Festzeltes?
 Neueste Nachrichten zu Shib-Münzen
 Alle Verwendungen von Cloud-Servern
 Vom Viewer aufgerufene Methode
 So registrieren Sie sich bei Binance
 Wissen Sie, ob Sie die andere Person sofort kündigen, nachdem Sie ihr auf Douyin gefolgt sind?
 Allgemeine iscsiadm-Befehle
 Was können TikTok-Freunde tun?


