 Technologie-Peripheriegeräte
 KI
KI
 Trajektoriengenerierung unter weichen und harten Einschränkungen: detaillierte Erklärung von Theorie und Code
Trajektoriengenerierung unter weichen und harten Einschränkungen: detaillierte Erklärung von Theorie und Code
Code dieses Projekts:
github.com/liangwq/robot_motion_planing
Weiche und harte Einschränkungen in Trajektorienbeschränkungen
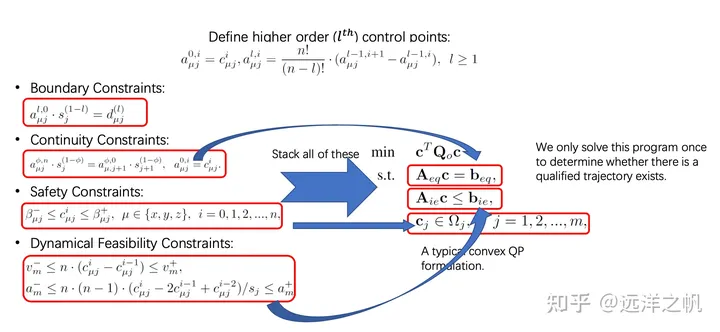
In den vorherigen Artikeln wurde bereits erläutert, dass das Wesen von Trajektorienbeschränkungen darin besteht, eine eingeschränkte Trajektorienanpassung durchzuführen. Die Eingabe ist die Wegpunktliste, und es gibt zwei Arten von Einschränkungen: harte Einschränkungen und weiche Einschränkungen. Die sogenannten harten Einschränkungen entsprechen der mathematischen Form der Kostenfunktion, und die harten Einschränkungen entsprechen den Einschränkungsbedingungen des Optimierungsherbstes. Entsprechend der physikalischen Bedeutung gibt es Folgendes, um eine sichere Flugbahn für das Gehen des Roboters zu erhalten:
- Schieben Sie die Flugbahn durch die Kostenfunktion von den Hindernissen weg.
- Geben Sie den begehbaren konvexen Rumpfkorridor zwischen den Hindernissen an und verwenden Sie ihn Harte Einschränkungen, die es zu ermöglichen gilt: Die Flugbahn des Roboters muss im konvexen Rumpfkorridor laufen Kostenfunktion (weiche Einschränkungen) oder zu lösende Einschränkungen (weiche Einschränkungen). image.png

In einem früheren Artikel wurden verschiedene Vorteile der Bezier-Kurvenanpassung vorgestellt: 
Endpunktinterpolation. Eine Bezier-Kurve beginnt immer am ersten Kontrollpunkt, endet am letzten Kontrollpunkt und verläuft nicht durch andere Kontrollpunkte.
Konvexe Hülle. Eine Bezier-Kurve ( ) besteht aus einer Reihe von Kontrollpunkten und ist vollständig auf die konvexe Hülle beschränkt, die durch alle diese Kontrollpunkte definiert wird. Geschwindigkeitskurve. Die Ableitungskurve ′( ) der Bezier-Kurve ( ) wird als Geschwindigkeitskurve bezeichnet, die auch eine durch einen Kontrollpunkt definierte Bezier-Kurve ist, wobei der Kontrollpunkt ∙ ( +1− ) ist, wobei die Ordnung ist.
Festes Zeitintervall. Bezier-Kurven werden immer auf [0,1] definiert.
- Abb1. Ein Abschnitt der Flugbahn wird mit einer Bezier-Kurve angepasst. image.png
def bernstein_poly(n, i, t):"""Bernstein polynom.:param n: (int) polynom degree:param i: (int):param t: (float):return: (float)"""return scipy.special.comb(n, i) * t ** i * (1 - t) ** (n - i)def bezier(t, control_points):"""Return one point on the bezier curve.:param t: (float) number in [0, 1]:param control_points: (numpy array):return: (numpy array) Coordinates of the point"""n = len(control_points) - 1return np.sum([bernstein_poly(n, i, t) * control_points[i] for i in range(n + 1)], axis=0)
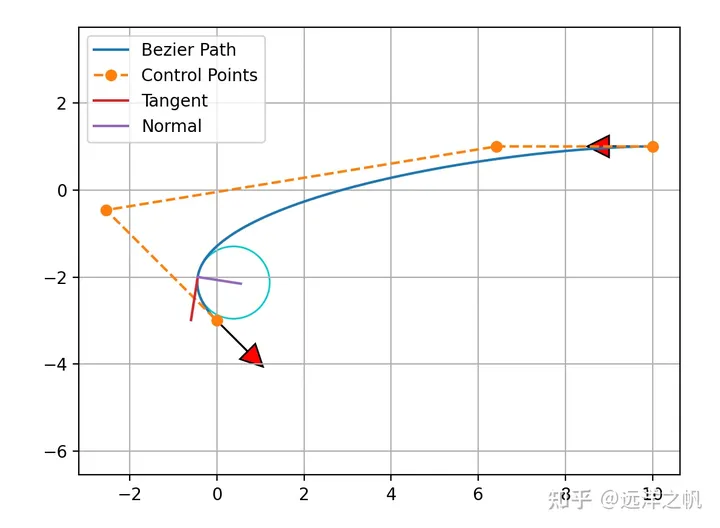 Um eine Bezier-Kurve zur Darstellung von a zu verwenden Abschnitt der Kurve, der oben angegeben wurde. Nachdem der Ausdruck und die Code-Implementierung aus dem Weg geräumt sind, fehlen jetzt die angegebenen Kontrollpunkte. Bringen Sie die Kontrollpunkte ein und verwenden Sie Bezier-Kurvenausdrücke, um die Koordinaten der Punkte zu berechnen, die benötigt werden in den angegebenen Endpunkt und Endpunkt eingezeichnet werden. Der folgende Code gibt die Bezier-Kurvenimplementierung von 4 Kontrollpunkten und 6 Kontrollpunkten an. Um die Kurve zu zeichnen, müssen 170 Online-Punkte berechnet werden. Der Code lautet wie folgt:
 def calc_4points_bezier_path(sx, sy, syaw, ex, ey, eyaw, offset):"""Compute control points and path given start and end position.:param sx: (float) x-coordinate of the starting point:param sy: (float) y-coordinate of the starting point:param syaw: (float) yaw angle at start:param ex: (float) x-coordinate of the ending point:param ey: (float) y-coordinate of the ending point:param eyaw: (float) yaw angle at the end:param offset: (float):return: (numpy array, numpy array)"""dist = np.hypot(sx - ex, sy - ey) / offsetcontrol_points = np.array([[sx, sy], [sx + dist * np.cos(syaw), sy + dist * np.sin(syaw)], [ex - dist * np.cos(eyaw), ey - dist * np.sin(eyaw)], [ex, ey]])path = calc_bezier_path(control_points, n_points=170)return path, control_pointsdef calc_6points_bezier_path(sx, sy, syaw, ex, ey, eyaw, offset):"""Compute control points and path given start and end position.:param sx: (float) x-coordinate of the starting point:param sy: (float) y-coordinate of the starting point:param syaw: (float) yaw angle at start:param ex: (float) x-coordinate of the ending point:param ey: (float) y-coordinate of the ending point:param eyaw: (float) yaw angle at the end:param offset: (float):return: (numpy array, numpy array)"""dist = np.hypot(sx - ex, sy - ey) * offsetcontrol_points = np.array([[sx, sy], [sx + 0.25 * dist * np.cos(syaw), sy + 0.25 * dist * np.sin(syaw)], [sx + 0.40 * dist * np.cos(syaw), sy + 0.40 * dist * np.sin(syaw)], [ex - 0.40 * dist * np.cos(eyaw), ey - 0.40 * dist * np.sin(eyaw)], [ex - 0.25 * dist * np.cos(eyaw), ey - 0.25 * dist * np.sin(eyaw)], [ex, ey]])path = calc_bezier_path(control_points, n_points=170)return path, control_pointsdef calc_bezier_path(control_points, n_points=100):"""Compute bezier path (trajectory) given control points.:param control_points: (numpy array):param n_points: (int) number of points in the trajectory:return: (numpy array)"""traj = []for t in np.linspace(0, 1, n_points):traj.append(bezier(t, control_points))return np.array(traj)
Mit der Anpassungsmethode einer Bezier-Kurve müssen Sie als Nächstes mehrere Bezier-Kurven generieren, um eine Trajektorie zu synthetisieren. Dies muss mithilfe der Kostenfunktionsmethode (weiche Einschränkungen) erfolgen muss durch die angegebenen Punkte + Formel verlaufen. Punktverbindungen müssen kontinuierlich sein (harte Einschränkungen), um eine glatte Flugbahnkurve zu erzeugen.

Abb.2. Keine Hindernisse, reibungslose Optimierung mit Bondary-Trajectory-Code. Tatsächlich ist das Prinzip wie folgt: Bei mehreren Wegpunktpunkten werden jeweils zwei benachbarte Wegpunkte generiert Bei einer Segment-Bezizer-Kurve lautet der Code wie folgt:
# Bezier path one as per the approach suggested in# https://users.soe.ucsc.edu/~elkaim/Documents/camera_WCECS2008_IEEE_ICIAR_58.pdfdef cubic_bezier_path(self, ax, ay):dyaw, _ = self.calc_yaw_curvature(ax, ay)cx = []cy = []ayaw = dyaw.copy()for n in range(1, len(ax)-1):yaw = 0.5*(dyaw[n] + dyaw[n-1])ayaw[n] = yawlast_ax = ax[0]last_ay = ay[0]last_ayaw = ayaw[0]# for n waypoints, there are n-1 bezier curvesfor i in range(len(ax)-1):path, ctr_points = calc_4points_bezier_path(last_ax, last_ay, ayaw[i], ax[i+1], ay[i+1], ayaw[i+1], 2.0)cx = np.concatenate((cx, path.T[0][:-2]))cy = np.concatenate((cy, path.T[1][:-2]))cyaw, k = self.calc_yaw_curvature(cx, cy)last_ax = path.T[0][-1]last_ay = path.T[1][-1]return cx, cy
Die Kostenfunktionsberechnung umfasst: Krümmungskosten + Abweichungskosten + Entfernungskosten + Kontinuitätskosten sowie Randbedingungen, Ungleichheitsbeschränkungen, dass die Flugbahn innerhalb der Röhre liegen muss, und Problem Optimierungslösung. Der spezifische Code wird wie folgt implementiert:
# Objective function of cost to be minimizeddef cubic_objective_func(self, deviation):ax = self.waypoints.x.copy()ay = self.waypoints.y.copy()for n in range(0, len(deviation)):ax[n+1] -= deviation[n]*np.sin(self.waypoints.yaw[n+1])ay[n+1] += deviation[n]*np.cos(self.waypoints.yaw[n+1])bx, by = self.cubic_bezier_path(ax, ay)yaw, k = self.calc_yaw_curvature(bx, by)# cost of curvature continuityt = np.zeros((len(k)))dk = self.calc_d(t, k)absolute_dk = np.absolute(dk)continuity_cost = 10.0 * np.mean(absolute_dk)# curvature costabsolute_k = np.absolute(k)curvature_cost = 14.0 * np.mean(absolute_k)# cost of deviation from input waypointsabsolute_dev = np.absolute(deviation)deviation_cost = 1.0 * np.mean(absolute_dev)distance_cost = 0.5 * self.calc_path_dist(bx, by)return curvature_cost + deviation_cost + distance_cost + continuity_cost# Minimize objective function using scipy optimize minimizedef optimize_min_cubic(self):print("Attempting optimization minima")initial_guess = [0, 0, 0, 0, 0]bnds = ((-self.bound, self.bound), (-self.bound, self.bound), (-self.bound, self.bound), (-self.bound, self.bound), (-self.bound, self.bound))result = optimize.minimize(self.cubic_objective_func, initial_guess, bounds=bnds)ax = self.waypoints.x.copy()ay = self.waypoints.y.copy()if result.success:print("optimized true")deviation = result.xfor n in range(0, len(deviation)):ax[n+1] -= deviation[n]*np.sin(self.waypoints.yaw[n+1])ay[n+1] += deviation[n]*np.cos(self.waypoints.yaw[n+1])x, y = self.cubic_bezier_path(ax, ay)yaw, k = self.calc_yaw_curvature(x, y)self.optimized_path = Path(x, y, yaw, k)else:print("optimization failure, defaulting")exit()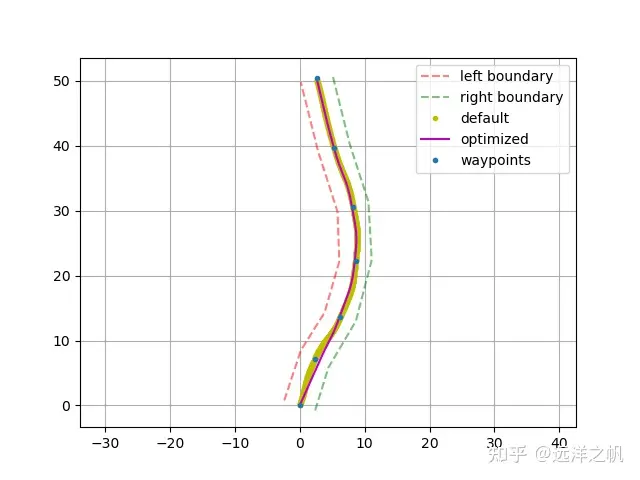
eine Szene mit Hindernissen, und die Kostenfunktion wird verwendet, um die generierte Kurve von den Hindernissen fernzuhalten. Um eine sicher begehbare Flugbahn zu erhalten, folgt die spezifische Code-Implementierung. Die Lambda-Funktion f in Optimizer_k soll nach den Kosten auflösen, wenn die Flugbahn in der Nähe des Hindernisses verläuft. Penalty1 und Penalty2 sollen den spezifischen Kostenwert der Kurve ermitteln, die in der Nähe des Hindernisses verläuft. arc_len (Granualität = 10) + m_k + Strafe1 + Strafe2 sind die Gesamtkosten der Flugbahn. Der for-Schleifenteil verwendet Scipys Optimieren und Minimieren, um die Flugbahn zu lösen.
def optimizer_k(cd, k, path, i, obs, curve_penalty_multiplier, curve_penalty_divider, curve_penalty_obst):"""Bezier curve optimizer that optimizes the curvature and path length by changing the distance of p1 and p2 from points p0 and p3, respectively. """p_tmp = copy.deepcopy(path)if i+3 > len(path)-1:b = CubicBezier()b.p0 = p_tmp[i]x, y = calc_p1(p_tmp[i], p_tmp[i + 1], p_tmp[i - 1], i, cd[0])b.p1 = Point(x, y)x, y = calc_p2(p_tmp[i-1], p_tmp[i + 0], p_tmp[i + 1], i, cd[1])b.p2 = Point(x, y)b.p3 = p_tmp[i + 1]B = CubicBezier()else:b = CubicBezier()b.p0 = p_tmp[i]x, y = calc_p1(p_tmp[i],p_tmp[i+1],p_tmp[i-1], i, cd[0])b.p1 = Point(x, y)x, y = calc_p2(p_tmp[i],p_tmp[i+1],p_tmp[i+2], i, cd[1])b.p2 = Point(x, y)b.p3 = p_tmp[i + 1]B = CubicBezier()B.p0 = p_tmp[i]x, y = calc_p1(p_tmp[i+1], p_tmp[i + 2], p_tmp[i], i, 10)B.p1 = Point(x, y)x, y = calc_p2(p_tmp[i+1], p_tmp[i + 2], p_tmp[i + 3], i, 10)B.p2 = Point(x, y)B.p3 = p_tmp[i + 1]m_k = b.max_k()if m_k>k:m_k= m_k*curve_penalty_multiplierelse:m_k = m_k/curve_penalty_dividerf = lambda x, y: max(math.sqrt((x[0] - y[0].x) ** 2 + (x[1] - y[0].y) ** 2) * curve_penalty_obst, 10) if math.sqrt((x[0] - y[0].x) ** 2 + (x[1] - y[0].y) ** 2) <h2 id="span-带飞行走廊的Bezier轨迹生成-span"><span>带飞行走廊的Bezier轨迹生成</span></h2><p>得益于贝赛尔曲线拟合的优势,如果我们可以让机器人可行走的轨迹转成多个有重叠区域的凸多面体,那么轨迹完全位于飞行走廊内。</p><p style="text-align:center;"><img src="/static/imghw/default1.png" data-src="https://img.php.cn/upload/article/000/887/227/170524425539093.png" class="lazy" alt="Trajektoriengenerierung unter weichen und harten Einschränkungen: detaillierte Erklärung von Theorie und Code"></p><p>image.png</p>
- 飞行走廊由凸多边形组成。
- 每个立方体对应于一段贝塞尔曲线。
- 此曲线的控制点被强制限制在多边形内部。
- 轨迹完全位于所有点的凸包内。
如何通过把障碍物地图生成可行凸包走廊
生成凸包走廊的方法目前有以下三大类的方法:
平行凸簇膨胀方法
从栅格地图出发,利用最小凸集生成算法,完成凸多面体的生成。其算法的思想是首先获得一个凸集,再沿着凸集的表面进行扩张,扩张之后再进行凸集检测,判断新扩张的集合是否保持为凸。一直扩张到不能再扩张为止,再提取凸集的边缘点,利用快速凸集生成算法,生成凸多面体。该算法的好处在于可以利用这种扩张的思路,将安全的多面体的体积尽可能的充满整个空间,因此获得的安全通道更大。但其也具有一定的缺点,就是计算量比较大,计算所需要的时间比较长,为了解决这个问题,在该文章中,又提出了采用GPU加速的方法,来加速计算。
基于凸分解的安全通道生成
基于凸分解的安全通道生成方法由四个步骤完成安全通道的生成,分别为:找到椭球、找到多面体、边界框、收缩。
半定规划的迭代区域膨胀
为了获取多面体,这个方法首先构造一个初始椭球,由一个以选定点为中心的单位球组成。然后,遍历障碍物,为每个障碍物生成一个超平面,该超平面与障碍物相切并将其与椭球分开。再次,这些超平面定义了一组线性约束,它们的交集是一个多面体。然后,可以在那个多面体中找到一个最大的椭球,使用这个椭球来定义一组新的分离超平面,从而定义一个新的多面体。选择生成分离超平面的方法,这样椭圆体的体积在迭代之间永远不会减少。可以重复这个过程,直到椭圆体的增长率低于某个阈值,此时我们返回多面体和内接椭圆体。这个方法具有迭代的思想,并且具有收敛判断的标准,算法的收敛快慢和初始椭球具有很大的关系。
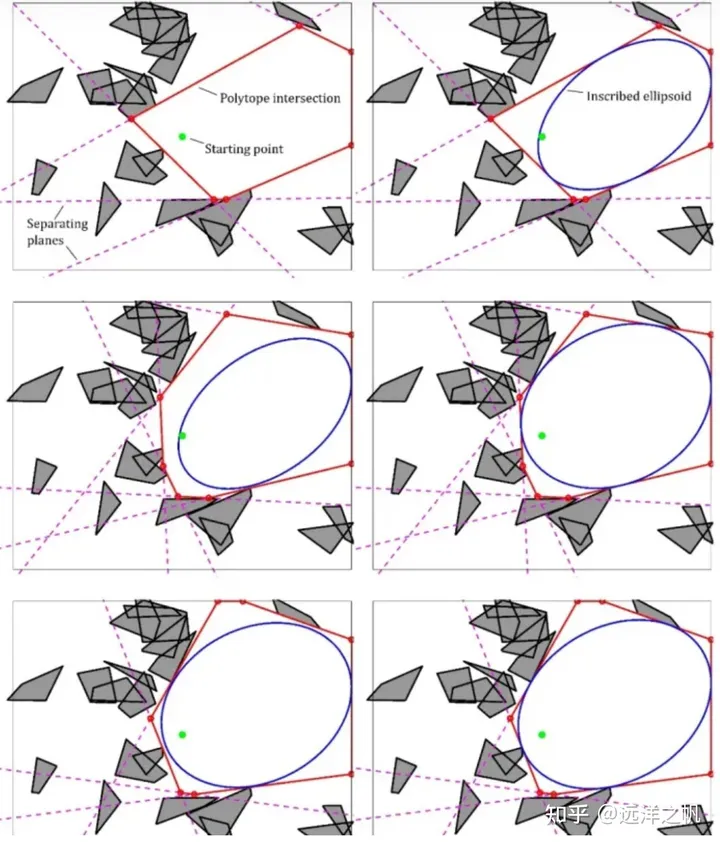
Fig3.半定规划的迭代区域膨胀。每一行即为一次迭代操作,直到椭圆体的增长率低于阈值。image.png
这篇文章介绍的是“半定规划的迭代区域膨胀”方法,具体代码实现如下:
# 根据输入路径对空间进行凸分解def decomp(self, line_points: list[np.array], obs_points: list[np.array], visualize=True):# 最终结果decomp_polygons = list()# 构建输入障碍物点的kdtreeobs_kdtree = KDTree(obs_points)# 进行空间分解for i in range(len(line_points) - 1):# 得到当前线段pf, pr = line_points[i], line_points[i + 1]print(pf)print(pr)# 构建初始多面体init_polygon = self.initPolygon(pf, pr)print(init_polygon.getInterPoints())print(init_polygon.getVerticals())# 过滤障碍物点candidate_obs_point_indexes = obs_kdtree.query_ball_point((pf + pr) / 2, np.linalg.norm([np.linalg.norm(pr - pf) / 2 + self.consider_range_, self.consider_range_]))local_obs_points = list()for index in candidate_obs_point_indexes:if init_polygon.inside(obs_points[index]):local_obs_points.append(obs_points[index])# 得到初始椭圆ellipse = self.findEllipse(pf, pr, local_obs_points)# 根据初始椭圆构建多面体polygon = self.findPolygon(ellipse, init_polygon, local_obs_points)# 进行保存decomp_polygons.append(polygon)if visualize:# 进行可视化plt.figure()# 绘制路径段plt.plot([pf[1], pr[1]], [pf[0], pr[0]], color="red")# 绘制初始多面体verticals = init_polygon.getVerticals()# 绘制多面体顶点plt.plot([v[1] for v in verticals] + [verticals[0][1]], [v[0] for v in verticals] + [verticals[0][0]], color="blue", linestyle="--")# 绘制障碍物点plt.scatter([p[1] for p in local_obs_points], [p[0] for p in local_obs_points], marker="o")# 绘制椭圆ellipse_x, ellipse_y = list(), list()for theta in np.linspace(-np.pi, np.pi, 1000):raw_point = np.array([np.cos(theta), np.sin(theta)])ellipse_point = np.dot(ellipse.C_, raw_point) + ellipse.d_ellipse_x.append(ellipse_point[0])ellipse_y.append(ellipse_point[1])plt.plot(ellipse_y, ellipse_x, color="orange")# 绘制最终多面体# 得到多面体顶点verticals = polygon.getVerticals()# 绘制多面体顶点plt.plot([v[1] for v in verticals] + [verticals[0][1]], [v[0] for v in verticals] + [verticals[0][0]], color="green")plt.show()return decomp_polygons# 构建初始多面体def initPolygon(self, pf: np.array, pr: np.array) -> Polygon:# 记录多面体的平面polygon_planes = list()# 得到线段方向向量dire = self.normalize(pr - pf)# 得到线段法向量dire_h = np.array([dire[1], -dire[0]])# 得到平行范围p_1 = pf + self.consider_range_ * dire_hp_2 = pf - self.consider_range_ * dire_hpolygon_planes.append(Hyperplane(dire_h, p_1))polygon_planes.append(Hyperplane(-dire_h, p_2))# 得到垂直范围p_3 = pr + self.consider_range_ * direp_4 = pf - self.consider_range_ * direpolygon_planes.append(Hyperplane(dire, p_3))polygon_planes.append(Hyperplane(-dire, p_4))# 构建多面体polygon = Polygon(polygon_planes)return polygon# 得到初始椭圆def findEllipse(self, pf: np.array, pr: np.array, obs_points: list[np.array]) -> Ellipse:# 计算长轴long_axis_value = np.linalg.norm(pr - pf) / 2axes = np.array([long_axis_value, long_axis_value])# 计算旋转rotation = self.vec2Rotation(pr - pf)# 计算初始椭圆C = np.dot(rotation, np.dot(np.array([[axes[0], 0], [0, axes[1]]]), np.transpose(rotation)))d = (pr + pf) / 2ellipse = Ellipse(C, d)# 得到椭圆内的障碍物点inside_obs_points = ellipse.insidePoints(obs_points)# 对椭圆进行调整,使得全部障碍物点都在椭圆外while inside_obs_points:# 得到与椭圆距离最近的点closest_obs_point = ellipse.closestPoint(inside_obs_points)# 将最近点转到椭圆坐标系下closest_obs_point = np.dot(np.transpose(rotation), closest_obs_point - ellipse.d_) # 根据最近点,在椭圆长轴不变的情况下对短轴进行改变,使得,障碍物点在椭圆上if Compare.small(closest_obs_point[0], axes[0]):axes[1] = np.abs(closest_obs_point[1]) / np.sqrt(1 - (closest_obs_point[0] / axes[0]) ** 2)# 更新椭圆ellipse.C_ = np.dot(rotation, np.dot(np.array([[axes[0], 0], [0, axes[1]]]), np.transpose(rotation)))# 更新椭圆内部障碍物inside_obs_points = ellipse.insidePoints(inside_obs_points, include_bound=False)return ellipse# 进行多面体的构建def findPolygon(self, ellipse: Ellipse, init_polygon: Polygon, obs_points: list[np.array]) -> Polygon:# 多面体由多个超平面构成polygon_planes = copy.deepcopy(init_polygon.hyper_planes_)# 初始化范围超平面remain_obs_points = obs_pointswhile remain_obs_points:# 得到与椭圆最近障碍物closest_point = ellipse.closestPoint(remain_obs_points)# 计算该处的切平面的法向量norm_vector = np.dot(np.linalg.inv(ellipse.C_), np.dot(np.linalg.inv(ellipse.C_), (closest_point - ellipse.d_)))norm_vector = self.normalize(norm_vector)# 构建平面hyper_plane = Hyperplane(norm_vector, closest_point)# 保存到多面体平面中polygon_planes.append(hyper_plane)# 去除切平面外部的障碍物new_remain_obs_points = list()for point in remain_obs_points:if Compare.small(hyper_plane.signDist(point), 0):new_remain_obs_points.append(point)remain_obs_points = new_remain_obs_pointspolygon = Polygon(polygon_planes)return polygon
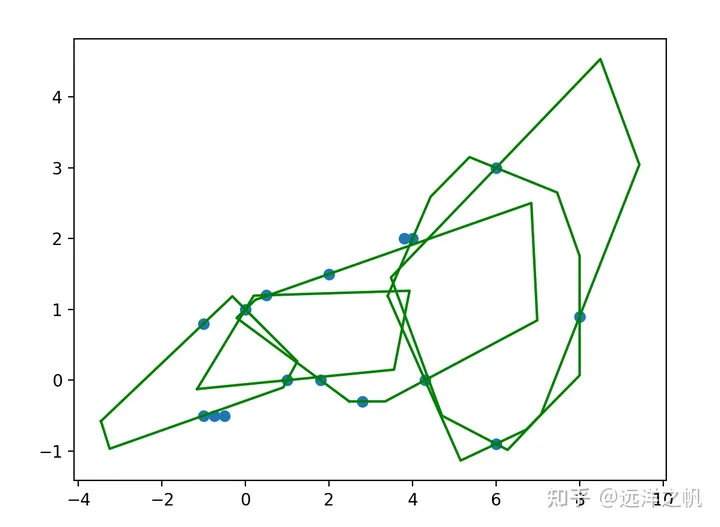
上面图是给定16个障碍物点,必经6个路径点后得到的凸包可行走廊,具体代码如下:
def main():# 路径点line_points = [np.array([-1.5, 0.0]), np.array([0.0, 0.8]), np.array([1.5, 0.3]), np.array([5, 0.6]), np.array([6, 1.2]), np.array([7.6, 2.2])]# 障碍物点obs_points = [np.array([4, 2.0]),np.array([6, 3.0]),np.array([2, 1.5]),np.array([0, 1]),np.array([1, 0]),np.array([1.8, 0]),np.array([3.8, 2]),np.array([0.5, 1.2]),np.array([4.3, 0]),np.array([8, 0.9]),np.array([2.8, -0.3]),np.array([6, -0.9]),np.array([-0.5, -0.5]),np.array([-0.75 ,-0.5]),np.array([-1, -0.5]),np.array([-1, 0.8])]convex_decomp = ConvexDecomp(2)decomp_polygons = convex_decomp.decomp(line_points, obs_points, False)#convex_decomp.decomp(line_points, obs_points,False)plt.figure()# 绘制障碍物点plt.scatter([p[0] for p in obs_points], [p[1] for p in obs_points], marker="o")# 绘制边界for polygon in decomp_polygons:verticals = polygon.getVerticals()# 绘制多面体顶点plt.plot([v[0] for v in verticals] + [verticals[0][0]], [v[1] for v in verticals] + [verticals[0][1]], color="green")#plt.plot(x_samples, y_samples)plt.show()
带凸包走廊求解
带凸包走廊的光滑轨迹生成。前面已经求解得到了可行的凸包走廊,这部分可以做为硬约束作为最优化求解的不等式条件。要求的光滑路径和必须经过点的点,这部分可以把必须经过点作为等式约束,光滑路径可以通过代价函数来实现。这样就可以把带软硬约束的轨迹生成框架各种技能点都用上了。
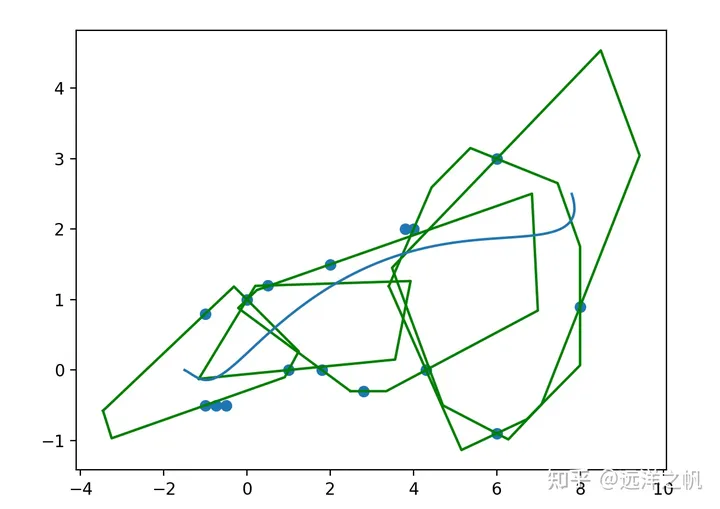
下面看具体代码实现:
# 进行优化def optimize(self, start_state: np.array, end_state: np.array, line_points: list[np.array], polygons: list[Polygon]):assert(len(line_points) == len(polygons) + 1)# 得到分段数量segment_num = len(polygons)assert(segment_num >= 1)# 计算初始时间分配time_allocations = list()for i in range(segment_num):time_allocations.append(np.linalg.norm(line_points[i+1] - line_points[i]) / self.vel_max_)# 进行优化迭代max_inter = 10cur_iter = 0while cur_iter <h2 id="span-小结-span"><span>小结:</span></h2><p>这篇文章介绍了带软硬约束的轨迹优化算法框架。第一部份介绍了软硬约束对应到最优求解问题数学上如何表示。第二部份介绍了贝赛尔曲线的代码实现,给出了具体的代码实现和讲解;并针对没有障碍物场景只给定waypoint点,生成光滑的Bezier轨迹的朴素求解代码实现。第三部份给出了带障碍物情况下如何做最优化求解,如何通过代价函数的方式来给轨迹施加推力让轨迹远离障碍物的代码实现。第四部分是一个综合性的例子,把软硬约束最优轨迹生成的求解框架做了一个综合呈现。详细的介绍了如何利用障碍物地图生成最大可行区域的凸包走廊,如何利用Bezier曲线的特性给定凸包两点生成路径一定在凸包中;以及如何利用代价行数来保证轨迹的光滑性、安全性,通过等式、不等式约束实现轨迹必须经过哪些点,某个点的运动状态如何。<br>这一系列的文章已经进入结尾的阶段,后面会简单介绍在碰到移动的物体时候单机器人如何处理;以及在多个机器人运行环境如何协同,最后会给出一个Motion Planning的综合实现例子讲解实际环境数据输入、前端规划、后端轨迹生成。至于定位和感知部分的内容后面可以根据情况而定是否在开一个新的系列来讲解介绍,对于更前沿的技术点会跟进论文做些文章分享。<br>最后本系列文章的代码在以下git链接,这部分代码相对零碎主要是配合文章理论来讲的,里面很多片段直接来源于网络整合。后面这可项目会持续维护,把项目代码(应该是c++实现,更体系)、整合进来,根据需要在看看有没必要整合出一个库。</p><p style="text-align:center;"><img src="/static/imghw/default1.png" data-src="https://img.php.cn/upload/article/000/887/227/170524425687764.jpg" class="lazy" alt="Trajektoriengenerierung unter weichen und harten Einschränkungen: detaillierte Erklärung von Theorie und Code"></p><p>原文链接:https://mp.weixin.qq.com/s/0EVgYKTxLzUj64L5jzMVug</p>
Das obige ist der detaillierte Inhalt vonTrajektoriengenerierung unter weichen und harten Einschränkungen: detaillierte Erklärung von Theorie und Code. Für weitere Informationen folgen Sie bitte anderen verwandten Artikeln auf der PHP chinesischen Website!

Heiße KI -Werkzeuge

Undresser.AI Undress
KI-gestützte App zum Erstellen realistischer Aktfotos

AI Clothes Remover
Online-KI-Tool zum Entfernen von Kleidung aus Fotos.

Undress AI Tool
Ausziehbilder kostenlos

Clothoff.io
KI-Kleiderentferner

Video Face Swap
Tauschen Sie Gesichter in jedem Video mühelos mit unserem völlig kostenlosen KI-Gesichtstausch-Tool aus!

Heißer Artikel

Heiße Werkzeuge

Notepad++7.3.1
Einfach zu bedienender und kostenloser Code-Editor

SublimeText3 chinesische Version
Chinesische Version, sehr einfach zu bedienen

Senden Sie Studio 13.0.1
Leistungsstarke integrierte PHP-Entwicklungsumgebung

Dreamweaver CS6
Visuelle Webentwicklungstools

SublimeText3 Mac-Version
Codebearbeitungssoftware auf Gottesniveau (SublimeText3)

Heiße Themen
 1392
1392
 52
52
 Warum ist Gaussian Splatting beim autonomen Fahren so beliebt, dass NeRF allmählich aufgegeben wird?
Jan 17, 2024 pm 02:57 PM
Oben geschrieben und persönliches Verständnis des Autors. Dreidimensionales Gaussplatting (3DGS) ist eine transformative Technologie, die in den letzten Jahren in den Bereichen explizite Strahlungsfelder und Computergrafik entstanden ist. Diese innovative Methode zeichnet sich durch die Verwendung von Millionen von 3D-Gaußkurven aus, was sich stark von der Neural Radiation Field (NeRF)-Methode unterscheidet, die hauptsächlich ein implizites koordinatenbasiertes Modell verwendet, um räumliche Koordinaten auf Pixelwerte abzubilden. Mit seiner expliziten Szenendarstellung und differenzierbaren Rendering-Algorithmen garantiert 3DGS nicht nur Echtzeit-Rendering-Fähigkeiten, sondern führt auch ein beispielloses Maß an Kontrolle und Szenenbearbeitung ein. Dies positioniert 3DGS als potenziellen Game-Changer für die 3D-Rekonstruktion und -Darstellung der nächsten Generation. Zu diesem Zweck geben wir erstmals einen systematischen Überblick über die neuesten Entwicklungen und Anliegen im Bereich 3DGS.
 Wie lässt sich das Long-Tail-Problem in autonomen Fahrszenarien lösen?
Jun 02, 2024 pm 02:44 PM
Gestern wurde ich während des Interviews gefragt, ob ich irgendwelche Long-Tail-Fragen gestellt hätte, also dachte ich, ich würde eine kurze Zusammenfassung geben. Das Long-Tail-Problem des autonomen Fahrens bezieht sich auf Randfälle bei autonomen Fahrzeugen, also mögliche Szenarien mit geringer Eintrittswahrscheinlichkeit. Das wahrgenommene Long-Tail-Problem ist einer der Hauptgründe, die derzeit den betrieblichen Designbereich intelligenter autonomer Einzelfahrzeugfahrzeuge einschränken. Die zugrunde liegende Architektur und die meisten technischen Probleme des autonomen Fahrens wurden gelöst, und die verbleibenden 5 % der Long-Tail-Probleme wurden nach und nach zum Schlüssel zur Einschränkung der Entwicklung des autonomen Fahrens. Zu diesen Problemen gehören eine Vielzahl fragmentierter Szenarien, Extremsituationen und unvorhersehbares menschliches Verhalten. Der „Long Tail“ von Randszenarien beim autonomen Fahren bezieht sich auf Randfälle in autonomen Fahrzeugen (AVs). Randfälle sind mögliche Szenarien mit geringer Eintrittswahrscheinlichkeit. diese seltenen Ereignisse
 Kamera oder Lidar wählen? Eine aktuelle Übersicht über die Erzielung einer robusten 3D-Objekterkennung
Jan 26, 2024 am 11:18 AM
0. Vorab geschrieben&& Persönliches Verständnis, dass autonome Fahrsysteme auf fortschrittlichen Wahrnehmungs-, Entscheidungs- und Steuerungstechnologien beruhen, indem sie verschiedene Sensoren (wie Kameras, Lidar, Radar usw.) verwenden, um die Umgebung wahrzunehmen, und Algorithmen und Modelle verwenden für Echtzeitanalysen und Entscheidungsfindung. Dies ermöglicht es Fahrzeugen, Verkehrszeichen zu erkennen, andere Fahrzeuge zu erkennen und zu verfolgen, das Verhalten von Fußgängern vorherzusagen usw. und sich so sicher an komplexe Verkehrsumgebungen anzupassen. Diese Technologie erregt derzeit große Aufmerksamkeit und gilt als wichtiger Entwicklungsbereich für die Zukunft des Transportwesens . eins. Aber was autonomes Fahren schwierig macht, ist herauszufinden, wie man dem Auto klarmachen kann, was um es herum passiert. Dies erfordert, dass der dreidimensionale Objekterkennungsalgorithmus im autonomen Fahrsystem Objekte in der Umgebung, einschließlich ihrer Standorte, genau wahrnehmen und beschreiben kann.
 Das Stable Diffusion 3-Papier wird endlich veröffentlicht und die architektonischen Details werden enthüllt. Wird es helfen, Sora zu reproduzieren?
Mar 06, 2024 pm 05:34 PM
Der Artikel von StableDiffusion3 ist endlich da! Dieses Modell wurde vor zwei Wochen veröffentlicht und verwendet die gleiche DiT-Architektur (DiffusionTransformer) wie Sora. Nach seiner Veröffentlichung sorgte es für großes Aufsehen. Im Vergleich zur Vorgängerversion wurde die Qualität der von StableDiffusion3 generierten Bilder erheblich verbessert. Es unterstützt jetzt Eingabeaufforderungen mit mehreren Themen, und der Textschreibeffekt wurde ebenfalls verbessert, und es werden keine verstümmelten Zeichen mehr angezeigt. StabilityAI wies darauf hin, dass es sich bei StableDiffusion3 um eine Reihe von Modellen mit Parametergrößen von 800 M bis 8 B handelt. Durch diesen Parameterbereich kann das Modell direkt auf vielen tragbaren Geräten ausgeführt werden, wodurch der Einsatz von KI deutlich reduziert wird
 Dieser Artikel reicht aus, um etwas über autonomes Fahren und Flugbahnvorhersage zu lesen!
Feb 28, 2024 pm 07:20 PM
Die Trajektorienvorhersage spielt eine wichtige Rolle beim autonomen Fahren. Unter autonomer Fahrtrajektorienvorhersage versteht man die Vorhersage der zukünftigen Fahrtrajektorie des Fahrzeugs durch die Analyse verschiedener Daten während des Fahrvorgangs. Als Kernmodul des autonomen Fahrens ist die Qualität der Trajektorienvorhersage von entscheidender Bedeutung für die nachgelagerte Planungssteuerung. Die Trajektorienvorhersageaufgabe verfügt über einen umfangreichen Technologie-Stack und erfordert Vertrautheit mit der dynamischen/statischen Wahrnehmung des autonomen Fahrens, hochpräzisen Karten, Fahrspurlinien, Fähigkeiten in der neuronalen Netzwerkarchitektur (CNN&GNN&Transformer) usw. Der Einstieg ist sehr schwierig! Viele Fans hoffen, so schnell wie möglich mit der Flugbahnvorhersage beginnen zu können und Fallstricke zu vermeiden. Heute werde ich eine Bestandsaufnahme einiger häufiger Probleme und einführender Lernmethoden für die Flugbahnvorhersage machen! Einführungsbezogenes Wissen 1. Sind die Vorschaupapiere in Ordnung? A: Schauen Sie sich zuerst die Umfrage an, S
 Sprechen wir über End-to-End- und autonome Fahrsysteme der nächsten Generation sowie über einige Missverständnisse über End-to-End-Autonomes Fahren?
Apr 15, 2024 pm 04:13 PM
Im vergangenen Monat hatte ich aus bekannten Gründen einen sehr intensiven Austausch mit verschiedenen Lehrern und Mitschülern der Branche. Ein unvermeidliches Thema im Austausch ist natürlich End-to-End und der beliebte Tesla FSDV12. Ich möchte diese Gelegenheit nutzen, einige meiner aktuellen Gedanken und Meinungen als Referenz und Diskussion darzulegen. Wie definiert man ein durchgängiges autonomes Fahrsystem und welche Probleme sollten voraussichtlich durchgängig gelöst werden? Gemäß der traditionellsten Definition bezieht sich ein End-to-End-System auf ein System, das Rohinformationen von Sensoren eingibt und für die Aufgabe relevante Variablen direkt ausgibt. Bei der Bilderkennung kann CNN beispielsweise als End-to-End bezeichnet werden, verglichen mit der herkömmlichen Methode zum Extrahieren von Merkmalen + Klassifizieren. Bei autonomen Fahraufgaben werden Eingabedaten verschiedener Sensoren (Kamera/LiDAR) benötigt
 SIMPL: Ein einfacher und effizienter Multi-Agent-Benchmark zur Bewegungsvorhersage für autonomes Fahren
Feb 20, 2024 am 11:48 AM
Originaltitel: SIMPL: ASimpleandEfficientMulti-agentMotionPredictionBaselineforAutonomousDriving Paper-Link: https://arxiv.org/pdf/2402.02519.pdf Code-Link: https://github.com/HKUST-Aerial-Robotics/SIMPL Autor: Hong Kong University of Science und Technologie DJI-Papieridee: Dieses Papier schlägt eine einfache und effiziente Bewegungsvorhersagebasislinie (SIMPL) für autonome Fahrzeuge vor. Im Vergleich zum herkömmlichen Agent-Cent
 FisheyeDetNet: der erste Zielerkennungsalgorithmus basierend auf einer Fischaugenkamera
Apr 26, 2024 am 11:37 AM
Die Zielerkennung ist ein relativ ausgereiftes Problem in autonomen Fahrsystemen, wobei die Fußgängererkennung einer der ersten Algorithmen ist, die eingesetzt werden. In den meisten Arbeiten wurde eine sehr umfassende Recherche durchgeführt. Die Entfernungswahrnehmung mithilfe von Fischaugenkameras für die Rundumsicht ist jedoch relativ wenig untersucht. Aufgrund der großen radialen Verzerrung ist es schwierig, die standardmäßige Bounding-Box-Darstellung in Fischaugenkameras zu implementieren. Um die obige Beschreibung zu vereinfachen, untersuchen wir erweiterte Begrenzungsrahmen-, Ellipsen- und allgemeine Polygondesigns in Polar-/Winkeldarstellungen und definieren eine mIOU-Metrik für die Instanzsegmentierung, um diese Darstellungen zu analysieren. Das vorgeschlagene Modell „fisheyeDetNet“ mit polygonaler Form übertrifft andere Modelle und erreicht gleichzeitig 49,5 % mAP auf dem Valeo-Fisheye-Kameradatensatz für autonomes Fahren


