Photoshop设计绘制出彩色相机镜头
最终效果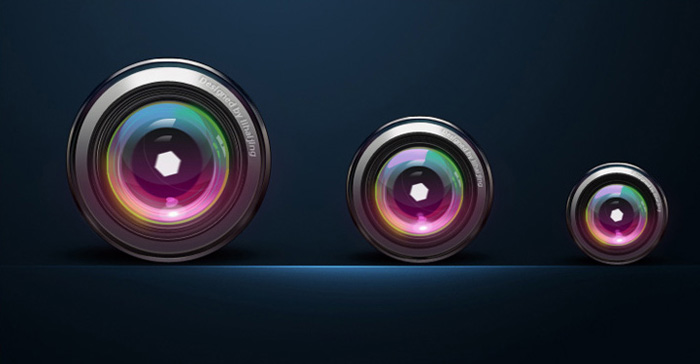
1、首先画镜头的大致形状,用椭圆工具按住Shift键画一个正圆,加上渐变及描边,如下图。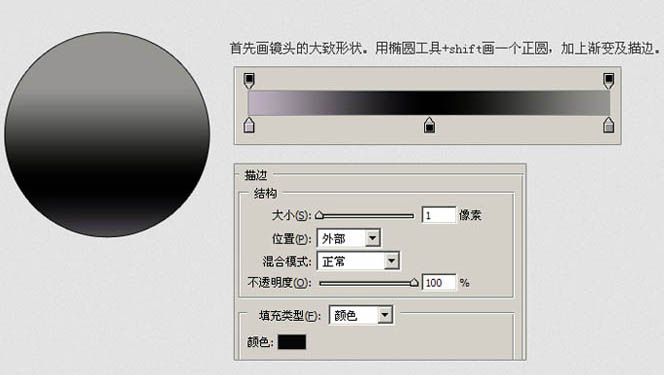
2、在底部的圆上叠加一个圆,平铺上:#000719色值。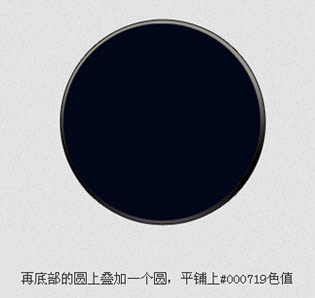
3、再画一个圆并缩小一个像素,叠在上层(这层的渐变是为了配合光影的方向)。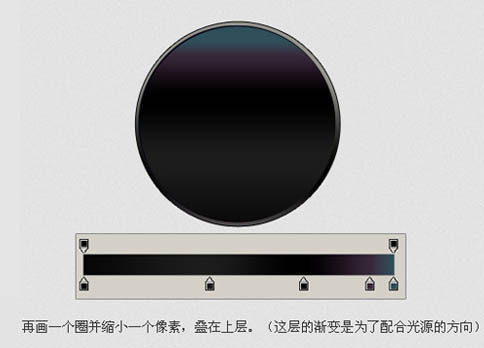
4、接下来画个圆,缩小4像素左右,叠在最上层,加上渐变及23%的透明度。
5、叠加圆,并添加渐变(叠加向上移一个像素,以确保露出上一层的边缘)。 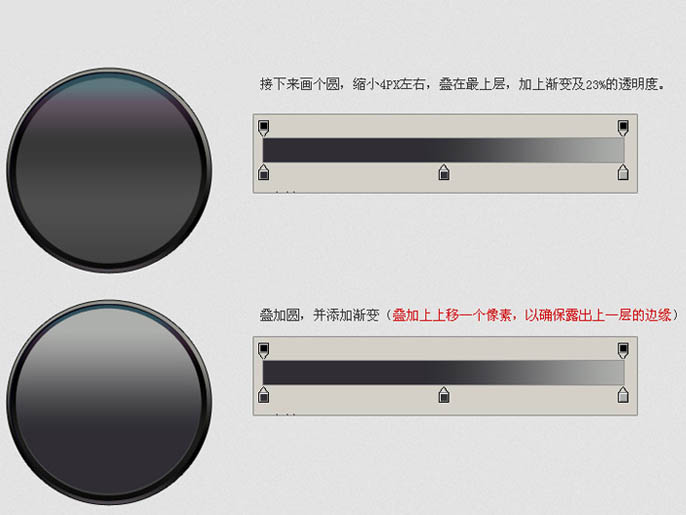
6、现在基本的形已经出来了,接下来就是画中间伸缩部分,加上渐变的同时加上3像素描边。
7、画伸缩镜头时,只要复制一个圆,缩小1像素叠加,当然有几个圆的距离可以空2 - 3 像素,复制8个小圆左右就可以了。 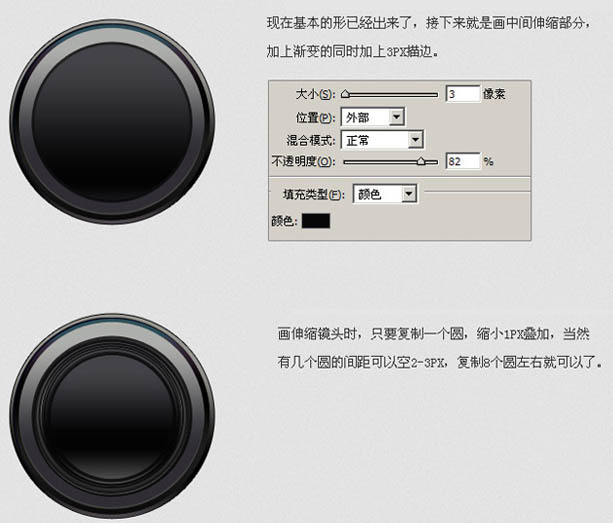
8、下面就是画彩色的镜头区了,最上层叠加一个渐变的圆。然后逐层再叠加不同颜色的圆,最中心的用黑色,过程如下图。 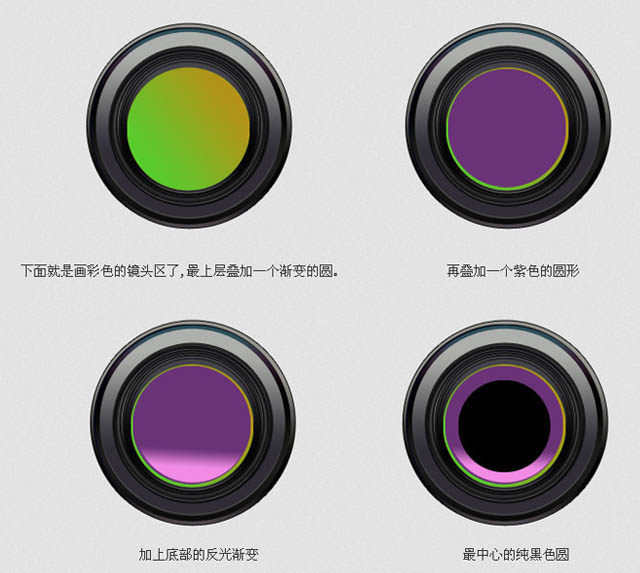
9、中心步骤分解。 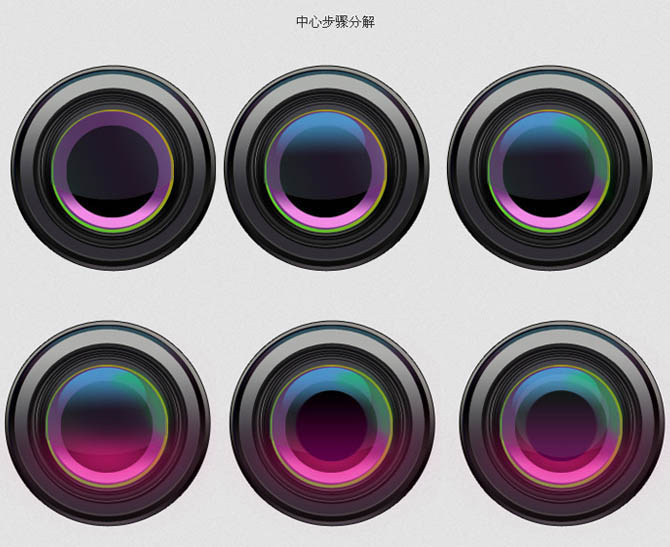
10、大致的形已经完成了,下面就是添加高光了。 
11、顶部、中间、底部分别加上高光,过程如下图。 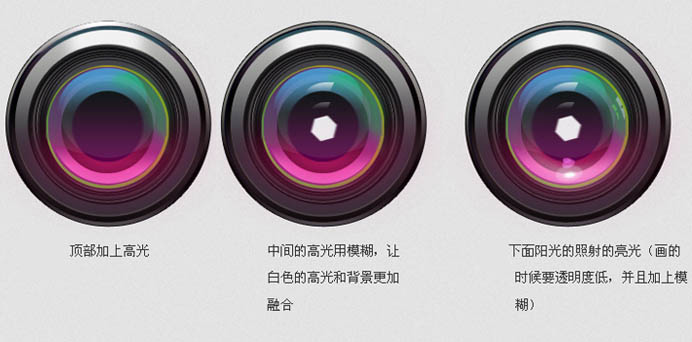
12、最后在中间加上一个细圆,如下图。 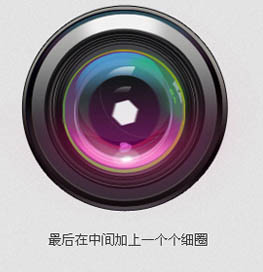
再加上背景,完成最终效果。 

Heiße KI -Werkzeuge

Undresser.AI Undress
KI-gestützte App zum Erstellen realistischer Aktfotos

AI Clothes Remover
Online-KI-Tool zum Entfernen von Kleidung aus Fotos.

Undress AI Tool
Ausziehbilder kostenlos

Clothoff.io
KI-Kleiderentferner

AI Hentai Generator
Erstellen Sie kostenlos Ai Hentai.

Heißer Artikel

Heiße Werkzeuge

Notepad++7.3.1
Einfach zu bedienender und kostenloser Code-Editor

SublimeText3 chinesische Version
Chinesische Version, sehr einfach zu bedienen

Senden Sie Studio 13.0.1
Leistungsstarke integrierte PHP-Entwicklungsumgebung

Dreamweaver CS6
Visuelle Webentwicklungstools

SublimeText3 Mac-Version
Codebearbeitungssoftware auf Gottesniveau (SublimeText3)

Heiße Themen
 1375
1375
 52
52
 Was macht die zweite Kamera beim iPhone 11?
May 25, 2023 am 10:18 AM
Was ist die zweite Kamera beim iPhone 11? Das iPhone 11 verfügt über zwei Kameras auf der Rückseite, die in einem quadratischen Modul untergebracht sind – ein primäres 12-MP-Objektiv mit einer Brennweite von 26 mm und einer Blende von f/1,8 und einen sekundären 12-MP-Sensor mit einer Brennweite von 13 mm und einer Blende von f/2,4; Für den Uneingeweihten: Das Hauptobjektiv ist eine Weitwinkelkamera und das Sekundärobjektiv ist eine Ultraweitwinkelkamera. Auf dem Papier ist die Ultraweitwinkelkamera des iPhone 11 identisch mit der des neuesten iPhone 13. Obwohl Apple behauptet, dass die Ultra-Wide-Kamera das Vierfache der Hauptkamera aufnehmen kann, ändert sich die Vergrößerung nur von 1x auf 0,5x. Diese zweite Kamera kann z.B. verwendet werden
 iOS 17: So sperren Sie den Weißabgleich in der Kamera-App auf dem iPhone
Sep 20, 2023 am 08:41 AM
Der Weißabgleich ist eine Kamerafunktion, die die Farbwiedergabe an die Lichtverhältnisse anpasst. Diese iPhone-Einstellung sorgt dafür, dass weiße Objekte in Fotos oder Videos weiß erscheinen und gleicht Farbveränderungen aufgrund typischer Beleuchtung aus. Sie können es sperren, wenn Sie Ihren Weißabgleich während der gesamten Videoaufnahme konstant halten möchten. Hier erfahren Sie, wie Sie einen festen Weißabgleich für iPhone-Videos beibehalten. So sperren Sie den Weißabgleich auf dem iPhone. Erforderlich: iOS17-Update. (Überprüfen Sie „Einstellungen“ > „Allgemein“ > „Softwareaktualisierung“). Öffnen Sie die Einstellungen-App auf Ihrem iPhone. Scrollen Sie in den Einstellungen nach unten und wählen Sie Kamera aus. Tippen Sie auf dem Kamerabildschirm auf „Video aufnehmen“. Hier
 Wie aktiviere ich die Douyin-Kameraberechtigung? Was soll ich tun, wenn der Bildschirm der TikTok-Kamera schwarz ist?
Mar 22, 2024 am 10:42 AM
Als eine der beliebtesten Kurzvideoplattformen der Welt ermöglicht Douyin vielen Nutzern, hier ihr Leben aufzuzeichnen und ihre Talente zu präsentieren. Wenn wir Douyin zum Aufnehmen von Werken verwenden, müssen wir Kameraberechtigungen aktivieren, um eine normale Nutzung der Aufnahmefunktion von Douyin sicherzustellen. Wie öffnet man also die Erlaubnis zur Douyin-Kamera? In diesem Artikel wird ausführlich beschrieben, wie Sie die Berechtigungen der Douyin-Kamera öffnen und das Problem mit dem schwarzen Bildschirm lösen, das beim Öffnen der Douyin-Kamera auftritt. 1. Wie aktiviere ich die Douyin-Kameraberechtigung? 1. Öffnen Sie die Telefoneinstellungen und suchen Sie die Option „Datenschutz“ oder „Berechtigungsverwaltung“. 2. Suchen Sie in den Datenschutzeinstellungen nach „App-Berechtigungen“ oder „App-Verwaltung“. 3. Suchen Sie die Douyin-App und klicken Sie, um die Berechtigungseinstellungsoberfläche von Douyin aufzurufen. 4. Suchen Sie in der Berechtigungseinstellungsoberfläche nach der Berechtigung „Kamera“ und stellen Sie sicher, dass sie aktiviert ist. 5. Bei Bedarf können Sie auch
 So legen Sie das Wasserzeichen für die Apple-Kamera fest
Feb 25, 2024 pm 04:37 PM
Wie stelle ich ein Wasserzeichen für die Apple-Kamera ein? Sie können auch ein exklusives Wasserzeichen verwenden, wenn Sie mit der Kamera eines Apple-Telefons fotografieren. Die meisten Benutzer wissen jedoch nicht, wie das Wasserzeichen für die Kamera festgelegt wird Um das Apple-Kamera-Wasserzeichen zu setzen, kommen interessierte Benutzer vorbei! Apple-Handy-Tutorial: So stellen Sie das Apple-Kamera-Wasserzeichen ein 1. Öffnen Sie zunächst den Verknüpfungsbefehl im Apple-Handy und wählen Sie das Symbol [iPhone-Kamera-Wasserzeichen] in der unteren linken Ecke aus. 2. Springen Sie dann zum Album, um das Foto auszuwählen das mit einem Wasserzeichen hinzugefügt werden muss, und klicken Sie auf das Symbol [iPhone-Kamera-Wasserzeichen] in der oberen rechten Ecke. 3. Wählen Sie dann das gewünschte Apple-Telefonmodell aus Wählen Sie einen Wasserzeichenstil, um die Einstellung abzuschließen.
 Wie deaktiviere ich das Kamerasymbol auf dem iPhone-Sperrbildschirm?
Apr 26, 2023 pm 03:43 PM
Haben Sie es jemals als äußerst nervig empfunden, dass jemand die Kamera-App einfach über den Sperrbildschirm Ihres iPhones öffnen kann? Ja, viele iPhone-Benutzer haben ihre Frustration über dieses Problem zum Ausdruck gebracht. Das Hauptproblem besteht darin, dass Sie die Kamera-App sogar öffnen können, ohne Ihr iPhone zu entsperren, und das Album durchsuchen können, das alle Fotos enthält, die Sie mit der Kamera Ihres iPhones aufgenommen haben. Nachdem wir einige Nachforschungen zu diesem Problem angestellt hatten, haben wir in diesem Artikel unten eine Lösung gefunden, um das Kamera-App-Symbol auf dem Sperrbildschirm zu deaktivieren, damit niemand die Kamera-App öffnen kann. So entfernen Sie das Kamerasymbol vom iPhone-Sperrbildschirm Schritt 1: Öffnen Sie die Seite „Einstellungen“ auf Ihrem iPhone, indem Sie auf dem Startbildschirm auf das Symbol „Einstellungen“ tippen, wie im Screenshot unten gezeigt
 Kamera des iPhone 14 Pro: Erste Schritte und 11 wichtige Tipps
May 06, 2023 pm 09:25 PM
Die Kamera des iPhone 14 Pro verfügt mit einer großen 48-MP-Einheit über den bislang größten Sensor eines iPhones. Wenn Sie kürzlich ein neues iPhone 14 Pro gekauft haben und die Kamera Ihres Telefons optimal nutzen möchten, finden Sie hier, was Sie wissen müssen, um loszulegen und einige grundlegende Tipps zu erhalten. Das iPhone steht seit langem an der Spitze der Smartphone-Fotografie, was zum Teil seinem hervorragenden Kamerasensor und zum Teil der Art und Weise zu verdanken ist, wie die Bilder hinter den Kulissen verarbeitet werden. Apple hat hart daran gearbeitet, die Bildaufnahmefunktionen von iPhones zu verbessern, und die neue iPhone14-Serie ist mit einer neuen Photonic-Engine ausgestattet. Darüber hinaus die einzigartigen Bilder des iPhone14Pro
 Diesmal ist Xiaomis Waffe auf Polaroid gerichtet
Jul 24, 2024 pm 12:10 PM
Am 19. Juli veranstaltete Xiaomi in Peking eine Konferenz zur Einführung neuer Produkte. Bei dem Treffen sprach Lei Jun nicht nur über seine Reise beim Bau eines Autos, sondern brachte auch eine Reihe neuer Blockbuster-Produkte wie XiaomiMIX Flip, XiaomiMIX Fold4 und Xiaomi Band mit 9 und Redmi K70 Extreme Edition. In Xiaoleis Erwartung ist Xiaomi MIX Flip als Xiaomis erstes kleines Faltdisplay-Handy ein Ereignis mit hoher Wahrscheinlichkeit, das viel Aufmerksamkeit erregt. Unerwarteterweise wurde als erstes das Accessoire populär, das gleichzeitig mit MIXFlip auf den Markt kam – das tragbare Kameraset MIXFlip, das den Eindruck vermittelt, „den Himmel umzukehren“. In letzter Zeit sind die sozialen Plattformen mit zahlreichen Beiträgen rund um Xiaomi Polaroid gefüllt. Wenn Sie dem digitalen Kreis nicht folgen, fragen Sie sich vielleicht: Wann wird Xiaomi auch damit beginnen?
 So aktivieren Sie das Kamera-Wasserzeichen auf dem iPhone 14
Feb 25, 2024 pm 04:46 PM
Wie schalte ich das Wasserzeichen der iPhone 14-Kamera ein? Mit dem iPhone 14 können Sie den aufgenommenen Fotos Wasserzeichen hinzufügen, aber die meisten Benutzer wissen nicht, wo sie das Wasserzeichen der iPhone 14-Kamera aktivieren sollen Schalten Sie das Wasserzeichen der iPhone 14-Kamera ein. Tutorial zur Verwendung von Apple-Mobiltelefonen So aktivieren Sie das Kamera-Wasserzeichen des iPhone 14 1. Öffnen Sie zunächst die Suchmaschine, geben Sie den Befehl „Verknüpfung“ ein und klicken Sie auf die Funktion „Wasserzeichen der iPhone-Kamera“, wie im Bild unten gezeigt. 2. Geben Sie dann das ein Verknüpfungsbefehlsseite und klicken Sie auf [Wie durch den Pfeil im Bild unten angezeigt] Verknüpfungen abrufen] 3. Springen Sie dann zur neuesten Seite und klicken Sie auf den roten Rand unten. 4. Klicken Sie dann auf der Verknüpfungstoolseite auf [i


