
 Web Front-end
JS Tutorial
Creating a full record of tank battles with javascript (1)_javascript skills
Web Front-end
JS Tutorial
Creating a full record of tank battles with javascript (1)_javascript skills
Creating a full record of tank battles with javascript (1)_javascript skills

PS: This tank battle was rewritten by myself after downloading a piece of source code online. There is nothing too difficult in itself. This case uses js object-oriented better and can be used as an introductory tutorial for js object-oriented.
1. Create basic objects to realize simple movement of tanks
1.1 How to draw canvas in the map?
Taking into account the issue of browser compatibility, we use the method of operating dom to realize the drawing and refreshing of game objects. How do we store our map? We should save the map in a two-dimensional array. There is no two-dimensional array in js, but it can be achieved by storing the array in a one-dimensional array.
1.2 Code Implementation
We design the canvas as a two-dimensional array of 13 * 13. The corresponding length and width of each element in the map are both 40px. The entire map can be regarded as a cell composed of 40px*40p x size. table, then the size of our entire canvas is 520px * 520px;
Before loading the code, let me give you an object relationship diagram:
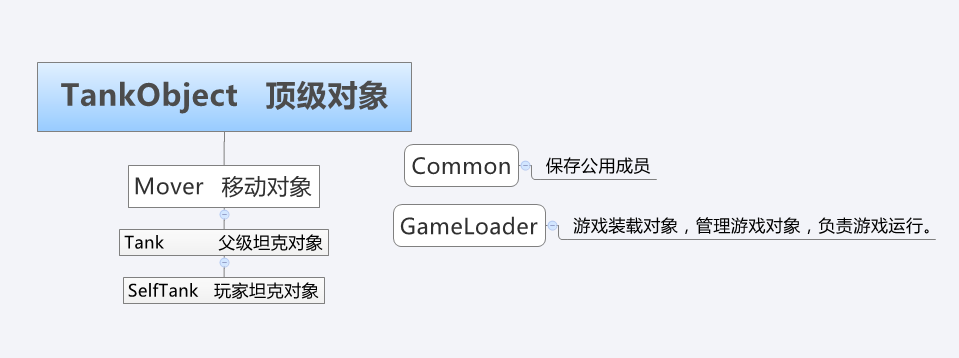
1.2.1 Create top-level objects
html code:
<script><br> window.onload = function () {<br> // Call the game loading object <br> var loader = new GameLoader();<br> Loader.Begin();<br> }<br> </script>
TankObject.js file:
// Top-level object
TankObject = function () {
This.XPosition = 0; // The X position of the object in the map (13*13)
This.YPosition = 0;
This.UI = null; // dom element
}
//Change UI static method
TankObject.prototype.UpdateUI = function (battlFiled) { }
//Set the position, the parameters are as follows: 1*40,6*40
TankObject.prototype.SetPosition = function (leftPosition, topPosition) {
// Math.round at the map location
This.XPosition = Math.round(leftPosition / 40);
This.YPosition = Math.round(topPosition / 40);
//Set the position on the form
If (this.UI != null && this.UI.style != null) {
This.UI.style.left = leftPosition "px";
This.UI.style.top = topPosition "px";
}
}
Here we use X, Y coordinates to represent the location of the object on the map. Later we will put each object in the map into a two-dimensional array. At this time, we can obtain the corresponding object through the X and Y coordinates.
Then use left and top in css to control the position of our object in the form. (movable objects: tanks, bullets)
1.2.2 Create public objects
We also need to create a public object to write some of our commonly used methods.
Common.js:
//Four directions of tank movement
var EnumDirection = {
Up: "0",
Right: "1",
Down: "2",
Left: "3"
};
//General method object
var UtilityClass = {
//Create dom element into parentNode, you can specify id, className
CreateE: function (type, id, className, parentNode) {
var J = document.createElement(type);
If (id) { J.id = id };
If (className) { J.className = className };
return parentNode.appendChild(J);
}, // Remove element
RemoveE: function (obj, parentNode) {
parentNode.removeChild(obj);
},
GetFunctionName: function (context, argumentCallee) {
for (var i in context) {
If (context[i] == argumentCallee) { return i };
}
return "";
}, // Bind the event and return the func method, this is the incoming obj
BindFunction: function (obj,func) {
return function () {
func.apply(obj, arguments);
};
}
};
1.2.3 Creating moving objects
Mover.js
//Move object, inherited from top-level object
Mover = function () {
This.Direction = EnumDirection.Up;
This.Speed = 1;
}
Mover.prototype = new TankObject();
Mover.prototype.Move = function () {
If (this.lock) {
return;/* Deactivated or still in progress, the operation is invalid */
}
//Set the background image of the tank according to the direction
This.UI.style.backgroundPosition = "0 -" this.Direction * 40 "px";
// If the direction is up and down, vp is top; if the direction is up and left, val is -1
var vp = ["top", "left"][((this.Direction == EnumDirection.Up) || (this.Direction == EnumDirection.Down)) ? 0 : 1];
var val = ((this.Direction == EnumDirection.Up) || (this.Direction == EnumDirection.Left)) ? -1 : 1;
This.lock = true;/* Lock */
//Save the current object to This
var This = this;
//Record the starting position of object movement
var startmoveP = parseInt(This.UI.style[vp]);
var xp = This.XPosition, yp = This.YPosition;
var subMove = setInterval(function () {
// Start moving, 5px each time
This.UI.style[vp] = parseInt(This.UI.style[vp]) 5 * val "px";
// Move one cell at a time 40px
If (Math.abs((parseInt(This.UI.style[vp]) - startmoveP)) >= 40) {
clearInterval(subMove);
This.lock = false;/* Unlock, allow stepping again */
// Record the position of the object in the table after moving
This.XPosition = Math.round(This.UI.offsetLeft / 40);
This.YPosition = Math.round(This.UI.offsetTop / 40);
}
}, 80 - this.Speed * 10);
}
The move object here inherits from our top-level object, and this here represents the object that calls the Move method.
The function of Move object moves according to the direction and speed of the object. Each time it moves 5px, it moves a total of 40px one cell. This object will be expanded later, and functions such as collision detection will be added.
1.2.4 Create tank object
Tank.js file:
//tank object inherited from Mover
Tank=function(){}
Tank.prototype = new Mover();
//Create a player tank, inherited from the tank object
SelfTank = function () {
This.UI = UtilityClass.CreateE("div", "", "itank", document.getElementById("divMap"));
This.MovingState = false;
This.Speed = 4;
}
SelfTank.prototype = new Tank();
//Set the tank's position
SelfTank.prototype.UpdateUI = function () {
This.UI.className = "itank";
// Top-level object method, set the position of the tank
This.SetPosition(this.XPosition * 40, this.YPosition * 40);
}
Now only player tanks have been created, and we will add enemy tanks to them later.
1.2.5 Create game loading object (core)
// Game loading object The core object of the entire game
GameLoader = function () {
This.mapContainer = document.getElementById("divMap"); // The div
that stores the game map This._selfTank = null; // Player tank
This._gameListener = null; // Game main loop timer id
}
GameLoader.prototype = {
Begin: function () {
// Initialize player tank
var selfT = new SelfTank();
selfT.XPosition = 4;
selfT.YPosition = 12;
selfT.UpdateUI();
This._selfTank = selfT;
// Add key event
var wrapper = UtilityClass.BindFunction(this, this.OnKeyDown);
window.onkeydown = document.body.onkeydown = warpper;
warpper = UtilityClass.BindFunction(this, this.OnKeyUp);
window.onkeyup = document.body.onkeyup = warpper;
// Game main loop
warpper = UtilityClass.BindFunction(this, this.Run);
/*Long timer monitoring control key*/
This._gameListener = setInterval(warpper, 20);
}
// Press the keyboard and the player tank starts moving
, OnKeyDown: function (e) {
switch ((window.event || e).keyCode) {
case 37:
This._selfTank.Direction = EnumDirection.Left;
This._selfTank.MovingState = true;
break; case 38:
This._selfTank.Direction = EnumDirection.Up;
This._selfTank.MovingState = true;
break; case 39:
This._selfTank.Direction = EnumDirection.Right;
This._selfTank.MovingState = true;
break; case 40:
This._selfTank.Direction = EnumDirection.Down;
This._selfTank.MovingState = true;
break; }
}
// The button pops up to stop moving
, OnKeyUp: function (e) {
switch ((window.event || e).keyCode) {
case 37:
case 38:
case 39:
case 40:
This._selfTank.MovingState = false;
break;
}
}
/*Game main loop running function, the heart and hub of the game*/
, Run: function () {
If (this._selfTank.MovingState) {
This._selfTank.Move();
}
}
};
The game loading object code seems to be a lot, but it actually does two things:
1. Create a player tank object.
2. Add a key listening event. When the player presses the movement key, the tank Move method is called to move the tank.
Summary: At this point our tank can move freely by pressing buttons. Next we need to improve the map and collision detection.

Hot AI Tools

Undresser.AI Undress
AI-powered app for creating realistic nude photos

AI Clothes Remover
Online AI tool for removing clothes from photos.

Undress AI Tool
Undress images for free

Clothoff.io
AI clothes remover

AI Hentai Generator
Generate AI Hentai for free.

Hot Article
Hot Tools

Notepad++7.3.1
Easy-to-use and free code editor

SublimeText3 Chinese version
Chinese version, very easy to use

Zend Studio 13.0.1
Powerful PHP integrated development environment

Dreamweaver CS6
Visual web development tools

SublimeText3 Mac version
God-level code editing software (SublimeText3)
Hot Topics
 1385
1385
 52
52

 Simple JavaScript Tutorial: How to Get HTTP Status Code
Jan 05, 2024 pm 06:08 PM
Simple JavaScript Tutorial: How to Get HTTP Status Code
Jan 05, 2024 pm 06:08 PM
JavaScript tutorial: How to get HTTP status code, specific code examples are required. Preface: In web development, data interaction with the server is often involved. When communicating with the server, we often need to obtain the returned HTTP status code to determine whether the operation is successful, and perform corresponding processing based on different status codes. This article will teach you how to use JavaScript to obtain HTTP status codes and provide some practical code examples. Using XMLHttpRequest
 Explore object-oriented programming in Go
Apr 04, 2024 am 10:39 AM
Explore object-oriented programming in Go
Apr 04, 2024 am 10:39 AM
Go language supports object-oriented programming through type definition and method association. It does not support traditional inheritance, but is implemented through composition. Interfaces provide consistency between types and allow abstract methods to be defined. Practical cases show how to use OOP to manage customer information, including creating, obtaining, updating and deleting customer operations.
 Analysis of object-oriented features of Go language
Apr 04, 2024 am 11:18 AM
Analysis of object-oriented features of Go language
Apr 04, 2024 am 11:18 AM
The Go language supports object-oriented programming, defining objects through structs, defining methods using pointer receivers, and implementing polymorphism through interfaces. The object-oriented features provide code reuse, maintainability and encapsulation in the Go language, but there are also limitations such as the lack of traditional concepts of classes and inheritance and method signature casts.
 PHP Advanced Features: Best Practices in Object-Oriented Programming
Jun 05, 2024 pm 09:39 PM
PHP Advanced Features: Best Practices in Object-Oriented Programming
Jun 05, 2024 pm 09:39 PM
OOP best practices in PHP include naming conventions, interfaces and abstract classes, inheritance and polymorphism, and dependency injection. Practical cases include: using warehouse mode to manage data and using strategy mode to implement sorting.
 Are there any class-like object-oriented features in Golang?
Mar 19, 2024 pm 02:51 PM
Are there any class-like object-oriented features in Golang?
Mar 19, 2024 pm 02:51 PM
There is no concept of a class in the traditional sense in Golang (Go language), but it provides a data type called a structure, through which object-oriented features similar to classes can be achieved. In this article, we'll explain how to use structures to implement object-oriented features and provide concrete code examples. Definition and use of structures First, let's take a look at the definition and use of structures. In Golang, structures can be defined through the type keyword and then used where needed. Structures can contain attributes
 How to get HTTP status code in JavaScript the easy way
Jan 05, 2024 pm 01:37 PM
How to get HTTP status code in JavaScript the easy way
Jan 05, 2024 pm 01:37 PM
Introduction to the method of obtaining HTTP status code in JavaScript: In front-end development, we often need to deal with the interaction with the back-end interface, and HTTP status code is a very important part of it. Understanding and obtaining HTTP status codes helps us better handle the data returned by the interface. This article will introduce how to use JavaScript to obtain HTTP status codes and provide specific code examples. 1. What is HTTP status code? HTTP status code means that when the browser initiates a request to the server, the service
 In-depth understanding of PHP object-oriented programming: Debugging techniques for object-oriented programming
Jun 05, 2024 pm 08:50 PM
In-depth understanding of PHP object-oriented programming: Debugging techniques for object-oriented programming
Jun 05, 2024 pm 08:50 PM
By mastering tracking object status, setting breakpoints, tracking exceptions and utilizing the xdebug extension, you can effectively debug PHP object-oriented programming code. 1. Track object status: Use var_dump() and print_r() to view object attributes and method values. 2. Set a breakpoint: Set a breakpoint in the development environment, and the debugger will pause when execution reaches the breakpoint, making it easier to check the object status. 3. Trace exceptions: Use try-catch blocks and getTraceAsString() to get the stack trace and message when the exception occurs. 4. Use the debugger: The xdebug_var_dump() function can inspect the contents of variables during code execution.
 JavaScript and WebSocket: Building an efficient real-time search engine
Dec 17, 2023 pm 10:13 PM
JavaScript and WebSocket: Building an efficient real-time search engine
Dec 17, 2023 pm 10:13 PM
JavaScript and WebSocket: Building an efficient real-time search engine Introduction: With the development of the Internet, users have higher and higher requirements for real-time search engines. When searching with traditional search engines, users need to click the search button to get results. This method cannot meet users' needs for real-time search results. Therefore, using JavaScript and WebSocket technology to implement real-time search engines has become a hot topic. This article will introduce in detail the use of JavaScript
