

Some people say that front-end developers who don’t know SVG are not called developers, but called enthusiasts. The front-end is not just Angularjs, it will be too late if you don’t learn SVG at this time! (If you only know jQuery, just pretend I didn’t say it...) Here I will share with you a high-end SVG effect that I saw elsewhere a few days ago. The menu on the left will pop up and say something. Click here for the link. .
I was shocked at the time. I took the time to find out the source code today, and here is the demo I made after painstaking research. Although it is rough, it still feels very foreign. Let me share with you this DEMO.
http://jsfiddle.net/windwhinny/n6w1ur5k/3/
This case requires some knowledge of paths in PS or AI. The following are the knowledge points and tools involved in this case:
snap.svg
svg path data
Adobe Illustrator
animation timing
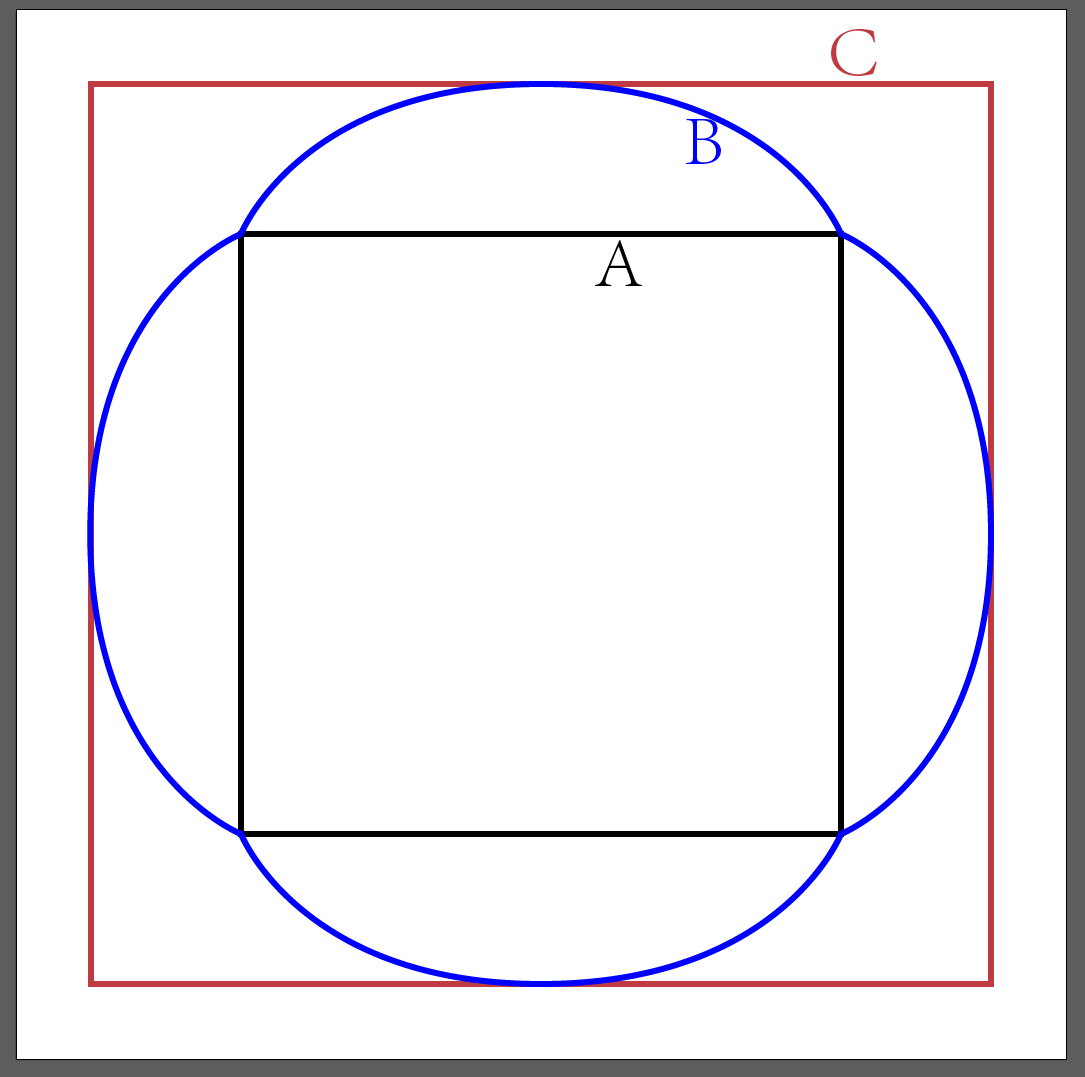
First give the principle: transform coordinates according to time. As shown in the figure below, this example is actually a conversion between three lines A, B, and C. A is the initial state. After clicking, it passes through B and finally forms C. There are two animations, A-B and B-C, and the timing function and time of these two animations are different.
Step One: Draw a Draft
The first step before making animation is to draw a draft (as shown above). I usually use AI to draw, because AI can accurately control the size and position of elements, and its principle is the same as SVG.
Then some students will say, "Lao Shi, should I save it in SVG format and then make modifications?"
Wrong
The purpose of drawing a rough diagram is just to conveniently determine the coordinates of each point. Calculating it yourself is too troublesome and easy to make mistakes. Beyond that the AI does nothing. The AI-generated SVG file cannot be used in this example because the road points are too confusing, as will be explained in detail below.
What? You don’t know how to use AI?
If you still want to continue on the front-end road, then learn it now. (Here I want to complain. PS is used to process bitmap images and is not suitable for making design drawings. In contrast, AI is for this. All the metric design layout templates provided by Google are in AI format. Yes. But no matter what company they are in China, they seem to be very happy using PS. I don’t know why)
Step 2: Calculate the path
This step is more complicated. As mentioned above, this animation is actually a conversion between coordinates. The conversion from a quadrilateral to an arc is not only a coordinate displacement, but also a conversion of the arc of the curve. The above design drawing is directly saved as SVG and the code is as follows:
We only need to pay attention to the d attribute of the path. It can be seen that the two paths AB can still be converted to each other, but they cannot be converted to the C path (the path with arcs). The drawing commands they use are different. Both AB and AB are rectangles. When drawing, they use h and v, which are the horizontal and vertical displacements. What they draw are horizontal and vertical lines. However, C Lu Jin used commands such as s and c, and all he drew were curves. Therefore, we cannot use the picture provided by AI, and have to redraw it ourselves based on svg path data.
The following are three paths I redrawn based on the AI design drawings:
Students with a background in design should understand the meaning of the above code, which is to convert all anchor points to smooth, and then change the position of the handle. The shape has not changed, although there is a lot more code, but the drawing commands have been changed to S , so that the only difference between the three paths is the numerical value. The animation process is the conversion between values.
Step 3: Timing
This step is to set the time point and timing function of the animation. The time points are easier to say. I set A-B and B-C to 300 milliseconds and 400 milliseconds respectively.
Timing function is the animation-timing-function attribute we use in CSS animation. The more common ones are ease, linear, and easein. We can also customize it ourselves using Bezier curves. However, the timing function of CSS is relatively simple and can only define a uniform curve. The ease-out is used for A-B conversion, but in order to reflect the bouncing effect of B-C, the timing-function used is not as simple as a uniform curve.
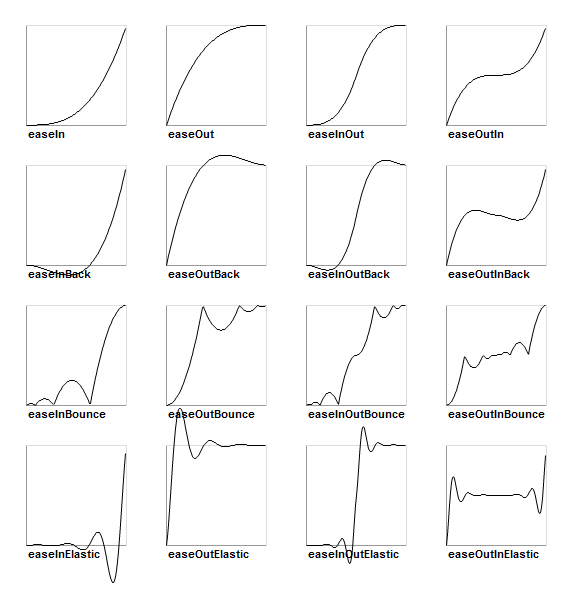
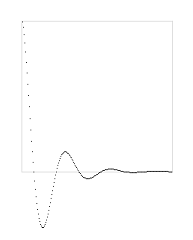
The above lists some commonly used timing-functions, which are roughly divided into three categories: ease, bounce, and elastic. Ease is generally used for decelerating or accelerating animation. Bounce, like its curve, is generally used for the dynamic effect of a ball landing. Elastic is generally used for dynamic effects like strings. One feature of this dynamic effect is that it is partially offset to the negative coordinate, and B-C uses this, as shown below.
According to the path drawn above, combined with animation, the code comes out:
var path=svg.path(pathes[0]);
path.attr({
fill:"#2E70FF"
});
function animateIn(callback){
path.animate({
d:pathes[1]
},300,mina.easeout,function(){
path.animate({
d:pathes[0]
},400,mina.elastic,callback)
});
};
function animateOut(callback){
path.animate({
d:pathes[1]
},300,mina.easeout,function(){
path.animate({
d:pathes[2]
},400,mina.elastic,callback)
});
};
Snap 是 Adobe 出品处理 SVG 的库,mina是 Snap 自带的一个动画工具集,其中有很多预设的动画。
结语
用 Snap 制作的动画可以兼容 IE9 ,而且速度也不错,自定义功能很强大。相信不久的将来还会有更多狂拽酷炫屌炸天的动效会用 Snap 制作出来。
如果想学习动效的话,可以先看一下 TED 一集关于动效的视频
 Is python front-end or back-end?
 How to implement instant messaging on the front end
 The difference between front-end and back-end
 Introduction to the relationship between php and front-end
 http 400 Bad Request
 Can I retrieve a deleted Douyin short video?
 Top ten digital currency exchanges
 User Account Control Cancellation Method
 USDT price today


![[Web front-end] Node.js quick start](https://img.php.cn/upload/course/000/000/067/662b5d34ba7c0227.png)


