

mysql5.6+版本主从设置(mysql5.5之后的主从设置跟5.5之前的设置

怎么安装mysql数据库,这里不说了,只说它的主从复制,步骤如下 在进行主从设置之前 首先确保mysql主从服务器之间的数据库端口防火墙互相打开, 尽量确保主从数据库账户一致性(主从切换使用),否则将操作失败, 其次是确保mysql账户对mysql数据库目录有“可
怎么安装mysql数据库,这里不说了,只说它的主从复制,步骤如下
在进行主从设置之前
首先确保mysql主从服务器之间的数据库端口防火墙互相打开,
尽量确保主从数据库账户一致性(主从切换使用),否则将操作失败,
其次是确保mysql账户对mysql数据库目录有“可读写”权限非“可写”权限,
为了确保不出意外,最好删除mysql之前陈旧的mysql-bin、mysql日志,然后重启mysql
在主服务器上新建一个new_test数据库并为其建一个test表,然后导出导入到从服务器上(测试主从使用)服务器上可替换成现有的数据库进行操作(我这里主从上各建立一个相同账户和密码,相同的端口配置,为了主从切换,方便测试,记得防火墙端口和日志位置读写权限一定要有的)
1、主从服务器分别作以下操作:
1.1、版本一致
1.2、初始化表,并在后台启动mysql
1.3、修改root的密码
2、修改主服务器master:
#vi /etc/my.cnf
[mysqld]
log-bin=mysql-bin //[必须]启用二进制日志
server-id=1 //[必须]默认是1,一般取IP最后一段
port=1223
bing-address=0.0.0.0
log-bin=mysql-bin.log(必须,数据库日志文件,主从必须)
binlog-do-db =new_test (要记录的数据库,多个可换行多次设置)
replicate-do-db =new_test (要复制的数据库,多个可换行过个设置)
binlog-ignore-db=mysql //不对mysql库进行日志记录操作 如下意思雷同
binlog-ignore-db=test
binlog-ignore-db=information_schema
binlog-ignore-db=performance_schema
replicate-ignore-db=test //不对test进行复制操作 如下意思雷同
replicate-ignore-db=mysql
replicate-ignore-db=information_schema
replicate-ignore-db=performance_schema
3、修改从服务器slave:
#vi /etc/my.cnf
[mysqld]
port=1223
bing-address=0.0.0.0 //意思是允许所有 机器 服务器安全起见可设置为指定的服务器IP地址 如 116.128.1.10等
log-bin=mysql-bin.log
server-id=2
binlog-do-db =new_test
replicate-do-db =new_test
binlog-ignore-db=mysql
binlog-ignore-db=test
binlog-ignore-db=information_schema
binlog-ignore-db=performance_schema
replicate-ignore-db=test
replicate-ignore-db=mysql
replicate-ignore-db=information_schema
replicate-ignore-db=performance_schema
4、重启两台服务器的mysql
service mysql restart
5、在主服务器上建立帐户并授权slave:
#/usr/local/mysql/bin/mysql -u数据库账户名 -p数据库密码
mysql>GRANT REPLICATION SLAVE ON *.* to 'newback_username'@'%' identified by 'newback_pwd'; //一般不用root帐号,“%”表示所有客户端都可能连(安全起见可将%替换成指定服务器IP,如116.121.1.10),只要帐号,密码正确。
6、登录主服务器的mysql,查询master的状态(可在phpmyadmin 中执行次操作)
mysql>show master status;
+------------------+----------+--------------+------------------+
| File | Position | Binlog_Do_DB | Binlog_Ignore_DB |
+------------------+----------+--------------+------------------+
| mysql-bin.000001 | 120 | | |
+------------------+----------+--------------+------------------+
1 row in set (0.00 sec)
注:执行完此步骤后不要再操作主服务器MYSQL,防止主服务器状态值变化
7、配置从服务器Slave:
mysql>change master to master_host='116.121.1.10',master_port=1223,master_user='newback',master_password='cctv@12315#$',master_log_file='mysql-bin.000001',master_log_pos=120 //注意不要断开,master_port为mysql服务器端口号(无引号),master_user为执行同步操作的数据库账户,“120”无单引号(此处的120就是show
master status 中看到的position的值,这里的mysql-bin.000001就是file对应的值)。(此处可在从服务器phpmyadmin中用sql语句操作)
Mysql>start slave; //启动从服务器复制功能(可在phpmyadmin中执行该SQL语句)
8、检查从服务器复制功能状态:
mysql> show slave status\G (可在从服务器phpmyadmin中执行“show slave status” SQL语句)
*************************** 1. row ***************************
……………………(省略部分)
Slave_IO_Running: Yes //此状态必须YES
Slave_SQL_Running: Yes //此状态必须YES
……………………(省略部分)
注:Slave_IO及Slave_SQL进程必须正常运行,即YES状态,否则都是错误的状态(如:其中一个NO均属错误)。
以上操作过程,主从服务器配置完成。
9、主从服务器测试:
在主服务器new_test数据库中的test表中插入 或者更新一条记录,如果从服务器同样更新 插入 则配置正确,否则错误
10、mysql5.5+版本与mysql5.5之前版本的一些差异:
其中大部分的内容相似
主要是5.5之后不再支持master打头的参数
如:
master-host,master-user,master-password,master-port等。
错误如下:
[ERROR] /usr/local/mysql/bin/mysqld: unknown variable 'master-host=192.168.2.182'
主配置不变,依旧是
server-id=1
log-bin=log
binlog-do-db=database1
binlog-do-db=database2
binlog-ignore-db=mysql
…………(省略部分)
从配置改为(注意下列注释部分,统统被废弃了):
server-id=2
#master-host=192.168.124.51
#master-user= AffairLog
#master-password= password
#master-port=3306
#master-connect-retry=60
replicate-do-db=database1
replicate-do-db=database2
replicate-ignore-db=mysql
我们需要使用change master to
即:
mysql>change master to
>master_host='192.168.124.51',
>master_user='username',
>master_password='password',
>master_log_file='bin-log.000001',
>master_log_pos=120;
然后start slave;
(也可一句话执行如:"change master to master_host='116.121.1.10',master_port=1223,master_user='newback',master_password='cctv@12315#$',master_log_file='mysql-bin.000001',master_log_pos=120" 【实际命令去掉外面的双引号,端口号和master_log_pos不加引号】 )
其他一切不变
Hot AI Tools

Undresser.AI Undress
AI-powered app for creating realistic nude photos

AI Clothes Remover
Online AI tool for removing clothes from photos.

Undress AI Tool
Undress images for free

Clothoff.io
AI clothes remover

AI Hentai Generator
Generate AI Hentai for free.

Hot Article
Hot Tools

Notepad++7.3.1
Easy-to-use and free code editor

SublimeText3 Chinese version
Chinese version, very easy to use

Zend Studio 13.0.1
Powerful PHP integrated development environment

Dreamweaver CS6
Visual web development tools

SublimeText3 Mac version
God-level code editing software (SublimeText3)
Hot Topics
 1378
1378
 52
52

 How to set the scheduled time for publishing works on Douyin? How does it set the video duration?
Mar 27, 2024 pm 06:11 PM
How to set the scheduled time for publishing works on Douyin? How does it set the video duration?
Mar 27, 2024 pm 06:11 PM
Publishing works on Douyin can attract more attention and likes, but sometimes it may be difficult for us to publish works in real time. In this case, we can use Douyin's scheduled release function. Douyin’s scheduled release function allows users to automatically publish works at a scheduled time, which can better plan the release plan and increase the exposure and influence of the work. 1. How to set the scheduled time for publishing works on Douyin? To set a scheduled release time, first go to Douyin's personal homepage, find the "+" button in the upper right corner, and click to enter the release page. There is a clock icon in the lower right corner of the publishing page. Click to enter the scheduled publishing interface. In the interface, you can choose the type of work you want to publish, including short videos, long videos, and live broadcasts. Next, you need to set a time for your work to be published. TikTok provides
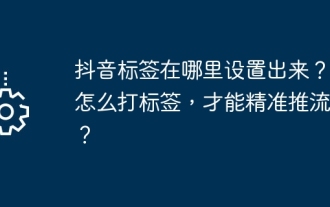 Where is the Douyin tag set? How can it be tagged so that it can be pushed accurately?
Mar 27, 2024 am 11:01 AM
Where is the Douyin tag set? How can it be tagged so that it can be pushed accurately?
Mar 27, 2024 am 11:01 AM
As one of the most popular short video platforms in the world, Douyin allows everyone to become a creator and share every moment of life. For Douyin users, tags are a very important function. It can help users better classify and retrieve content, and also allows the platform to push appropriate content to users more accurately. So, where are the Douyin tags set? This article will explain in detail how to set up and use tags on Douyin. 1. Where is the Douyin tag set? Using tags on Douyin can help users better classify and label their works, making it easier for other users to find and follow them. The method to set the label is as follows: 1. Open the Douyin APP and log in to your account. 2. Click the "+" sign at the bottom of the screen and select the "Publish" button. 3.
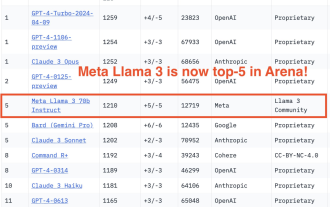 750,000 rounds of one-on-one battle between large models, GPT-4 won the championship, and Llama 3 ranked fifth
Apr 23, 2024 pm 03:28 PM
750,000 rounds of one-on-one battle between large models, GPT-4 won the championship, and Llama 3 ranked fifth
Apr 23, 2024 pm 03:28 PM
Regarding Llama3, new test results have been released - the large model evaluation community LMSYS released a large model ranking list. Llama3 ranked fifth, and tied for first place with GPT-4 in the English category. The picture is different from other benchmarks. This list is based on one-on-one battles between models, and the evaluators from all over the network make their own propositions and scores. In the end, Llama3 ranked fifth on the list, followed by three different versions of GPT-4 and Claude3 Super Cup Opus. In the English single list, Llama3 overtook Claude and tied with GPT-4. Regarding this result, Meta’s chief scientist LeCun was very happy and forwarded the tweet and
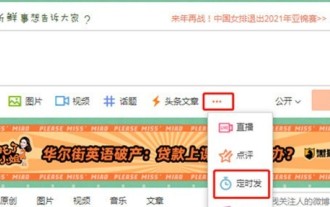 How to set up scheduled publishing on Weibo_Tutorial on how to set up scheduled publishing on Weibo
Mar 29, 2024 pm 03:51 PM
How to set up scheduled publishing on Weibo_Tutorial on how to set up scheduled publishing on Weibo
Mar 29, 2024 pm 03:51 PM
1. Open the Weibo client, click the three little dots on the editing page, and then click Scheduled Post. 2. After clicking on scheduled posting, there will be a time option on the right side of the publishing time. Set the time, edit the article, and click on the yellow words in the lower right corner to schedule posting. 3. The mobile version of Weibo does not currently support scheduled publishing. This function can only be used on the PC client!
 Interpret the meaning and difference of PHP version NTS
Mar 27, 2024 am 11:48 AM
Interpret the meaning and difference of PHP version NTS
Mar 27, 2024 am 11:48 AM
The meaning and difference of PHP version NTS PHP is a popular server-side scripting language that is widely used in the field of web development. There are two main versions of PHP: ThreadSafe(TS) and Non-ThreadSafe(NTS). On the official website of PHP, we can see two different PHP download versions, namely PHPNTS and PHPTS. So, what does PHP version NTS mean? What is the difference between it and the TS version? Next,
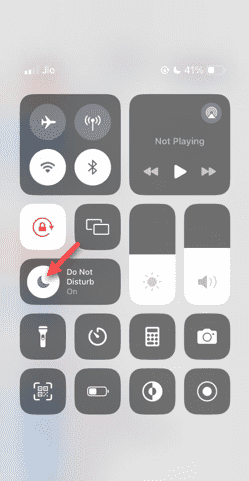 Do Not Disturb Mode Not Working in iPhone: Fix
Apr 24, 2024 pm 04:50 PM
Do Not Disturb Mode Not Working in iPhone: Fix
Apr 24, 2024 pm 04:50 PM
Even answering calls in Do Not Disturb mode can be a very annoying experience. As the name suggests, Do Not Disturb mode turns off all incoming call notifications and alerts from emails, messages, etc. You can follow these solution sets to fix it. Fix 1 – Enable Focus Mode Enable focus mode on your phone. Step 1 – Swipe down from the top to access Control Center. Step 2 – Next, enable “Focus Mode” on your phone. Focus Mode enables Do Not Disturb mode on your phone. It won't cause any incoming call alerts to appear on your phone. Fix 2 – Change Focus Mode Settings If there are some issues in the focus mode settings, you should fix them. Step 1 – Open your iPhone settings window. Step 2 – Next, turn on the Focus mode settings
 Where to set Douyin recommendations and selections
Mar 27, 2024 pm 05:06 PM
Where to set Douyin recommendations and selections
Mar 27, 2024 pm 05:06 PM
Where are the recommendations and selections on Douyin? In Douyin short videos, there are two categories: selection and recommendation. Most users don’t know how to set up recommendations and selections. Next is the Douyin tutorial that the editor brings to users. Audio recommendations and selected setting method tutorials, interested users come and take a look! Douyin usage tutorial Where to set up Douyin recommendations and selections 1. First open the Douyin short video APP and enter the main page, click on the [Me] area in the lower right corner and select [three horizontal lines] in the upper right corner; 2. Then on the right The function bar will expand, slide the page to select [Settings] at the bottom; 3. Then on the settings function page, find the [Personal Information Management] service; 4. Finally jump to the personal information management page, slide [Personalized Content Recommendations] 】The buttons on the back can be set.
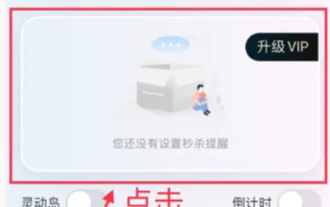 How to set the countdown to grab tickets in Damai
Apr 01, 2024 pm 07:01 PM
How to set the countdown to grab tickets in Damai
Apr 01, 2024 pm 07:01 PM
When buying tickets on Damai.com, in order to ensure that the ticket purchase time can be accurately grasped, users can set a floating clock to grab tickets. The detailed setting method is below, let us learn together. How to bind the floating clock to Damai 1. Click to open the floating clock app on your phone to enter the interface, and click on the location where the flash sale check is set, as shown in the figure below: 2. After coming to the page of adding new records, click on Damai.com Copy the ticket purchase link page copied in. 3. Next, set the flash sale time and notification time below, turn on the switch button behind [Save to Calendar], and click [Save] below. 4. Click to turn on [Countdown], as shown in the figure below: 5. When the reminder time comes, click the [Start Picture-in-Picture] button below. 6. When the ticket purchase time comes
