

揭秘企业级web负载均衡完美架构

【51CTO.com独家特稿】相信很多朋友对 企业 级的 负载 均衡 高可用实例非常感兴趣,此篇 文章 根据成熟的线上环境而写,旨在帮助大家迅速 架构 一个 企业 级的 负载 均衡 高可用的web环境。 此系统 架构 仅映射内网VIP的80及443端口于外网的Juniper防火墙下
【51CTO.com独家特稿】相信很多朋友对企业级的负载均衡高可用实例非常感兴趣,此篇文章根据成熟的线上环境而写,旨在帮助大家迅速架构一个企业级的负载均衡高可用的web环境。
此系统架构仅映射内网VIP的80及443端口于外网的Juniper防火墙下,其它端口均关闭,内网所有机器均关闭iptables及ipfw防火墙;外网DNS指向即通过Juniper映射出来的外网地址,而此映射的地址对映的其实是内网VIP地址。这里说下端口的问题,有的朋友可能会很疑惑,这样映射端口行不?通过项目实践得知,这样完全是可行的,php-cgi需要的9000端口及MySQL的3306端口均可走内网,完全不影响业务系统的运行。
另外,我维护的电子商务网站并发大约在1000左右,此时,Nginx+Apache集群运行得非常稳定,尤其是apache,并没有想象中那般弱;其实,在内存足够(>=8G)的情况,测试时不连数据库的话,单台apache+php5能顶得住6000并发,而且相当稳定。在网站升级架构方面,我不赞成全面淘汰生级,锦上添花式的升级会更好。

第一部分:Nginx+Keepalived的说明及环境说明
喜欢看我博客或文章的朋友都知道,我一直主力推崇Nginx+Keepalived作web的负载均衡高可用架构,并积极将其用于项目方案中;Nginx负载均衡作服务器遇到的故障一般有①服务器网线松动等网络故障;②服务器硬件故障从而crash;③nginx服务死掉;遇到前二者情况,keeaplived是能起到HA的作用的;然而遇到③种情况就没有办法了,但可以通过shell监控解决这问题,从而实现真正意义上的负载均衡高可用。此篇的最新更新时间为2010年6月25号,下面将其安装步骤详细说明下:
环境:
<ol class="dp-xml">
<li class="alt">centos5.3(64位)、nginx-0.7.51、keepalived-1.1.15   </li>
<li>主nginx<strong>负载</strong><strong>均衡</strong>器:192.168.0.154  </li>
<li class="alt">辅nginx<strong>负载</strong><strong>均衡</strong>器:192.168.9.155  </li>
<li>vip:192.168.0.188 </li>
</ol>
第二部分:分别安装Nginx负载均衡器及相关配置脚本
先安装Nginx负载均衡器,nginx负载的配置就用一般的模板来配置了
<ol class="dp-xml">
<li class="alt">#添加运行nginx的用户和组www  </li>
<li>groupadd www   </li>
<li class="alt">useradd -g www www   </li>
<li>wget ftp://ftp.csx.cam.ac.uk/pub/software/programming/pcre/pcre-7.8.tar.gz  </li>
<li class="alt">tar zxvf pcre-7.8.tar.gz  </li>
<li>cd pcre-7.8/  </li>
<li class="alt">./configure  </li>
<li>make && make install  </li>
<li class="alt">wget http://sysoev.ru/nginx/nginx-0.7.51.tar.gz  </li>
<li>tar zxvf nginx-0.7.51.tar.gz  </li>
<li class="alt">cd nginx-0.7.51/  </li>
<li>./configure <span class="attribute">--user</span>=<span class="attribute-value">www</span> <span class="attribute">--group</span>=<span class="attribute-value">www</span> <span class="attribute">--prefix</span>=/usr/local/webserver/nginx --with-http_stub_status_module --with-http_ssl_module  </li>
<li class="alt">make && make install </li>
</ol>
配置nginx负载均衡器的配置文件vim /usr/local/nginx/conf/nginx.conf,此篇文章仅仅只是我的某项目的配置文档,纯80转发;如果对nginx配置有https要求的可参考张宴的相关文章。
<ol class="dp-xml">
<li class="alt">user www www;  </li>
<li>worker_processes 8;  </li>
<li class="alt"> </li>
<li>pid /usr/local/nginx/logs/nginx.pid;  </li>
<li class="alt">worker_rlimit_nofile 65535;  </li>
<li> </li>
<li class="alt">events  </li>
<li>{  </li>
<li class="alt">use epoll;  </li>
<li>worker_connections 65535;  </li>
<li class="alt">}  </li>
<li>http{  </li>
<li class="alt">include       mime.types;  </li>
<li>default_type application/octet-stream;  </li>
<li class="alt">server_names_hash_bucket_size 128;  </li>
<li>client_header_buffer_size 32k;  </li>
<li class="alt">large_client_header_buffers 4 32k;  </li>
<li>client_max_body_size 8m;  </li>
<li class="alt">sendfile on;  </li>
<li>tcp_nopush     on;  </li>
<li class="alt">keepalive_timeout 60;  </li>
<li>tcp_nodelay on;  </li>
<li class="alt">fastcgi_connect_timeout 300;  </li>
<li>fastcgi_send_timeout 300;  </li>
<li class="alt">fastcgi_read_timeout 300;  </li>
<li>fastcgi_buffer_size 64k;  </li>
<li class="alt">fastcgi_buffers 4 64k;  </li>
<li>fastcgi_busy_buffers_size 128k;  </li>
<li class="alt">fastcgi_temp_file_write_size 128k;  </li>
<li>gzip on;  </li>
<li class="alt">gzip_min_length 1k;  </li>
<li>gzip_buffers     4 16k;  </li>
<li class="alt">gzip_http_version 1.0;  </li>
<li>gzip_comp_level 2;  </li>
<li class="alt">gzip_types       text/plain application/x-javascript text/css application/xml;  </li>
<li>gzip_vary on;  </li>
<li class="alt"> </li>
<li>upstream backend  </li>
<li class="alt">{  </li>
<li>server 192.168.1.102:80;  </li>
<li class="alt">server 192.168.1.103:80;  </li>
<li>server 192.168.1.105:80;  </li>
<li class="alt">}  </li>
<li>server {  </li>
<li class="alt">listen 80;  </li>
<li>server_name www.yuhongchun027.com;  </li>
<li class="alt">location / {  </li>
<li>root /var/www ;  </li>
<li class="alt">index index.jsp index.htm index.html;  </li>
<li>proxy_redirect off;  </li>
<li class="alt">proxy_set_header Host $host;  </li>
<li>proxy_set_header X-Real-IP $remote_addr;  </li>
<li class="alt">proxy_set_header X-Forwarded-For $proxy_add_x_forwarded_for;  </li>
<li>proxy_pass http://backend;  </li>
<li class="alt">}  </li>
<li> </li>
<li class="alt">location /nginx {  </li>
<li>access_log on;  </li>
<li class="alt">auth_basic "NginxStatus";  </li>
<li>auth_basic_user_file /usr/local/nginx/htpasswd;  </li>
<li class="alt">}  </li>
<li> </li>
<li class="alt">log_format access '$remote_addr - $remote_user [$time_local] "$request" '  </li>
<li>'$status $body_bytes_sent "$http_referer" '  </li>
<li class="alt">'"$http_user_agent" $http_x_forwarded_for';  </li>
<li>access_log /var/log/access.log access;  </li>
<li class="alt"> </li>
<li>}  </li>
<li class="alt">} </li>
</ol>小节:
第一部分和第二部分讲的是如何通过安装Nginx来达到负载均衡后端web集群的过程,Nginx能实现自动切换后端有故障的web服务器;但Nginx负载均衡器出了问题怎么办呢,它们之间是如何实现无故障转移的呢?
第三部分:安装Keepalived,让其分别作web及Nginx的HA
安装keepalived,并将其做成服务模式,方便以后调试。
<ol class="dp-xml">
<li class="alt">wget http://www.keepalived.org/software/keepalived-1.1.15.tar.gz  </li>
<li>#tar zxvf keepalived-1.1.15.tar.gz  </li>
<li class="alt">#cd keepalived-1.1.15  </li>
<li>#./configure <span class="attribute">--prefix</span>=/usr/local/keepalived  </li>
<li class="alt">#make   </li>
<li>#make install  </li>
<li class="alt">#cp /usr/local/keepalived/sbin/keepalived /usr/sbin/  </li>
<li>#cp /usr/local/keepalived/etc/sysconfig/keepalived /etc/sysconfig/  </li>
<li class="alt">#cp /usr/local/keepalived/etc/rc.d/init.d/keepalived /etc/init.d/  </li>
<li>#mkdir /etc/keepalived  </li>
<li class="alt">#cd /etc/keepalived/  </li>
<li> </li>
<li class="alt">vim keepalived.conf  </li>
<li>! Configuration File for keepalived  </li>
<li class="alt">global_defs {  </li>
<li>   notification_email {  </li>
<li class="alt">   yuhongchun027@163.com  </li>
<li>        }  </li>
<li class="alt">   notification_email_from keepalived@chtopnet.com  </li>
<li>   smtp_server 127.0.0.1  </li>
<li class="alt">   smtp_connect_timeout 30  </li>
<li>   router_id LVS_DEVEL  </li>
<li class="alt">}  </li>
<li>vrrp_instance VI_1 {  </li>
<li class="alt">    state MASTER  </li>
<li>    interface eth0  </li>
<li class="alt">    virtual_router_id 51  </li>
<li>    mcast_src_ip 192.168.0.154    <span class="tag">==主nginx的IP地址  </span>
</li>
<li class="alt">    priority 100  </li>
<li>    advert_int 1  </li>
<li class="alt">    authentication {  </li>
<li>        auth_type PASS  </li>
<li class="alt">        auth_pass chtopnet  </li>
<li>    }  </li>
<li class="alt">    virtual_ipaddress {  </li>
<li>        192.168.0.188                      <span class="tag">==vip地址  </span>
</li>
<li class="alt">    }  </li>
<li>}  </li>
<li class="alt">#service keepalived start </li>
</ol>我们来看一下日志:
<ol class="dp-xml">
<li class="alt">[root@ltos ~]# tail /var/log/messages  </li>
<li>Oct 6 03:25:03 ltos avahi-daemon[2306]: Registering new address record for 192.168.0.188 on eth0.  </li>
<li class="alt">Oct 6 03:25:03 ltos avahi-daemon[2306]: Registering new address record for 192.168.0.154 on eth0.  </li>
<li>Oct 6 03:25:03 ltos avahi-daemon[2306]: Registering HINFO record with values 'I686'/'LINUX'.  </li>
<li class="alt">Oct 6 03:25:23 ltos avahi-daemon[2306]: Withdrawing address record for fe80::20c:29ff:feb9:eeab on eth0.  </li>
<li>Oct 6 03:25:23 ltos avahi-daemon[2306]: Withdrawing address record for 192.168.0.154 on eth0.  </li>
<li class="alt">Oct 6 03:25:23 ltos avahi-daemon[2306]: Host name conflict, retrying with <span class="tag"><span class="tag-name">ltos-31</span><span class="tag">></span> </span>
</li>
</ol>
很显然vrrp已经启动,我们还可以通过命令来检查
<ol class="dp-xml">
<li class="alt">[root@ltos html]# ip addr  </li>
<li>1: lo: <span class="tag"><span class="tag-name">LOOPBACK</span>,UP,LOWER_UP<span class="tag">></span> mtu 16436 qdisc noqueue   </span>
</li>
<li class="alt">    link/loopback 00:00:00:00:00:00 brd 00:00:00:00:00:00  </li>
<li>    inet 127.0.0.1/8 scope host lo  </li>
<li class="alt">    inet6 ::1/128 scope host   </li>
<li>       valid_lft forever preferred_lft forever  </li>
<li class="alt">2: eth0: <span class="tag"><span class="tag-name">BROADCAST</span>,MULTICAST,UP,LOWER_UP<span class="tag">></span> mtu 1500 qdisc pfifo_fast qlen 1000  </span>
</li>
<li>    link/ether 00:0c:29:ba:9b:e7 brd ff:ff:ff:ff:ff:ff  </li>
<li class="alt">    inet 192.168.0.154/24 brd 192.168.0.255 scope global eth0  </li>
<li>    inet 192.168.0.188/32 scope global eth0  </li>
<li class="alt">    inet6 fe80::20c:29ff:feba:9be7/64 scope link   </li>
<li>       valid_lft forever preferred_lft forever  </li>
<li class="alt">3: sit0: <span class="tag"><span class="tag-name">NOARP</span><span class="tag">></span> mtu 1480 qdisc noop   </span>
</li>
<li>    link/sit 0.0.0.0 brd 0.0.0.0 </li>
</ol>
说明vip已经启动,这样主服务器就配置好了,辅机的配置大致一样,除了配置文件有少部分的变化,下面贴出辅机的配置文件:
<ol class="dp-xml">
<li class="alt">! Configuration File for keepalived  </li>
<li>global_defs {  </li>
<li class="alt">   notification_email {  </li>
<li>   yuhongchun027@163.com  </li>
<li class="alt">        }  </li>
<li>   notification_email_from keepalived@chtopnet.com  </li>
<li class="alt">   smtp_server 127.0.0.1  </li>
<li>   smtp_connect_timeout 30  </li>
<li class="alt">   router_id LVS_DEVEL  </li>
<li>}  </li>
<li class="alt">vrrp_instance VI_1 {  </li>
<li>    state BACKUP  </li>
<li class="alt">    interface eth0  </li>
<li>    virtual_router_id 51  </li>
<li class="alt">    mcast_src_ip 192.168.0.155              <span class="tag">==辅nginx的IP的地址  </span>
</li>
<li>    priority 100  </li>
<li class="alt">    advert_int 1  </li>
<li>    authentication {  </li>
<li class="alt">        auth_type PASS  </li>
<li>        auth_pass chtopnet  </li>
<li class="alt">    }  </li>
<li>    virtual_ipaddress {  </li>
<li class="alt">        192.168.0.188  </li>
<li>    }  </li>
<li class="alt">} </li>
</ol>
第四部分:针对Keepalived的不足,用Nginx_pid.sh来监控nginx进程,实现真正意义上的负载均衡高可用。
针对Nginx+Keepalived,编写nginx监控脚本nginx_pid.sh,此脚本思路其实也很简单,即放置在后台一直监控nginx进程;如进程消失,尝试重启nginx,如是失败则立即停掉本机的keepalived服务,让另一台负载均衡器接手,此脚本直接从生产环境下载:
<ol class="dp-xml">
<li class="alt">vim /root/nginx_pid.sh   </li>
<li>#!/bin/bash  </li>
<li class="alt">while  :  </li>
<li>do  </li>
<li class="alt"> <span class="attribute">nginxpid</span>=`ps -C nginx --no-header | wc -l`  </li>
<li> if [ $nginxpid -eq 0 ];then  </li>
<li class="alt">  /usr/local/nginx/sbin/nginx  </li>
<li>  sleep 5  </li>
<li>nginxpid=`ps -C nginx --no-header | wc -l`</li>
<li class="alt">   if [ $nginxpid -eq 0 ];then  </li>
<li>   /etc/init.d/keepalived stop  </li>
<li class="alt">   fi  </li>
<li> fi  </li>
<li class="alt"> sleep 5   </li>
<li>done </li>
</ol>
然后置于后台运行 sh /root/nginx_pid.sh &,这种写法是错误的,这样你用root用户logout后,此进程会消失;正确写法为nohup/bin/bash /root/nginx_pid.sh &,附带下注释:如果你正在运行一个进程,而且你觉得在退出帐户时该进程还不会结束,那么可以使用nohup命令。该命令可以在你退出root帐户之后继续运行相应的进程。nohup就是不挂起的意思( no hang up),哈哈,差点老马失蹄了。
后记:
我的线上环境网络非常复杂,这也是LVS+Keepalived失败的原因。目前此套架构在1000并发的电子商务网站非常稳定,带来的直接影响就是nginx_backup一直处于闲置状态。相对于张宴的双机轮询而言,我感觉他的可能更加完美,因为目前我的Nginx仅仅只做了负载均衡器,如果以后有机会我会尝试做负载均衡器/反向代理加速。

Hot AI Tools

Undresser.AI Undress
AI-powered app for creating realistic nude photos

AI Clothes Remover
Online AI tool for removing clothes from photos.

Undress AI Tool
Undress images for free

Clothoff.io
AI clothes remover

Video Face Swap
Swap faces in any video effortlessly with our completely free AI face swap tool!

Hot Article
Hot Tools

Notepad++7.3.1
Easy-to-use and free code editor

SublimeText3 Chinese version
Chinese version, very easy to use

Zend Studio 13.0.1
Powerful PHP integrated development environment

Dreamweaver CS6
Visual web development tools

SublimeText3 Mac version
God-level code editing software (SublimeText3)
Hot Topics


 How to implement SSL passthrough in HAProxy
Mar 20, 2024 am 09:30 AM
How to implement SSL passthrough in HAProxy
Mar 20, 2024 am 09:30 AM
Keeping web servers load balanced is one of the key measures to prevent downtime. Using a load balancer is a reliable approach, with HAProxy being a highly regarded choice. Using HAProxy, you can accurately configure the load balancing method and support SSL passthrough to ensure the security of communication between the client and the server. It starts by exploring the importance of implementing SSL passthrough in HAProxy, followed by a detailed discussion of the steps required to implement this feature and an example for better understanding. What is SSL passthrough? Why is it important? As a load balancer, HAProxy accepts and distributes the load flowing to your web servers across configured servers. Load distribution is targeted to client devices and
 What is the architecture and working principle of Spring Data JPA?
Apr 17, 2024 pm 02:48 PM
What is the architecture and working principle of Spring Data JPA?
Apr 17, 2024 pm 02:48 PM
SpringDataJPA is based on the JPA architecture and interacts with the database through mapping, ORM and transaction management. Its repository provides CRUD operations, and derived queries simplify database access. Additionally, it uses lazy loading to only retrieve data when necessary, thus improving performance.
 1.3ms takes 1.3ms! Tsinghua's latest open source mobile neural network architecture RepViT
Mar 11, 2024 pm 12:07 PM
1.3ms takes 1.3ms! Tsinghua's latest open source mobile neural network architecture RepViT
Mar 11, 2024 pm 12:07 PM
Paper address: https://arxiv.org/abs/2307.09283 Code address: https://github.com/THU-MIG/RepViTRepViT performs well in the mobile ViT architecture and shows significant advantages. Next, we explore the contributions of this study. It is mentioned in the article that lightweight ViTs generally perform better than lightweight CNNs on visual tasks, mainly due to their multi-head self-attention module (MSHA) that allows the model to learn global representations. However, the architectural differences between lightweight ViTs and lightweight CNNs have not been fully studied. In this study, the authors integrated lightweight ViTs into the effective
 Golang's life or death is uncertain? Google's attitude revealed
Mar 06, 2024 pm 05:42 PM
Golang's life or death is uncertain? Google's attitude revealed
Mar 06, 2024 pm 05:42 PM
The Internet industry is developing at a rapid pace, and programming languages are also constantly evolving. Among many programming languages, Golang (Go), as a relatively young language, has attracted much attention since its inception. However, there have been various opinions and speculations about Golang's prospects and development trends. Is Golang’s life or death still uncertain? What is Google's attitude towards Golang? Golang, as an open source programming language developed by Google, has attracted much attention since its birth. It is designed to
 Revealing my real life experience: Is it a sub-brand of OPPO?
Mar 23, 2024 pm 09:24 PM
Revealing my real life experience: Is it a sub-brand of OPPO?
Mar 23, 2024 pm 09:24 PM
"True Me" life experience revealed: Is it a sub-brand of OPPO? As the smartphone market continues to develop, various mobile phone brands have launched new products to meet the changing needs of consumers. Among them, a mobile phone brand called "True Me" has attracted much attention in recent years. Its high cost performance and high-quality user experience have been welcomed by many consumers. However, the life experience and brand background of the "True Me" mobile phone have always been shrouded in a veil of mystery. Recently, there was news that the "Real Me" mobile phone is a sub-brand of OPPO. This news has made a lot of noise in the mobile phone circle.
 How steep is the learning curve of golang framework architecture?
Jun 05, 2024 pm 06:59 PM
How steep is the learning curve of golang framework architecture?
Jun 05, 2024 pm 06:59 PM
The learning curve of the Go framework architecture depends on familiarity with the Go language and back-end development and the complexity of the chosen framework: a good understanding of the basics of the Go language. It helps to have backend development experience. Frameworks that differ in complexity lead to differences in learning curves.
 How to enable administrative access from the cockpit web UI
Mar 20, 2024 pm 06:56 PM
How to enable administrative access from the cockpit web UI
Mar 20, 2024 pm 06:56 PM
Cockpit is a web-based graphical interface for Linux servers. It is mainly intended to make managing Linux servers easier for new/expert users. In this article, we will discuss Cockpit access modes and how to switch administrative access to Cockpit from CockpitWebUI. Content Topics: Cockpit Entry Modes Finding the Current Cockpit Access Mode Enable Administrative Access for Cockpit from CockpitWebUI Disabling Administrative Access for Cockpit from CockpitWebUI Conclusion Cockpit Entry Modes The cockpit has two access modes: Restricted Access: This is the default for the cockpit access mode. In this access mode you cannot access the web user from the cockpit
 Hand-tearing Llama3 layer 1: Implementing llama3 from scratch
Jun 01, 2024 pm 05:45 PM
Hand-tearing Llama3 layer 1: Implementing llama3 from scratch
Jun 01, 2024 pm 05:45 PM
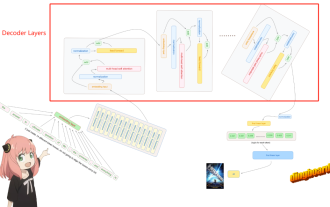
1. Architecture of Llama3 In this series of articles, we implement llama3 from scratch. The overall architecture of Llama3: Picture the model parameters of Llama3: Let's take a look at the actual values of these parameters in the Llama3 model. Picture [1] Context window (context-window) When instantiating the LlaMa class, the variable max_seq_len defines context-window. There are other parameters in the class, but this parameter is most directly related to the transformer model. The max_seq_len here is 8K. Picture [2] Vocabulary-size and AttentionL
