

nginx安装与配置

从今开始,学nginx #安装pcre [root@svr3 ~]# tar -xjf pcre-8.02.tar.bz2 -C /usr/src/ [root@svr3 ~]# cd /usr/src/pcre-8.02/ [root@svr3 pcre-8.02]# ./configure make make install #安装nginx [root@svr3 ~]# useradd -M -s /sbin/nologin nginx [root
从今开始,学nginx
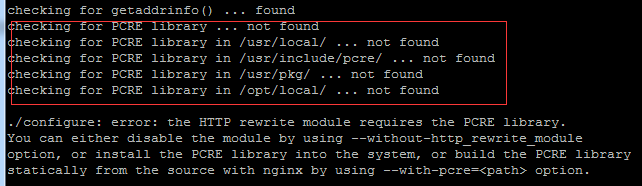
#安装pcre
[root@svr3 ~]# tar -xjf pcre-8.02.tar.bz2 -C /usr/src/
[root@svr3 ~]# cd /usr/src/pcre-8.02/
[root@svr3 pcre-8.02]# ./configure && make && make install
#安装nginx
[root@svr3 ~]# useradd -M -s /sbin/nologin nginx
[root@svr3 ~]# tar -xzf nginx-1.0.5.tar.gz -C /usr/src/
[root@svr3 ~]# cd /usr/src/nginx-1.0.5/
[root@svr3 nginx-1.0.5]# ./configure --prefix=/usr/local/nginx --user=nginx --group=nginx
[root@svr3 nginx-1.0.5]# make && make install
[root@svr3 ~]#vim /usr/local/nginx/conf/nginx.conf
+++++++++++++++相关说明+++++++++++++++++++++++++++++
user nginx; #用户使用nginx
worker_processes 1; #程序启动后,初始化的进程数;内核多的话,可根据内核数量设置。
#error_log logs/error.log;
#error_log logs/error.log notice;
error_log logs/error.log info; #设置错误日志的记录级别
pid logs/nginx.pid; #重启关闭nginx时,需要知道pid文件。
worker_rlimit_nofile 51000;
#
events {
worker_connections 50000; #允许的连接数,我这里设置50000个。
}
http {
include mime.types;
default_type application/octet-stream;
#log_format main '$remote_addr - $remote_user [$time_local] "$request" '
# '$status $body_bytes_sent "$http_referer" '
# '"$http_user_agent" "$http_x_forwarded_for"';
#access_log logs/access.log main;
sendfile on;
tcp_nopush on;
#keepalive_timeout 0;
keepalive_timeout 30;
gzip on; #允许gzip压缩。
gzip_buffers 32 4k;
gzip_comp_level 1;
gzip_min_length 1024;
gzip_types text/html text/css application/xml;
server {
listen 80;
server_name localhost;
#charset koi8-r;
access_log logs/host.access.log main;
location / {
root html; #目录
index index.html index.htm; #index类型
}
#error_page 404 /404.html;
# redirect server error pages to the static page /50x.html
#
error_page 500 502 503 504 /50x.html;
location = /50x.html {
root html;
}
#这里是关于转发的部分
# proxy the PHP scripts to Apache listening on 127.0.0.1:80
#
#location ~ \.php$ {
# proxy_pass http://127.0.0.1;
#}
#fastcgi的部分
# pass the PHP scripts to FastCGI server listening on 127.0.0.1:9000
#
#location ~ \.php$ {
# root html;
# fastcgi_pass 127.0.0.1:9000;
# fastcgi_index index.php;
# fastcgi_param SCRIPT_FILENAME /scripts$fastcgi_script_name;
# include fastcgi_params;
#}
# deny access to .htaccess files, if Apache's document root
# concurs with nginx's one
#
#location ~ /\.ht {
# deny all;
#}
}
# another virtual host using mix of IP-, name-, and port-based configuration
虚拟主机的部分
}
+++++++++++++++++++++++++++++++++++++++++++++
现在就配置一台主机,改了以下内容:
server {
listen 80;
server_name svr3.labexam.com 10.1.1.30;
#charset koi8-r;
access_log logs/w1.access.log combined;
location / {
root /var/www/w1;
index index.html index.htm;
}
#看了下日志
[root@svr3 nginx]# tail /usr/local/nginx/logs/w1.access.log
10.1.1.8 - - [15/Aug/2011:02:21:50 +0800] "GET / HTTP/1.1" 200 8 "-" "Opera/9.80 (Windows NT 5.1; U; zh-cn) Presto/2.9.168 Version/11.50"
10.1.1.8 - - [15/Aug/2011:02:21:50 +0800] "GET /favicon.ico HTTP/1.1" 404 142 "http://svr3.labexam.com/" "Opera/9.80 (Windows NT 5.1; U; zh-cn) Presto/2.9.168 Version/11.50"
===>如何启动nginx?
方法1、执行/usr/local/nginx/sbin/nginx -t 检查配置文件是否有误!或是直接执行/usr/local/nginx/sbin/nginx
如果有多个配置文件可以使用指定的配置文件启动:
#/usr/local/nginx/sbin/nginx -c /usr/local/nginx/conf/nginx.conf
===> nginx的信号控制:
TERM,INT 快速关闭
QUIT 从容关闭
HUP 重启,重新加载配置文件
USR1 重启打开日志,在切割日志时用途大
USR2 平滑升级可执行程序
WINCH 从容关闭进程
本文出自 “潜入技术的海洋” 博客

Hot AI Tools

Undresser.AI Undress
AI-powered app for creating realistic nude photos

AI Clothes Remover
Online AI tool for removing clothes from photos.

Undress AI Tool
Undress images for free

Clothoff.io
AI clothes remover

AI Hentai Generator
Generate AI Hentai for free.

Hot Article
Hot Tools

Notepad++7.3.1
Easy-to-use and free code editor

SublimeText3 Chinese version
Chinese version, very easy to use

Zend Studio 13.0.1
Powerful PHP integrated development environment

Dreamweaver CS6
Visual web development tools

SublimeText3 Mac version
God-level code editing software (SublimeText3)
Hot Topics
 1377
1377
 52
52

 How to allow external network access to tomcat server
Apr 21, 2024 am 07:22 AM
How to allow external network access to tomcat server
Apr 21, 2024 am 07:22 AM
To allow the Tomcat server to access the external network, you need to: modify the Tomcat configuration file to allow external connections. Add a firewall rule to allow access to the Tomcat server port. Create a DNS record pointing the domain name to the Tomcat server public IP. Optional: Use a reverse proxy to improve security and performance. Optional: Set up HTTPS for increased security.
 How to generate URL from html file
Apr 21, 2024 pm 12:57 PM
How to generate URL from html file
Apr 21, 2024 pm 12:57 PM
Converting an HTML file to a URL requires a web server, which involves the following steps: Obtain a web server. Set up a web server. Upload HTML file. Create a domain name. Route the request.
 Can nodejs be accessed from the outside?
Apr 21, 2024 am 04:43 AM
Can nodejs be accessed from the outside?
Apr 21, 2024 am 04:43 AM
Yes, Node.js can be accessed from the outside. You can use the following methods: Use Cloud Functions to deploy the function and make it publicly accessible. Use the Express framework to create routes and define endpoints. Use Nginx to reverse proxy requests to Node.js applications. Use Docker containers to run Node.js applications and expose them through port mapping.
 How to deploy and maintain a website using PHP
May 03, 2024 am 08:54 AM
How to deploy and maintain a website using PHP
May 03, 2024 am 08:54 AM
To successfully deploy and maintain a PHP website, you need to perform the following steps: Select a web server (such as Apache or Nginx) Install PHP Create a database and connect PHP Upload code to the server Set up domain name and DNS Monitoring website maintenance steps include updating PHP and web servers, and backing up the website , monitor error logs and update content.
 How to use Fail2Ban to protect your server from brute force attacks
Apr 27, 2024 am 08:34 AM
How to use Fail2Ban to protect your server from brute force attacks
Apr 27, 2024 am 08:34 AM
An important task for Linux administrators is to protect the server from illegal attacks or access. By default, Linux systems come with well-configured firewalls, such as iptables, Uncomplicated Firewall (UFW), ConfigServerSecurityFirewall (CSF), etc., which can prevent a variety of attacks. Any machine connected to the Internet is a potential target for malicious attacks. There is a tool called Fail2Ban that can be used to mitigate illegal access on the server. What is Fail2Ban? Fail2Ban[1] is an intrusion prevention software that protects servers from brute force attacks. It is written in Python programming language
 Come with me to learn Linux and install Nginx
Apr 28, 2024 pm 03:10 PM
Come with me to learn Linux and install Nginx
Apr 28, 2024 pm 03:10 PM
Today, I will lead you to install Nginx in a Linux environment. The Linux system used here is CentOS7.2. Prepare the installation tools 1. Download Nginx from the Nginx official website. The version used here is: 1.13.6.2. Upload the downloaded Nginx to Linux. Here, the /opt/nginx directory is used as an example. Run "tar-zxvfnginx-1.13.6.tar.gz" to decompress. 3. Switch to the /opt/nginx/nginx-1.13.6 directory and run ./configure for initial configuration. If the following prompt appears, it means that PCRE is not installed on the machine, and Nginx needs to
 Several points to note when building high availability with keepalived+nginx
Apr 23, 2024 pm 05:50 PM
Several points to note when building high availability with keepalived+nginx
Apr 23, 2024 pm 05:50 PM
After yum installs keepalived, configure the keepalived configuration file. Note that in the keepalived configuration files of master and backup, the network card name is the network card name of the current machine. VIP is selected as an available IP. It is usually used in high availability and LAN environments. There are many, so this VIP is an intranet IP in the same network segment as the two machines. If used in an external network environment, it does not matter whether it is on the same network segment, as long as the client can access it. Stop the nginx service and start the keepalived service. You will see that keepalived pulls the nginx service to start. If it cannot start and fails, it is basically a problem with the configuration files and scripts, or a prevention problem.
 How to implement PHP security best practices
May 05, 2024 am 10:51 AM
How to implement PHP security best practices
May 05, 2024 am 10:51 AM
How to Implement PHP Security Best Practices PHP is one of the most popular backend web programming languages used for creating dynamic and interactive websites. However, PHP code can be vulnerable to various security vulnerabilities. Implementing security best practices is critical to protecting your web applications from these threats. Input validation Input validation is a critical first step in validating user input and preventing malicious input such as SQL injection. PHP provides a variety of input validation functions, such as filter_var() and preg_match(). Example: $username=filter_var($_POST['username'],FILTER_SANIT
