How to use zen coding in dreamweaver_HTML/Xhtml_webpage production
After I published my last article "Zen Coding: A quick way to write HTML/CSS code", some netizens expressed that they did not know how to use the zen coding plug-in on Dreamweaver. OK, today I will write a detailed tutorial on how to use zen coding in DW. If you already know how to use it, you can stop reading this article.
The good news is that I tested it on Dreamweaver CS3, which proved that both Dreamweaver CS3 and CS4 support the Zen coding plug-in.
Get ready
Before installing the plug-in, please make sure you have installed Adobe Extention Manager. If not, please download and install it from Adobe official website:
- DW CS3 needs to install Extention Manager version 1.8, visit the download page, or download directly;
- DW CS4 needs to install Extention Manager 2.0 version, visit the download page, or directly download ;
Download and install
Go to zen coding project homepage to download the latest zen coding plug-in for dreamweaver. There is a download list in the right column of the page, which is the one with the extension mxp. (The current version is 0.7, you can click here to download , there is a version packaged by qianduan, but the official new version is 0.7, it is recommended to use the official one.).
After downloading, double-click the Zen Coding v.0.7.mxp file you downloaded to install it directly. It is very simple.
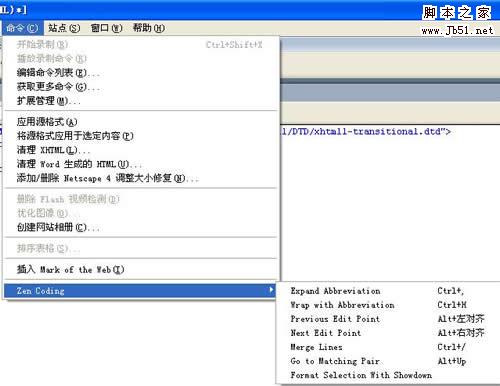
Restart DW after installation, and then you will find the zen coding submenu under the command menu, as shown below:

This means that the installation has been successful.
How to use
The usage of zen coding is also very simple. Create a new one or switch to the code view in any html file and write zencoding format code, such as:
ul#nav>li*4>a
Then, select this line of code and press the shortcut key CTRL to generate the complete HTML code:
It’s that simple.
Modify Dreamweaver shortcut keys
Maybe you are not used to using the default shortcut keys of the zen coding plug-in, then you can easily modify the shortcut keys:
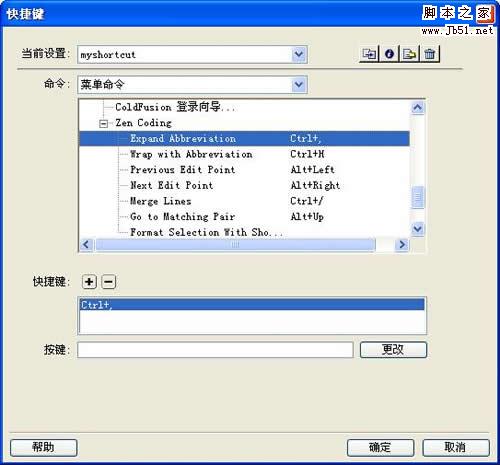
Select the "Shortcut Keys" submenu under the "Edit" menu to edit the shortcut keys. The interface is as shown below:

The shortcut key row displays the current shortcut key. If you need to change it, move the cursor to the input box behind the key, then directly press the key you want to use on the keyboard, click the "Change" button, and then Sure.
If you modify the shortcut keys, please be careful not to conflict with the currently used shortcut keys.
In addition, the default shortcut key settings cannot be modified. You will be prompted when you change them. You can follow the prompts to create a new setting.

Hot AI Tools

Undresser.AI Undress
AI-powered app for creating realistic nude photos

AI Clothes Remover
Online AI tool for removing clothes from photos.

Undress AI Tool
Undress images for free

Clothoff.io
AI clothes remover

AI Hentai Generator
Generate AI Hentai for free.

Hot Article

Hot Tools

Notepad++7.3.1
Easy-to-use and free code editor

SublimeText3 Chinese version
Chinese version, very easy to use

Zend Studio 13.0.1
Powerful PHP integrated development environment

Dreamweaver CS6
Visual web development tools

SublimeText3 Mac version
God-level code editing software (SublimeText3)

Hot Topics
 How to adjust text position in dreamweaver
Apr 09, 2024 am 02:24 AM
Adjusting the text position in Dreamweaver can be completed by the following steps: Select the text and use the text position adjuster to make horizontal adjustments: left alignment, right alignment, center alignment; 2. Make vertical adjustments: top alignment, bottom alignment, vertical center; 3. Press Shift key and use the arrow keys to fine-tune the position; 4. Use shortcut keys to quickly align: left alignment (Ctrl/Cmd + L), right alignment (Ctrl/Cmd + R), center alignment (Ctrl/Cmd + C).
 How to add video to dreamweaver webpage production
Apr 09, 2024 am 01:42 AM
Embed video using Dreamweaver: Insert a video element. Select and upload a video file. Set video type, URL, size, autoplay and controls. Insert video. Optional: Customize the video appearance.
 How to adjust line spacing in dreamweaver
Apr 09, 2024 am 03:00 AM
Adjusting line spacing in Dreamweaver is a four-step process: select the text, open the Paragraph panel, adjust the Line Spacing options, and finally click OK to apply the changes.
 How to set text size in dreamweaver
Apr 09, 2024 am 02:18 AM
To set text size in Dreamweaver, just: Select the text Go to the Text menu Select Font Size Select the desired size Press Enter to save
 How to set dreamweaver font
Apr 09, 2024 am 02:54 AM
You can set fonts in Dreamweaver by selecting a font, size, and color using the Properties panel. Use CSS to set fonts for your entire website or specific elements. Set the font directly in the HTML code using the "font" tag.
 How to set the web design software Dreamweaver to Chinese
Apr 09, 2024 am 12:39 AM
To set Dreamweaver to Chinese, follow these steps: Open Dreamweaver; change User Interface Language to Simplified Chinese or Traditional Chinese in the preferences; restart Dreamweaver; check the Help menu About Dreamweaver" item to verify the language settings.
 How to indent text in dreamweaver
Apr 09, 2024 am 02:15 AM
There are four ways to indent text in Dreamweaver: Indent a single paragraph: Format > Paragraph > Indent Indent multiple paragraphs: Set the indent value in the paragraph panel Use style: Set the indent value in the paragraph style dialog box Use indent Key: Tab key to indent right, Shift + Tab key to indent left
 How to add pictures to dreamweaver
Apr 09, 2024 am 03:30 AM
To insert a picture in Dreamweaver, click the Insert menu and choose Image, then navigate to the picture file and select it. Other methods include dragging and dropping files or inserting HTML code directly. Adjusting properties includes changing size, alignment, adding borders, and entering alt text.


