

javaWeb项目SpringMVC3.2.1与Mybatis3.0.4整合实例(Mybaits

网上有许多关于SpringMVC与Mybatis整合的实例,但是由于Mybaits-spring有好几种配置方式,这样看起来会觉得很乱,不知道哪个是对的,觉得很复杂(至少我的感觉是这样的)。把关于这块的学习过程记录下来,留作备注同时与大家分享交流。 工具 :eclipse-luna、m
网上有许多关于SpringMVC与Mybatis整合的实例,但是由于Mybaits-spring有好几种配置方式,这样看起来会觉得很乱,不知道哪个是对的,觉得很复杂(至少我的感觉是这样的)。把关于这块的学习过程记录下来,留作备注同时与大家分享交流。
工具:eclipse-luna、mysql数据库
SpringMVC版本:3.2.1
Mybatis版本:3.0.4
Mybaits-spring版本:
服务器:tomcat7.0.57
文件结构:

项目所使用的lib包截图:
我们按照javaWeb项目在服务器中执行顺序(web项目首先加载web.xml文件)来说:
web.xml文件:在文件中,我们需要配置Spring的监听器ContextLoaderListener和SpringMVC的转发器DispatcherServlet,在web.xml中加入如下代码
  <!--
  	说明:
  	我的所有的配置文件(.xml)都放在了WEB-INF/下,所以文件路径配置成了这种形式:<param-value>/WEB-INF/spring-applicationContext.xml</param-value>
  	如果你想把某一些配置文件(.xml)放到类路径下(也就是src文件下),形式为:<param-value>classpath:spring-applicationContext.xml</param-value>
   -->
  <!-- 配置Spring-start -->
  	<listener>
		<listener-class>org.springframework.web.context.ContextLoaderListener</listener-class>
  	</listener>
  <!-- 配置Spring-end -->

  <!-- 配置Spring的上下文参数-start-->
  	<context-param>
		<param-name>contextConfigLocation</param-name>
		<param-value>/WEB-INF/spring-applicationContext.xml</param-value>
  	</context-param>
  <!-- 配置Spring的上下文参数-end -->

  <filter>
  	<filter-name>encodingFilter</filter-name>
  	<filter-class>org.springframework.web.filter.CharacterEncodingFilter</filter-class>
  	<init-param>
  		<param-name>encoding</param-name>
  		<param-value>utf-8</param-value>
  	</init-param>
  </filter>

  <filter-mapping>
  	<filter-name>encodingFilter</filter-name>
  	<url-pattern>*.yy</url-pattern>
  </filter-mapping>

  <filter-mapping>
  	<filter-name>encodingFilter</filter-name>
  	<url-pattern>*.jsp</url-pattern>
  </filter-mapping>

  <!-- 配置SpringMVC-start  -->
  <servlet>
        <servlet-name>springmvc</servlet-name>
        <servlet-class>org.springframework.web.servlet.DispatcherServlet</servlet-class>
	        <init-param>
	        	 <param-name>contextConfigLocation</param-name>
	      		 <param-value>/WEB-INF/spring-dispatcher.xml</param-value>
	        </init-param>
        <load-on-startup>1</load-on-startup>
  </servlet>

  <servlet-mapping>
        <servlet-name>springmvc</servlet-name>
        <url-pattern>*.yy</url-pattern>
  </servlet-mapping>
<!-- 配置SpringMVC-end -->在web.xml文件中,包含spring的配置文件:spring-applicationContext.xml ;SpringMVC的配置文件:spring-dispatcher.xml。
spring-dispatcher.xml文件:在文件中加入如下代码
<!-- 扫描所以的bean包,解析@Controller @service等注解,自动set所用到的下一层的bean属性 -->
    <component-scan base-package="com.yy"></component-scan>
    <!-- 模型视图名称解析 -->
    <bean id="viewResolver" class="org.springframework.web.servlet.view.InternalResourceViewResolver">
        <!-- 如果使用jstl的话,配置下面的属性-->
        <property name="viewClass">
            <value>org.springframework.web.servlet.view.JstlView</value>
        </property>
        <property name="prefix" value="/"></property>
        <property name="suffix" value=".jsp"></property>
</bean>spring-applicationContext.xml文件:在文件中加入如下代码
 <!-- 由于spring-dispatcher文件已经加了下面这句话,所以这里加不加都行,但是spring-dispatcher是必须要加的,否则报错 -->
    <!--  <context:component-scan base-package="com.yy" /> -->
    <!-- 读取资源文件 -->
    <!-- 第一种写法 -->
    <property-placeholder location="WEB-INF/jdbc.properties"></property-placeholder>
    <!-- 第二种写法
	<bean class="org.springframework.beans.factory.config.PropertyPlaceholderConfigurer">
		<property name="location" value="WEB-INF/jdbc.properties" />
	</bean>
	 -->
	<bean id="dataSource" class="org.springframework.jdbc.datasource.DriverManagerDataSource">
		<property name="driverClassName">
			<value>${driverClassName}</value>
		</property>
		<property name="password">
			<value>${password}</value>
		</property>
		<property name="username">
			<value>${username}</value>
		</property>
		<property name="url">
			<value>${url}</value>
		</property>
	</bean>

<import resource="spring-mybatis.xml"></import>jdbc.properties文件:在文件中加入如下代码
driverClassName=com.mysql.jdbc.Driver
url=jdbc:mysql://localhost:3306/你的数据库名字
username=root
password=root
spring-mybatis.xml文件:在文件中加入如下代码
  <bean id="sqlSessionFactory" class="org.mybatis.spring.SqlSessionFactoryBean">
	<property name="dataSource" ref="dataSource"></property>
	<property name="configLocation" value="WEB-INF/mybatis-config.xml"></property></bean>
<span style="white-space:pre">	</span><!-- 当BuyOrderMapper.java与BuyOrderMapper.xml文件在同一个包下时,不需要配置mapperLocations属性;相反,则必须配置 -->
	<property name="mapperLocations">
		<list>
			<value>classpath:com/yy/mapper/**/*Mapper.xml</value>
		</list>
	</property>


<bean id="sqlSession" class="org.mybatis.spring.SqlSessionTemplate">
	<constructor-arg index="0" ref="sqlSessionFactory"></constructor-arg>
</bean>
mybatis-config.xml文件:在文件中加入如下代码
配置文件到这里就配置完了,下面我们说一下controller、service、dao、model四层的代码
controller层:
package com.yy.controller;

import javax.annotation.Resource;
import javax.servlet.http.HttpServletRequest;
import javax.servlet.http.HttpServletResponse;

import org.springframework.stereotype.Controller;
import org.springframework.web.bind.annotation.RequestMapping;
import org.springframework.web.servlet.ModelAndView;

import com.yy.model.Order;
import com.yy.service.BuyOrderService;

@Controller
@RequestMapping("buyOrder")
public class BuyOrderController {

	@Resource
	private BuyOrderService buyOrderService;

	@RequestMapping("/addBuyOrder")
	public ModelAndView addBuyOrder(HttpServletRequest resquest,HttpServletResponse response){
		return new ModelAndView("/test");
	}

	@RequestMapping("/deleteBuyOrder")
	public ModelAndView deleteBuyOrder(HttpServletRequest resquest,HttpServletResponse response){
		return new ModelAndView("/test");
	}

	@RequestMapping("/getBuyOrderById")
	public ModelAndView getBuyOrderById(int id,HttpServletRequest resquest,HttpServletResponse response){
		Order order = buyOrderService.getBuyOrderById(id);
		System.out.println(order.getId()+"+++"+order.getId());
		return new ModelAndView("/test");
	}

	@RequestMapping("/getBuyOrderList")
	public ModelAndView getBuyOrderList(HttpServletRequest resquest,HttpServletResponse response){
		return new ModelAndView("/test");
	}
}service层
package com.yy.service;

import com.yy.model.Order;

public interface BuyOrderService {

	public Order getBuyOrderById(int id);

	public void addBuyOrder(Order order);
}
package com.yy.service.Impl;

import javax.annotation.Resource;

import org.springframework.stereotype.Service;

import com.yy.dao.BuyOrderDao;
import com.yy.model.Order;
import com.yy.service.BuyOrderService;

@Service
public class BuyOrderServiceImpl implements BuyOrderService{

	@Resource
	private BuyOrderDao buyOrderDao;

	@Override
	public Order getBuyOrderById(int id) {
		return buyOrderDao.getBuyOrderById(id);
	}

	@Override
	public void addBuyOrder(Order order) {
		buyOrderDao.addBuyOrder(order);
	}

}dao层
package com.yy.dao;

import com.yy.model.Order;

public interface BuyOrderDao {

	Order getBuyOrderById(int id);

	void addBuyOrder(Order order);

}mapper映射器类、映射器xml文件
映射器类文件
package com.yy.mapper;

import org.mybatis.spring.support.SqlSessionDaoSupport;
import org.springframework.stereotype.Repository;

import com.yy.dao.BuyOrderDao;
import com.yy.model.Order;

@Repository
public class BuyOrderMapper extends SqlSessionDaoSupport implements BuyOrderDao {

	@Override
	public Order getBuyOrderById(int id) {
		return (Order)this.getSqlSession().selectOne("com.yy.mapper.BuyOrderMapper.getBuyOrderById", id);
	}

	@Override
	public void addBuyOrder(Order order) {
		this.getSqlSession().insert("org.mybatis.spring.com.yy.mapper.addBuyOrder",order);
	}
}
<?xml version="1.0" encoding="UTF-8" ?>


<mapper namespace="com.yy.mapper.BuyOrderMapper">
	<select id="getBuyOrderById" parametertype="int" resulttype="com.yy.model.Order">
		select * from order1 where id = #{id}
	</select>
</mapper>model层
package com.yy.model;

import java.sql.Date;

public class Order {
	private int id;
	private String code;
	private String username;
	private String tel;
	private String addresss;
	private Date create_time;

	public Order(){}

	public Order(int id, String code, String username, String tel,String addresss, Date create_time) {
		super();
		this.id = id;
		this.code = code;
		this.username = username;
		this.tel = tel;
		this.addresss = addresss;
		this.create_time = create_time;
	}

	public int getId() {
		return id;
	}
	public void setId(int id) {
		this.id = id;
	}
	public String getCode() {
		return code;
	}
	public void setCode(String code) {
		this.code = code;
	}
	public String getUsername() {
		return username;
	}
	public void setUsername(String username) {
		this.username = username;
	}
	public String getTel() {
		return tel;
	}
	public void setTel(String tel) {
		this.tel = tel;
	}
	public String getAddresss() {
		return addresss;
	}
	public void setAddresss(String addresss) {
		this.addresss = addresss;
	}
	public Date getCreate_time() {
		return create_time;
	}
	public void setCreate_time(Date create_time) {
		this.create_time = create_time;
	}
}
前台jsp文件:
index.jsp
<meta http-equiv="Content-Type" content="text/html; charset=ISO-8859-1">
<base href="<%=basePath%>">
<title>Insert title here</title>
<a href="buyOrder/getBuyOrderById.yy">欢è¿</a><br>
<meta http-equiv="Content-Type" content="text/html; charset=ISO-8859-1">
<base href="<%=basePath%>">
<title>Insert title here</title>


	<a href="jsp/welcome.jsp">test</a>
æ°æ®sqlæ件ï¼
DROP TABLE IF EXISTS `order1`;
CREATE TABLE `order1` (
`id` int(10) NOT NULL AUTO_INCREMENT,
`code` varchar(20) DEFAULT NULL,
`username` varchar(20) DEFAULT NULL,
`tel` varchar(20) DEFAULT NULL,
`address` varchar(20) DEFAULT NULL,
`create_time` datetime DEFAULT NULL,
PRIMARY KEY (`id`)
) ENGINE=InnoDB AUTO_INCREMENT=3 DEFAULT CHARSET=utf8;
-- ----------------------------
-- Records of order1
-- ----------------------------
INSERT INTO `order1` VALUES ('1', '001', 'yy', '123456', 'äºæ´²', '2014-12-16 16:19:51');
INSERT INTO `order1` VALUES ('2', '002', 'yyy', '654321', '欧洲', '2014-12-24 16:21:04');
å°è¿éï¼ä»£ç å°±å ¨é¨åç°äºãåªéçç»èä½ è§å¾ä¸æç½ï¼æ¬¢è¿äº¤æµ

Hot AI Tools

Undresser.AI Undress
AI-powered app for creating realistic nude photos

AI Clothes Remover
Online AI tool for removing clothes from photos.

Undress AI Tool
Undress images for free

Clothoff.io
AI clothes remover

Video Face Swap
Swap faces in any video effortlessly with our completely free AI face swap tool!

Hot Article
Hot Tools

Notepad++7.3.1
Easy-to-use and free code editor

SublimeText3 Chinese version
Chinese version, very easy to use

Zend Studio 13.0.1
Powerful PHP integrated development environment

Dreamweaver CS6
Visual web development tools

SublimeText3 Mac version
God-level code editing software (SublimeText3)
Hot Topics
 1387
1387
 52
52

 Share an easy way to package PyCharm projects
Dec 30, 2023 am 09:34 AM
Share an easy way to package PyCharm projects
Dec 30, 2023 am 09:34 AM
Share the simple and easy-to-understand PyCharm project packaging method. With the popularity of Python, more and more developers use PyCharm as the main tool for Python development. PyCharm is a powerful integrated development environment that provides many convenient functions to help us improve development efficiency. One of the important functions is project packaging. This article will introduce how to package projects in PyCharm in a simple and easy-to-understand way, and provide specific code examples. Why package projects? Developed in Python
 Can AI conquer Fermat's last theorem? Mathematician gave up 5 years of his career to turn 100 pages of proof into code
Apr 09, 2024 pm 03:20 PM
Can AI conquer Fermat's last theorem? Mathematician gave up 5 years of his career to turn 100 pages of proof into code
Apr 09, 2024 pm 03:20 PM
Fermat's last theorem, about to be conquered by AI? And the most meaningful part of the whole thing is that Fermat’s Last Theorem, which AI is about to solve, is precisely to prove that AI is useless. Once upon a time, mathematics belonged to the realm of pure human intelligence; now, this territory is being deciphered and trampled by advanced algorithms. Image Fermat's Last Theorem is a "notorious" puzzle that has puzzled mathematicians for centuries. It was proven in 1993, and now mathematicians have a big plan: to recreate the proof using computers. They hope that any logical errors in this version of the proof can be checked by a computer. Project address: https://github.com/riccardobrasca/flt
 A closer look at PyCharm: a quick way to delete projects
Feb 26, 2024 pm 04:21 PM
A closer look at PyCharm: a quick way to delete projects
Feb 26, 2024 pm 04:21 PM
Title: Learn more about PyCharm: An efficient way to delete projects. In recent years, Python, as a powerful and flexible programming language, has been favored by more and more developers. In the development of Python projects, it is crucial to choose an efficient integrated development environment. As a powerful integrated development environment, PyCharm provides Python developers with many convenient functions and tools, including deleting project directories quickly and efficiently. The following will focus on how to use delete in PyCharm
 PyCharm Practical Tips: Convert Project to Executable EXE File
Feb 23, 2024 am 09:33 AM
PyCharm Practical Tips: Convert Project to Executable EXE File
Feb 23, 2024 am 09:33 AM
PyCharm is a powerful Python integrated development environment that provides a wealth of development tools and environment configurations, allowing developers to write and debug code more efficiently. In the process of using PyCharm for Python project development, sometimes we need to package the project into an executable EXE file to run on a computer that does not have a Python environment installed. This article will introduce how to use PyCharm to convert a project into an executable EXE file, and give specific code examples. head
 How to Analyze Code Auditing in Java Web Security
May 16, 2023 am 08:04 AM
How to Analyze Code Auditing in Java Web Security
May 16, 2023 am 08:04 AM
1. JavaWeb Security Basics 1. What is code auditing? In layman’s terms, Java code auditing is to discover security issues in the Java application itself by auditing Java code. Since Java itself is a compiled language, even if there are only class files We can still audit Java code. For uncompiled Java source code files, we can read the source code directly, but for compiled class or jar files, we need to decompile them. Java code auditing itself is not very difficult. As long as you are proficient in the auditing process and common vulnerability auditing techniques, you can complete the code auditing work relatively easily. But the way of Java code auditing is not just to use
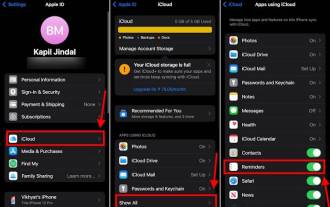 How to Make a Shopping List in the iOS 17 Reminders App on iPhone
Sep 21, 2023 pm 06:41 PM
How to Make a Shopping List in the iOS 17 Reminders App on iPhone
Sep 21, 2023 pm 06:41 PM
How to Make a GroceryList on iPhone in iOS17 Creating a GroceryList in the Reminders app is very simple. You just add a list and populate it with your items. The app automatically sorts your items into categories, and you can even work with your partner or flat partner to make a list of what you need to buy from the store. Here are the full steps to do this: Step 1: Turn on iCloud Reminders As strange as it sounds, Apple says you need to enable reminders from iCloud to create a GroceryList on iOS17. Here are the steps for it: Go to the Settings app on your iPhone and tap [your name]. Next, select i
 What to do if there is an error when starting the react project
Dec 27, 2022 am 10:36 AM
What to do if there is an error when starting the react project
Dec 27, 2022 am 10:36 AM
Solution to the error when starting the react project: 1. Enter the project folder, start the project and view the error message; 2. Execute the "npm install" or "npm install react-scripts" command; 3. Execute "npm install @ant-design/ pro-field --save" command.
 Based on the open source ChatGPT Web UI project, quickly build your own ChatGPT site
Apr 15, 2023 pm 07:43 PM
Based on the open source ChatGPT Web UI project, quickly build your own ChatGPT site
Apr 15, 2023 pm 07:43 PM
As a technology blogger, Fengfeng prefers all kinds of tossing. I have previously introduced ChatGPT to connect to WeChat, DingTalk and Knowledge Planet (if you haven’t seen it, you can read the previous article). Recently, when I looked at open source projects , discovered a ChatGPTWebUI project. Thinking that I have never connected ChatGPT to WebUI before, it is really good to have this open source project to use. Here are the practical installation steps to share with everyone. The installation official provides many installation methods on Github’s project documentation, including manual installation, docker deployment, and remote deployment. It’s amazing that when choosing a deployment method, I thought about simplicity at first.
