

自己动手写CPU之第八阶段(4)转移指令实现过程2

将陆续上传本人写的新书《 自己动手写CPU 》,今天是第36篇,我尽量每周四篇 开展晒书评送书活动,在亚马逊、京东、当当三大图书网站上,发表《自己动手写CPU》书评的前十名读者,均可获赠《步步惊芯——软核 处理器 内部 设计 分析 》一书,大家踊跃参与吧
将陆续上传本人写的新书《自己动手写CPU》,今天是第36篇,我尽量每周四篇
开展晒书评送书活动,在亚马逊、京东、当当三大图书网站上,发表《自己动手写CPU》书评的前十名读者,均可获赠《步步惊芯——软核处理器内部设计分析》一书,大家踊跃参与吧!活动时间:2014-9-11至2014-10-20
8.4.3 修改执行阶段的EX 模块
参考图8-6可知,EX模块需要增加一些接口,增加的接口描述如表8-4所示。
EX模块的代码主要修改如下,完整代码请参考本书附带光盘Code\Chapter8目录下的ex.v文件。
module ex(

  ......

  // 处于执行阶段的转移指令要保存的返回地址
  input wire[`RegBus]           link_address_i,

  // 当前执行阶段的指令是否位于延迟槽
  input wire                    is_in_delayslot_i,

  ......

);

  ......

  always @ (*) begin

  ......

    case ( alusel_i )
      `EXE_RES_LOGIC:		begin
        wdata_o <br>

<p>      如果alusel_o为EXE_RES_JUMP_BRANCH,那么就将返回地址link_address_i作为要写入目的寄存器的值赋给wdata_o。</p>
<p>      注意一点,此处并没有利用输入的信号is_in_delayslot_i,该信号表示当前处于执行阶段的指令是否是延迟槽指令,这个信号会在异常处理过程中使用到,本章暂时不需要。</p>
<h3 id="修改OpenMIPS模块">8.4.4 修改OpenMIPS模块</h3>
<p>      因为有一些模块添加了接口,所以需要修改顶层模块OpenMIPS,以将这些新增加的接口按照图8-6所示的关系连接起来。具体修改也很简单,不在书中列出,读者可以参考本书附带光盘Code\Chapter8目录下的openmips.v文件。</p>
<h2 id="测试转移指令的实现效果">8.5 测试转移指令的实现效果</h2>
<p>      本节将通过两个测试程序验证转移指令是否实现正确,这两个测试程序分别验证跳转指令、分支指令。</p>
<h3 id="测试跳转指令">8.5.1 测试跳转指令</h3>
<p>      测试代码如下,源文件是本书光盘Code\Chapter8\AsmTest\Test1目录下的inst_rom.S文件。</p>
<pre class="brush:php;toolbar:false">.org 0x0
.set noat
.set noreorder      # 添加这个伪操作,指示编译器不要对程序做出任何优化或是改动
.set nomacro
.global _start
_start:
   ori  $1,$0,0x0001   # (1)$1 = 0x1
   j    0x20           #  转移到0x20处
   ori  $1,$0,0x0002   # (2)$1 = 0x2,这是延迟槽指令
   ori  $1,$0,0x1111
   ori  $1,$0,0x1100

   .org 0x20
   ori  $1,$0,0x0003   # (3)$1 = 0x3
   jal  0x40           #  转移到0x40处,同时设置$31为0x2c
   div  $zero,$31,$1   # (4)此时$31 = 0x2c, $1 = 0x3,所以得到除法结果
                       #     HI = 0x2, LO = 0xe,这是延迟槽指令

   ori  $1,$0,0x0005   # (6)$1 = 0x5
   ori  $1,$0,0x0006   # (7)$1 = 0x6
   j    0x60           #  转移到0x60处
   nop

   .org 0x40
   jalr $2,$31          #  此时$31为0x2c,所以转移到0x2c,同时设置$2为0x48
   or   $1,$2,$0        # (5)$1 = 0x48,这是延迟槽指令

   ori  $1,$0,0x0009    # (10)$1 = 0x9
   ori  $1,$0,0x000a    # (11)$1 = 0xa
   j 0x80               #  转移到0x80处
   nop

   .org 0x60
   ori  $1,$0,0x0007    # (8)$1 = 0x7
   jr   $2              #  此时$2为0x48,所以转移到0x48处
   ori  $1,$0,0x0008    # (9)$1 = 0x8,这是延迟槽指令
   ori  $1,$0,0x1111
   ori  $1,$0,0x1100

   .org 0x80
   nop

_loop:
   j _loop
   nop
8.5.2 测试分支指令
测试代码如下,源文件是本书光盘Code\Chapter8\AsmTest\Test2目录下的inst_rom.S文件。
.org 0x0
   .set noat
   .set noreorder
   .set nomacro
   .global _start
_start:
   ori  $3,$0,0x8000
   sll  $3,16               # 设置$3 = 0x80000000
   ori  $1,$0,0x0001        #(1)$1 = 0x1
   b    s1                  # 转移到s1处
   ori  $1,$0,0x0002        #(2)$1 = 0x2,这是延迟槽指令
1:
   ori  $1,$0,0x1111
   ori  $1,$0,0x1100

   .org 0x20
s1:
   ori  $1,$0,0x0003        #(3)$1 = 0x3
   bal  s2                  # 转移到s2处,同时设置$31为0x2c
   div  $zero,$31,$1        #(4)此时$31 = 0x2c, $1 = 0x3,所以除法结果为
                            #    HI = 0x2, LO = 0xe,这是延迟槽指令
   ori  $1,$0,0x1100
   ori  $1,$0,0x1111
   bne  $1,$0,s3
   nop
   ori  $1,$0,0x1100
   ori  $1,$0,0x1111

   .org 0x50
s2:
   ori  $1,$0,0x0004      #(5)$1 = 0x4
   beq  $3,$3,s3          # $3等于$3,所以会发生转移,目的地址是s3
   or   $1,$31,$0         #(6)$1 = 0x2c,这是延迟槽指令
   ori  $1,$0,0x1111
   ori  $1,$0,0x1100
2:
   ori  $1,$0,0x0007      #(9)$1 = 0x7
   ori  $1,$0,0x0008      #(10)$1 = 0x8
   bgtz $1,s4             # 此时$1为0x8,大于0,所以转移至标号s4处
   ori  $1,$0,0x0009      #(11)$1 = 0x9,这是延迟槽指令
   ori  $1,$0,0x1111
   ori  $1,$0,0x1100

   .org 0x80
s3:
   ori  $1,$0,0x0005      #(7)$1 = 0x5
   bgez $1,2b             # 此时$1为0x5,大于0,所以转移至前面的标号2处
   ori  $1,$0,0x0006      #(8)$1 = 0x6,这是延迟槽指令
   ori  $1,$0,0x1111
   ori  $1,$0,0x1100

   .org 0x100
s4:
   ori  $1,$0,0x000a      #(12)$1 = 0xa
   bgezal $3,s3           # 此时$3为0x80000000,小于0,所以不发生转移
   or   $1,$0,$31         #(13)$1 = 0x10c
   ori  $1,$0,0x000b      #(14)$1 = 0xb
   ori  $1,$0,0x000c      #(15)$1 = 0xc
   ori  $1,$0,0x000d      #(16)$1 = 0xd
   ori  $1,$0,0x000e      #(17)$1 = 0xe
   bltz $3,s5             # 此时$3为0x80000000,小于0,所以发生转移,转移至s5处
   ori  $1,$0,0x000f      #(18)$1 = 0xf,这是延迟槽指令
   ori  $1,$0,0x1100


   .org 0x130
s5:
   ori  $1,$0,0x0010      #(19)$1 = 0x10
   blez $1,2b             # 此时$1为0x10,大于0,所以不发生转移
   ori  $1,$0,0x0011      #(20)$1 = 0x11
   ori  $1,$0,0x0012      #(21)$1 = 0x12
   ori  $1,$0,0x0013      #(22)$1 = 0x13
   bltzal $3,s6           # 此时$3为0x80000000,小于0,所以发生转移,转移到s6处
   or   $1,$0,$31         #(23)$1 = 0x14c,这是延迟槽指令
   ori  $1,$0,0x1100


   .org 0x160
s6:
   ori $1,$0,0x0014       #(24)$1 = 0x14
   nop


_loop:
   j _loop
   nop
上面的测试程序使用到了所有的分支指令,程序的注释给出了寄存器$1的变化情况,及指令执行顺序,注意寄存器$1的变化是按照注释中的序号顺序进行的。ModelSim仿真结果如图8-9所示,观察$1的变化可知OpenMIPS正确实现了分支指令。
至此,转移指令也实现完毕了,下一步将实现加载存储指令,敬请关注!

Hot AI Tools

Undresser.AI Undress
AI-powered app for creating realistic nude photos

AI Clothes Remover
Online AI tool for removing clothes from photos.

Undress AI Tool
Undress images for free

Clothoff.io
AI clothes remover

AI Hentai Generator
Generate AI Hentai for free.

Hot Article
Hot Tools

Notepad++7.3.1
Easy-to-use and free code editor

SublimeText3 Chinese version
Chinese version, very easy to use

Zend Studio 13.0.1
Powerful PHP integrated development environment

Dreamweaver CS6
Visual web development tools

SublimeText3 Mac version
God-level code editing software (SublimeText3)
Hot Topics


 How to get items using commands in Terraria? -How to collect items in Terraria?
Mar 19, 2024 am 08:13 AM
How to get items using commands in Terraria? -How to collect items in Terraria?
Mar 19, 2024 am 08:13 AM
How to get items using commands in Terraria? 1. What is the command to give items in Terraria? In the Terraria game, giving command to items is a very practical function. Through this command, players can directly obtain the items they need without having to fight monsters or teleport to a certain location. This can greatly save time, improve the efficiency of the game, and allow players to focus more on exploring and building the world. Overall, this feature makes the gaming experience smoother and more enjoyable. 2. How to use Terraria to give item commands 1. Open the game and enter the game interface. 2. Press the "Enter" key on the keyboard to open the chat window. 3. Enter the command format in the chat window: "/give[player name][item ID][item quantity]".
 144-core, 3D-stacked SRAM: Fujitsu details next-generation data center processor MONAKA
Jul 29, 2024 am 11:40 AM
144-core, 3D-stacked SRAM: Fujitsu details next-generation data center processor MONAKA
Jul 29, 2024 am 11:40 AM
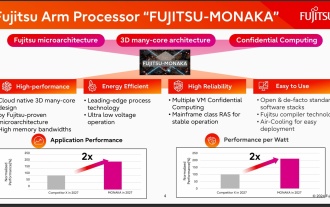
According to news from this website on July 28, foreign media TechRader reported that Fujitsu introduced in detail the FUJITSU-MONAKA (hereinafter referred to as MONAKA) processor planned to be shipped in 2027. MONAKACPU is based on the "cloud native 3D many-core" architecture and adopts the Arm instruction set. It is oriented to the data center, edge and telecommunications fields. It is suitable for AI computing and can realize mainframe-level RAS1. Fujitsu said that MONAKA will achieve a leap in energy efficiency and performance: thanks to technologies such as ultra-low voltage (ULV) technology, the CPU can achieve 2 times the energy efficiency of competing products in 2027, and cooling does not require water cooling; in addition, the application performance of the processor It can also reach twice as much as your opponent. In terms of instructions, MONAKA is equipped with vector
 The operation process of WIN10 service host occupying too much CPU
Mar 27, 2024 pm 02:41 PM
The operation process of WIN10 service host occupying too much CPU
Mar 27, 2024 pm 02:41 PM
1. First, we right-click the blank space of the taskbar and select the [Task Manager] option, or right-click the start logo, and then select the [Task Manager] option. 2. In the opened Task Manager interface, we click the [Services] tab on the far right. 3. In the opened [Service] tab, click the [Open Service] option below. 4. In the [Services] window that opens, right-click the [InternetConnectionSharing(ICS)] service, and then select the [Properties] option. 5. In the properties window that opens, change [Open with] to [Disabled], click [Apply] and then click [OK]. 6. Click the start logo, then click the shutdown button, select [Restart], and complete the computer restart.
 Leak reveals key specs of Intel Arrow Lake-U, -H, -HX and -S
Jun 15, 2024 pm 09:49 PM
Leak reveals key specs of Intel Arrow Lake-U, -H, -HX and -S
Jun 15, 2024 pm 09:49 PM
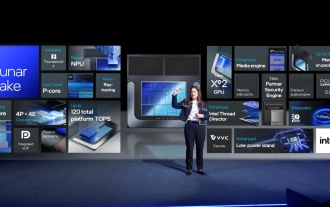
IntelArrowLakeisexpectedtobebasedonthesameprocessorarchitectureasLunarLake,meaningthatIntel'sbrandnewLionCoveperformancecoreswillbecombinedwiththeeconomicalSkymontefficiencycores.WhileLunarLakeisonlyavailableasava
 AM4 refuses to die, news says AMD will launch Ryzen 9 5900XT/7 5800XT: clocked at up to 4.8GHz
Jun 05, 2024 pm 09:43 PM
AM4 refuses to die, news says AMD will launch Ryzen 9 5900XT/7 5800XT: clocked at up to 4.8GHz
Jun 05, 2024 pm 09:43 PM
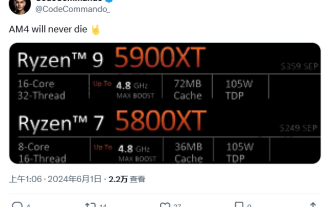
According to news from this website on June 1st, the source @CodeCommando tweeted today, sharing some screenshots of AMD’s upcoming presentation documents at the Computex2024 event. The content of the tweet was “AM4 will never die”, and the accompanying picture showed two new Ryzen5000XT series processors. The screenshots show the following two products: Ryzen 95900 Ryzen75800XT It is a faster variant of AMD's existing Ryzen75800X processor. Both processors are clocked up to 4.8G
 How to implement dual WeChat login on Huawei mobile phones?
Mar 24, 2024 am 11:27 AM
How to implement dual WeChat login on Huawei mobile phones?
Mar 24, 2024 am 11:27 AM
How to implement dual WeChat login on Huawei mobile phones? With the rise of social media, WeChat has become one of the indispensable communication tools in people's daily lives. However, many people may encounter a problem: logging into multiple WeChat accounts at the same time on the same mobile phone. For Huawei mobile phone users, it is not difficult to achieve dual WeChat login. This article will introduce how to achieve dual WeChat login on Huawei mobile phones. First of all, the EMUI system that comes with Huawei mobile phones provides a very convenient function - dual application opening. Through the application dual opening function, users can simultaneously
 The perfect solution to the problem of high CPU usage in Chrome browser
Mar 14, 2024 pm 12:25 PM
The perfect solution to the problem of high CPU usage in Chrome browser
Mar 14, 2024 pm 12:25 PM
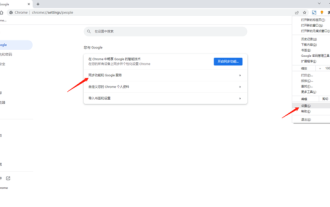
When the computer is running, some users find that Google Chrome in the task manager occupies a very high CPU. If it is not processed in time, the computer will become more and more stuck, and even crash. So how to deal with the high CPU usage of Chrome browser? Let’s take a look at this issue together. High CPU usage issues in Google Chrome are usually due to "SoftwareReporterTool" running abnormally in Task Manager. This tool is actually a Chrome browser cleaning tool, used to clean up unnecessary or harmful extensions, applications or homepage hijackers. When Chrome is installed, Software_reporter_tool.exe is also downloaded to SwR
 2024 latest CPU ladder chart sharing (detailed high-definition)
Mar 13, 2024 pm 08:19 PM
2024 latest CPU ladder chart sharing (detailed high-definition)
Mar 13, 2024 pm 08:19 PM
The level of game performance has a great relationship with the CPU. For game-loving users, CPU performance is the focus of computer configuration, especially for LOL and CS:GO. It is more accurate and objective to directly look at the single-core performance for some large-scale 3D games. It mainly depends on the graphics card + CPU scheduling, so which CPU has better performance? This article will introduce you to the celestial map. The latest high-definition full version of the CPU ladder diagram
