

Ubuntu下如何解压缩zip,tar,tar.gz,tar.bz2文件

tar 解包:tar xvf FileName.tar 打包:tar cvf FileName.tar DirName (注:tar是打包,不是压缩!) ——————————————— .gz 解压1:gunzip FileName.gz 解压2:gzip -d FileName.gz 压缩:gzip FileName .tar.gz 解压:tar zxvf FileName.tar
tar解包:tar xvf FileName.tar
打包:tar cvf FileName.tar DirName
(注:tar是打包,不是压缩!)
———————————————
.gz
解压1:gunzip FileName.gz
解压2:gzip -d FileName.gz
压缩:gzip FileName
.tar.gz
解压:tar zxvf FileName.tar.gz
压缩:tar zcvf FileName.tar.gz DirName
———————————————
.bz2
解压1:bzip2 -d FileName.bz2
解压2:bunzip2 FileName.bz2
压缩: bzip2 -z FileName
.tar.bz2
解压:tar jxvf FileName.tar.bz2
压缩:tar jcvf FileName.tar.bz2 DirName
———————————————
.bz
解压1:bzip2 -d FileName.bz
解压2:bunzip2 FileName.bz
.tar.bz
解压:tar jxvf FileName.tar.bz
———————————————
.Z
解压:uncompress FileName.Z
压缩:compress FileName
.tar.Z
解压:tar Zxvf FileName.tar.Z
压缩:tar Zcvf FileName.tar.Z DirName
———————————————
.tgz
解压:tar zxvf FileName.tgz
.tar.tgz
解压:tar zxvf FileName.tar.tgz
压缩:tar zcvf FileName.tar.tgz FileName
———————————————
.zip
解压:unzip FileName.zip
压缩:zip FileName.zip DirName
———————————————
.rar
解压:rar a FileName.rar
压缩:rar e FileName.rar
———————————————
.lha
解压:lha -e FileName.lha
压缩:lha -a FileName.lha FileName
ZIP
zip可能是目前使用得最多的文档压缩格式。它最大的优点就是在不同的操作系统平台,比如Linux, Windows以及MacOS,上使用。缺点就是支持的压缩率不是很高,而tar.gz和tar.gz2在压缩率方面做得非常好。闲话少说,我们步入正题吧:
我们可以使用下列的命令压缩一个目录:
# zip -r archive_name.zip directory_to_compress
下面是如果解压一个zip文档:
# unzip archive_name.zip
TAR
Tar是在Linux中使用得非常广泛的文档打包格式。它的好处就是它只消耗非常少的CPU以及时间去打包文件,他仅仅只是一个打包工具,并不负责压缩。下面是如何打包一个目录:
# tar -cvf archive_name.tar directory_to_compress
如何解包:
# tar -xvf archive_name.tar.gz
上面这个解包命令将会将文档解开在当前目录下面。当然,你也可以用这个命令来捏住解包的路径:
# tar -xvf archive_name.tar -C /tmp/extract_here/
TAR.GZ
这种格式是我使用得最多的压缩格式。它在压缩时不会占用太多CPU的,而且可以得到一个非常理想的压缩率。使用下面这种格式去压缩一个目录:
# tar -zcvf archive_name.tar.gz directory_to_compress
解压缩:
# tar -zxvf archive_name.tar.gz
上面这个解包命令将会将文档解开在当前目录下面。当然,你也可以用这个命令来捏住解包的路径:
# tar -zxvf archive_name.tar.gz -C /tmp/extract_here/
TAR.BZ2
这种压缩格式是我们提到的所有方式中压缩率最好的。当然,这也就意味着,它比前面的方式要占用更多的CPU与时间。这个就是你如何使用tar.bz2进行压缩。
# tar -jcvf archive_name.tar.bz2 directory_to_compress
上面这个解包命令将会将文档解开在当前目录下面。当然,你也可以用这个命令来捏住解包的路径:
# tar -jxvf archive_name.tar.bz2 -C /tmp/extract_here/

Hot AI Tools

Undresser.AI Undress
AI-powered app for creating realistic nude photos

AI Clothes Remover
Online AI tool for removing clothes from photos.

Undress AI Tool
Undress images for free

Clothoff.io
AI clothes remover

Video Face Swap
Swap faces in any video effortlessly with our completely free AI face swap tool!

Hot Article
Hot Tools

Notepad++7.3.1
Easy-to-use and free code editor

SublimeText3 Chinese version
Chinese version, very easy to use

Zend Studio 13.0.1
Powerful PHP integrated development environment

Dreamweaver CS6
Visual web development tools

SublimeText3 Mac version
God-level code editing software (SublimeText3)
Hot Topics
 1386
1386
 52
52

 What should I do if the Ubuntu terminal cannot be opened? How to fix the problem that Ubuntu cannot open the terminal
Feb 29, 2024 pm 05:30 PM
What should I do if the Ubuntu terminal cannot be opened? How to fix the problem that Ubuntu cannot open the terminal
Feb 29, 2024 pm 05:30 PM
It is a very common problem these days that Ubuntu does not allow its users to open the terminal. If you receive a similar issue and don’t know what to do next, learn about five fixes on how to resolve this “Ubuntu cannot open terminal” issue on your Linux device. Without further ado, let’s dive into what causes it and the solutions available to it. Why can't Ubuntu open the terminal on it? This mainly happens when you install some defective software or modify the terminal configuration. In addition to this, new applications or games that interact with locales and corrupt them can cause similar problems. Some users reported a fix for this issue when searching for Terminal in Ubuntu's activity menu. This shows that
 Log in to Ubuntu as superuser
Mar 20, 2024 am 10:55 AM
Log in to Ubuntu as superuser
Mar 20, 2024 am 10:55 AM
In Ubuntu systems, the root user is usually disabled. To activate the root user, you can use the passwd command to set a password and then use the su- command to log in as root. The root user is a user with unrestricted system administrative rights. He has permissions to access and modify files, user management, software installation and removal, and system configuration changes. There are obvious differences between the root user and ordinary users. The root user has the highest authority and broader control rights in the system. The root user can execute important system commands and edit system files, which ordinary users cannot do. In this guide, I'll explore the Ubuntu root user, how to log in as root, and how it differs from a normal user. Notice
 A sneak peek of the seven highlights of Ubuntu 24.04 LTS
Feb 27, 2024 am 11:22 AM
A sneak peek of the seven highlights of Ubuntu 24.04 LTS
Feb 27, 2024 am 11:22 AM
Ubuntu24.04LTS, codenamed "NobleNumbat" will be released soon! If you are using a non-LTS version such as Ubuntu 23.10, sooner or later you will need to consider upgrading. For those using Ubuntu20.04LTS or Ubuntu22.04LTS, it is worth thinking about whether to upgrade. Canonical has announced that Ubuntu 24.04LTS will provide update support for up to 12 years, broken down as follows: As an LTS version, it will have 5 years of regular maintenance and security updates. If you subscribe to Ubuntu Pro, you can enjoy an additional 5 years of support. Currently, this additional support period has been extended to 7 years, which means you will get up to 12
 Ubuntu 20.04 screen recording software OBS installation and uninstallation graphic tutorial
Feb 29, 2024 pm 04:01 PM
Ubuntu 20.04 screen recording software OBS installation and uninstallation graphic tutorial
Feb 29, 2024 pm 04:01 PM
OBS is open source software developed by volunteer contributors around the world in their free time. A video live recording software, mainly used for video recording and live streaming. Please note that when installing Ubuntu/Mint, OBSStudio cannot fully work on ChromeOS, and functions such as screen and window capture cannot be used. It is recommended to use xserver-xorg1.18.4 or newer version to avoid potential performance issues with certain features in OBS, such as full-screen projectors. FFmpeg is required. If you don't have FFmpeg installed (if you're not sure, you probably don't), you can get it with: sudoaptinstallffmpeg I already have it installed here
 Android TV Box gets unofficial Ubuntu 24.04 upgrade
Sep 05, 2024 am 06:33 AM
Android TV Box gets unofficial Ubuntu 24.04 upgrade
Sep 05, 2024 am 06:33 AM
For many users, hacking an Android TV box sounds daunting. However, developer Murray R. Van Luyn faced the challenge of looking for suitable alternatives to the Raspberry Pi during the Broadcom chip shortage. His collaborative efforts with the Armbia
 How to install the Linux kernel on Ubuntu 22.04 Detailed tutorial!
Mar 01, 2024 pm 10:34 PM
How to install the Linux kernel on Ubuntu 22.04 Detailed tutorial!
Mar 01, 2024 pm 10:34 PM
To install the Linux kernel on Ubuntu22.04, you can follow the following steps: Update the system: First, make sure your Ubuntu system is the latest, execute the following command to update the system package: sudoaptupdatesudoaptupgrade Download the kernel file: Visit the official Linux kernel website () to download Required kernel version. Select a stable version and download the source code file (with .tar.gz or .tar.xz extension), for example: wget Unzip the file: Use the following command to unzip the downloaded kernel source code file: tar-xflinux-5.14.tar. xz install build dependencies: Install the tools and dependencies required to build the kernel. Execute
 How to remove Firefox Snap in Ubuntu Linux?
Feb 21, 2024 pm 07:00 PM
How to remove Firefox Snap in Ubuntu Linux?
Feb 21, 2024 pm 07:00 PM
To remove FirefoxSnap in Ubuntu Linux, you can follow these steps: Open a terminal and log in to your Ubuntu system as administrator. Run the following command to uninstall FirefoxSnap: sudosnapremovefirefox You will be prompted for your administrator password. Enter your password and press Enter to confirm. Wait for command execution to complete. Once completed, FirefoxSnap will be completely removed. Note that this will remove versions of Firefox installed via the Snap package manager. If you installed another version of Firefox through other means (such as the APT package manager), you will not be affected. Go through the above steps
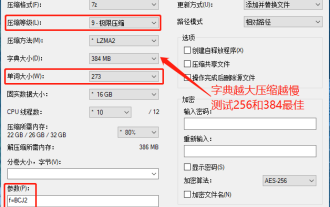 7-zip maximum compression rate setting, how to compress 7zip to the minimum
Jun 18, 2024 pm 06:12 PM
7-zip maximum compression rate setting, how to compress 7zip to the minimum
Jun 18, 2024 pm 06:12 PM
I found that the compressed package downloaded from a download website will be larger than the original compressed package after decompression. The difference is tens of Kb for a small one and several dozen Mb for a large one. If it is uploaded to a cloud disk or paid space, it does not matter if the file is small. , if there are many files, the storage cost will be greatly increased. I studied it specifically and can learn from it if necessary. Compression level: 9-Extreme compression Dictionary size: 256 or 384, the more compressed the dictionary, the slower it is. The compression rate difference is larger before 256MB, and there is no difference in compression rate after 384MB. Word size: maximum 273 Parameters: f=BCJ2, test and add parameter compression rate will be higher
