

HTTP Status 403 – Access to the requested resource has been

访问地址: http://localhost:8080/manager/status http://localhost:8080/manager/html 错误提示 HTTP Status 403 – Access to the requested resource has been denied type Status report message Access to the requested resource has been denied des
访问地址:
http://localhost:8080/manager/status
http://localhost:8080/manager/html
错误提示
HTTP Status 403 – Access to the requested resource has been denied
type Status report
message Access to the requested resource has been denied
description Access to the specified resource (Access to the requested resource has been denied) has been forbidden.
Apache Tomcat/7.0.21
解决方法:
先进入manager所在目录
[root@localhost tomcat]# cd webapps/manager/WEB-INF/
查看 web.xml
[root@localhost WEB-INF]# more web.xml
  <!-- Define a Security Constraint on this Application -->
  <!-- NOTE:  None of these roles are present in the default users file -->
  <security-constraint>
    <web-resource-collection>
      <web-resource-name>HTML Manager interface (for humans)</web-resource-name>
     <span> <url-pattern>/html/*</url-pattern> 对应:http://localhost:8080/manager/html</span>
    </web-resource-collection>
    <auth-constraint>
      <span> <role-name>manager-gui</role-name> 定义了访问这个页面的角色名:manage-gui</span>
    </auth-constraint>
  </security-constraint>
  <security-constraint>
    <web-resource-collection>
      <web-resource-name>Text Manager interface (for scripts)</web-resource-name>
      <url-pattern>/text/*</url-pattern>
    </web-resource-collection>
    <auth-constraint>
       <role-name>manager-script</role-name>
    </auth-constraint>
  </security-constraint>
  <security-constraint>
    <web-resource-collection>
      <web-resource-name>JMX Proxy interface</web-resource-name>
      <url-pattern>/jmxproxy/*</url-pattern>
    </web-resource-collection>
    <auth-constraint>
       <role-name>manager-jmx</role-name>
    </auth-constraint>
  </security-constraint>

  <security-constraint>
    <web-resource-collection>
      <web-resource-name>Status interface</web-resource-name>
    <span> <url-pattern>/status/*</url-pattern> 对应:http://localhost:8080/manager/status  </span>
    </web-resource-collection>
    <auth-constraint>
      <span> <role-name>manager-gui</role-name> </span>
       <role-name>manager-script</role-name>
       <role-name>manager-jmx</role-name>
       <role-name>manager-status</role-name>
    </auth-constraint>
  </security-constraint>
进入host-manager所在目录
[root@localhost tomcat]# cd webapps/host-manager/WEB-INF/
查看 web.xml
[root@localhost WEB-INF]# more web.xml
  <security-constraint>
    <web-resource-collection>
      <web-resource-name>HTMLHostManager commands</web-resource-name>
      <url-pattern><span>/html/*</span></url-pattern> <span>对应:<span>http://192.168.14.219:8080/host-manager/</span>htm</span>l
    </web-resource-collection>
    <auth-constraint>
       <!-- NOTE:  This role is not present in the default users file -->
      <span> <role-name>admin-gui</role-name> 定义了管理角色名称</span></auth-constraint>
</security-constraint> <!-- Security roles referenced by this web application -->
<security-role>
<description>
<span>The role that is required to log in to the Host Manager Application HTML</span>
<span> interface</span>
</description>
<span><role-name>admin-gui</role-name></span>
</security-role>
<security-role>
<description>
The role that is required to log in to the Host Manager Application text
interface
</description>
<role-name>admin-script</role-name>
</security-role>
编辑Tomcat用户配置文件,添加角色
[root@localhost tomcat]# vi conf/tomcat-users.xml
<tomcat-users>
<!--
  NOTE:  By default, no user is included in the "manager-gui" role required
  to operate the "/manager/html" web application.  If you wish to use this app,
  you must define such a user - the username and password are arbitrary.
-->
<!--
  NOTE:  The sample user and role entries below are wrapped in a comment
  and thus are ignored when reading this file. Do not forget to remove
  <!.. ..> that surrounds them.
-->
<span><!-- 这里有个注释符号去掉,使下面的生效</span>
  <role rolename="tomcat"/>
  <role rolename="role1"/>
<!--添加管理页面访问角色-->
 <span> <role rolename="manager-gui"></role> </span>
 <span> <role rolename="admin-gui"></role></span>
  <span><user username="manager" password="manager" roles="manager-gui,admin-gui">>
  <user username="tomcat" password="tomcat" roles="tomcat"></user>
  <user username="both" password="tomcat" roles="tomcat,role1"></user>
  <user username="role1" password="tomcat" roles="role1"></user>
<span>--> 这里有个注释符号去掉,是下面的生效</span>
</user></span></span></tomcat-users>
重启 tomcat
[root@localhost tomcat]# ./bin/shutdown.sh
[root@localhost tomcat]# ./bin/startup.sh

总结:
虚拟目录/WEB-INF/web.xml一般定义了访问这个目录的安全角色名称,得知这个安全角色名称后便可在conf/tomcat-users.xml添加对应的访问角色,获得访问权限。(于是这里也是个黑客可以利用的后门。。。)

Hot AI Tools

Undresser.AI Undress
AI-powered app for creating realistic nude photos

AI Clothes Remover
Online AI tool for removing clothes from photos.

Undress AI Tool
Undress images for free

Clothoff.io
AI clothes remover

AI Hentai Generator
Generate AI Hentai for free.

Hot Article
Hot Tools

Notepad++7.3.1
Easy-to-use and free code editor

SublimeText3 Chinese version
Chinese version, very easy to use

Zend Studio 13.0.1
Powerful PHP integrated development environment

Dreamweaver CS6
Visual web development tools

SublimeText3 Mac version
God-level code editing software (SublimeText3)
Hot Topics


 How to disable background applications in Windows 11_Windows 11 tutorial to disable background applications
May 07, 2024 pm 04:20 PM
How to disable background applications in Windows 11_Windows 11 tutorial to disable background applications
May 07, 2024 pm 04:20 PM
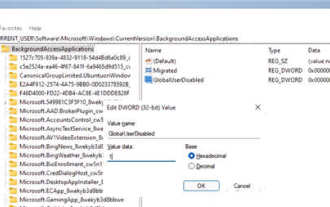
1. Open settings in Windows 11. You can use Win+I shortcut or any other method. 2. Go to the Apps section and click Apps & Features. 3. Find the application you want to prevent from running in the background. Click the three-dot button and select Advanced Options. 4. Find the [Background Application Permissions] section and select the desired value. By default, Windows 11 sets power optimization mode. It allows Windows to manage how applications work in the background. For example, once you enable battery saver mode to preserve battery, the system will automatically close all apps. 5. Select [Never] to prevent the application from running in the background. Please note that if you notice that the program is not sending you notifications, failing to update data, etc., you can
 How to convert deepseek pdf
Feb 19, 2025 pm 05:24 PM
How to convert deepseek pdf
Feb 19, 2025 pm 05:24 PM
DeepSeek cannot convert files directly to PDF. Depending on the file type, you can use different methods: Common documents (Word, Excel, PowerPoint): Use Microsoft Office, LibreOffice and other software to export as PDF. Image: Save as PDF using image viewer or image processing software. Web pages: Use the browser's "Print into PDF" function or the dedicated web page to PDF tool. Uncommon formats: Find the right converter and convert it to PDF. It is crucial to choose the right tools and develop a plan based on the actual situation.
 Can't allow access to camera and microphone in iPhone
Apr 23, 2024 am 11:13 AM
Can't allow access to camera and microphone in iPhone
Apr 23, 2024 am 11:13 AM
Are you getting "Unable to allow access to camera and microphone" when trying to use the app? Typically, you grant camera and microphone permissions to specific people on a need-to-provide basis. However, if you deny permission, the camera and microphone will not work and will display this error message instead. Solving this problem is very basic and you can do it in a minute or two. Fix 1 – Provide Camera, Microphone Permissions You can provide the necessary camera and microphone permissions directly in settings. Step 1 – Go to the Settings tab. Step 2 – Open the Privacy & Security panel. Step 3 – Turn on the “Camera” permission there. Step 4 – Inside, you will find a list of apps that have requested permission for your phone’s camera. Step 5 – Open the “Camera” of the specified app
 What does field mean in java
Apr 25, 2024 pm 10:18 PM
What does field mean in java
Apr 25, 2024 pm 10:18 PM
In Java, a "field" is a data member in a class or interface that is used to store data or state. The properties of field include: type (can be any Java data type), access rights, static (belongs to a class rather than an instance), final (immutable) and transient (not serialized). Field is used to store state information of a class or interface, such as storing object data and maintaining object state.
 How does the Java reflection mechanism modify the behavior of a class?
May 03, 2024 pm 06:15 PM
How does the Java reflection mechanism modify the behavior of a class?
May 03, 2024 pm 06:15 PM
The Java reflection mechanism allows programs to dynamically modify the behavior of classes without modifying the source code. By operating the Class object, you can create instances through newInstance(), modify private field values, call private methods, etc. Reflection should be used with caution, however, as it can cause unexpected behavior and security issues, and has a performance overhead.
 How to cross-domain iframe in vue
May 02, 2024 pm 10:48 PM
How to cross-domain iframe in vue
May 02, 2024 pm 10:48 PM
Ways to solve iframe cross-domain issues in Vue: CORS: Enable CORS support in the backend server and use XMLHttpRequest or fetch API to send CORS requests in Vue. JSONP: Dynamically load JSONP scripts in Vue using the JSONP endpoint in the backend server. Proxy server: Set up a proxy server to forward requests, use a third-party library (such as axios) in Vue to send requests and set the proxy server URL.
 What does a memory stick look like?
Apr 21, 2024 pm 01:01 PM
What does a memory stick look like?
Apr 21, 2024 pm 01:01 PM
What does a computer memory module look like? This is an overview of the graphics card and memory module in the computer. The computer's independent graphics card is inserted into the graphics card slot, with a fan, and the memory module is inside the memory module slot on the computer's motherboard, shaped like a green rectangle. Laptop memory modules are different from desktop memory modules, and they cannot be used interchangeably. Appearance difference 1: Desktop memory, slender, 13-14 cm in length. 2: Notebook memory is shorter, about five centimeters. Memory is the bridge in the computer, responsible for data exchange between the processor and hardware such as hard disk, motherboard, and graphics card. The red circle on the way is the memory stick, next to the CPU fan and plugged into the memory stick. Look, a computer memory stick looks like this. Use a screwdriver to open the cover of the desktop computer. The red circle in the middle is the memory module. What is a memory stick?
 Common exception types and their repair measures in Java function development
May 03, 2024 pm 02:09 PM
Common exception types and their repair measures in Java function development
May 03, 2024 pm 02:09 PM
Common exception types and their repair measures in Java function development During the development of Java functions, various exceptions may be encountered, which affect the correct execution of the function. The following are common exception types and their repair measures: 1. NullPointerException Description: Thrown when accessing an object that has not been initialized. Fix: Make sure you check the object for non-null before using it. Sample code: try{Stringname=null;System.out.println(name.length());}catch(NullPointerExceptione){
