

Box2D v2.1.0用户手册翻译

内容很多摘自 Aman JIANG(江超宇)翻译的 Box2D v2.0.1 用户手册 第02章 Hello Box2D Box2D的发布包中有个Hello World程序。程序创建了一个大大的地面盒(ground box)和一个小小的动态盒(dynamic box)。盒子的位置随着时间的变化而变化。代码没有涉及到图形界
内容很多摘自
Aman JIANG(江超宇)翻译的Box2D v2.0.1 用户手册
第02章 Hello Box2D
Box2D的发布包中有个Hello World程序。程序创建了一个大大的地面盒(ground box)和一个小小的动态盒(dynamic box)。盒子的位置随着时间的变化而变化。代码没有涉及到图形界面,你只能在控制台中看到文字输出
这是个很好的例子, 展示了怎么使用Box2D。
2.1 创建世界(Creating a World)
每个Box2D程序开始时都会创建一个b2World对象。b2World是物理枢纽(physics hub), 用于管理内存、对象和模拟。根据自己的实际情况, 你可以在栈, 堆或数据区中创建出world。
创建Box2D的world很简单。首先, 我们要定义重力矢量,另外还要告诉world是否允许body在静止时休眠。休眠中的body不需要任何模拟。
b2Vec2 gravity(0.0f, -10.0f);
bool doSleep = true;
现在可以创建world对象了。注意,在这里我们是在栈中创建world, 所以world不能离开它的作用域。
b2World world(gravity, doSleep);
我们已经有了自己的物理世界, 开始向里面加东西了。
2.2 创建地面盒(Creating a Ground Box)
body用以下步骤来创建:
1. 用位置(position), 阻尼(damping)等来定义body
2. 通过world对象来创建body
3. 用形状(shape), 摩擦(friction), 密度(density)等来定义fixture
4. 在body上来创建fixture
第一步,创建ground body。我们需要一个body定义。在定义中,我们指定ground body的初始位置。
b2BodyDef groundBodyDef;
groundBodyDef.position.Set(0.0f,-10.0f);
第二步, 将body定义传給world对象, 创建ground body。world对象并不保留body定义的引用。ground body是作为静态物体(static body)创建的。静态物体和其它静态物体之间并没有碰撞, 它们是固定的。当body的质量为零时, Box2D就认为它是静态的。物体质量的默认值就为零, 所以它们默认就是静态的。
b2Body* groundBody =world.CreateBody(&groundBodyDef);
第三步, 创建地面多边形。我们用简便函数SetAsBox使得地面多边形构成一个盒子形状,盒子的中心点就是父body的原点。
b2PolygonShape groundBox;
groundBox.SetAsBox(50.0f, 10.0f);
SetAsBox函数接收半个宽度和半个高度作为参数。因此在这种情况下,地面盒就是100个单位宽(x轴),20个单位高(y轴)。Box2D已被调谐到使用米,千克和秒做单位。你可以认为长度单位就是米。当物体的大小跟真实世界一样时,Box2D通常工作良好。例如,一个桶约1米高。由于浮点算法的局限性,使用Box2D模拟冰川或沙尘的运动并不是一个好主意。
第四步, 我们创建shape fixture, 以完成ground body。这步中,我们有个简便方法。我们并不需要修改fixture默认的材质属性, 可以直接将形状传给body而不需要创建fixture的定义。随后的教程中, 我们将会看到如何使用fixture定义来定制材质属性。
groundBody->CreateFixture(&groundBox);
Box2D并不保存shape的引用。它把数据复制到一个新的b2Shape对象中。
注意,每个fixture都必须有一个父body,即使fixture是静态的。然而,你可以把所有静态fixture都依附于单个静态body之上。之所以需要这个静态body, 是为了保证Box2D内部的代码更具一致性,以减少潜在的bug数量。
可能你已经注意到, 多数Box2D类型都有b2前缀。这是为了降低它和你的代码之间名字冲突的机会。
2.3 创建动态物体(Creating a Dynamic Body)
现在我们已经有了一个地面body,我们可以使用同样的方法来创建一个动态body。除尺寸之外的主要区别是, 我们必须为动态body设置质量属性。
首先我们用CreateBody创建body。默认情况下,body是静态的, 所以在构造时候应该设置b2BodyType使得body成为动态
b2BodyDef bodyDef;
bodyDef.type = b2_dynamicBody;
bodyDef.position.Set(0.0f, 4.0f);
b2Body* body =world.CreateBody(&bodyDef);
注意
如果你想body受力的影响而运动, 你必须将body的类型设为b2_dynamicBody。
然后,我们创建一个多边形shapde, 并将它附加到fixture定义上。我们先创建一个box shape:
b2PolygonShape dynamicBox;
dynamicBox.SetAsBox(1.0f, 1.0f);
接下来我们使用box创建一个fixture定义。注意, 我们把密度值设置为1,而密度值默认是0。并且,fixture的摩擦系数设置为0.3。
b2FixtureDef fixtureDef;
fixtureDef.shape = &dynamicBox;
fixtureDef.density = 1.0f;
fixtureDef.friction = 0.3f;
使用fixture定义, 我们现在就可以创建fixture。这会自动更新body的质量。要是你喜欢, 你可以为body添加许多不同的fixture。每个fixture都会增加物体的总质量。
body->CreateFixture(&fixtureDef);
这就是初始化过程。现在我们已经做好准备,可以开始模拟了。
2.4 模拟(Box2D的)世界
我们已经初始化好了地面box和一个动态box。该让牛顿来接手了。我们只有少数几个问题需要考虑。
Box2D使用了一个叫积分器(integrator)的数值算法。 积分器在离散的时间点上模拟连续的物理方程。 它与传统的游戏动画循环一同运行。我们需要为Box2D选取一个时间步。通常来说用于游戏的物理引擎需要至少 60Hz 的速度,也就是 1/60 的时间步。你可以使用更大的时间步,但是你必须更加小心地为你的世界调整定义。我们也不喜欢时间步变化得太大,所以不要把时间步关联到帧频(除非你真的必须这样做)。直截了当地,这个就是时间步:
float32 timeStep = 1.0f / 60.0f;
除积分器外,Box2D代码还使用了约束求解器(constraint solver)。约束求解器用于解决模拟中的所有约束,一次一个。单个的约束会被完美的求解,然而当我们求解一个约束的时候,我们就会稍微耽误另一个。要得到良好的解,我们需要多次迭代所有约束。
约束求解有两个阶段:速度、位置。在速度阶段,求解器会计算必要的冲量,使得物体正确运动。而在位置阶段,求解器会调整物体的位置,减少物体之间的重叠。每个阶段都有自己的迭代计数。此外,如果误差已足够小的话,位置阶段的迭代可能会提前退出。
对于速度和位置,建议的Box2D迭代次数都是10次。你可以按自己的喜好去调整这个数字,但要记得它是性能与精度之间的折中。更少的迭代会增加性能但降低精度,同样地,更多的迭代会降低性能但能提高模拟质量。对于这个简单示例,我们不需要多次迭代。这是我们选择的迭代次数。
int32 velocityIterations = 6;
int32 positionIterations = 2;
时间步和迭代数是完全无关的。一个迭代并不是一个子步。一次迭代就是在时间步之中的单次遍历所有约束,你可以在单个时间步内多次遍历约束。
现在我们可以开始模拟循环了, 在你的游戏中, 模拟循环和游戏循环可以合并起来。每次游戏循环你都应该调用b2World::Step, 通常调用一次就够了, 这取决于帧频以及物理时间步。步进后,你应当调用b2World::ClearForces清除你施加到body上的任何力。
这个Hello World程序设计得非常简单, 它没有图形输出。代码会打印出动态body的位置以及旋转角, 有文字输出总比完全没有输出好。这就是模拟 1 秒钟内 60 个时间步的循环:
for (int32 i = 0; i
{
world.Step(timeStep,velocityIterations, positionIterations);
world.ClearForces();
b2Vec2 position =body->GetPosition();
float32 angle =body->GetAngle();
printf("%4.2f %4.2f%4.2f\n", position.x, position.y, angle);
}
输出展示了动态box降落到地面的情况。你的输出看起来应当是这样:
0.00 4.00 0.00
0.00 3.99 0.00
0.00 3.98 0.00
...
0.00 1.25 0.00
0.00 1.13 0.00
0.00 1.01 0.00
2.5 清理
当world对象超出它的作用域,或通过指针将其 delete 时, 分配给body, fixture, joint使用的内存都会被释放。这能使你的生活变得更简单。然而,你应该将body, fixture或joint的指针都清零,因为它们已经无效了。
2.6 Testbed例子
一旦你征服了 HelloWorld 例子,你应该开始看 Box2D 的 testbed 了。testbed 是个单元测试框架,也是个演示环境, 这是它的一些特点:
? 可移动和缩放的摄像机
? 可用鼠标选中依附在动态物体上的形状
? 可扩展的测试集
? 通过图形界面选择测试,调整参数,以及设置调试绘图
? 暂停和单步模拟
? 文字渲染

在 testbed 中有许多 Box2D 的测试用例,以及框架本身的实例。我鼓励你通过研究和修改它来学习 Box2D。
注意:testbed 是使用 freeglut 和 GLUI 写成的,testbed 本身并不是 Box2D 库的一部分。Box2D本身不知道如何渲染,就像 HelloWorld 例子一样,使用 Box2D 并不一定需要渲染。

Hot AI Tools

Undresser.AI Undress
AI-powered app for creating realistic nude photos

AI Clothes Remover
Online AI tool for removing clothes from photos.

Undress AI Tool
Undress images for free

Clothoff.io
AI clothes remover

AI Hentai Generator
Generate AI Hentai for free.

Hot Article
Hot Tools

Notepad++7.3.1
Easy-to-use and free code editor

SublimeText3 Chinese version
Chinese version, very easy to use

Zend Studio 13.0.1
Powerful PHP integrated development environment

Dreamweaver CS6
Visual web development tools

SublimeText3 Mac version
God-level code editing software (SublimeText3)
Hot Topics


 How to use Xiaohongshu account to find users? Can I find my mobile phone number?
Mar 22, 2024 am 08:40 AM
How to use Xiaohongshu account to find users? Can I find my mobile phone number?
Mar 22, 2024 am 08:40 AM
With the rapid development of social media, Xiaohongshu has become one of the most popular social platforms. Users can create a Xiaohongshu account to show their personal identity and communicate and interact with other users. If you need to find a user’s Xiaohongshu number, you can follow these simple steps. 1. How to use Xiaohongshu account to find users? 1. Open the Xiaohongshu APP, click the "Discover" button in the lower right corner, and then select the "Notes" option. 2. In the note list, find the note posted by the user you want to find. Click to enter the note details page. 3. On the note details page, click the "Follow" button below the user's avatar to enter the user's personal homepage. 4. In the upper right corner of the user's personal homepage, click the three-dot button and select "Personal Information"
 What should I do if the translation web page that comes with the Edge browser is missing?
Mar 14, 2024 pm 08:50 PM
What should I do if the translation web page that comes with the Edge browser is missing?
Mar 14, 2024 pm 08:50 PM
The edge browser comes with a translation function that allows users to translate anytime and anywhere, which brings great convenience to users. However, many users say that the built-in translation webpage is missing. Then the edge browser automatically What should I do if the translation page I brought is missing? Let this site introduce how to restore the translated web page that comes with the Edge browser if it is missing. How to restore the translation webpage that comes with the Edge browser is missing 1. Check whether the translation function is enabled: In the Edge browser, click the three dots icon in the upper right corner, and then select the "Settings" option. On the left side of the settings page, select the Language option. Make sure "Translate&rd"
 Log in to Ubuntu as superuser
Mar 20, 2024 am 10:55 AM
Log in to Ubuntu as superuser
Mar 20, 2024 am 10:55 AM
In Ubuntu systems, the root user is usually disabled. To activate the root user, you can use the passwd command to set a password and then use the su- command to log in as root. The root user is a user with unrestricted system administrative rights. He has permissions to access and modify files, user management, software installation and removal, and system configuration changes. There are obvious differences between the root user and ordinary users. The root user has the highest authority and broader control rights in the system. The root user can execute important system commands and edit system files, which ordinary users cannot do. In this guide, I'll explore the Ubuntu root user, how to log in as root, and how it differs from a normal user. Notice
 Explore Windows 11 guide: How to access user folders on your old hard drive
Sep 27, 2023 am 10:17 AM
Explore Windows 11 guide: How to access user folders on your old hard drive
Sep 27, 2023 am 10:17 AM
Certain folders are not always accessible due to permissions, and in today’s guide we will show you how to access user folders on your old hard drive on Windows 11. The process is simple but can take a while, sometimes even hours, depending on the size of the drive, so be extra patient and follow the instructions in this guide closely. Why can't I access my user folders on my old hard drive? User folders are owned by another computer, so you cannot modify them. You don't have any permissions on the folder other than ownership. How to open user files on old hard drive? 1. Take ownership of the folder and change permissions Find the old user directory, right-click on it and select Properties. Navigate to "An
 Don't worry about watching movies without subtitles! Xiaomi announces the launch of Xiaoai Translation real-time subtitles for Japanese and Korean translation
Jul 22, 2024 pm 02:11 PM
Don't worry about watching movies without subtitles! Xiaomi announces the launch of Xiaoai Translation real-time subtitles for Japanese and Korean translation
Jul 22, 2024 pm 02:11 PM
According to news on July 22, today, the official Weibo of Xiaomi ThePaper OS announced that Xiaoai Translation has been upgraded. Real-time subtitles have been added to Japanese and Korean translations, and subtitle-free videos and live conferences can be transcribed and translated in real time. Face-to-face simultaneous interpretation supports translation into 12 languages, including Chinese, English, Japanese, Korean, Russian, Portuguese, Spanish, Italian, French, German, Indonesian, and Hindi. The above functions currently only support the following three new phones: Xiaomi MIX Fold 4 Xiaomi MIX Flip Redmi K70 Extreme Edition It is reported that in 2021, Xiao Ai’s AI subtitles will be added to Japanese and Korean translations. AI subtitles use Xiaomi’s self-developed simultaneous interpretation technology to provide a faster, more stable and accurate subtitle reading experience. 1. According to the official statement, Xiaoai Translator can not only be used in audio and video venues
 How to translate Sogou browser
Feb 01, 2024 am 11:09 AM
How to translate Sogou browser
Feb 01, 2024 am 11:09 AM
How does Sogou browser translate? When we usually use Sogou browser to check information, we will encounter some websites that are all in English. Because we can’t understand English, it is very difficult to browse the website. This is also very inconvenient. It doesn’t matter if you encounter this situation! Sogou Browser has a built-in translation button. With just one click, Sogou Browser will automatically translate the entire webpage for you? If you don’t know how to operate it, the editor has compiled the specific steps on how to translate it on Sogou Browser. If you don’t know how, follow me and read on! How to translate Sogou Browser 1. Open Sogou Browser, click the translation icon in the upper right corner 2. Select the type of translation text, and then enter the text that needs to be translated 3. Sogou Browser will automatically translate the text. At this point, the above Sogou Browsing operation is completed. How to translate all contents
 What is sudo and why is it important?
Feb 21, 2024 pm 07:01 PM
What is sudo and why is it important?
Feb 21, 2024 pm 07:01 PM
sudo (superuser execution) is a key command in Linux and Unix systems that allows ordinary users to run specific commands with root privileges. The function of sudo is mainly reflected in the following aspects: Providing permission control: sudo achieves strict control over system resources and sensitive operations by authorizing users to temporarily obtain superuser permissions. Ordinary users can only obtain temporary privileges through sudo when needed, and do not need to log in as superuser all the time. Improved security: By using sudo, you can avoid using the root account during routine operations. Using the root account for all operations may lead to unexpected system damage, as any mistaken or careless operation will have full permissions. and
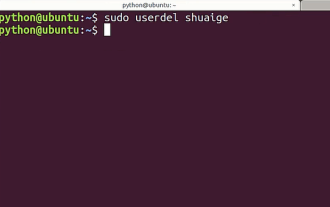 Tutorial: How to delete a normal user account in Ubuntu system?
Jan 02, 2024 pm 12:34 PM
Tutorial: How to delete a normal user account in Ubuntu system?
Jan 02, 2024 pm 12:34 PM
Many users have been added to the Ubuntu system. I want to delete the users that are no longer in use. How to delete them? Let’s take a look at the detailed tutorial below. 1. Open the terminal command line and use the userdel command to delete the specified user. Be sure to add the sudo permission command, as shown in the figure below. 2. When deleting, be sure to be in the administrator directory. Ordinary users do not have this permission. , as shown in the figure below 3. After the delete command is executed, how to judge whether it has been truly deleted? Next we use the cat command to open the passwd file, as shown in the figure below 4. We see that the deleted user information is no longer in the passwd file, which proves that the user has been deleted, as shown in the figure below 5. Then we enter the home file
