

win7系统下安装/配置/卸载Oracle10g

Oracle 安装 1 Oracle完全卸载删除步骤: 1 . 1 开始->设置->控制面板->管理工具->服务,停止所有Oracle服务。 1.2 开始->程序->Oracle for Windows NT->Oracle Installer, 在右边已安装产品的框中,全部选中,再单击 删除 按钮,提示 是否删
Oracle 安装
1Oracle完全卸载删除步骤:
1.1 开始->设置->控制面板->管理工具->服务,停止所有Oracle服务。
1.2 开始->程序->OracleforWindowsNT->OracleInstaller,在右边已安装产品的框中,全部选中,再单击 "删除 "按钮,提示 "是否删除? "时选择 "是 ",卸装所有Oracle产品。
(以上步骤有时可以省略)
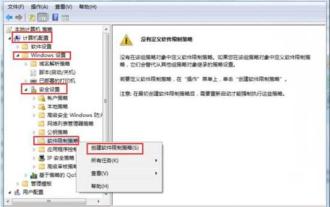
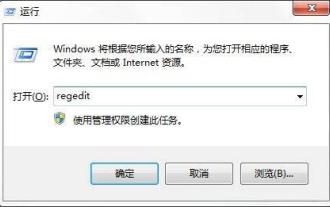
1.3 运行regedit,选择HKEY_LOCAL_MACHINE\SOFTWARE\ORACLE,按del键删除这个入口。
1.4 运行regedit,
选择HKEY_LOCAL_MACHINE\SYSTEM\CurrentControlSet\Services,滚动这个列表,删除所有Oracle入口;
选择HKEY_LOCAL_MACHINE\SYSTEM\ControlSet001\Services,滚动这个列表,删除所有Oracle入口;
选择HKEY_LOCAL_MACHINE\SYSTEM\ControlSet002\Services,滚动这个列表,删除所有Oracle入口。
1.5 从桌面上、启动组、程序菜单中,删除所有有关Oracle的菜单组和图标。
1.6 重新启动计算机,重起后才能完全删除Oracle所在目录 。
1.7 删除与Oracle有关的文件,选择Oracle所在的缺省目录D:\Oracle,删除这个入口目录及所有子目录,并从Windows 2000目录(一般为C:\WINNT)下删除以下文件:ORACLE.INI、oradim80.INI
1.8 WIN.INI文件中若有[ORACLE]的标记段,删除该段
2. Oracle 安装
win7系统下安装Oracle10g :
一:通过对安装软件中某些文件的修改使oracle 10g可以与win7兼容。
a)打开“\Oracle 10G \stage\prereq\db\refhost.xml”,向其中添加如下代码并保存。
b)打开“\Oracle 10G \install\oraparam.ini”,向其中添加如下代码并保存。
[Windows-6.1-required]
#Minimum display colours for OUI to run
MIN_DISPLAY_COLORS=256
#Minimum CPU speed required for OUI
#CPU=300
[Windows-6.1-optional]
c.找到oracle安装文件中的setup应用程序,右击,打开“兼容性疑难解答”,点击“尝试建议的设置”,选择“启动程序”。
d.安装oracle 10g,直到安装程序结束。
2.1 选择高级安装

2.2 选择企业版,它的功能最强

2.3 注意硬盘空间,C盘也需要有2G的空间用来存放临时文件

2.4 有的时候网络检查通不过,没关系,不管它。

2.5 默认

2.6事务处理:适合大并发量段时间的操作,比如BBS。数据仓库:适合量不大但是长时间的数据挖掘操作。

2.7 全局数据库一般建议internet上独一无二,SID是维护这个数据库的一系列进程的总名称(要注意一定要选择“创建样本方案数据库”这是我们将来练习的基石)

选择数据库字符集时一定要选择符合项目要求的 AL32UTF8字符集
2.8 默认

2.9 默认

2.10 默认

2.11 请指定公共的口令,根据要求输入密码,避免忘记

2.12 默认

2.13 等待安装…

2.14 再等待安装

2.15 接着等待安装

2.16 管理口令

2.17 去掉scott用户的锁,把密码更新为“tiger”(不用的话可以不改)

2.18 把最后一页的内容应该记录在一个文本文件里面(完成之后:开始-所有程序-oracle_xxx-应用程序开发—SQL PLUS-输入“scott”密码“tiger”,验证安装是否正常。)

3. 配置
3.1 创建表空间:
create tablespace spectrip logging datafile '/opt/oracle/oradata/test' size 200M autoextend on next 50M extent management local segment space management auto;
3.2 创建用户名和密码:
create user spectrip identified by "spectrip" default tablespace spectrip temporary tablespace TEMP profile default quota unlimited on users;
3.3 添加用户授权:
grant dba,connect,resource,aq_administrator_role,aq_user_role,authenticateduser to spectrip;
3.4 删除表空间/用户
DROP TABLESPACE spectrip INCLUDING CONTENTS AND DATAFILES;
drop user spectrip;
3.5 新建用户
设置完成后,用PLSQL Developer登入客户端:
在Users下,右击,新建用户,创建步骤如下:
创建完用户后需要给创建的用户授权,如下操作:
4. 更改Oracle字符集(如果需要):
在客户机上的注册表下:
HKEY_LOCAL_MACHINEàSOFTWARE-àORACLEàKEY_OraDb10g_home1àNLS_LANG
打开设置成:SIMPLIFIED CHINESE_CHINA.AL32UTF8。配置成服务器上oracle的一致的字符集。
5. 数据导入/出
开始-运行-CMD-回车,在命令行模式下
导出
exp bm_2010/supporter @[数据库名称] file=[dmp文件路径] full=y
导入
Imp bm_2010/supporter @[数据库名称] file=[dmp文件路径] full=y
6. 备注
EXP、IMP 命令详解
命令详解:
E:\>exp help=y
通过输入 EXP 命令和用户名/口令,您可以在用户 / 口令之后的命令:
实例: EXP SCOTT/TIGER
或者,您也可以通过输入跟有各种参数的 EXP 命令来控制“导出”的运行方式。
要指定参数,您可以使用关键字:
格式: EXP KEYWORD=value 或 KEYWORD=(value1,value2,...,valueN)
实例: EXP SCOTT/TIGER GRANTS=Y TABLES=(EMP,DEPT,MGR) 或 TABLES=(T1: P1,T1: P2),如果 T1 是分区表USERID 必须是命令行中的第一个参数。
关键字 说明(默认)
---------------------------------------------------
USERID 用户名/口令
FULL 导出整个文件 (N)
BUFFER 数据缓冲区的大小
OWNER 所有者用户名列表
FILE 输出文件 (EXPDAT.DMP)
TABLES 表名列表
COMPRESS 导入一个范围 (Y)
RECORDLENGTH IO 记录的长度
GRANTS 导出权限 (Y)
INCTYPE 增量导出类型
INDEXES 导出索引 (Y)
RECORD 跟踪增量导出 (Y)
ROWS 导出数据行 (Y)
PARFILE 参数文件名
CONSTRAINTS 导出限制 (Y)
CONSISTENT 交叉表一致性
LOG 屏幕输出的日志文件
STATISTICS 分析对象 (ESTIMATE,NONE)
DIRECT 直接路径 (N)
TRIGGERS 导出触发器 (Y)
FEEDBACK 显示每 x 行 (0) 的进度
FILESIZE 各转储文件的最大尺寸
QUERY 选定导出表子集的子句
下列关键字仅用于可传输的表空间
TRANSPORT_TABLESPACE 导出可传输的表空间元数据 (N)
TABLESPACES 将传输的表空间列表
E:\>imp help=y
可以通过输入 IMP 命令和您的用户名/口令
跟有您的用户名 / 口令的命令:
实例: IMP SCOTT/TIGER
或者, 可以通过输入 IMP 命令和各种自变量来控制“导入”按照不同参数。
要指定参数,您可以使用关键字:
格式: IMP KEYWORD=value 或 KEYWORD=(value1,value2,...,vlaueN)
实例: IMP SCOTT/TIGER IGNORE=Y TABLES=(EMP,DEPT) FULL=N
或 TABLES=(T1: P1,T1: P2),如果 T1 是分区表
USERID 必须是命令行中的第一个参数。
关键字 说明(默认)
----------------------------------------------
USERID 用户名/口令
FULL 导入整个文件 (N)
BUFFER 数据缓冲区大小
FROMUSER 所有人用户名列表
FILE 输入文件 (EXPDAT.DMP)
TOUSER 用户名列表
SHOW 只列出文件内容 (N)
TABLES 表名列表
IGNORE 忽略创建错误 (N)
RECORDLENGTH IO 记录的长度
GRANTS 导入权限 (Y)
INCTYPE 增量导入类型
INDEXES 导入索引 (Y)
COMMIT 提交数组插入 (N)
ROWS 导入数据行 (Y)
PARFILE 参数文件名
LOG 屏幕输出的日志文件
CONSTRAINTS 导入限制 (Y)
DESTROY 覆盖表空间数据文件 (N)
INDEXFILE 将表/索引信息写入指定的文件
SKIP_UNUSABLE_INDEXES 跳过不可用索引的维护 (N)
ANALYZE 执行转储文件中的 ANALYZE 语句 (Y)
FEEDBACK 显示每 x 行 (0) 的进度
TOID_NOVALIDATE 跳过指定类型 id 的校验
FILESIZE 各转储文件的最大尺寸
RECALCULATE_STATISTICS 重新计算统计值 (N)
下列关键字仅用于可传输的表空间
TRANSPORT_TABLESPACE 导入可传输的表空间元数据 (N)
TABLESPACES 将要传输到数据库的表空间
DATAFILES 将要传输到数据库的数据文件
TTS_OWNERS 拥有可传输表空间集中数据的用户
exp system/1 file=d:\mis.dmp log=d:\exp_mis.log full=y statistics=none direct=y
exp system/manager@mis file=d:\mis.dmp log=d:\exp_mis.log owner=yy_pub statistics=none direct=y
imp system/1 file=E:\12\ztbf\yy_ca.dmp log=D:\oracle\imp_mis.log fromuser=yy_ca touser=YY_ca ignore=y
imp system/1 file=E:\12\ztbf\yy_db.dmp log=D:\oracle\imp_mis.log fromuser=yy_db
touser=yy_db ignore=y
imp system/1 file=E:\12\ztbf\yy_pub.dmp log=D:\oracle\imp_mis.log fromuser=yy_pub
touser=YY-pub ignore=y
imp system/1 file=E:\12\ztbf\yy_sc.dmp log=D:\oracle\imp_mis.log fromuser=yy_sc touser=yy_sc ignore=y
imp system/1 file=E:\12\ztbf\yy_sg.dmp log=D:\oracle\imp_mis.log fromuser=yy_sg touser=yy_sg ignore=y

Hot AI Tools

Undresser.AI Undress
AI-powered app for creating realistic nude photos

AI Clothes Remover
Online AI tool for removing clothes from photos.

Undress AI Tool
Undress images for free

Clothoff.io
AI clothes remover

AI Hentai Generator
Generate AI Hentai for free.

Hot Article
Hot Tools

Notepad++7.3.1
Easy-to-use and free code editor

SublimeText3 Chinese version
Chinese version, very easy to use

Zend Studio 13.0.1
Powerful PHP integrated development environment

Dreamweaver CS6
Visual web development tools

SublimeText3 Mac version
God-level code editing software (SublimeText3)
Hot Topics
 1381
1381
 52
52

 What should I do if the Win7 taskbar does not display the icon? How to solve the problem of the computer taskbar icon disappearing
Jun 09, 2024 pm 01:49 PM
What should I do if the Win7 taskbar does not display the icon? How to solve the problem of the computer taskbar icon disappearing
Jun 09, 2024 pm 01:49 PM
Recently, many users using Win7 system have found that the icons in the taskbar suddenly disappeared, which makes the operation very inconvenient and they do not know how to solve the problem. This article will introduce to you how to solve the problem of disappearing taskbar icons in Win7 system. Bar! Cause Analysis When encountering such a situation, there are generally two situations: one is that the taskbar on the computer does not really disappear, but is just hidden, and the other is that the taskbar does disappear. Method 1: 1. There is a situation that you need to confirm first, that is, when the mouse is placed at the bottom of the screen, the taskbar will be displayed. You can directly click the mouse on the taskbar and select "Properties". 2. In the dialog box that opens, click & on the "Hide taskbar" option.
 Huawei's Qiankun ADS3.0 intelligent driving system will be launched in August and will be launched on Xiangjie S9 for the first time
Jul 30, 2024 pm 02:17 PM
Huawei's Qiankun ADS3.0 intelligent driving system will be launched in August and will be launched on Xiangjie S9 for the first time
Jul 30, 2024 pm 02:17 PM
On July 29, at the roll-off ceremony of AITO Wenjie's 400,000th new car, Yu Chengdong, Huawei's Managing Director, Chairman of Terminal BG, and Chairman of Smart Car Solutions BU, attended and delivered a speech and announced that Wenjie series models will be launched this year In August, Huawei Qiankun ADS 3.0 version was launched, and it is planned to successively push upgrades from August to September. The Xiangjie S9, which will be released on August 6, will debut Huawei’s ADS3.0 intelligent driving system. With the assistance of lidar, Huawei Qiankun ADS3.0 version will greatly improve its intelligent driving capabilities, have end-to-end integrated capabilities, and adopt a new end-to-end architecture of GOD (general obstacle identification)/PDP (predictive decision-making and control) , providing the NCA function of smart driving from parking space to parking space, and upgrading CAS3.0
 How to clear all desktop background images in Win7? Tips for deleting personalized background images in Win7
Jun 02, 2024 am 09:01 AM
How to clear all desktop background images in Win7? Tips for deleting personalized background images in Win7
Jun 02, 2024 am 09:01 AM
In Win7 system, many users want to delete personalized desktop background images, but do not know how to delete them. This article will show you how to delete personalized background images in Win7 system. 1. First, open the control panel interface of the Win7 system and click to enter the "Appearance and Personalization" settings; 2. Then, in the opened interface, click the "Change Desktop Background" setting; 3. Then, click below "Desktop background" option; 4. Then, select Select all, and then click Clear all. Of course, you can also use it under "Customize", right-click the theme you want to delete, and then click &q on the shortcut menu
 Where is the network discovery in Win7? Tips for enabling the network discovery function in Win7
Jun 04, 2024 am 09:02 AM
Where is the network discovery in Win7? Tips for enabling the network discovery function in Win7
Jun 04, 2024 am 09:02 AM
Many computer users know that network discovery is a network setting. This setting will affect whether the computer can find other computers and devices on the network and whether it can find the computer when other computers on the network are found. So how to enable network discovery in win7? The following computer System Home U Disk Installation will introduce you to the tutorial on how to enable network discovery in win7 system. 1. First, click the "Start Menu" icon on the desktop taskbar and choose to open the "Control Panel" interface. 2. Then, in the interface that opens, set "View by" to "Category", and then choose to enter "Network and Internet"
 Introduction to how to change the startup sound of Windows 7 computer
Mar 26, 2024 pm 09:30 PM
Introduction to how to change the startup sound of Windows 7 computer
Mar 26, 2024 pm 09:30 PM
1. First copy the file you want to use as boot music to the corresponding directory of C: WindowsMedia. As shown in the figure: 2. Right-click the desktop on a single machine and select Personalize menu; as shown in the figure: 3. Select the sound option; as shown in the figure: 4. In the [Program Events] box in the [Sound] tab of the sound interface Select [Windows Login], then click [Browse]; as shown in the figure: 5. Select the music file that needs to be replaced, click Open, then click Apply and confirm to save the settings. as the picture shows:
 How to delete vbs virus in win7
Mar 26, 2024 pm 09:21 PM
How to delete vbs virus in win7
Mar 26, 2024 pm 09:21 PM
1. Click [Start → Run] and enter gpedit.msc. On the left side of the [Group Policy] window, click the [Computer Configuration → Windows Settings → Security Settings → Software Restriction Policy] item, and then click the [Action → Create New Policy] menu item. As shown in the picture: 2. Select [Other Rules] from the left. Right-click the blank space in the right pane and select the [New Path Rule] item in the menu. In the pop-up window, click the [Browse] button after [Path], select the wscript.exe file in the C: WindowsSystem32 folder, and set the [Security Level] to [Not Allowed]. Change C: System32, Dllcache and I386 under Windows
 Always new! Huawei Mate60 series upgrades to HarmonyOS 4.2: AI cloud enhancement, Xiaoyi Dialect is so easy to use
Jun 02, 2024 pm 02:58 PM
Always new! Huawei Mate60 series upgrades to HarmonyOS 4.2: AI cloud enhancement, Xiaoyi Dialect is so easy to use
Jun 02, 2024 pm 02:58 PM
On April 11, Huawei officially announced the HarmonyOS 4.2 100-machine upgrade plan for the first time. This time, more than 180 devices will participate in the upgrade, covering mobile phones, tablets, watches, headphones, smart screens and other devices. In the past month, with the steady progress of the HarmonyOS4.2 100-machine upgrade plan, many popular models including Huawei Pocket2, Huawei MateX5 series, nova12 series, Huawei Pura series, etc. have also started to upgrade and adapt, which means that there will be More Huawei model users can enjoy the common and often new experience brought by HarmonyOS. Judging from user feedback, the experience of Huawei Mate60 series models has improved in all aspects after upgrading HarmonyOS4.2. Especially Huawei M
 How to modify boot animation in Windows 7
Mar 26, 2024 pm 08:51 PM
How to modify boot animation in Windows 7
Mar 26, 2024 pm 08:51 PM
1. Press and hold the [Win+R] keys to open the run dialog box, enter [regedit] in the search box, and then confirm; as shown in the figure: 2. Open HKEY_LOCAL_MACHINESoftwareMicrosoftWindowsCurrentVersionAuthenticationLogonUIBackgroud in the opened registry editor; as shown in the figure Display: 3. Double-click [OEMBackground] and open it, change the default value [0] to [1], and then confirm to exit; as shown in the figure: 4. Rename the image backgroundDefault.jpg, (the image size cannot exceed 256k
