

Hive集成Mysql作为元数据

默认情况下,Hive元数据保存在内嵌的 Derby 数据库中,只能允许一个会话连接,只适合简单的测试。为了支持多用户多会话,则需要一个独立的元数据库,我们使用 MySQL 作为元数据库,Hive 内部对 MySQL 提供了很好的支持,配置一个独立的元数据库需要增加以下
默认情况下,Hive元数据保存在内嵌的 Derby 数据库中,只能允许一个会话连接,只适合简单的测试。为了支持多用户多会话,则需要一个独立的元数据库,我们使用 MySQL 作为元数据库,Hive 内部对 MySQL 提供了很好的支持,配置一个独立的元数据库需要增加以下几步骤:
第一步:安装MySQL服务器端和MySQL客户端,并启动MySQL服务。
此步省略,具体请看http://www.cnblogs.com/linjiqin/archive/2013/03/04/2942497.html
第二步:安装Hive
此步省略,具体请看http://www.cnblogs.com/linjiqin/archive/2013/03/04/2942402.html
第三步:为Hive建立相应的MySQL账户,并赋予足够的权限,执行命令如下:
hadoop@ubuntu:~$ mysql -uroot -pmysql
mysql> CREATE USER <span>'</span><span>hive</span><span>'</span> IDENTIFIED BY <span>'</span><span>mysql</span><span>'</span>;
mysql> GRANT ALL PRIVILEGES ON *.* TO <span>'</span><span>hive</span><span>'</span>@<span>'</span><span>%</span><span>'</span> WITH GRANT OPTION;
mysql> flush privileges;
默认情况下Mysql只允许本地登录,所以需要修改配置文件将地址绑定给注释掉:
root@ubuntu:~# <span>sudo</span> gedit /etc/mysql/my.cnf
找到如下内容:
# Instead of skip-networking the default is now to listen only on
# localhost which is more compatible and is not less secure.
#bind-address           = 127.0.0.1  <span><span>---</span><span>注释掉这一行就可以远程登录了</span></span>
重启mysql服务:
<span>sudo</span> service mysql restart
第四步:建立 Hive 专用的元数据库,记得创建时用刚才创建的“hive”账号登陆。
mysql> exit;
hadoop@ubuntu:~$ mysql -uhive -pmysql
mysql> create database hive;
第五步:在Hive的conf目录下的文件“hive-site.xml”中增加如下配置:

<span></span><span>xml version="1.0"</span><span>?></span>
<span></span><span>xml-stylesheet type="text/xsl" href="configuration.xsl"</span><span>?></span>

<span><span>configuration</span><span>></span>
    <span><span>property</span><span>></span>
        <span><span>name</span><span>></span>hive.metastore.local<span></span><span>name</span><span>></span>
        <span><span>value</span><span>></span>true<span></span><span>value</span><span>></span>
    <span></span><span>property</span><span>></span>
    <span><span>property</span><span>></span>
        <span><span>name</span><span>></span>javax.jdo.option.ConnectionURL<span></span><span>name</span><span>></span>
        <span><span>value</span><span>></span>jdbc:mysql://192.168.11.157:3306/hive?characterEncoding=UTF-8<span></span><span>value</span><span>></span>
    <span></span><span>property</span><span>></span>
    <span><span>property</span><span>></span>
        <span><span>name</span><span>></span>javax.jdo.option.ConnectionDriverName<span></span><span>name</span><span>></span>
        <span><span>value</span><span>></span>com.mysql.jdbc.Driver<span></span><span>value</span><span>></span>
    <span></span><span>property</span><span>></span>
    <span><span>property</span><span>></span>
        <span><span>name</span><span>></span>javax.jdo.option.ConnectionUserName<span></span><span>name</span><span>></span>
        <span><span>value</span><span>></span>hive<span></span><span>value</span><span>></span>
    <span></span><span>property</span><span>></span>
    <span><span>property</span><span>></span>
        <span><span>name</span><span>></span>javax.jdo.option.ConnectionPassword<span></span><span>name</span><span>></span>
        <span><span>value</span><span>></span>mysql<span></span><span>value</span><span>></span>
    <span></span><span>property</span><span>></span>
<span></span><span>configuration</span><span>></span></span></span></span></span></span></span></span></span></span></span></span></span></span></span></span></span>
从前面我们知道我们的“hive-site.xml”是一个“hive-default.xml.template”的一个拷贝,里面的配置参数非常之多,但是并不是我们都需要的,我们知道,Hive 系统会加载两个配置文件一个默认配置文件“hive-default.xml”,另一个就是用户自定义文件“hive-site.xml”。当“hive-site.xml”中的配置参数的值与“hive-default.xml”文件中不一致时,以用户自定义的为准。所以我们就把我们不需要的参数都删除掉,只留下上面所示的内容。
备注:其实修改这里的配置文件如果在Linux下面进行则非常麻烦,尽然我们都建立了FTP了,为何不用,所以把Master.Hadoop上面的这个配置文件下载下来,按照要求进行修改,这样的文件在Windows进行操作是非常方便的,弄好之后在上传上去,覆盖原来的即可。
第六步:把MySQL的JDBC驱动包复制到Hive的lib目录下。
JDBC驱动包的版本:mysql-connector-java-5.1.18-bin.jar
第七步:启动 Hive Shell, 执行“show tables;”命令,如果不报错,表明基于独立元数据库的 Hive 已经安装成功了。
hadoop@ubuntu:~$ hive
Logging initialized using configuration <span>in</span> <span>file</span>:/home/hadoop/hive-<span>0.9</span>.<span>0</span>/conf/hive-log4j.properties
Hive history <span>file</span>=/tmp/hadoop/hive_job_log_hadoop_201303041631_450140463.txt
hive> show tables;
OK
Time taken: <span>1.988</span> seconds
hive>
第八步:验证Hive配置是否有误,进入Hive的shell新建表,在MySQL的Hive数据库中可以看到相应的元数据库信息。
1)在Hive上建立数据表
hive> CREATE TABLE xp(id INT,name string) ROW FORMAT DELIMITED FIELDS TERMINATED BY '\t';
2)从 MySQL 数据库上查看元数据信息
用到的 SQL 语句:
use hive; //使用 hive 数据库库
show tables;//显示 hive 数据库中的数据表
select * from TBLS;//查看 hive 的元数据信息
到此Hive集成Mysql作为元数据已完成。
远程模式安装
远程模式安装是把 metastore 配置到远程机器上,可以配置多个。在独立模式的基础上需要在 hive-site.xml 文件中增加的配置项如下:
<span><span>property</span><span>></span>
    <span><span>name</span><span>></span>hive.metastore.local<span></span><span>name</span><span>></span>
    <span><span>value</span><span>></span>local<span></span><span>value</span><span>></span>
<span></span><span>property</span><span>></span>
<span><span>property</span><span>></span>
    <span><span>name</span><span>></span>hive.metastore.uris<span></span><span>name</span><span>></span>
    <span><span>value</span><span>></span>uri1,uri2,... <span></span><span>value</span><span>></span>//可配置多个 uri
    <span><span>description</span><span>></span>JDBC connect string for a JDBC metastore<span></span><span>description</span><span>></span>
<span></span><span>property</span><span>></span></span></span></span></span></span></span></span>
Hot AI Tools

Undresser.AI Undress
AI-powered app for creating realistic nude photos

AI Clothes Remover
Online AI tool for removing clothes from photos.

Undress AI Tool
Undress images for free

Clothoff.io
AI clothes remover

AI Hentai Generator
Generate AI Hentai for free.

Hot Article
Hot Tools

Notepad++7.3.1
Easy-to-use and free code editor

SublimeText3 Chinese version
Chinese version, very easy to use

Zend Studio 13.0.1
Powerful PHP integrated development environment

Dreamweaver CS6
Visual web development tools

SublimeText3 Mac version
God-level code editing software (SublimeText3)
Hot Topics


 How to use MySQL backup and restore in PHP?
Jun 03, 2024 pm 12:19 PM
How to use MySQL backup and restore in PHP?
Jun 03, 2024 pm 12:19 PM
Backing up and restoring a MySQL database in PHP can be achieved by following these steps: Back up the database: Use the mysqldump command to dump the database into a SQL file. Restore database: Use the mysql command to restore the database from SQL files.
 How to optimize MySQL query performance in PHP?
Jun 03, 2024 pm 08:11 PM
How to optimize MySQL query performance in PHP?
Jun 03, 2024 pm 08:11 PM
MySQL query performance can be optimized by building indexes that reduce lookup time from linear complexity to logarithmic complexity. Use PreparedStatements to prevent SQL injection and improve query performance. Limit query results and reduce the amount of data processed by the server. Optimize join queries, including using appropriate join types, creating indexes, and considering using subqueries. Analyze queries to identify bottlenecks; use caching to reduce database load; optimize PHP code to minimize overhead.
 How to insert data into a MySQL table using PHP?
Jun 02, 2024 pm 02:26 PM
How to insert data into a MySQL table using PHP?
Jun 02, 2024 pm 02:26 PM
How to insert data into MySQL table? Connect to the database: Use mysqli to establish a connection to the database. Prepare the SQL query: Write an INSERT statement to specify the columns and values to be inserted. Execute query: Use the query() method to execute the insertion query. If successful, a confirmation message will be output.
 How to create a MySQL table using PHP?
Jun 04, 2024 pm 01:57 PM
How to create a MySQL table using PHP?
Jun 04, 2024 pm 01:57 PM
Creating a MySQL table using PHP requires the following steps: Connect to the database. Create the database if it does not exist. Select a database. Create table. Execute the query. Close the connection.
 How to use MySQL stored procedures in PHP?
Jun 02, 2024 pm 02:13 PM
How to use MySQL stored procedures in PHP?
Jun 02, 2024 pm 02:13 PM
To use MySQL stored procedures in PHP: Use PDO or the MySQLi extension to connect to a MySQL database. Prepare the statement to call the stored procedure. Execute the stored procedure. Process the result set (if the stored procedure returns results). Close the database connection.
 How to fix mysql_native_password not loaded errors on MySQL 8.4
Dec 09, 2024 am 11:42 AM
How to fix mysql_native_password not loaded errors on MySQL 8.4
Dec 09, 2024 am 11:42 AM
One of the major changes introduced in MySQL 8.4 (the latest LTS release as of 2024) is that the "MySQL Native Password" plugin is no longer enabled by default. Further, MySQL 9.0 removes this plugin completely. This change affects PHP and other app
 70B model generates 1,000 tokens in seconds, code rewriting surpasses GPT-4o, from the Cursor team, a code artifact invested by OpenAI
Jun 13, 2024 pm 03:47 PM
70B model generates 1,000 tokens in seconds, code rewriting surpasses GPT-4o, from the Cursor team, a code artifact invested by OpenAI
Jun 13, 2024 pm 03:47 PM
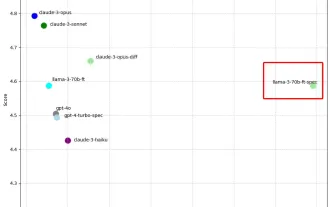
70B model, 1000 tokens can be generated in seconds, which translates into nearly 4000 characters! The researchers fine-tuned Llama3 and introduced an acceleration algorithm. Compared with the native version, the speed is 13 times faster! Not only is it fast, its performance on code rewriting tasks even surpasses GPT-4o. This achievement comes from anysphere, the team behind the popular AI programming artifact Cursor, and OpenAI also participated in the investment. You must know that on Groq, a well-known fast inference acceleration framework, the inference speed of 70BLlama3 is only more than 300 tokens per second. With the speed of Cursor, it can be said that it achieves near-instant complete code file editing. Some people call it a good guy, if you put Curs
 AI startups collectively switched jobs to OpenAI, and the security team regrouped after Ilya left!
Jun 08, 2024 pm 01:00 PM
AI startups collectively switched jobs to OpenAI, and the security team regrouped after Ilya left!
Jun 08, 2024 pm 01:00 PM
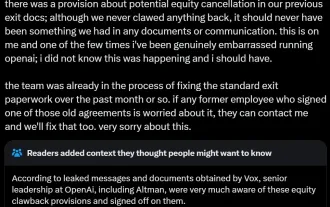
Last week, amid the internal wave of resignations and external criticism, OpenAI was plagued by internal and external troubles: - The infringement of the widow sister sparked global heated discussions - Employees signing "overlord clauses" were exposed one after another - Netizens listed Ultraman's "seven deadly sins" Rumors refuting: According to leaked information and documents obtained by Vox, OpenAI’s senior leadership, including Altman, was well aware of these equity recovery provisions and signed off on them. In addition, there is a serious and urgent issue facing OpenAI - AI safety. The recent departures of five security-related employees, including two of its most prominent employees, and the dissolution of the "Super Alignment" team have once again put OpenAI's security issues in the spotlight. Fortune magazine reported that OpenA
