

基于4.5Framework web程序、SQLSERVER数据库打包

估计很多朋友和我一样,对于C/S程序打包很熟悉,但对于B/S程序打包一头雾水。。。 最近公司要求我们把项目和数据库(SQLSERVER)一起打包,然后安装在CD光盘上,打算拿光盘去客户那边实现一键安装。哎!!!最终这个任务给我了, 我只有抱着学习的态度去慢慢摸
估计很多朋友和我一样,对于C/S程序打包很熟悉,但对于B/S程序打包一头雾水。。。
最近公司要求我们把项目和数据库(SQLSERVER)一起打包,然后安装在CD光盘上,打算拿光盘去客户那边实现一键安装。哎!!!最终这个任务给我了,
我只有抱着学习的态度去慢慢摸索。
打包的程序是基于VS2012、MVC4模板开发出来的,框架是4.5版本。
类似于这种4.5框架打包,目前微软好像也提供了一个打包工具 InstallShield,下载InstallShield2012 或者InstallShield2013,然后安装,安装完成之后就会
在 安装和部署里面会生成一个图标(InstallShield Limited Edition Project), 如下图(1.1)。。

图(1.1)
通过双击 InstallShield Limited Edition Project这个图标,就可以根据前进、后退图标实现安装了,如图(1.2)

图(1.2)
最终WEB打包生成出来的只是一个lnk快捷方式图标,无法指定到输出文件。然后我用C/S WINFORM程序、也是基于4.5框架来进行打包,发现安装生成出来的
文件可以完美运行。
产生这种情况我也感到很无语,于是在网上查找这方面的相关资料,发现InstallShield这款插件从2010开始,微软已经不管了,只是推荐这款插件。
哎!!!真坑...
基于这种情况我彻底无语了,只能从新找其他办法。
之后我就开始尝试把4.5框架程序降到4.0框架程序,然后再次进行打包。
降框架有两种办法:1.在VS2012上面打开, 更改所有程序集的目标框架,如图(1.3)

如图(1.3)
2. 用文本打开项目文件进行更改,更改TargetFrameworkVersion 为v4.0 如图(1.4)

图(1.4)
但是如果在4.5框架程序中引用了4.5版本的包,那也要对包进行降版本。去掉引用的包,或者找低版本的包来替代高版本的包
下面开始讲解用VS2010打包 4.0WEB程序
1.用VS2010打开即将要打包的WEB程序(图就省了。。)
2.右击解决方案一>添加一>新建项目,然后点击web安装项目,如图(1.5)

图(1.5)
3.右击安装包WebSetup1一>添加一>项目输出,然后选中项目WEB程序集 ,选中本地化资源、内容文件 如图(1.6)、(1.7)

图(1.6)

图(1.7)
4.右击安装包一>视图一>用户界面 ,如图(1.8)

图(1.8)
5.右击启动一>添加对话框一>选中文本框、许可协议,如图(1.9)

图(1.9)
6.右击文本框(A),许可协议上移到选定的位置, 如图(2.0)

图(2.0)
7.新建一个许可协议文件,打开WORD文档,里面写写协议内容,保存后WORD文档要改成rtf格式,然后右击许可协议一>属性窗口,在LicenseFile属性中点击浏览,如图(2.1)

如图(2.1)
8.双击Web应用程序文件夹,添加rtf文件,如图(2.2)

图(2.2)
9.右击解决方案一>新建项目一>类库,命名为安装类(我随便命名的),右击安装类一>添加一>新建类一>安装程序类,如图(2.3)

图(2.3)
10.双击安装类一>单击此处切换到代码视图,如图(2.4)

如图(2.4)
11.重写安装类,源码如下
<span>using</span><span> System;
</span><span>using</span><span> System.Collections;
</span><span>using</span><span> System.Collections.Generic;
</span><span>using</span><span> System.ComponentModel;
</span><span>using</span><span> System.Configuration.Install;
</span><span>using</span><span> System.Data.SqlClient;
</span><span>using</span><span> System.IO;
</span><span>using</span><span> System.Linq;


</span><span>namespace</span><span> 安装类
{
    [RunInstaller(</span><span>true</span><span>)]
    </span><span>public</span> <span>partial</span> <span>class</span><span> Installer : System.Configuration.Install.Installer
    {
        </span><span>public</span><span> Installer()
        {
            InitializeComponent();<br>
        }


        </span><span>///</span> <span><summary></summary></span>
        <span>///</span><span> 重写安装方法
        </span><span>///</span> <span></span>
        <span>///</span> <span><param name="stateSaver"></span>
        <span>public</span> <span>override</span> <span>void</span><span> Install(IDictionary stateSaver)
        {
            </span><span>base</span><span>.Install(stateSaver);
            </span><span>string</span> Server = Context.Parameters[<span>"</span><span>server</span><span>"</span><span>].ToString();
            </span><span>string</span> dbName = Context.Parameters[<span>"</span><span>dbname</span><span>"</span><span>].ToString();
            </span><span>string</span> userName = Context.Parameters[<span>"</span><span>user</span><span>"</span><span>].ToString();
            </span><span>string</span> userPass = Context.Parameters[<span>"</span><span>pwd</span><span>"</span><span>].ToString();
            </span><span>string</span> targetdir = Context.Parameters[<span>"</span><span>targetdir</span><span>"</span><span>].ToString();

            </span><span>/*</span><span>
            * 设置webconfig连接字符串
            </span><span>*/</span>
            <span>string</span> webconfigpath = Path.Combine(<span>this</span>.Context.Parameters[<span>"</span><span>targetdir</span><span>"</span>].ToString(), <span>"</span><span>web.config</span><span>"</span><span>);
            </span><span>//</span><span>修改第一个数据库连接</span>
            <span>string</span> webcofnigstring2 = File.ReadAllText(webconfigpath).Replace(<span>@"</span><span>server=JEFFREY9061\SQL2008;database=yd_esms;uid=sa;pwd=********</span><span>"</span><span>, GetConnectionString2());
            File.WriteAllText(webconfigpath, webcofnigstring2);
            </span><span>//</span><span>修改第二个数据连接</span>
            <span>string</span> webcofnigstring = File.ReadAllText(webconfigpath).Replace(<span>@"</span><span>Data Source=JEFFREY9061\SQL2008;Initial Catalog=yd_esms;Persist Security Info=True;User ID=sa;Password=******</span><span>"</span><span>, GetConnectionString());
            File.WriteAllText(webconfigpath, webcofnigstring);
            </span><span>//</span><span>这个是测试在安装目录下添加接收到的用户填写的数据库信息</span>
            File.WriteAllText(Path.Combine(targetdir, <span>"</span><span>log.txt</span><span>"</span>), Server + <span>"</span><span>/n/r</span><span>"</span> + dbName + <span>"</span><span>/n/r</span><span>"</span> + userName + <span>"</span><span>/n/r</span><span>"</span> +<span> userPass);
        }
        </span><span>///</span> <span><summary></summary></span>
        <span>///</span><span> 执行sql语句
        </span><span>///</span> <span></span>
        <span>///</span> <span><param name="connection"></span>
        <span>///</span> <span><param name="sql"></span>
        <span>void</span> ExecuteSQL(SqlConnection connection, <span>string</span><span> sql)
        {
            SqlCommand cmd </span>= <span>new</span><span> SqlCommand(sql, connection);
            cmd.ExecuteNonQuery();
        }
        </span><span>///</span> <span><summary></summary></span>
        <span>///</span><span> 获取文本框输入的信息,来插入到登录连接字符串
        </span><span>///</span> <span></span>
        <span>///</span> <span><returns></returns></span>
        <span>private</span> <span>string</span><span> GetConnectionString()
        {
            </span><span>return</span> <span>@"</span><span>Data Source=</span><span>"</span> + <span>this</span>.Context.Parameters[<span>"</span><span>server</span><span>"</span>] + <span>"</span><span>;Initial Catalog=</span><span>"</span> + <span>this</span>.Context.Parameters[<span>"</span><span>dbname</span><span>"</span>] + <span>"</span><span>;Persist Security Info=True;User ID=</span><span>"</span> + <span>this</span>.Context.Parameters[<span>"</span><span>user</span><span>"</span>] + <span>"</span><span>;Password=</span><span>"</span> + <span>this</span>.Context.Parameters[<span>"</span><span>pwd</span><span>"</span>] + <span>""</span><span>;
        }
        </span><span>private</span> <span>string</span><span> GetConnectionString2()
        {
            </span><span>return</span> <span>@"</span><span>server=</span><span>"</span> + <span>this</span>.Context.Parameters[<span>"</span><span>server</span><span>"</span>] + <span>"</span><span>;database=</span><span>"</span> + <span>this</span>.Context.Parameters[<span>"</span><span>dbname</span><span>"</span>] + <span>"</span><span>;uid=</span><span>"</span> + <span>this</span>.Context.Parameters[<span>"</span><span>user</span><span>"</span>] + <span>"</span><span>;pwd=</span><span>"</span> + <span>this</span>.Context.Parameters[<span>"</span><span>pwd</span><span>"</span><span>];
        }
    }
}</span>
12.安装类点击生成,又击WEB安装包一>添加一>项目输出,选中安装类为主输出,如图(2.5)

如图(2.5)
13.有击WEB安装包一>视图一>自定义操作,右击安装一>添加自定义操作一>双击Web应用程序文件夹,选中主输出来自安装类(活动),如图(2.6)

如图(2.6)
14.依次对WEB程序、安装类、安装包重新生成
15.右击安装包一>打开资源管理文件夹一>debug,在debug文件夹中会存在exe、msi两个文件,如图(2.7)

如图(2.7)
16.双击setup.exe 安装步骤如下


17.基本上再这里就算结束了,后面的我就不用演示了。
下面讲解如何把SQLSERVER数据库和程序一键打包,打包数据库其实很简单
分离数据库,找到对应的ldf、mdf文件进行复制,粘贴到任意盘,我是放到桌面了,如图(3.1)

图(3.1)
右击安装包一>添加一>文件,把ldf、mdf文件添加进去,如图(3.2)
 、
、
图(3.2)
打开安装类,添加一段代码,结合WEB源码如下
<span>using</span><span> System;
</span><span>using</span><span> System.Collections;
</span><span>using</span><span> System.Collections.Generic;
</span><span>using</span><span> System.ComponentModel;
</span><span>using</span><span> System.Configuration.Install;
</span><span>using</span><span> System.Data.SqlClient;
</span><span>using</span><span> System.IO;
</span><span>using</span><span> System.Linq;


</span><span>namespace</span><span> 安装类
{
    [RunInstaller(</span><span>true</span><span>)]
    </span><span>public</span> <span>partial</span> <span>class</span><span> Installer : System.Configuration.Install.Installer
    {
        </span><span>public</span><span> Installer()
        {
            InitializeComponent();
        }

        </span><span>///</span> <span><summary></summary></span>
        <span>///</span><span> 重写安装方法
        </span><span>///</span> <span></span>
        <span>///</span> <span><param name="stateSaver"></span>
        <span>public</span> <span>override</span> <span>void</span><span> Install(IDictionary stateSaver)
        {
            </span><span>base</span><span>.Install(stateSaver);
            </span><span>string</span> Server = Context.Parameters[<span>"</span><span>server</span><span>"</span><span>].ToString();
            </span><span>string</span> dbName = Context.Parameters[<span>"</span><span>dbname</span><span>"</span><span>].ToString();
            </span><span>string</span> userName = Context.Parameters[<span>"</span><span>user</span><span>"</span><span>].ToString();
            </span><span>string</span> userPass = Context.Parameters[<span>"</span><span>pwd</span><span>"</span><span>].ToString();
            </span><span>string</span> targetdir = Context.Parameters[<span>"</span><span>targetdir</span><span>"</span><span>].ToString();

            </span><span>/*</span><span>
            * 设置webconfig连接字符串
            </span><span>*/</span>
            <span>string</span> webconfigpath = Path.Combine(<span>this</span>.Context.Parameters[<span>"</span><span>targetdir</span><span>"</span>].ToString(), <span>"</span><span>web.config</span><span>"</span><span>);
            </span><span>//</span><span>修改第一个数据库连接</span>
            <span>string</span> webcofnigstring2 = File.ReadAllText(webconfigpath).Replace(<span>@"</span><span>server=JEFFREY9061\SQL2008;database=yd_esms;uid=sa;pwd=********</span><span>"</span><span>, GetConnectionString2());
            File.WriteAllText(webconfigpath, webcofnigstring2);
            </span><span>//</span><span>修改第二个数据连接</span>
            <span>string</span> webcofnigstring = File.ReadAllText(webconfigpath).Replace(<span>@"</span><span>Data Source=JEFFREY9061\SQL2008;Initial Catalog=yd_esms;Persist Security Info=True;User ID=sa;Password=******</span><span>"</span><span>, GetConnectionString());
            File.WriteAllText(webconfigpath, webcofnigstring);
            </span><span>//</span><span>这个是测试在安装目录下添加接收到的用户填写的数据库信息</span>
            File.WriteAllText(Path.Combine(targetdir, <span>"</span><span>log.txt</span><span>"</span>), Server + <span>"</span><span>/n/r</span><span>"</span> + dbName + <span>"</span><span>/n/r</span><span>"</span> + userName + <span>"</span><span>/n/r</span><span>"</span> +<span> userPass);
            </span><span>#region</span> 数据库处理
            <span>string</span> strSql = <span>""</span><span>;
            </span><span>if</span> (userPass == <span>""</span><span>)
            {
                strSql </span>= <span>"</span><span>server=</span><span>"</span> + Server + <span>"</span><span>;database=master;Integrated Security=True</span><span>"</span>;<span>//</span><span>连接数据库字符串      </span>
<span>            }
            </span><span>else</span><span>
            {
                strSql </span>= <span>"</span><span>server=</span><span>"</span> + Server + <span>"</span><span>;uid=</span><span>"</span> + userName + <span>"</span><span>;pwd=</span><span>"</span> + userPass + <span>"</span><span>;database=master</span><span>"</span>;<span>//</span><span>连接数据库字符串                </span>
<span>            }
            </span><span>string</span> DataName = <span>"</span><span>TEST</span><span>"</span>;<span>//</span><span>数据库名          </span>
            <span>string</span> strMdf = targetdir + <span>@"</span><span>TEST.mdf</span><span>"</span>;<span>//</span><span>MDF文件路径,这里需注意文件名要与刚添加的数据库文件名一样!      </span>
            <span>string</span> strLdf = targetdir + <span>@"</span><span>TEST_log.ldf</span><span>"</span>;<span>//</span><span>LDF文件路径       </span>
            <span>base</span><span>.Install(stateSaver);
            </span><span>this</span>.CreateDataBase(strSql, DataName, strMdf, strLdf, targetdir);<span>//</span><span>开始创建数据库 </span>
            <span>#endregion</span><span>
        }
        </span><span>///</span> <span><summary></summary></span>
        <span>///</span><span> 执行sql语句
        </span><span>///</span> <span></span>
        <span>///</span> <span><param name="connection"></span>
        <span>///</span> <span><param name="sql"></span>
        <span>void</span> ExecuteSQL(SqlConnection connection, <span>string</span><span> sql)
        {
            SqlCommand cmd </span>= <span>new</span><span> SqlCommand(sql, connection);
            cmd.ExecuteNonQuery();
        }
        </span><span>///</span> <span><summary></summary></span>
        <span>///</span><span> 获取文本框输入的信息,来插入到登录连接字符串
        </span><span>///</span> <span></span>
        <span>///</span> <span><returns></returns></span>
        <span>private</span> <span>string</span><span> GetConnectionString()
        {
            </span><span>return</span> <span>@"</span><span>Data Source=</span><span>"</span> + <span>this</span>.Context.Parameters[<span>"</span><span>server</span><span>"</span>] + <span>"</span><span>;Initial Catalog=</span><span>"</span> + <span>this</span>.Context.Parameters[<span>"</span><span>dbname</span><span>"</span>] + <span>"</span><span>;Persist Security Info=True;User ID=</span><span>"</span> + <span>this</span>.Context.Parameters[<span>"</span><span>user</span><span>"</span>] + <span>"</span><span>;Password=</span><span>"</span> + <span>this</span>.Context.Parameters[<span>"</span><span>pwd</span><span>"</span>] + <span>""</span><span>;
        }
        </span><span>private</span> <span>string</span><span> GetConnectionString2()
        {
            </span><span>return</span> <span>@"</span><span>server=</span><span>"</span> + <span>this</span>.Context.Parameters[<span>"</span><span>server</span><span>"</span>] + <span>"</span><span>;database=</span><span>"</span> + <span>this</span>.Context.Parameters[<span>"</span><span>dbname</span><span>"</span>] + <span>"</span><span>;uid=</span><span>"</span> + <span>this</span>.Context.Parameters[<span>"</span><span>user</span><span>"</span>] + <span>"</span><span>;pwd=</span><span>"</span> + <span>this</span>.Context.Parameters[<span>"</span><span>pwd</span><span>"</span><span>];
        }

        </span><span>///</span> <span><summary></summary></span>
        <span>///</span><span> 附加数据库方法
        </span><span>///</span> <span></span>
        <span>///</span> <span><param name="strSql"></span><span>连接数据库字符串,连接master系统数据库</span><span></span>
        <span>///</span> <span><param name="DataName"></span><span>数据库名字</span><span></span>
        <span>///</span> <span><param name="strMdf"></span><span>数据库文件MDF的路径</span><span></span>
        <span>///</span> <span><param name="strLdf"></span><span>数据库文件LDF的路径</span><span></span>
        <span>///</span> <span><param name="path"></span><span>安装目录</span><span></span>
         <span>private</span> <span>void</span> CreateDataBase(<span>string</span> strSql, <span>string</span> DataName, <span>string</span> strMdf, <span>string</span> strLdf, <span>string</span><span> path)
         {
             SqlConnection myConn </span>= <span>new</span><span> SqlConnection(strSql);
             String str </span>= <span>null</span><span>;
             </span><span>try</span><span>
             {
                 str </span>= <span>"</span><span> EXEC sp_attach_db @dbname='</span><span>"</span> + DataName + <span>"</span><span>',@filename1='</span><span>"</span> + strMdf + <span>"</span><span>',@filename2='</span><span>"</span> + strLdf +
                       <span>"</span><span>'</span><span>"</span><span>;
                 SqlCommand myCommand </span>= <span>new</span><span> SqlCommand(str, myConn);
                 myConn.Open();
                 myCommand.ExecuteNonQuery();
                 </span><span>//</span><span>MessageBox.Show("数据库安装成功!点击确定继续");
                 </span><span>//</span><span>需Using System.Windows.Forms           </span>
<span>             }
             </span><span>catch</span><span> (Exception ex)
             {
                 Console.Write(ex.StackTrace.ToString());
                 </span><span>//</span><span>MessageBox.Show("数据库安装失败!" + e.Message + "\n\n" + "您可以手动附加数据");  </span>
<span>                 System.Diagnostics.Process.Start(path);
                 </span><span>//</span><span>打开安装目录           </span>
<span>             }
             </span><span>finally</span><span>
             {
                 myConn.Close();
             }
         }
    }
}</span>
最后把解决方案全部重新生成,再次重复上面的WEB打包、安装就好了。。。
由于空余的时间不是很多,写的不是很详细,如有不懂的,可以来我QQ群一起讨论
QQ群号: 8017417 身份认证:Rach技术讨论
http://www.cnblogs.com/hank-hu/p/3967101.html

Hot AI Tools

Undresser.AI Undress
AI-powered app for creating realistic nude photos

AI Clothes Remover
Online AI tool for removing clothes from photos.

Undress AI Tool
Undress images for free

Clothoff.io
AI clothes remover

AI Hentai Generator
Generate AI Hentai for free.

Hot Article
Hot Tools

Notepad++7.3.1
Easy-to-use and free code editor

SublimeText3 Chinese version
Chinese version, very easy to use

Zend Studio 13.0.1
Powerful PHP integrated development environment

Dreamweaver CS6
Visual web development tools

SublimeText3 Mac version
God-level code editing software (SublimeText3)
Hot Topics
 1377
1377
 52
52

 How to make Google Maps the default map in iPhone
Apr 17, 2024 pm 07:34 PM
How to make Google Maps the default map in iPhone
Apr 17, 2024 pm 07:34 PM
The default map on the iPhone is Maps, Apple's proprietary geolocation provider. Although the map is getting better, it doesn't work well outside the United States. It has nothing to offer compared to Google Maps. In this article, we discuss the feasible steps to use Google Maps to become the default map on your iPhone. How to Make Google Maps the Default Map in iPhone Setting Google Maps as the default map app on your phone is easier than you think. Follow the steps below – Prerequisite steps – You must have Gmail installed on your phone. Step 1 – Open the AppStore. Step 2 – Search for “Gmail”. Step 3 – Click next to Gmail app
 How to write a simple countdown program in C++?
Nov 03, 2023 pm 01:39 PM
How to write a simple countdown program in C++?
Nov 03, 2023 pm 01:39 PM
C++ is a widely used programming language that is very convenient and practical in writing countdown programs. Countdown program is a common application that can provide us with very precise time calculation and countdown functions. This article will introduce how to use C++ to write a simple countdown program. The key to implementing a countdown program is to use a timer to calculate the passage of time. In C++, we can use the functions in the time.h header file to implement the timer function. The following is the code for a simple countdown program
 Clock app missing in iPhone: How to fix it
May 03, 2024 pm 09:19 PM
Clock app missing in iPhone: How to fix it
May 03, 2024 pm 09:19 PM
Is the clock app missing from your phone? The date and time will still appear on your iPhone's status bar. However, without the Clock app, you won’t be able to use world clock, stopwatch, alarm clock, and many other features. Therefore, fixing missing clock app should be at the top of your to-do list. These solutions can help you resolve this issue. Fix 1 – Place the Clock App If you mistakenly removed the Clock app from your home screen, you can put the Clock app back in its place. Step 1 – Unlock your iPhone and start swiping to the left until you reach the App Library page. Step 2 – Next, search for “clock” in the search box. Step 3 – When you see “Clock” below in the search results, press and hold it and
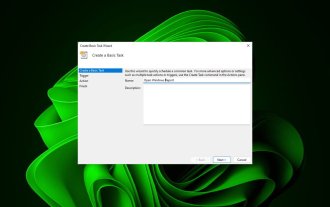 How to open a website using Task Scheduler
Oct 02, 2023 pm 11:13 PM
How to open a website using Task Scheduler
Oct 02, 2023 pm 11:13 PM
Do you frequently visit the same website at about the same time every day? This can lead to spending a lot of time with multiple browser tabs open and cluttering the browser while performing daily tasks. Well, how about opening it without having to launch the browser manually? It's very simple and doesn't require you to download any third-party apps, as shown below. How do I set up Task Scheduler to open a website? Press the key, type Task Scheduler in the search box, and then click Open. Windows On the right sidebar, click on the Create Basic Task option. In the Name field, enter the name of the website you want to open and click Next. Next, under Triggers, click Time Frequency and click Next. Select how long you want the event to repeat and click Next. Select enable
 Can't allow access to camera and microphone in iPhone
Apr 23, 2024 am 11:13 AM
Can't allow access to camera and microphone in iPhone
Apr 23, 2024 am 11:13 AM
Are you getting "Unable to allow access to camera and microphone" when trying to use the app? Typically, you grant camera and microphone permissions to specific people on a need-to-provide basis. However, if you deny permission, the camera and microphone will not work and will display this error message instead. Solving this problem is very basic and you can do it in a minute or two. Fix 1 – Provide Camera, Microphone Permissions You can provide the necessary camera and microphone permissions directly in settings. Step 1 – Go to the Settings tab. Step 2 – Open the Privacy & Security panel. Step 3 – Turn on the “Camera” permission there. Step 4 – Inside, you will find a list of apps that have requested permission for your phone’s camera. Step 5 – Open the “Camera” of the specified app
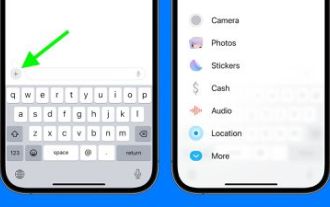 iOS 17: How to organize iMessage apps in Messages
Sep 18, 2023 pm 05:25 PM
iOS 17: How to organize iMessage apps in Messages
Sep 18, 2023 pm 05:25 PM
In iOS 17, Apple not only added several new messaging features, but also tweaked the design of the Messages app to give it a cleaner look. All iMessage apps and tools, such as the camera and photo options, can now be accessed by tapping the "+" button above the keyboard and to the left of the text input field. Clicking the "+" button brings up a menu column with a default order of options. Starting from the top, there's camera, photos, stickers, cash (if available), audio, and location. At the very bottom is a "More" button, which when tapped will reveal any other installed messaging apps (you can also swipe up to reveal this hidden list). How to reorganize your iMessage app You can do this below
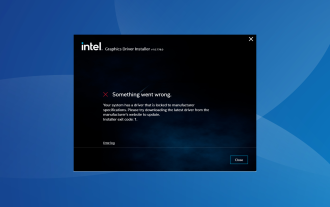 Fix: System driver locked to manufacturer specifications
Sep 23, 2023 pm 07:25 PM
Fix: System driver locked to manufacturer specifications
Sep 23, 2023 pm 07:25 PM
Graphics driver is one of the most important drivers on your PC, directly affecting performance and gaming experience. However, many people encounter the "Your system has drivers locked to manufacturer specifications" error when updating drivers through the installer. This issue occurs because the manufacturer restricts updates unless they are specifically pushed from their end. This ensures stability, but may be an issue for many people. So, let’s find out how to solve the problem now! How to fix your system with drivers locked to manufacturer specifications on Windows 11? Before we move on to slightly more complicated solutions, try these quick fixes: Make sure your computer and operating system meet the driver's system requirements. Boot your computer into safe mode, then
 Microsoft automatically installs HP Smart apps on Windows 10 and 11 PCs
Nov 30, 2023 pm 11:25 PM
Microsoft automatically installs HP Smart apps on Windows 10 and 11 PCs
Nov 30, 2023 pm 11:25 PM
Windows 10 and 11 come with multiple apps that you probably don't need. According to reports, one more app has joined the bloatware list, the HPSmart app. A report by WindowsLatest says they noticed that a new app called HPSmart has been added to the Start menu of their Windows 10 laptops. However, it didn't end there, the authors discovered that the application had also been automatically installed on their virtual machine running on Windows 11. What’s interesting about this situation is that the report states that the app automatically installs even when no HP product is connected to the PC. Some users reported on reddit that they also encountered similar
