Tasks for building web programs using GruntJS_node.js
How to customize Grunt tasks
Sometimes we need to write some of our own grunt tasks, here is a specific example
1. Preparation
1. Create a new directory g1
2. Create a new package.json and put it in g1
3. Create a new Gruntfile.js and put it in g1
package.json
{
"name": "g1",
"version": "0.1.0",
"author": "@snandy",
"homepage": "http://www.g1.com",
"devDependencies" : {
"grunt": "~0.4.0"
}
}
4. cd into g1, npm install to install the grunt package
The entire directory structure is as follows

Gruntfile.js is temporarily empty.
2. Create the simplest task
grunt.registerTask(taskName, [description,] taskFunction)
taskName task name, use grunt in the command line taskName
description description of the task
taskFunction implementation of the task
Fill in the code in Gruntfile.js
module.exports = function(grunt) {
grunt.registerTask('mytask', 'A simplest task demonstration, print different outputs according to parameters.', function(arg1, arg2) {
.log.writeln('Task' this.name ", no parameters passed");
} else if (arguments.length === 1) {
grunt.log.writeln('Task' this.name ", one parameter is " arg1);
} else {
grunt.log.writeln('task' this.name ", there are two parameters are " arg1 ", " arg2);
}
});
};
Go to the g1 directory and enter grunt mytask


Enter grunt mytask:snandy:backus

3. Create multiple tasks at one time
grunt.registerMultiTask(taskName, [description,] taskFunction)
You can see that the parameters are the same but the method names are different. But the usage method is different. You need to initialize the config first. Gruntfile.js is as follows
grunt.initConfig({
log: {
t1: [1, 2, 3],
t2: 'hello world',
t3: false
}
});
grunt.registerMultiTask('log', 'Log stuff.', function() {
grunt.log.writeln(this.target ': ' this.data);
});
};
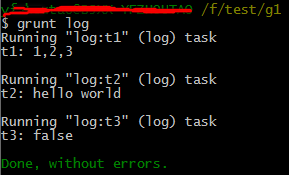
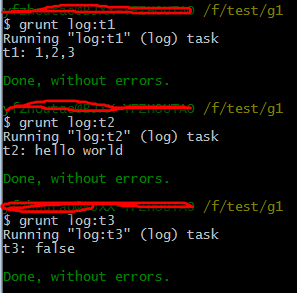
Enter grunt, and three subtasks t1, t2, t3 will be executed in sequence


4. Communication between tasks
module.exports = function(grunt) {
grunt.registerTask('mytask', 'The simplest task demonstration, printing different outputs according to parameters.', function(arg1, arg2) {
if (arguments.length === 0) {
grunt.log.writeln('task' this.name ", no parameters passed");
} else if (arguments.length === 1) {
grunt.log.writeln('Task' this.name ", one parameter is " arg1); .name ", there are two parameters: " arg1 ", " arg2);
}
});
grunt.registerTask('default', 'Default task', function( ) {
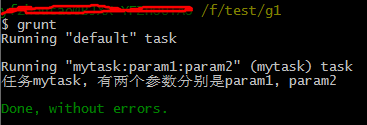
Enter the command line and type grunt
To call multiple tasks, just pass them to the run method separated by commas, or in array form
 Copy code

Hot AI Tools

Undresser.AI Undress
AI-powered app for creating realistic nude photos

AI Clothes Remover
Online AI tool for removing clothes from photos.

Undress AI Tool
Undress images for free

Clothoff.io
AI clothes remover

AI Hentai Generator
Generate AI Hentai for free.

Hot Article

Hot Tools

Notepad++7.3.1
Easy-to-use and free code editor

SublimeText3 Chinese version
Chinese version, very easy to use

Zend Studio 13.0.1
Powerful PHP integrated development environment

Dreamweaver CS6
Visual web development tools

SublimeText3 Mac version
God-level code editing software (SublimeText3)

Hot Topics
 1386
1386
 52
52
 How to complete the horror corridor mission in Goat Simulator 3
Feb 25, 2024 pm 03:40 PM
The Terror Corridor is a mission in Goat Simulator 3. How can you complete this mission? Master the detailed clearance methods and corresponding processes, and be able to complete the corresponding challenges of this mission. The following will bring you Goat Simulator. 3 Horror Corridor Guide to learn related information. Goat Simulator 3 Terror Corridor Guide 1. First, players need to go to Silent Hill in the upper left corner of the map. 2. Here you can see a house with RESTSTOP written on the roof. Players need to operate the goat to enter this house. 3. After entering the room, we first go straight forward, and then turn right. There is a door at the end here, and we go in directly from here. 4. After entering, we also need to walk forward first and then turn right. When we reach the door here, the door will be closed. We need to turn back and find it.
 Fix: Operator denied request error in Windows Task Scheduler
Aug 01, 2023 pm 08:43 PM
To automate tasks and manage multiple systems, mission planning software is a valuable tool in your arsenal, especially as a system administrator. Windows Task Scheduler does the job perfectly, but lately many people have reported operator rejected request errors. This problem exists in all iterations of the operating system, and even though it has been widely reported and covered, there is no effective solution. Keep reading to find out what might actually work for other people! What is the request in Task Scheduler 0x800710e0 that was denied by the operator or administrator? Task Scheduler allows automating various tasks and applications without user input. You can use it to schedule and organize specific applications, configure automatic notifications, help deliver messages, and more. it
 How to pass the Imperial Tomb mission in Goat Simulator 3
Mar 11, 2024 pm 01:10 PM
Goat Simulator 3 is a game with classic simulation gameplay, allowing players to fully experience the fun of casual action simulation. The game also has many exciting special tasks. Among them, the Goat Simulator 3 Imperial Tomb task requires players to find the bell tower. Some players are not sure how to operate the three clocks at the same time. Here is the guide to the Tomb of the Tomb mission in Goat Simulator 3! The guide to the Tomb of the Tomb mission in Goat Simulator 3 is to ring the bells in order. Detailed step expansion 1. First, players need to open the map and go to Wuqiu Cemetery. 2. Then go up to the bell tower. There will be three bells inside. 3. Then, in order from largest to smallest, follow the familiarity of 222312312. 4. After completing the knocking, you can complete the mission and open the door to get the lightsaber.
 How to do the rescue Steve mission in Goat Simulator 3
Feb 25, 2024 pm 03:34 PM
Rescue Steve is a unique task in Goat Simulator 3. What exactly needs to be done to complete it? This task is relatively simple, but we need to be careful not to misunderstand the meaning. Here we will bring you the rescue of Steve in Goat Simulator 3 Task strategies can help you better complete related tasks. Goat Simulator 3 Rescue Steve Mission Strategy 1. First come to the hot spring in the lower right corner of the map. 2. After arriving at the hot spring, you can trigger the task of rescuing Steve. 3. Note that there is a man in the hot spring. Although his name is Steve, he is not the target of this mission. 4. Find a fish named Steve in this hot spring and bring it ashore to complete this task.
 Where can I find Douyin fan group tasks? Will the Douyin fan club lose level?
Mar 07, 2024 pm 05:25 PM
TikTok, as one of the most popular social media platforms at the moment, has attracted a large number of users to participate. On Douyin, there are many fan group tasks that users can complete to obtain certain rewards and benefits. So where can I find Douyin fan club tasks? 1. Where can I view Douyin fan club tasks? In order to find Douyin fan group tasks, you need to visit Douyin's personal homepage. On the homepage, you will see an option called "Fan Club." Click this option and you can browse the fan groups you have joined and related tasks. In the fan club task column, you will see various types of tasks, such as likes, comments, sharing, forwarding, etc. Each task has corresponding rewards and requirements. Generally speaking, after completing the task, you will receive a certain amount of gold coins or experience points.
 Timing Analysis Pentagon Warrior! Tsinghua University proposes TimesNet: leading in prediction, filling, classification, and detection
Apr 11, 2023 pm 07:34 PM
Achieving task universality is a core issue in the research of basic deep learning models, and is also one of the main focuses in the recent direction of large models. However, in the field of time series, various types of analysis tasks vary greatly. There are prediction tasks that require fine-grained modeling and classification tasks that require extracting high-level semantic information. How to build a unified deep basic model to efficiently complete various timing analysis tasks has not yet been established. To this end, a team from the School of Software of Tsinghua University conducted research on the basic issue of timing change modeling and proposed TimesNet, a task-universal timing basic model. The paper was accepted by ICLR 2023. Author list: Wu Haixu*, Hu Tengge*, Liu Yong*, Zhou Hang, Wang Jianmin, Long Mingsheng Link: https://ope
 How to stop Task Manager process updates and kill tasks more easily in Windows 11
Aug 20, 2023 am 11:05 AM
How to Pause Task Manager Process Updates in Windows 11 and Windows 10 Press CTRL+Window Key+Delete to open Task Manager. By default, Task Manager will open the Processes window. As you can see here, all the apps are endlessly moving around and it can be hard to point them down when you want to select them. So, press CTRL and hold it, this will pause the task manager. You can still select apps and even scroll down, but you must hold down the CTRL button at all times.
 Everything you need to know about the End Task option in the Windows 11 taskbar
Aug 25, 2023 pm 12:29 PM
Frozen or unresponsive programs are easy to kill from Task Manager. But Microsoft has recently provided users with the facility to terminate these tasks directly from the taskbar. While the option isn't rolled out to everyone, it's easily available if you have the Windows Insider build. Here's everything you need to enable the End Task button and close tasks from the taskbar. How to Get the End Task Button from the Taskbar to Kill Apps Currently, the option to enable the End Task button for taskbar apps is only available as a developer option for users with Windows Insider builds. However, this may change in an upcoming feature update as it will be rolled out to users globally on the stable version. If you still


