

MFC打印相关操作

虽说现在已经有越来越多的人转向用C#来做界面的开发,但是对于一个习惯了C这种半面向对象语言的人来说,MFC依然是难割舍的存在。最近在做些数据库相关的事,因为是数据库,自然离不开打印报表之类的东西,所以顺带的也去研究了下如何用MFC来进行打印相关的的
虽说现在已经有越来越多的人转向用C#来做界面的开发,但是对于一个习惯了C++这种半面向对象语言的人来说,MFC依然是难割舍的存在。最近在做些数据库相关的事,因为是数据库,自然离不开打印报表之类的东西,所以顺带的也去研究了下如何用MFC来进行打印相关的的操作。
本篇文章参考的比较多的是这篇文章和MSDN的示例代码,另外这篇文章也提供了很多有用的参考,如果想看原文的话可以去看看。
直接用微软提供的CPrintDialog类进行打印的相关操作是非常简单的,本人将代码封装成为两个函数,除了实际往一页纸上绘制东西的部分在第二个函数中进行定义外,其他与打印相关的操作都在第一个函数上实现了。具体如下:
打印相关操作主函数:
void CPrinttToPrinterDlg::OnBnClickedButtonPrint()
{
CPrintDialog dlg(FALSE, PD_ALLPAGES, NULL);//打印对话框对象定义,参数一设置弹出对话框为打印对话框,参数二设置打印范围为全部页面,参数三可指定打印机,这里缺省即可
/*打印对话框的初始值设置,在实际应用中可根据需要进行设置,如通过预先计算得到要打印的页面范围等*/
dlg.m_pd.nMinPage = 1;//指定开始/结束页码编辑控件的页码范围的最小值,若nMinPage=nMaxPage,则“页码范围”单选钮和开始/结束页码编辑控件被灰化
dlg.m_pd.nMaxPage = 2;//指定开始/结束页码编辑控件的页码范围的最大值
dlg.m_pd.nCopies = 1;//指定拷贝份数编辑控件的初始值
dlg.m_pd.nFromPage = 1;//指定开始页码编辑控件的初始值
dlg.m_pd.nToPage = 2;//指定结束页码编辑控件的初始值
if (dlg.DoModal() == IDOK)
{
HDC hdcPrinter = dlg.GetPrinterDC();
if (hdcPrinter == NULL)//检取设备环境的句柄,检索不到则提醒并退出
{
MessageBox(_T("Buy a printer!"));
}
else
{
/*创建图形设备环境并与打印机设备关联,在上面绘图就相当于往打印机要打出的纸上绘图*/
CDC dcPrinter;
dcPrinter.Attach(hdcPrinter);
/*
*在打印设置过程中有些东西我们希望用户来选,所以使用了对话框的形式,但是有些
*东西比如纸张大小和打印方向等我们希望它是固定的,不能让用户随意设置造成麻烦
*因此,我们利用已经得到的打印机图形设备环境,通过修改它来实现固定设置的功能
*/
LPDEVMODE pDevMode;
pDevMode = (LPDEVMODE)GlobalLock(dlg.m_pd.hDevMode);
pDevMode->dmOrientation = DMORIENT_LANDSCAPE;//设置打印方向为横向
pDevMode->dmPaperSize = DMPAPER_A4;//设置纸张大小为A4
dcPrinter.ResetDC(pDevMode);
//通知打印机驱动程序接收打印文档并开始打印
DOCINFO docinfo;
memset(&docinfo, 0, sizeof(docinfo));
docinfo.cbSize = sizeof(docinfo);
docinfo.lpszDocName = _T("CDC::StartDoc() Code Fragment");
//如果初始化失败则提醒并退出
if (dcPrinter.StartDoc(&docinfo) < 0)
{
MessageBox(_T("Printer wouldn't initalize"));
}
else
{
/*打印的纸张大小我们是需要知道的,此外我们还需要设备像素点和实际长度单位的换算关系即DPI*/
int xDPI = GetDeviceCaps(hdcPrinter, LOGPIXELSX);//返回X方向上每英寸的设备点数,即DPI
float mmdpix = xDPI / 25.4;//每毫米所占的设备点数
int yDPI = GetDeviceCaps(hdcPrinter, LOGPIXELSY);//返回Y方向上每英寸的设备点数,即DPI
float mmdpiy = yDPI / 25.4;//每毫米所占的设备点数
float printerscreenx, printerscreeny;//这里得到打印机屏幕的宽高,也就是纸张的大小,会比实际小约6mm
printerscreenx = GetDeviceCaps(hdcPrinter, HORZSIZE);
printerscreeny = GetDeviceCaps(hdcPrinter, VERTSIZE);
/*因为要打印的页码范围和份数是用户选择的,所以在此对用户选择的项做处理*/
int pagebegin, pageend;//打印范围
if (dlg.PrintAll())//看用户是否选择了全部打印这一项,是的话则全部打印
{
pagebegin = dlg.m_pd.nMinPage;
pageend = dlg.m_pd.nMaxPage;
}
else if (dlg.PrintRange())//用户选择了选定页码范围项
{
pagebegin = dlg.m_pd.nFromPage;
pageend = dlg.m_pd.nToPage;
}
else//用户选择了选定范围打印,因为我们在这里没有提供选定范围的功能,所以用户一旦选择这里当成是操作错误处理即可
{
MessageBox(_T("Could not choise this one"));
dcPrinter.AbortDoc();//错误退出区别于EndDoc
}
int ncopy = dlg.m_pd.nCopies;//用户选择打印分数
/*在这里进行打印工作*/
while (ncopy--)//逐份打印
{
for (int page = pagebegin; page <= pageend; page++)//从选定范围开始打印
{
if (dcPrinter.StartPage() < 0)
{
MessageBox(_T("Could not start page"));
dcPrinter.AbortDoc();//错误退出区别于EndDoc
}
else//如果进入这里则绘出要打印内容并结束掉一页的打印
{
doThePrint(dcPrinter, page, mmdpix, mmdpiy, printerscreenx, printerscreeny);
dcPrinter.EndPage();
}
}
}
}
dcPrinter.EndDoc();//打印完成退出
dcPrinter.Detach();//释放DC
}
}
}void CPrinttToPrinterDlg::doThePrint(CDC &dc,int page, float mdpix, float mdpiy, float mpagex, float mpagey)//打印实际绘图函数,往参数一传入的CDC上面绘图
{
CPen pen, *pOldPen;// 定义笔对象和指针 // 创建10单位宽的绿色实心笔
pen.CreatePen(PS_SOLID, 100, RGB(0, 255, 0));
pOldPen = dc.SelectObject(&pen);// 选入绿色笔
dc.Re【本文来自鸿网互联 (http://www.68idc.cn)】ctangle(0 * mdpix, 0 * mdpiy, mpagex*mdpix, mpagey*mdpiy);// 画矩形
dc.SelectObject(pOldPen);// 选出绿色笔
pen.DeleteObject();// 删除绿色笔
}到此文章就已经写得七七八八了,调用主函数就可以实现往打印机上打印动东西的功能。至于打印什么东西,如何去打,就是GDI绘图的事了。另外由于我们还没有实现打印预览的功能,所以可以用虚拟打印机来看效果,当然如果有钱,也可以直接用真的打印机来看啦哈哈,本人用的是finepring,简而言之就两个字形容,神器!
打印预览还有如何去打印数据表格这些功能本人后面如果研究实现了的话也会贴上来,或者发个链接上来,这篇文章就先到这里吧。

Hot AI Tools

Undresser.AI Undress
AI-powered app for creating realistic nude photos

AI Clothes Remover
Online AI tool for removing clothes from photos.

Undress AI Tool
Undress images for free

Clothoff.io
AI clothes remover

AI Hentai Generator
Generate AI Hentai for free.

Hot Article
Hot Tools

Notepad++7.3.1
Easy-to-use and free code editor

SublimeText3 Chinese version
Chinese version, very easy to use

Zend Studio 13.0.1
Powerful PHP integrated development environment

Dreamweaver CS6
Visual web development tools

SublimeText3 Mac version
God-level code editing software (SublimeText3)
Hot Topics


 What should I do if the frame line disappears when printing in Excel?
Mar 21, 2024 am 09:50 AM
What should I do if the frame line disappears when printing in Excel?
Mar 21, 2024 am 09:50 AM
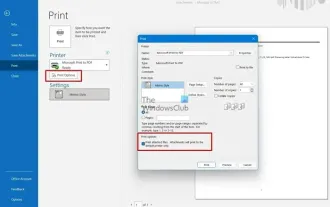
If when opening a file that needs to be printed, we will find that the table frame line has disappeared for some reason in the print preview. When encountering such a situation, we must deal with it in time. If this also appears in your print file If you have questions like this, then join the editor to learn the following course: What should I do if the frame line disappears when printing a table in Excel? 1. Open a file that needs to be printed, as shown in the figure below. 2. Select all required content areas, as shown in the figure below. 3. Right-click the mouse and select the "Format Cells" option, as shown in the figure below. 4. Click the “Border” option at the top of the window, as shown in the figure below. 5. Select the thin solid line pattern in the line style on the left, as shown in the figure below. 6. Select "Outer Border"
 Insufficient memory or disk space to repagin or print this document Word error
Feb 19, 2024 pm 07:15 PM
Insufficient memory or disk space to repagin or print this document Word error
Feb 19, 2024 pm 07:15 PM
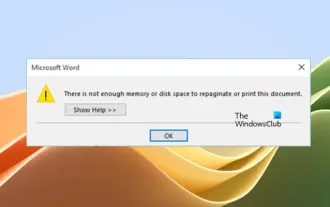
This article will introduce how to solve the problem of insufficient memory or disk space to repage or print the document in Microsoft Word. This error usually occurs when users try to print a Word document. If you encounter a similar error, please refer to the suggestions provided in this article to resolve it. Insufficient memory or disk space to repage or print this document Word error How to resolve the Microsoft Word printing error "There is not enough memory or disk space to repage or print the document." Update Microsoft Office Close memory-hogging applications Change your default printer Start Word in safe mode Rename the NorMal.dotm file Save the Word file as another
 4 Ways to Print from iPhone
Feb 02, 2024 pm 04:10 PM
4 Ways to Print from iPhone
Feb 02, 2024 pm 04:10 PM
In this digital world, the need for printed pages has not disappeared. While you might think it's more convenient to save content on your computer and send it directly to the printer, you can do the same thing on your iPhone. With your iPhone's camera, you can take a photo or document, and you can also store the file directly for printing at any time. This way you can quickly and easily materialize the information you need and save it in a paper document. Whether at work or in daily life, iPhone provides you with a portable printing solution. The following post will help you understand everything you need to know if you wish to use your iPhone to print pages on a printer. Print from iPhone: Ask Apple
 Can't print from snipping tool in Windows 11/10
Feb 19, 2024 am 11:39 AM
Can't print from snipping tool in Windows 11/10
Feb 19, 2024 am 11:39 AM
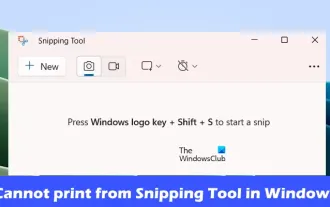
If you are unable to print using the Snipping Tool in Windows 11/10, it may be caused by corrupted system files or driver issues. This article will provide you with solutions to this problem. Can't print from Snipping Tool in Windows 11/10 If you can't print from Snipping Tool in Windows 11/10, use these fixes: Restart PC Printer Clear print queue Update printer and graphics driver Fix or reset Snipping Tool Run SFC and DISM Scan uses PowerShell commands to uninstall and reinstall Snipping Tool. let us start. 1] Restart your PC and printer Restarting your PC and printer helps eliminate temporary glitches
 PyCharm usage tutorial: guide you in detail to run the operation
Feb 26, 2024 pm 05:51 PM
PyCharm usage tutorial: guide you in detail to run the operation
Feb 26, 2024 pm 05:51 PM
PyCharm is a very popular Python integrated development environment (IDE). It provides a wealth of functions and tools to make Python development more efficient and convenient. This article will introduce you to the basic operation methods of PyCharm and provide specific code examples to help readers quickly get started and become proficient in operating the tool. 1. Download and install PyCharm First, we need to go to the PyCharm official website (https://www.jetbrains.com/pyc
 How to print all attachments in Outlook
Feb 20, 2024 am 10:30 AM
How to print all attachments in Outlook
Feb 20, 2024 am 10:30 AM
Outlook is one of the most feature-rich email clients and has become an indispensable tool for professional communication. One of the challenges is printing all attachments at the same time in Outlook. Usually you need to download attachments one by one before you can print them, but if you want to print everything at once, this is the problem most people encounter. How to Print All Attachments in Outlook Although most of the information is maintained online in the Outlook application, there are times when you need to print out the information for backup. Must sign documents in person to satisfy legal requirements such as contracts, government forms, or homework assignments. There are several methods that allow you to print all attachments in Outlook with one click instead of printing them one by one. Let's look at each one in detail. Outloo
 Word mail merge prints blank page
Feb 19, 2024 pm 04:51 PM
Word mail merge prints blank page
Feb 19, 2024 pm 04:51 PM
If you find that blank pages appear when printing a mail merge document using Word, this article will help you. Mail merge is a convenient feature that allows you to easily create personalized documents and send them to multiple recipients. In Microsoft Word, the mail merge feature is highly regarded because it helps users save time manually copying the same content for each recipient. In order to print the mail merge document, you can go to the Mailings tab. But some Word users have reported that when trying to print a mail merge document, the printer prints a blank page or doesn't print at all. This may be due to incorrect formatting or printer settings. Try checking the document and printer settings and make sure to preview the document before printing to ensure the content is correct. if
 What is sudo and why is it important?
Feb 21, 2024 pm 07:01 PM
What is sudo and why is it important?
Feb 21, 2024 pm 07:01 PM
sudo (superuser execution) is a key command in Linux and Unix systems that allows ordinary users to run specific commands with root privileges. The function of sudo is mainly reflected in the following aspects: Providing permission control: sudo achieves strict control over system resources and sensitive operations by authorizing users to temporarily obtain superuser permissions. Ordinary users can only obtain temporary privileges through sudo when needed, and do not need to log in as superuser all the time. Improved security: By using sudo, you can avoid using the root account during routine operations. Using the root account for all operations may lead to unexpected system damage, as any mistaken or careless operation will have full permissions. and
