

搭pl/proxy集群

最近朋友要上一个系统,设计百亿级数据。我去帮着搭建系统,采用pg/proxy集群,业务相关就不说了,这里就把简单技术验证放出来。相关人员比较保守,就用了OS官方的安装包,pg版本9.1. 规划中两台服务器上验证,一个上三个实例(一个实例做代理,另外两个做数
最近朋友要上一个系统,设计百亿级数据。我去帮着搭建系统,采用pg/proxy集群,业务相关就不说了,这里就把简单技术验证放出来。相关人员比较保守,就用了OS官方的安装包,pg版本9.1.
规划中两台服务器上验证,一个上三个实例(一个实例做代理,另外两个做数据节点),一个上两个实例(做数据节点)
数据节目录如下,不过是在两台服务器上,如上所说。
/opt/pg91/pgdata0
/opt/pg91/pgdata1
/opt/pg91/pgdata2
/opt/pg91/pgdata3
/opt/pg91/pgdata4
0
第一部分,安装
1
查询可安装版本
zxw@pgproxy1:~$ apt-cache search postgres | grep 9
libpgtypes3 - shared library libpgtypes for PostgreSQL 9.1
postgresql-9.1 - object-relational SQL database, version 9.1 server
。。。
postgresql-9.1-slony1-2 - replication system for PostgreSQL: PostgreSQL 9.1 server plug-in
skytools-modules-9.1 - PostgreSQL 9.1 modules for skytools
2
装
zxw@pgproxy1:~$ sudo apt-get install -y postgresql-9.1 postgresql-client-9.1 postgresql-contrib-9.1 postgresql-server-dev-9.1
... ...
update-alternatives: using /usr/share/postgresql/9.1/man/man1/postmaster.1.gz to provide /usr/share/man/man1/postmaster.1.gz (postmaster.1.gz) in auto mode.
* Starting PostgreSQL 9.1 database server
...done.
Setting up postgresql-contrib-9.1 (9.1.14-0ubuntu0.12.04) ...
Setting up postgresql-server-dev-9.1 (9.1.14-0ubuntu0.12.04) ...
Processing triggers for libc-bin ...
ldconfig deferred processing now taking place
看到上面这句就ok了,就是说有些事情在以上安装过程中给deferred(推迟)了,推迟到现在集中处理了。
3
查看,已经跑起来了
zxw@pgproxy1:~$ ps -ef | grep postgres
postgres 8362 1 0 17:22 ? 00:00:00 /usr/lib/postgresql/9.1/bin/postgres -D /var/lib/postgresql/9.1/main -c config_file=/etc/postgresql/9.1/main/postgresql.conf
postgres 8364 8362 0 17:22 ? 00:00:00 postgres: writer process
postgres 8365 8362 0 17:22 ? 00:00:00 postgres: wal writer process
postgres 8366 8362 0 17:22 ? 00:00:00 postgres: autovacuum launcher process
postgres 8367 8362 0 17:22 ? 00:00:00 postgres: stats collector process
zxw 8425 1486 0 17:34 pts/0 00:00:00 grep --color=auto postgres
zxw@pgproxy1:~$
zxw@pgproxy1:~$ /etc/init.d/postgresql status
Running clusters: 9.1/main
4
这样登录不行,默认Peer authentication
zxw@pgproxy1:~$ psql -U postgres postgres
psql: FATAL: Peer authentication failed for user "postgres"
zxw@pgproxy1:~$
5
这样登录
zxw@pgproxy1:~$ sudo -u postgres psql
[sudo] password for zxw:
psql (9.1.14)
Type "help" for help.
postgres=# \q
5
确认Peer authentication
zxw@pgproxy1:~$ sudo nl /etc/postgresql/9.1/main/pg_hba.conf | more
79 # Database administrative login by Unix domain socket
80 local all postgres peer
81 # TYPE DATABASE USER ADDRESS METHOD
82 # "local" is for Unix domain socket connections only
83 local all all peer
84 # IPv4 local connections:
85 host all all 127.0.0.1/32 md5
peer
Obtain the client’s operating system user name from the operating system and check if it
matches the requested database user name. This is only available for local connections. See
Section 19.3.7 for details.
给改成md5认证,
6
安装时没提示设置密码,超级用户密码随机了一个,给修改一下
postgres=# select * from pg_user;
usename | usesysid | usecreatedb | usesuper | usecatupd | userepl | passwd | valuntil | useconfig
----------+----------+-------------+----------+-----------+---------+----------+----------+-----------
postgres | 10 | t | t | t | t | ******** | |
(1 row)
postgres=# alter user postgres password 'postgres';
ALTER ROLE
postgres=# select * from pg_user;
usename | usesysid | usecreatedb | usesuper | usecatupd | userepl | passwd | valuntil | useconfig
----------+----------+-------------+----------+-----------+---------+----------+----------+-----------
postgres | 10 | t | t | t | t | ******** | |
(1 row)
7
md5 authentication ok:
zxw@pgproxy1:~$ psql -h 127.0.0.1 -U postgres postgres
Password for user postgres:
psql (9.1.14)
SSL connection (cipher: DHE-RSA-AES256-SHA, bits: 256)
Type "help" for help.
postgres=#
8
修改监听地址等,加载配置参数
zxw@pgproxy1:~$ sudo -u postgres /etc/init.d/postgresql reload
* Reloading PostgreSQL 9.1 database server
...done.
zxw@pgproxy1:~$
9
验证ok
zxw@pgproxy1:~$ psql -h127.0.0.1 -Upostgres postgres
Password for user postgres:
psql (9.1.14)
SSL connection (cipher: DHE-RSA-AES256-SHA, bits: 256)
Type "help" for help.
postgres=# show all ;
name | setting | description
---------------------------------+------------------------------------------+-------------------------------------------------------------------------------------------------------------------------------
allow_system_table_mods | off | Allows modifications of the structure of system tables.
。。。。。。
listen_addresses | * | Sets the host name or IP address(es) to listen to.
lo_compat_privileges | off | Enables backward compatibility mode for privilege checks on large objects.
local_preload_libraries | | Lists shared libraries to preload into each backend.
10
验证ok
zxw@pgproxy1:~$ psql -h192.168.11.131 -Upostgres postgres
Password for user postgres:
psql (9.1.14)
SSL connection (cipher: DHE-RSA-AES256-SHA, bits: 256)
Type "help" for help.
postgres=#
11
ubuntu12上官方pg包安装完后的目录基本如下:
istall directory
/usr/lib/postgresql/9.1/bin/postgres proc
/var/lib/postgresql/9.1/main data
/etc/postgresql/9.1/main/postgresql.conf option file
/usr/share/postgresql/9.1/contrib/
/usr/share/postgresql/9.1/extension/
/usr/share/postgresql-common/
第二部分
初始化n个实例
1
准备目录
root@pgproxy1:~# mkdir /opt/pg91
root@pgproxy1:~# chown postgres:postgres /opt/pg91/
2
初始化一个实例
root@pgproxy1:~# sudo -u postgres /usr/lib/postgresql/9.1/bin/initdb -E utf8 -Upostgres --locale=C -W -D /opt/pg91/pgdata1
could not change directory to "/root"
The files belonging to this database system will be owned by user "postgres".
This user must also own the server process.
The database cluster will be initialized with locale C.
The default text search configuration will be set to "english".
creating directory /opt/pg91/pgdata1 ... ok
creating subdirectories ... ok
selecting default max_connections ... 100
。。。
Enter new superuser password:
。。。
vacuuming database template1 ... ok
copying template1 to template0 ... ok
copying template1 to postgres ... ok
WARNING: enabling "trust" authentication for local connections
You can change this by editing pg_hba.conf or using the -A option the
next time you run initdb.
Success. You can now start the database server using:
/usr/lib/postgresql/9.1/bin/postgres -D /opt/pg91/pgdata1
or
/usr/lib/postgresql/9.1/bin/pg_ctl -D /opt/pg91/pgdata1 -l logfile start
root@pgproxy1:~#
3
查看数据集目录
root@pgproxy1:~# ll /opt/pg91/pgdata1/
total 88
drwx------ 13 postgres postgres 4096 Oct 23 15:49 ./
drwxr-xr-x 3 postgres postgres 4096 Oct 23 15:49 ../
drwx------ 5 postgres postgres 4096 Oct 23 15:49 base/
drwx------ 2 postgres postgres 4096 Oct 23 15:49 global/
drwx------ 2 postgres postgres 4096 Oct 23 15:49 pg_clog/
-rw------- 1 postgres postgres 4476 Oct 23 15:49 pg_hba.conf
-rw------- 1 postgres postgres 1636 Oct 23 15:49 pg_ident.conf
drwx------ 4 postgres postgres 4096 Oct 23 15:49 pg_multixact/
drwx------ 2 postgres postgres 4096 Oct 23 15:49 pg_notify/
drwx------ 2 postgres postgres 4096 Oct 23 15:49 pg_serial/
drwx------ 2 postgres postgres 4096 Oct 23 15:49 pg_stat_tmp/
drwx------ 2 postgres postgres 4096 Oct 23 15:49 pg_subtrans/
drwx------ 2 postgres postgres 4096 Oct 23 15:49 pg_tblspc/
drwx------ 2 postgres postgres 4096 Oct 23 15:49 pg_twophase/
-rw------- 1 postgres postgres 4 Oct 23 15:49 PG_VERSION
drwx------ 3 postgres postgres 4096 Oct 23 15:49 pg_xlog/
-rw------- 1 postgres postgres 19129 Oct 23 15:49 postgresql.conf
4
搞个放日志的地方
root@pgproxy1:~# mkdir /opt/pg91/pgdata1/pg_log
root@pgproxy1:~# chown postgres:postgres /opt/pg91/pgdata1/pg_log/
root@pgproxy1:~# chmod 700 /opt/pg91/pgdata1/pg_log/
修改认证监听等相关参数,后跑一个
root@pgproxy1:~# sudo -u postgres /usr/lib/postgresql/9.1/bin/pg_ctl -D /opt/pg91/pgdata1 -l /opt/pg91/pgdata1/pg_log/pg.log start
重复以上跑起5个实例。
第三部分
安装pl/proxy
1
查一下能装啥
zxw@pgproxy1:~$ 【本文来自鸿网互联 (http://www.68idc.cn)】apt-cache search plproxy
postgresql-9.1-plproxy - database partitioning system for PostgreSQL 9.1
2
装
zxw@pgproxy1:~$ sudo apt-get install -y postgresql-9.1-plproxy
[sudo] password for zxw:
Reading package lists... Done
Building dependency tree
Reading state information... Done
The following NEW packages will be installed:
postgresql-9.1-plproxy
0 upgraded, 1 newly installed, 0 to remove and 69 not upgraded.
Need to get 65.3 kB of archives.
After this operation, 268 kB of additional disk space will be used.
Get:1 http://hk.archive.ubuntu.com/ubuntu/ precise/universe postgresql-9.1-plproxy amd64 2.3-1 [65.3 kB]
Fetched 65.3 kB in 10s (6,138 B/s)
Selecting previously unselected package postgresql-9.1-plproxy.
(Reading database ... 58432 files and directories currently installed.)
Unpacking postgresql-9.1-plproxy (from .../postgresql-9.1-plproxy_2.3-1_amd64.deb) ...
Setting up postgresql-9.1-plproxy (2.3-1) ...
zxw@pgproxy1:~$
3
规划
proxy node:
ip
port portN
create user beiigang
create user proxy
create database proxy;
schema beiigang
data node:
ip
port portN
create user beiigang
create user devart
create database datadb
schema beiigang
4
跑规划
#
#proxy
#
create role beiigang superuser login encrypted password 'beiigang';
create role proxy nosuperuser nocreatedb nocreaterole noinherit login encrypted password 'proxy';
create database proxy with owner beiigang template template0 encoding 'UTF8' lc_collate 'en_US.UTF-8' lc_ctype 'en_US.UTF-8';
grant all on database proxy to proxy;
create schema proxy authorization proxy;
#
#data node
#
create role beiigang superuser login encrypted password 'beiigang';
create role devart nosuperuser nocreatedb nocreaterole noinherit login encrypted password 'devart';
create database datadb with owner beiigang template template0 encoding 'UTF8' lc_collate 'en_US.UTF-8' lc_ctype 'en_US.UTF-8';
grant all on database datadb to devart;
create schema devart authorization devart;
#
#proxy node
#
postgres=# create role beiigang superuser login encrypted password 'beiigang';
CREATE ROLE
postgres=# create role proxy nosuperuser nocreatedb nocreaterole noinherit login encrypted password 'proxy';
CREATE ROLE
postgres=# create database proxy with owner beiigang template template0 encoding 'UTF8' lc_collate 'en_US.UTF-8' lc_ctype 'en_US.UTF-8';
CREATE DATABASE
postgres=# grant all on database proxy to proxy;
GRANT
proxy=# create schema proxy authorization proxy;
CREATE SCHEMA
#
#data node
#
postgres=# create role beiigang superuser login encrypted password 'beiigang';
CREATE ROLE
postgres=# create role datasch nosuperuser nocreatedb nocreaterole noinherit login encrypted password 'datasch';
CREATE ROLE
postgres=# create database datadb with owner beiigang template template0 encoding 'UTF8' lc_collate 'en_US.UTF-8' lc_ctype 'en_US.UTF-8';
CREATE DATABASE
postgres=# grant all on database datadb to datasch;
GRANT
datadb=> create schema datasch authorization datasch;
CREATE SCHEMA
5
在代理上跑plproxy.sql
root@pgproxy1:~# psql -h ip -p portN -Upostgres -f /usr/share/postgresql/9.1/contrib/plproxy.sql proxy
Password for user postgres:
CREATE FUNCTION
CREATE LANGUAGE
CREATE FUNCTION
CREATE FOREIGN DATA WRAPPER
plproxy.sql的内容如下
## nl /usr/share/postgresql/9.1/contrib/plproxy.sql | more
#
# 1 -- handler function
# 2 CREATE FUNCTION plproxy_call_handler ()
# 3 RETURNS language_handler AS '$libdir/plproxy' LANGUAGE C;
#
# 4 -- language
# 5 CREATE LANGUAGE plproxy HANDLER plproxy_call_handler;
#
# 6 -- validator function
# 7 CREATE FUNCTION plproxy_fdw_validator (text[], oid)
# 8 RETURNS boolean AS '$libdir/plproxy' LANGUAGE C;
#
# 9 -- foreign data wrapper
# 10 CREATE FOREIGN DATA WRAPPER plproxy VALIDATOR plproxy_fdw_validator;
6
查看上面创建的对象
#proxy=# select * from pg_language;
# lanname | lanowner | lanispl | lanpltrusted | lanplcallfoid | laninline | lanvalidator | lanacl
#----------+----------+---------+--------------+---------------+-----------+--------------+--------
# internal | 10 | f | f | 0 | 0 | 2246 |
# c | 10 | f | f | 0 | 0 | 2247 |
# sql | 10 | f | t | 0 | 0 | 2248 |
# plpgsql | 10 | t | t | 11678 | 11679 | 11680 |
# plproxy | 10 | t | f | 16399 | 0 | 0 |
#(5 rows)
#
#proxy=# select * from pg_foreign_data_wrapper;
# fdwname | fdwowner | fdwhandler | fdwvalidator | fdwacl | fdwoptions
#---------+----------+------------+--------------+--------+------------
# plproxy | 10 | 0 | 16401 | |
#(1 row)
#还drop了一回,这个不要跑啊
#proxy=# drop language plproxy cascade;
#DROP LANGUAGE
#proxy=#
#proxy=# drop FOREIGN DATA WRAPPER plproxy cascade;
#DROP FOREIGN DATA WRAPPER
#proxy=#
#proxy=# drop function plproxy_call_handler();
#DROP FUNCTION
#proxy=#
#proxy=# drop function plproxy_fdw_validator (text[], oid);
#DROP FUNCTION
#
7
授权
########这句报错
#proxy=# grant usage on language plproxy to proxy;
#ERROR: language "plproxy" is not trusted
#HINT: Only superusers can use untrusted languages.
########下面的ok
#proxy=# grant usage on foreign data wrapper plproxy to proxy;
#GRANT
#proxy=# grant usage on foreign server cluster_art to proxy;
#GRANT
8
proxy node创建plproxy server
#super user do
#drop server cluster_art;
CREATE SERVER cluster_art FOREIGN DATA WRAPPER plproxy OPTIONS
(connection_lifetime '1800',
p0 'dbname=datadb port=9901 host=192.168.11.196 application_name=testart',
p1 'dbname=datadb port=9902 host=192.168.11.197 ',
p2 'dbname=datadb port=9903 host=192.168.11.196 ',
p3 'dbname=datadb port=9904 host=192.168.11.197 ');
9
proxy node授权
grant usage on foreign server cluster_art to proxy;
10
proxy node创建user mapping
create user mapping for proxy server cluster_art options (user 'devart', password 'xxxxxxxx');
plproxy集群搭好了。。。。。。
第四部分
测试
这儿前前后后测试了不少场景,花了好几天,基本上没有记录,下面的也不是一个完整一致的测试,只是记录到这儿,大家就不要看了,看了就晕了
--test
CREATE OR REPLACE FUNCTION proxy.test_pl_clust(sql text)
RETURNS SETOF record
LANGUAGE plproxy
STRICT
AS $function$
cluster 'cluster_art';
run on all;
target devart.test_pl_clust;
$function$;
grant execute on function datasch.test_pl_clust(text) to proxy;
CREATE OR REPLACE FUNCTION test_pl_clust(sql text)
RETURNS SETOF record
LANGUAGE plpgsql
STRICT
AS $function$
declare
rec record;
begin
for rec in execute sql loop
return next rec;
end loop;
return;
end;
$function$;
select * from datasch.test_pl_clust('select count(*) from pg_class') as t(i int8);
proxy=> select * from test_pl_clust('select count(*) from pg_user') as t(k int8);
k
---
3
3
3
3
(4 rows)
proxy=> select sum(k) from test_pl_clust('select count(*) from pg_user') as t(k int8);
sum
-----
12
(1 row)
附记
1
pl/proxy源码下载地址,好像是吧
http://pgfoundry.org/projects/plproxy
2
官网上记录的一个bug
dumpall 不能正常工作
http://pgfoundry.org/tracker/index.php?func=detail&aid=1011283&group_id=1000207&atid=814
pg_dumpall sorts 'create server FOREIGN DATA WRAPPER' options
(keys) as varchar and not as integer.
Example from dumped sql (see "pX" option key):
CREATE SERVER can_master_cluster FOREIGN DATA WRAPPER plproxy OPTIONS (
connection_lifetime '1800',
p0 'dbname=database11 host=xxx-11 port=9811',
p1 'dbname=database12 host=xxx-12 port=9812',
p10 'dbname=database21 host=xxx-21 port=9821',
p11 'dbname=database22 host=xxx-22 port=9822',
p12 'dbname=database23 host=xxx-23 port=9823',
p13 'dbname=database24 host=xxx-24 port=9824',
p14 'dbname=database25 host=xxx-25 port=9825',
p15 'dbname=database26 host=xxx-26 port=9826',
p2 'dbname=database13 host=xxx-13 port=9813',
p3 'dbname=database14 host=xxx-14 port=9814',
p4 'dbname=database15 host=xxx-15 port=9815',
p5 'dbname=database16 host=xxx-16 port=9816',
p6 'dbname=database17 host=xxx-17 port=9817',
p7 'dbname=database18 host=xxx-18 port=9818',
p8 'dbname=database19 host=xxx-19 port=9819',
p9 'dbname=database20 host=xxx-20 port=9820'
);
which causes next error during the load:
ERROR: Pl/Proxy: partitions must be numbered consecutively
HINT: next valid partition number is 2
STATEMENT: CREATE SERVER can_master_cluster ...
Old 9.0 'pg_dumpall' doing job correct.

Hot AI Tools

Undresser.AI Undress
AI-powered app for creating realistic nude photos

AI Clothes Remover
Online AI tool for removing clothes from photos.

Undress AI Tool
Undress images for free

Clothoff.io
AI clothes remover

Video Face Swap
Swap faces in any video effortlessly with our completely free AI face swap tool!

Hot Article
Hot Tools

Notepad++7.3.1
Easy-to-use and free code editor

SublimeText3 Chinese version
Chinese version, very easy to use

Zend Studio 13.0.1
Powerful PHP integrated development environment

Dreamweaver CS6
Visual web development tools

SublimeText3 Mac version
God-level code editing software (SublimeText3)
Hot Topics


 Open source! Beyond ZoeDepth! DepthFM: Fast and accurate monocular depth estimation!
Apr 03, 2024 pm 12:04 PM
Open source! Beyond ZoeDepth! DepthFM: Fast and accurate monocular depth estimation!
Apr 03, 2024 pm 12:04 PM
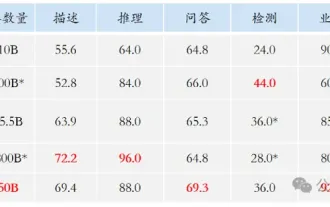
0.What does this article do? We propose DepthFM: a versatile and fast state-of-the-art generative monocular depth estimation model. In addition to traditional depth estimation tasks, DepthFM also demonstrates state-of-the-art capabilities in downstream tasks such as depth inpainting. DepthFM is efficient and can synthesize depth maps within a few inference steps. Let’s read about this work together ~ 1. Paper information title: DepthFM: FastMonocularDepthEstimationwithFlowMatching Author: MingGui, JohannesS.Fischer, UlrichPrestel, PingchuanMa, Dmytr
 Huawei's Qiankun ADS3.0 intelligent driving system will be launched in August and will be launched on Xiangjie S9 for the first time
Jul 30, 2024 pm 02:17 PM
Huawei's Qiankun ADS3.0 intelligent driving system will be launched in August and will be launched on Xiangjie S9 for the first time
Jul 30, 2024 pm 02:17 PM
On July 29, at the roll-off ceremony of AITO Wenjie's 400,000th new car, Yu Chengdong, Huawei's Managing Director, Chairman of Terminal BG, and Chairman of Smart Car Solutions BU, attended and delivered a speech and announced that Wenjie series models will be launched this year In August, Huawei Qiankun ADS 3.0 version was launched, and it is planned to successively push upgrades from August to September. The Xiangjie S9, which will be released on August 6, will debut Huawei’s ADS3.0 intelligent driving system. With the assistance of lidar, Huawei Qiankun ADS3.0 version will greatly improve its intelligent driving capabilities, have end-to-end integrated capabilities, and adopt a new end-to-end architecture of GOD (general obstacle identification)/PDP (predictive decision-making and control) , providing the NCA function of smart driving from parking space to parking space, and upgrading CAS3.0
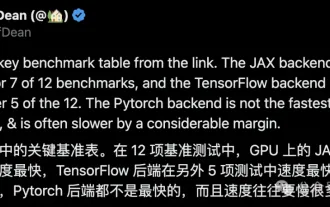 Google is ecstatic: JAX performance surpasses Pytorch and TensorFlow! It may become the fastest choice for GPU inference training
Apr 01, 2024 pm 07:46 PM
Google is ecstatic: JAX performance surpasses Pytorch and TensorFlow! It may become the fastest choice for GPU inference training
Apr 01, 2024 pm 07:46 PM
The performance of JAX, promoted by Google, has surpassed that of Pytorch and TensorFlow in recent benchmark tests, ranking first in 7 indicators. And the test was not done on the TPU with the best JAX performance. Although among developers, Pytorch is still more popular than Tensorflow. But in the future, perhaps more large models will be trained and run based on the JAX platform. Models Recently, the Keras team benchmarked three backends (TensorFlow, JAX, PyTorch) with the native PyTorch implementation and Keras2 with TensorFlow. First, they select a set of mainstream
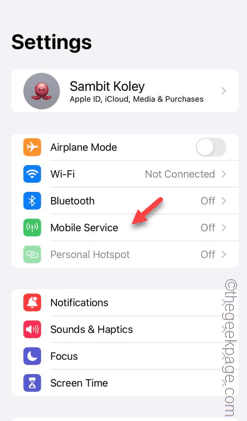 Slow Cellular Data Internet Speeds on iPhone: Fixes
May 03, 2024 pm 09:01 PM
Slow Cellular Data Internet Speeds on iPhone: Fixes
May 03, 2024 pm 09:01 PM
Facing lag, slow mobile data connection on iPhone? Typically, the strength of cellular internet on your phone depends on several factors such as region, cellular network type, roaming type, etc. There are some things you can do to get a faster, more reliable cellular Internet connection. Fix 1 – Force Restart iPhone Sometimes, force restarting your device just resets a lot of things, including the cellular connection. Step 1 – Just press the volume up key once and release. Next, press the Volume Down key and release it again. Step 2 – The next part of the process is to hold the button on the right side. Let the iPhone finish restarting. Enable cellular data and check network speed. Check again Fix 2 – Change data mode While 5G offers better network speeds, it works better when the signal is weaker
 ZTE 5G portable Wi-Fi U50S goes on sale for NT$899 at first launch: top speed 500Mbps
Apr 26, 2024 pm 03:46 PM
ZTE 5G portable Wi-Fi U50S goes on sale for NT$899 at first launch: top speed 500Mbps
Apr 26, 2024 pm 03:46 PM
According to news on April 26, ZTE’s 5G portable Wi-Fi U50S is now officially on sale, starting at 899 yuan. In terms of appearance design, ZTE U50S Portable Wi-Fi is simple and stylish, easy to hold and pack. Its size is 159/73/18mm and is easy to carry, allowing you to enjoy 5G high-speed network anytime and anywhere, achieving an unimpeded mobile office and entertainment experience. ZTE 5G portable Wi-Fi U50S supports the advanced Wi-Fi 6 protocol with a peak rate of up to 1800Mbps. It relies on the Snapdragon X55 high-performance 5G platform to provide users with an extremely fast network experience. Not only does it support the 5G dual-mode SA+NSA network environment and Sub-6GHz frequency band, the measured network speed can even reach an astonishing 500Mbps, which is easily satisfactory.
 Retro trend! HMD and Heineken jointly launch flip phone: transparent shell design
Apr 17, 2024 pm 06:50 PM
Retro trend! HMD and Heineken jointly launch flip phone: transparent shell design
Apr 17, 2024 pm 06:50 PM
According to news on April 17, HMD teamed up with the well-known beer brand Heineken and the creative company Bodega to launch a unique flip phone - The Boring Phone. This phone is not only full of innovation in design, but also returns to nature in terms of functionality, aiming to lead people back to real interpersonal interactions and enjoy the pure time of drinking with friends. Boring mobile phone adopts a unique transparent flip design, showing a simple yet elegant aesthetic. It is equipped with a 2.8-inch QVGA display inside and a 1.77-inch display outside, providing users with a basic visual interaction experience. In terms of photography, although it is only equipped with a 30-megapixel camera, it is enough to handle simple daily tasks.
 The vitality of super intelligence awakens! But with the arrival of self-updating AI, mothers no longer have to worry about data bottlenecks
Apr 29, 2024 pm 06:55 PM
The vitality of super intelligence awakens! But with the arrival of self-updating AI, mothers no longer have to worry about data bottlenecks
Apr 29, 2024 pm 06:55 PM
I cry to death. The world is madly building big models. The data on the Internet is not enough. It is not enough at all. The training model looks like "The Hunger Games", and AI researchers around the world are worrying about how to feed these data voracious eaters. This problem is particularly prominent in multi-modal tasks. At a time when nothing could be done, a start-up team from the Department of Renmin University of China used its own new model to become the first in China to make "model-generated data feed itself" a reality. Moreover, it is a two-pronged approach on the understanding side and the generation side. Both sides can generate high-quality, multi-modal new data and provide data feedback to the model itself. What is a model? Awaker 1.0, a large multi-modal model that just appeared on the Zhongguancun Forum. Who is the team? Sophon engine. Founded by Gao Yizhao, a doctoral student at Renmin University’s Hillhouse School of Artificial Intelligence.
 Tesla robots work in factories, Musk: The degree of freedom of hands will reach 22 this year!
May 06, 2024 pm 04:13 PM
Tesla robots work in factories, Musk: The degree of freedom of hands will reach 22 this year!
May 06, 2024 pm 04:13 PM
The latest video of Tesla's robot Optimus is released, and it can already work in the factory. At normal speed, it sorts batteries (Tesla's 4680 batteries) like this: The official also released what it looks like at 20x speed - on a small "workstation", picking and picking and picking: This time it is released One of the highlights of the video is that Optimus completes this work in the factory, completely autonomously, without human intervention throughout the process. And from the perspective of Optimus, it can also pick up and place the crooked battery, focusing on automatic error correction: Regarding Optimus's hand, NVIDIA scientist Jim Fan gave a high evaluation: Optimus's hand is the world's five-fingered robot. One of the most dexterous. Its hands are not only tactile
