

mysql+ssh调整例子,附源码下载

mysql+ssh整合例子,附源码下载 项目引用jar下载:http://download.csdn.net/detail/adam_zs/7262727 项目源码下载地址:http://download.csdn.net/detail/adam_zs/7262749 今天花时间把ssh整合了一下,重新再学习一下,希望对大家有所帮助! 我用的是mysql数
mysql+ssh整合例子,附源码下载项目引用jar下载:http://download.csdn.net/detail/adam_zs/7262727
项目源码下载地址:http://download.csdn.net/detail/adam_zs/7262749
今天花时间把ssh整合了一下,重新再学习一下,希望对大家有所帮助!
我用的是mysql数据库,建表语句比较简单就不贴出来了,建表的时候记的设置id为自动增加哦。
项目文件位置,项目引用jar包


项目配置文件
web.xml
<?xml version="1.0" encoding="UTF-8"?>
<web-app version="2.5" xmlns="http://java.sun.com/xml/ns/javaee" xmlns:xsi="http://www.w3.org/2001/XMLSchema-instance" xsi:schemalocation="http://java.sun.com/xml/ns/javaee
	http://java.sun.com/xml/ns/javaee/web-app_2_5.xsd">
	<welcome-file-list>
		<welcome-file>index.jsp</welcome-file>
	</welcome-file-list>

	<!-- 使用ContextLoaderListener初始化Spring容器 -->
	<listener>
		<listener-class>org.springframework.web.context.ContextLoaderListener</listener-class>
	</listener>

	<!-- 定义Struts2的FilterDispathcer的Filter -->
	<filter>
		<filter-name>struts2</filter-name>
		<filter-class>org.apache.struts2.dispatcher.FilterDispatcher</filter-class>
	</filter>
	<!-- FilterDispatcher用来初始化Struts2并且处理所有的WEB请求。 -->
	<filter-mapping>
		<filter-name>struts2</filter-name>
		<url-pattern>/*</url-pattern>
	</filter-mapping>

</web-app>
struts.xml
<?xml version="1.0" encoding="UTF-8"?>

<struts>
	<!-- 配置了系列常量 -->
	<constant name="struts.i18n.encoding" value="UTF-8"></constant>

	<package name="wangzs" extends="struts-default">
		<action name="login" class="loginAction">
			<result name="error">/error.jsp</result>
			<result name="success">/welcome.jsp</result>
		</action>
		<!-- 让用户直接访问该应用时列出所有视图页面 -->
		<action name="">
			<result>.</result>
		</action>
	</package>
</struts>
applicationContext.xml
<?xml version="1.0" encoding="UTF-8"?>

<beans>

	<!-- 定义数据源Bean,使用C3P0数据源实现 -->
	<bean id="dataSource" class="com.mchange.v2.c3p0.ComboPooledDataSource" destroy-method="close">
		<property name="driverClass" value="com.mysql.jdbc.Driver"></property>
		<property name="jdbcUrl" value="jdbc:mysql://localhost/test"></property>
		<property name="user" value="root"></property>
		<property name="password" value="wzs_626750095"></property>
		<property name="maxPoolSize" value="40"></property>
		<property name="minPoolSize" value="1"></property>
		<property name="initialPoolSize" value="1"></property>
		<property name="maxIdleTime" value="20"></property>
	</bean>

	<!-- 定义Hibernate的SessionFactory -->
	<bean id="sessionFactory" class="org.springframework.orm.hibernate3.LocalSessionFactoryBean">
		<property name="dataSource" ref="dataSource"></property>
		<!-- mappingResouces属性用来列出全部映射文件 -->
		<property name="mappingResources">
			<list>
				<value>com/wzs/bean/Person.hbm.xml</value>
			</list>
		</property>
		<!-- 定义Hibernate的SessionFactory的属性 -->
		<property name="hibernateProperties">
			<props>
				<prop key="hibernate.dialect">
					org.hibernate.dialect.MySQLInnoDBDialect</prop>
				<prop key="hibernate.hbm2ddl.auto">update</prop>
				<prop key="hibernate.show_sql">true</prop>
				<prop key="hibernate.format_sql">true</prop>
			</props>
		</property>
	</bean>

	<bean id="loginAction" class="com.wzs.action.LoginAction" scope="prototype">
		<property name="ms" ref="myService"></property>
	</bean>
	<bean id="myService" class="com.wzs.service.impl.MyServiceImpl">
		<property name="personDao" ref="personDao"></property>
	</bean>
	<bean id="personDao" class="com.wzs.dao.impl.PersonDaoImpl">
		<property name="sessionFactory" ref="sessionFactory"></property>
	</bean>
</beans>
java代码
Person.java
package com.wzs.bean;

public class Person {
	private Integer id;
	private String name;
	private String password;

	public Integer getId() {
		return id;
	}

	public void setId(Integer id) {
		this.id = id;
	}

	public String getName() {
		return name;
	}

	public void setName(String name) {
		this.name = name;
	}

	public String getPassword() {
		return password;
	}

	public void setPassword(String password) {
		this.password = password;
	}

}
Person.hbm.xml
<?xml version="1.0" encoding="UTF-8"?>

<hibernate-mapping package="lee">
	<class name="com.wzs.bean.Person" table="Person">
		<!-- 映射标识属性 -->
		<id name="id" type="int" column="id">
			<generator class="identity"></generator>
		</id>
		<!-- 映射普通属性 -->
		<property name="name" type="string" column="name"></property>
		<property name="password" type="string" column="password"></property>
	</class>
</hibernate-mapping>
LoginAction.java
package com.wzs.action;

import com.opensymphony.xwork2.ActionSupport;
import com.wzs.service.MyService;

@SuppressWarnings("serial")
public class LoginAction extends ActionSupport {
	// 下面是用于封装用户请求参数的两个属性
	private String name;
	private String password;
	// 用于封装处理结果的属性
	private String tip;
	// 系统所用的业务逻辑组件
	private MyService ms;

	// 设置注入业务逻辑组件所必需的setter方法
	public void setMs(MyService ms) {
		this.ms = ms;
	}

	/**
	 * 用户登录
	 *
	 * @return
	 * @throws Exception
	 */
	public String login() throws Exception {
		// 调用业务逻辑组件的valid方法来
		// 验证用户输入的用户名和密码是否正确
		if (ms.valid(getName(), getPassword())) {
			setTip("哈哈,整合成功!");
			return SUCCESS;
		} else {
			return ERROR;
		}
	}

	public String getName() {
		return name;
	}

	public void setName(String name) {
		this.name = name;
	}

	public String getPassword() {
		return password;
	}

	public void setPassword(String password) {
		this.password = password;
	}

	public String getTip() {
		return tip;
	}

	public void setTip(String tip) {
		this.tip = tip;
	}

	public MyService getMs() {
		return ms;
	}

}
MyService.java
package com.wzs.service;

public interface MyService {
	/**
	 * 校验用户名密码
	 *
	 * @param name
	 *            用户名
	 * @param password
	 *            密码
	 * @return true:存在,false:不存在
	 */
	boolean valid(String name, String password);
}
MyServiceImpl.java
package com.wzs.service.impl;

import com.wzs.dao.PersonDao;
import com.wzs.service.MyService;

public class MyServiceImpl implements MyService {

	private PersonDao personDao;

	/**
	 * 校验用户名密码
	 *
	 * @param name
	 *            用户名
	 * @param password
	 *            密码
	 * @return true:存在,false:不存在
	 */
	public boolean valid(String name, String password) {
		return personDao.valid(name, password);
	}

	public PersonDao getPersonDao() {
		return personDao;
	}

	public void setPersonDao(PersonDao personDao) {
		this.personDao = personDao;
	}

}
PersonDao.java
package com.wzs.dao;

import java.util.List;

import com.wzs.bean.Person;

public interface PersonDao {

	/**
	 * 校验用户名密码
	 *
	 * @param name
	 *            用户名
	 * @param password
	 *            密码
	 * @return true:存在,false:不存在
	 */
	public boolean valid(String name, String password);

	public Person get(Integer id);

	/**
	 * 保存Person实例
	 *
	 * @param person
	 *            需要保存的Person实例
	 * @return 刚刚保存的Person实例的标识属性值
	 */
	public Integer save(Person person);

	/**
	 * 修改Person实例
	 *
	 * @param person
	 *            需要修改的Person实例
	 */
	public void update(Person person);

	/**
	 * 删除Person实例
	 *
	 * @param id
	 *            需要删除的Person实例的标识属性值
	 */
	public void delete(Integer id);

	/**
	 * 删除Person实例
	 *
	 * @param person
	 *            需要删除的Person实例
	 */
	public void delete(Person person);

	/**
	 * 根据用户名查找Person
	 *
	 * @param name
	 *            查询的人名
	 * @return 指定用户名对应的全部Person
	 */
	public List<person> findByName(String name);

	/**
	 * 查询全部Person实例
	 *
	 * @return 全部Person实例
	 */
	@SuppressWarnings("unchecked")
	public List findAllPerson();

	/**
	 * 查询数据表中Person实例的总数
	 *
	 * @return 数据表中Person实例的总数
	 */
	public long getPersonNumber();
}
</person>PersonDaoImpl.java
package com.wzs.dao.impl;

import java.util.List;

import org.hibernate.SessionFactory;
import org.springframework.orm.hibernate3.HibernateTemplate;

import com.wzs.bean.Person;
import com.wzs.dao.PersonDao;

public class PersonDaoImpl implements PersonDao {
	private HibernateTemplate ht = null;
	private SessionFactory sessionFactory;

	// 依赖注入SessionFactory的setter方法
	public void setSessionFactory(SessionFactory sessionFactory) {
		this.sessionFactory = sessionFactory;
	}

	// 初始化HibernateTemplate的方法
	private HibernateTemplate getHibernateTemplate() {
		if (ht == null) {
			ht = new HibernateTemplate(sessionFactory);
		}
		return ht;
	}

	/**
	 * 校验用户名密码
	 *
	 * @param name
	 *            用户名
	 * @param password
	 *            密码
	 * @return true:存在,false:不存在
	 */
	@SuppressWarnings("unchecked")
	public boolean valid(String name, String password) {
		List<person> list = getHibernateTemplate().find("from Person p where p.name=? and p.password=?",
				new String[] { name, password });
		if (list.size() > 0) {
			return true;
		}
		return false;
	}

	/**
	 * 加载Person实例
	 *
	 * @param id
	 *            需要加载的Person实例的标识属性值
	 * @return 指定id对应的Person实例
	 */
	public Person get(Integer id) {
		return (Person) getHibernateTemplate().get(Person.class, id);
	}

	/**
	 * 保存Person实例
	 *
	 * @param person
	 *            需要保存的Person实例
	 * @return 刚刚保存的Person实例的标识属性值
	 */
	public Integer save(Person person) {
		return (Integer) getHibernateTemplate().save(person);
	}

	/**
	 * 修改Person实例
	 *
	 * @param person
	 *            需要修改的Person实例
	 */
	public void update(Person person) {
		getHibernateTemplate().update(person);
	}

	/**
	 * 删除Person实例
	 *
	 * @param id
	 *            需要删除的Person实例的标识属性值
	 */
	public void delete(Integer id) {
		getHibernateTemplate().delete(get(id));
	}

	/**
	 * 删除Person实例
	 *
	 * @param person
	 *            需要删除的Person实例
	 */
	public void delete(Person person) {
		getHibernateTemplate().delete(person);
	}

	/**
	 * 根据用户名查找Person
	 *
	 * @param name
	 *            查询的人名
	 * @return 指定用户名对应的全部Person
	 */
	@SuppressWarnings("unchecked")
	public List<person> findByName(String name) {
		return (List<person>) getHibernateTemplate().find("from Person p where p.name like ?", name);
	}

	/**
	 * 查询全部Person实例
	 *
	 * @return 全部Person实例
	 */
	@SuppressWarnings("unchecked")
	public List findAllPerson() {
		return (List<person>) getHibernateTemplate().find("from Person");
	}

	/**
	 * 查询数据表中Person实例的总数
	 *
	 * @return 数据表中Person实例的总数
	 */
	public long getPersonNumber() {
		return (Long) getHibernateTemplate().find("select count(*) from Person as p").get(0);
	}
}
</person></person></person></person>jsp界面
login.jsp
<title>登录页面</title>
welcome.jsp
		<title>成功页面</title>


		您已经登录!
		<property value="tip"></property>
error.jsp
		<title>错误页面</title>


		您不能登录!

Hot AI Tools

Undresser.AI Undress
AI-powered app for creating realistic nude photos

AI Clothes Remover
Online AI tool for removing clothes from photos.

Undress AI Tool
Undress images for free

Clothoff.io
AI clothes remover

AI Hentai Generator
Generate AI Hentai for free.

Hot Article
Hot Tools

Notepad++7.3.1
Easy-to-use and free code editor

SublimeText3 Chinese version
Chinese version, very easy to use

Zend Studio 13.0.1
Powerful PHP integrated development environment

Dreamweaver CS6
Visual web development tools

SublimeText3 Mac version
God-level code editing software (SublimeText3)
Hot Topics


 What are constants in C language? Can you give an example?
Aug 28, 2023 pm 10:45 PM
What are constants in C language? Can you give an example?
Aug 28, 2023 pm 10:45 PM
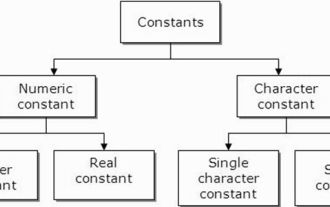
A constant is also called a variable and once defined, its value does not change during the execution of the program. Therefore, we can declare a variable as a constant referencing a fixed value. It is also called text. Constants must be defined using the Const keyword. Syntax The syntax of constants used in C programming language is as follows - consttypeVariableName; (or) consttype*VariableName; Different types of constants The different types of constants used in C programming language are as follows: Integer constants - For example: 1,0,34, 4567 Floating point constants - Example: 0.0, 156.89, 23.456 Octal and Hexadecimal constants - Example: Hex: 0x2a, 0xaa.. Octal
 How to adjust mouse dpi in win11
Dec 29, 2023 pm 04:34 PM
How to adjust mouse dpi in win11
Dec 29, 2023 pm 04:34 PM
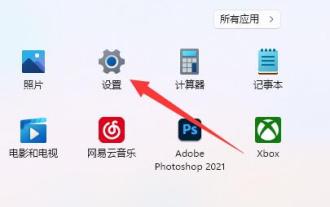
For gamers, mouse dpi is very important and affects the operating feel. So how to adjust mouse dpi in win11? In fact, the adjustment method may be different depending on the mouse model we use. How to adjust mouse dpi in win11 Method 1: (General) 1. First, open the "Settings" application and click on "Bluetooth and other devices" on the left. 2. Then click to enter the "Mouse" setting option on the right. 3. Finally, click on this page to modify the mouse speed dpi. Method 2: (Professional equipment) 1. Professional mice usually come with a dpi adjustment button. 2. If not, download a professional driver software and adjust the dpi in it.
 How to solve the problem of missing 1920x1080 resolution in Win10
Jan 06, 2024 am 09:08 AM
How to solve the problem of missing 1920x1080 resolution in Win10
Jan 06, 2024 am 09:08 AM
The win10 system is a very excellent system, and its strong stability is the most powerful part of the system. Today, the editor brings you a solution to the problem that the win10 resolution does not have 1920x1080! Let's take a look together if necessary. Solution to the problem that the resolution of win10 system is not 1920x1080: Note: The problem that the resolution of win10 is not 1920x1080 is caused by the graphics card driver! So I just need to update the graphics card driver. (The specific steps are as follows) 1. Right-click the computer and select Manage to open. 2. Find the device manager from the left side of the opened management interface. 3. Continue to find the display adapter from the left side in the opened device manager interface and open it. 4. Finally, right-click and select
 How to adjust screen brightness on Windows 11
Jan 02, 2024 pm 03:17 PM
How to adjust screen brightness on Windows 11
Jan 02, 2024 pm 03:17 PM
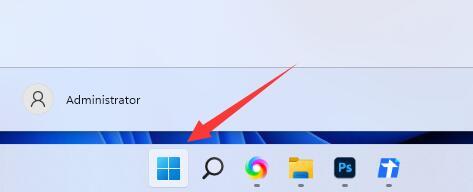
In win11, if the screen brightness is too dark, you will not be able to see the picture clearly, and if it is too bright, it will dazzle your eyes. So how do you adjust the screen brightness in win11? In fact, you can adjust it in the display settings, which is very convenient. How to adjust the screen brightness in win11: 1. First open the "Start Menu" below 2. Then click "Settings" above 3. After opening, enter the "Display" settings on the right. 4. After opening, slide the brightness slider to adjust the screen brightness.
 How to change web page zoom ratio in Edge browser
Jan 29, 2024 pm 09:06 PM
How to change web page zoom ratio in Edge browser
Jan 29, 2024 pm 09:06 PM
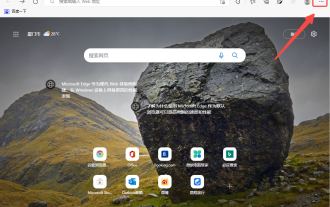
How to adjust the web page display ratio of the Edge browser? When we use the edge browser, if we want to adjust the web page display ratio, how should we adjust it? Let’s introduce it below! When we use the edge browser to browse the web, the text on some web pages is relatively small. In this case, we can adjust the web page proportion to enlarge the entire page so that we can clearly see the text. So what is the specific operation? Let me introduce it below! If not, let’s read on! Tips for adjusting the display ratio of Edge browser web pages: 1. After using Edge browser to open the web page that needs to be enlarged, click the "Settings and Others" icon consisting of three dots in the upper right corner of the browser. 2. Then find the “Zoom” option in the Edge browser menu window that pops up below.
 How to fix inappropriate resolution issues
Jan 08, 2024 pm 03:25 PM
How to fix inappropriate resolution issues
Jan 08, 2024 pm 03:25 PM
After reinstalling the system, we may not have the resolution we want, and some resolutions may look very uncomfortable. The reason may be that the graphics card driver is not installed or the driver version is out of date. After installing a driver, the problem will appear after opening it. You will be prompted for the drivers you need to install. After all are installed, restart the computer. Generally, it can automatically match the resolution suitable for your monitor. If it still doesn't work, we need to customize one. Let's take a look at the details. There is no suitable solution for the resolution. 1. Install driver life, update all drivers according to the prompts, and then restart the computer; 2. Right-click the computer desktop and select NVIDIA Control Panel to open. If not, click the start menu program in the lower left corner of the computer. 3. Select <Change Resolution>→<Customize>
 How to edit photos on iPhone using iOS 17
Nov 30, 2023 pm 11:39 PM
How to edit photos on iPhone using iOS 17
Nov 30, 2023 pm 11:39 PM
Mobile photography has fundamentally changed the way we capture and share life’s moments. The advent of smartphones, especially the iPhone, played a key role in this shift. Known for its advanced camera technology and user-friendly editing features, iPhone has become the first choice for amateur and experienced photographers alike. The launch of iOS 17 marks an important milestone in this journey. Apple's latest update brings an enhanced set of photo editing features, giving users a more powerful toolkit to turn their everyday snapshots into visually engaging and artistically rich images. This technological development not only simplifies the photography process but also opens up new avenues for creative expression, allowing users to effortlessly inject a professional touch into their photos
 How to adjust Win11 mouse DPI?
Jun 30, 2023 pm 12:53 PM
How to adjust Win11 mouse DPI?
Jun 30, 2023 pm 12:53 PM
How to adjust mouse dpi in Win11? The mouse is an essential device for using a computer. For some players who like to play games, the higher the DPI value of the mouse, the higher the sensitivity. However, some friends using the Win11 system want to modify the DPI value but do not know. How to operate, let’s take a look at how to modify the mouse dpi value in Win11 system with the editor. Detailed steps for adjusting mouse dpi in Win11 1. First, let’s talk about a general method, open the system settings. 2. After opening it, enter Bluetooth and other devices on the left. 3. Then enter the mouse settings on the right. 4. Finally, you can modify the mouse speed dpi. The above is [How to adjust mouse dpi in Win11-Win11 adjustment
