

用rsync进行两机备份的shell脚本

最近做服务器运维,用rsync进行两机备份的话比较好,对数据保全比较好。因此写了这个脚本,加进crontab当中,定期对服务器备份数据库以及www目录下的网站。 脚本如下,使用前请先针对自己的服务器环境设置变量值,错误之处还请指出,谢谢!原创脚本,转载请
最近做服务器运维,用rsync进行两机备份的话比较好,对数据保全比较好。因此写了这个脚本,加进crontab当中,定期对服务器备份数据库以及www目录下的网站。
脚本如下,使用前请先针对自己的服务器环境设置变量值,错误之处还请指出,谢谢!原创脚本,转载请保留原作者信息!
[bash]
#/bin/bash
# This script is used to do backup and rsync works for servers.
# ./backup.sh (db_rsync|www_rsync)
# By Chen Zhidong
# http://sillydong.com
# 获取可执行文件路径
MYSQL=”$(which mysql)”
MYSQLDUMP=”$(which mysqldump)”
GZIP=”$(which gzip)”
#定义数据库dump目录
DB_DUMP=”/home/www/database/”
#定义MySQL认证
DB_USER=”"
DB_PASS=”"
DB_HOST=”127.0.0.1″
#定义www目录
LOCAL_WWW=”"
RSYNC_WWW=”"
#定义本地rsync密码文件位置
PASSFILE=”"
RSYNC_NAME=”"
RSYNC_IP=”"
#获取本地AccessIP用作后面rsync的文件夹
IP=`ifconfig | grep “venet0:0″ –after-context=1 | sed -n ‘s/..*addr:\(..*\) P-t-P..*/\1/p’ | sed ‘/127.0.0.1/d’`
function db_dump{
DBS=”$($MYSQL -u’$DB_USER’ -h $DB_HOST -p’$DB_PASS’ -Bse ‘show databases’)”
for db in $DBS
do
case $db in
“information_schema”)
;;
“mysql”)
;;
“test”)
;;
*)
echo “Dump $db begin at $(date)” >> $DB_DUMP/db_dump.log
$MYSQLDUMP –opt $db -u’$DB_USER’ -h $DB_HOST -p’$DB_PASS’ > $DB_DUMP/$(date +%F)-$db.sql
esac
done
echo “Dump $db done at $(date)” >> $DB_DUMP/db_dump.log
}
function db_rsync{
echo “db_rsync begin at $(date)!” >> db_rsync.log
rsync -rvlHpogDtS –delete –password-file=$PASSFILE /home/database –exclude *\log\* –exclude *\backup\* –exclude *.rar –exclude *.zip rsync://$RSYNC_NAME@$RSYNC_IP/$IP_db_lio >> $DB_DUMP/db_rsync.log
echo “db_rsync done at $(date)!” >> db_rsync.log
}
function www_rsync{
echo “www_rsync begin at $(date)!” >> www_rsync.log
rsync -rvlHpogDtS –delete –password-file=$PASSFILE /home/www –exclude *\log\* –exclude *\backup\* –exclude *.rar –exclude *.zip rsync://$RSYNC_NAME@$RSYNC_IP/$IP_www_lio >> $DB_DUMP/db_rsync.log
echo “www_rsync done at $(date)!” >> www_rsync.log
}
case $1 in
db_rsync)
db_dump 2>> /home/rsync_error.log
db_rsync 2>> /home/rsync_error.log
;;
www_rsync)
www_rsync 2>> /home/rsync_error.log
;;
*)
echo “$(date)You didn’t add parameter in your crontab.” >> crontab.log
echo “Syntax: backup.sh (db_rsync|www_rsync)” >> crontab.log
;;
esac
[/bash]
另有一脚本,用于在备份机上rsyncd.conf中添加记录,如下:
[bash]
#/bin/bash
# ./rsyncd.sh IP
# for db
echo “”
echo “[$1_db_lio]” >> /etc/rsyncd.conf
echo “path = /backup/mysql/$1″ >> /etc/rsyncd.conf
echo “uid = root” >> /etc/rsyncd.conf
echo “gid = root” >> /etc/rsyncd.conf
echo “read only = false” >> /etc/rsyncd.conf
echo “ignore errors” >> /etc/rsyncd.conf
echo “secrets file = /etc/rsyncd.pas” >> /etc/rsyncd.conf
echo “host allow $1″ >> /etc/rsyncd.conf
#for www
echo “”
echo “[$1_www_lio]” >> /etc/rsyncd.conf
echo “path = /backup/vhosts/rsyncfiles/$1″ >> /etc/rsyncd.conf
echo “uid = root” >> /etc/rsyncd.conf
echo “gid = root” >> /etc/rsyncd.conf
echo “read only = false” >> /etc/rsyncd.conf
echo “ignore errors” >> /etc/rsyncd.conf
echo “secrets file = /etc/rsyncd.pas” >> /etc/rsyncd.conf
echo “host allow $1″ >> /etc/rsyncd.conf
tail -n 17 /etc/rsyncd.conf
[/bash]
原文地址:用rsync进行两机备份的shell脚本, 感谢原作者分享。

Hot AI Tools

Undresser.AI Undress
AI-powered app for creating realistic nude photos

AI Clothes Remover
Online AI tool for removing clothes from photos.

Undress AI Tool
Undress images for free

Clothoff.io
AI clothes remover

AI Hentai Generator
Generate AI Hentai for free.

Hot Article
Hot Tools

Notepad++7.3.1
Easy-to-use and free code editor

SublimeText3 Chinese version
Chinese version, very easy to use

Zend Studio 13.0.1
Powerful PHP integrated development environment

Dreamweaver CS6
Visual web development tools

SublimeText3 Mac version
God-level code editing software (SublimeText3)
Hot Topics
 1385
1385
 52
52

 How to create a script for editing? Tutorial on how to create a script through editing
Mar 13, 2024 pm 12:46 PM
How to create a script for editing? Tutorial on how to create a script through editing
Mar 13, 2024 pm 12:46 PM
Cutting is a video editing tool with comprehensive editing functions, support for variable speed, various filters and beauty effects, and rich music library resources. In this software, you can edit videos directly or create editing scripts, but how to do it? In this tutorial, the editor will introduce the method of editing and making scripts. Production method: 1. Click to open the editing software on your computer, then find the "Creation Script" option and click to open. 2. In the creation script page, enter the "script title", and then enter a brief introduction to the shooting content in the outline. 3. How can I see the "Storyboard Description" option in the outline?
 How to execute .sh file in Linux system?
Mar 14, 2024 pm 06:42 PM
How to execute .sh file in Linux system?
Mar 14, 2024 pm 06:42 PM
How to execute .sh file in Linux system? In Linux systems, a .sh file is a file called a Shell script, which is used to execute a series of commands. Executing .sh files is a very common operation. This article will introduce how to execute .sh files in Linux systems and provide specific code examples. Method 1: Use an absolute path to execute a .sh file. To execute a .sh file in a Linux system, you can use an absolute path to specify the location of the file. The following are the specific steps: Open the terminal
 Solution to the inability to connect to the RPC server and the inability to enter the desktop
Feb 18, 2024 am 10:34 AM
Solution to the inability to connect to the RPC server and the inability to enter the desktop
Feb 18, 2024 am 10:34 AM
What should I do if the RPC server is unavailable and cannot be accessed on the desktop? In recent years, computers and the Internet have penetrated into every corner of our lives. As a technology for centralized computing and resource sharing, Remote Procedure Call (RPC) plays a vital role in network communication. However, sometimes we may encounter a situation where the RPC server is unavailable, resulting in the inability to enter the desktop. This article will describe some of the possible causes of this problem and provide solutions. First, we need to understand why the RPC server is unavailable. RPC server is a
 Detailed explanation of CentOS installation fuse and CentOS installation server
Feb 13, 2024 pm 08:40 PM
Detailed explanation of CentOS installation fuse and CentOS installation server
Feb 13, 2024 pm 08:40 PM
As a LINUX user, we often need to install various software and servers on CentOS. This article will introduce in detail how to install fuse and set up a server on CentOS to help you complete the related operations smoothly. CentOS installation fuseFuse is a user space file system framework that allows unprivileged users to access and operate the file system through a customized file system. Installing fuse on CentOS is very simple, just follow the following steps: 1. Open the terminal and Log in as root user. 2. Use the following command to install the fuse package: ```yuminstallfuse3. Confirm the prompts during the installation process and enter `y` to continue. 4. Installation completed
 How to quickly delete the line at the end of a file in Linux
Mar 01, 2024 pm 09:36 PM
How to quickly delete the line at the end of a file in Linux
Mar 01, 2024 pm 09:36 PM
When processing files under Linux systems, it is sometimes necessary to delete lines at the end of the file. This operation is very common in practical applications and can be achieved through some simple commands. This article will introduce the steps to quickly delete the line at the end of the file in Linux system, and provide specific code examples. Step 1: Check the last line of the file. Before performing the deletion operation, you first need to confirm which line is the last line of the file. You can use the tail command to view the last line of the file. The specific command is as follows: tail-n1filena
 How to configure Dnsmasq as a DHCP relay server
Mar 21, 2024 am 08:50 AM
How to configure Dnsmasq as a DHCP relay server
Mar 21, 2024 am 08:50 AM
The role of a DHCP relay is to forward received DHCP packets to another DHCP server on the network, even if the two servers are on different subnets. By using a DHCP relay, you can deploy a centralized DHCP server in the network center and use it to dynamically assign IP addresses to all network subnets/VLANs. Dnsmasq is a commonly used DNS and DHCP protocol server that can be configured as a DHCP relay server to help manage dynamic host configurations in the network. In this article, we will show you how to configure dnsmasq as a DHCP relay server. Content Topics: Network Topology Configuring Static IP Addresses on a DHCP Relay D on a Centralized DHCP Server
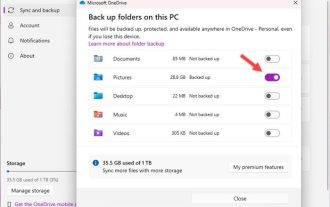 How to delete startup backup in Windows 11's File Explorer
Feb 18, 2024 pm 05:40 PM
How to delete startup backup in Windows 11's File Explorer
Feb 18, 2024 pm 05:40 PM
If you wish to hide the "Start Backup" option in Windows 11's File Explorer, here's what you can do. There are several ways to disable or hide the startup backup option in File Explorer, and we'll briefly list some methods to help you accomplish this task quickly. Before you get started, you need to understand that this option is closely tied to OneDrive. Once you open a library folder (such as Document, Pictures, Music, etc.), it will immediately appear in the file explorer's path. How to delete startup backup in Windows 11’s File Explorer To delete startup backup in Windows 11’s File Explorer, follow the steps below
 How to use MySQL backup and restore in PHP?
Jun 03, 2024 pm 12:19 PM
How to use MySQL backup and restore in PHP?
Jun 03, 2024 pm 12:19 PM
Backing up and restoring a MySQL database in PHP can be achieved by following these steps: Back up the database: Use the mysqldump command to dump the database into a SQL file. Restore database: Use the mysql command to restore the database from SQL files.
