

Oracle11g发行版2数据库安装教程【最新的oracle版本】

首先大家可以去Oracle中文官网上下载oracle11g第二版(我这里演示的是windows32位操作系统上安装)。Oracle11g第二版中文官网安装地址:http://www.oracle.com/t
首先大家可以去Oracle中文官网上下载oracle11g第二版(我这里演示的是windows32位操作系统上安装)。
Oracle11g第二版中文官网安装地址:?ssSourceSiteId=ocomcn
下载的时候一定要注意,需要同时下载文件一和文件二,缺一不可!

下载的这个过程比较漫长,需要等待段时间,你可以通宵开着机器下载,自己睡觉去

下载完成后,可以看到下面两个东东。

将它们解压到同一个目录中去,如下图所示:

stage是由第二个文件解压出来的,切记,没有它,安装的过程可能不成功。
现在点击setup.exe开始安装oracle11g第二版数据库了。。。

填好自己的电子邮件,香港虚拟主机,直接点一下步。

选择创建和配置数据库,这三个项的意思大家一看就明白了,直接下一步。

注意这里选择服务器类,我们要用高级配置。(桌面类貌似是只安装了客户端)

默认单实例数据库安装,第二个我不知道干什么的,有知道的欢迎给我留言评论告诉我,再下不胜感激,下一步。

这里选择高级安装,美国服务器,走起,下一步。

语言你自己看着办吧,你要是觉得你还会其他国语言你就选个外语。下一步

选择企业版,下一步。

指定好目录,下一步。

选择第一项,下一步:

给个全局数据库名,下一步:

内存(最好保持默认)

字符集可以选择中文,也可以使用默认值


勾选创建具有示例方案的数据库,下一步:

这里你可以启动电子邮件通知,我这里没有选,下一步:

指定好数据库文件位置,下一步:

这里可以启用自动备份,我这里为了省事就没选。下一步:

对所有账户使用相同口令,方便管理,下一步:

出现进度条,正在安装中……耐心等待。

弹出上面的框,点击完成:
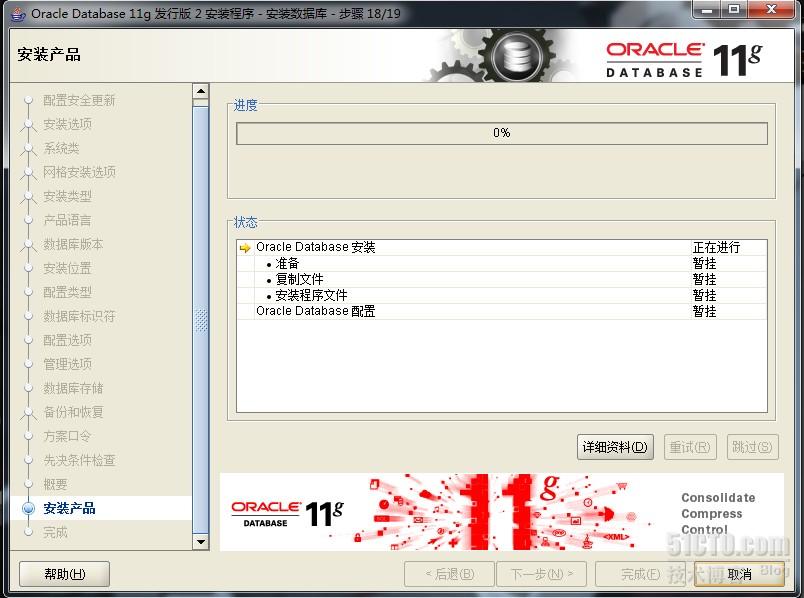
正式安装产品……耐心等待段时间

安装过程中跳出创建数据库……

跳出数据库创建成功窗口,别急着点确定,我们点口令管理。。。

根据需要将指定的用户解锁并更改密码,香港虚拟主机,注意:system和sys用户步能锁定。

OK,Oracle安装完毕,现在检查下吧。
PLSQL Developer官方网站下载页面:
本文出自 “On My Way” 博客,请务必保留此出处

Hot AI Tools

Undresser.AI Undress
AI-powered app for creating realistic nude photos

AI Clothes Remover
Online AI tool for removing clothes from photos.

Undress AI Tool
Undress images for free

Clothoff.io
AI clothes remover

AI Hentai Generator
Generate AI Hentai for free.

Hot Article
Hot Tools

Notepad++7.3.1
Easy-to-use and free code editor

SublimeText3 Chinese version
Chinese version, very easy to use

Zend Studio 13.0.1
Powerful PHP integrated development environment

Dreamweaver CS6
Visual web development tools

SublimeText3 Mac version
God-level code editing software (SublimeText3)
Hot Topics
 1359
1359
 52
52

 Quickly install OpenCV study guide using pip package manager
Jan 18, 2024 am 09:55 AM
Quickly install OpenCV study guide using pip package manager
Jan 18, 2024 am 09:55 AM
Use the pip command to easily install OpenCV tutorial, which requires specific code examples. OpenCV (OpenSource Computer Vision Library) is an open source computer vision library. It contains a large number of computer vision algorithms and functions, which can help developers quickly build image and video processing related applications. Before using OpenCV, we need to install it first. Fortunately, Python provides a powerful tool pip to manage third-party libraries
 Learn to install Selenium easily using PyCharm: PyCharm installation and configuration guide
Jan 04, 2024 pm 09:48 PM
Learn to install Selenium easily using PyCharm: PyCharm installation and configuration guide
Jan 04, 2024 pm 09:48 PM
PyCharm installation tutorial: Easily learn how to install Selenium, specific code examples are needed. As Python developers, we often need to use various third-party libraries and tools to complete project development. Among them, Selenium is a very commonly used library for automated testing and UI testing of web applications. As an integrated development environment (IDE) for Python development, PyCharm provides us with a convenient and fast way to develop Python code, so how
 PyCharm Community Edition Installation Guide: Quickly master all the steps
Jan 27, 2024 am 09:10 AM
PyCharm Community Edition Installation Guide: Quickly master all the steps
Jan 27, 2024 am 09:10 AM
Quick Start with PyCharm Community Edition: Detailed Installation Tutorial Full Analysis Introduction: PyCharm is a powerful Python integrated development environment (IDE) that provides a comprehensive set of tools to help developers write Python code more efficiently. This article will introduce in detail how to install PyCharm Community Edition and provide specific code examples to help beginners get started quickly. Step 1: Download and install PyCharm Community Edition To use PyCharm, you first need to download it from its official website
 A must-read for Python beginners: a concise and easy-to-understand pip installation guide
Jan 16, 2024 am 10:34 AM
A must-read for Python beginners: a concise and easy-to-understand pip installation guide
Jan 16, 2024 am 10:34 AM
Essential for Python novices: Simple and easy-to-understand pip installation tutorial Introduction: In Python programming, installing external libraries is a very important step. As the officially recommended package management tool for Python, pip is easy to understand and powerful, making it one of the essential skills for Python novices. This article will introduce you to the pip installation method and specific code examples to help you get started easily. 1. Installation of pip Before you start using pip, you need to install it first. Here is how to install pip: First,
 Ubuntu installation tutorial and Ubuntu installation tutorial 20.04
Feb 14, 2024 pm 05:09 PM
Ubuntu installation tutorial and Ubuntu installation tutorial 20.04
Feb 14, 2024 pm 05:09 PM
LINUX is an open source operating system known for its stability, security and flexibility. Ubuntu is one of the most popular distributions in the LINUX system. This article will introduce you to the installation process of Ubuntu and provide details. Instructions on how to install Ubuntu20.04 version. Ubuntu installation tutorial preparation Before starting to install Ubuntu, you need to prepare the following materials: 1. An idle computer 2. An Ubuntu installation CD or USB drive 3. Make sure the computer meets the minimum system requirements for Ubuntu Create installation media 1. Download Image file of Ubuntu20.04 and save it on your computer. 2. If you are using a CD, leave blank
 How to install NeXus desktop beautification-NeXus desktop beautification installation tutorial
Mar 04, 2024 am 11:30 AM
How to install NeXus desktop beautification-NeXus desktop beautification installation tutorial
Mar 04, 2024 am 11:30 AM
Friends, do you know how to install NeXus desktop beautification? Today I will explain the installation tutorial of NeXus desktop beautification. If you are interested, come and take a look with me. I hope it can help you. 1. Download the latest version of the Nexus desktop beautification plug-in software package from this site (as shown in the picture). 2. Unzip the Nexus desktop beautification plug-in software and run the file (as shown in the picture). 3. Double-click to open and enter the Nexus desktop beautification plug-in software interface. Please read the installation license agreement below carefully to see if you accept all the terms of the above license agreement. Click I agree and click Next (as shown in the picture). 4. Select the destination location. The software will be installed in the folder listed below. To select a different location and create a new path, click Next
 Win10 system installation guide
Dec 24, 2023 am 09:04 AM
Win10 system installation guide
Dec 24, 2023 am 09:04 AM
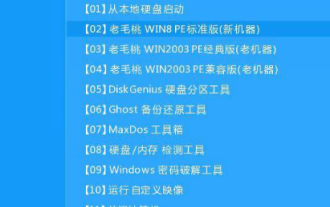
Recently, some friends reported that they downloaded the win10 image file, but they don’t know how to install it. What should I do? In fact, we can make a U disk boot disk and use the U disk to install it. Today, the editor has brought detailed information Let’s take a look at the specific solution steps. win10 image installation tutorial 1. Make a U disk boot disk 2. Download the Win10 system image file and copy it to the U disk boot disk 3. After making the U disk boot disk, quickly press F12 (some models are F8 ) Select the U disk to boot, enter the PE system, select the second option and press Enter to enter as shown below: 4. After a few minutes, enter the PE system, click on the PE installation tool on the desktop, and then click the "Browse" button in the main window of the tool. As shown in the figure below: 5.
 How to install solidworks2016-solidworks2016 installation tutorial
Mar 05, 2024 am 11:25 AM
How to install solidworks2016-solidworks2016 installation tutorial
Mar 05, 2024 am 11:25 AM
Recently, many friends have asked me how to install solidworks2016. Next, let us learn the installation tutorial of solidworks2016. I hope it can help everyone. 1. First, exit the anti-virus software and make sure to disconnect from the network (as shown in the picture). 2. Then right-click the installation package and select to extract to the SW2016 installation package (as shown in the picture). 3. Double-click to enter the decompressed folder. Right-click setup.exe and click Run as administrator (as shown in the picture). 4. Then click OK (as shown in the picture). 5. Then check [Single-machine installation (on this computer)] and click [Next] (as shown in the picture). 6. Then enter the serial number and click [Next] (as shown in the picture). 7.
