python web框架学习笔记
一、web框架本质
1.基于socket,自己处理请求
#!/usr/bin/env python3
#coding:utf8
import socket
def handle_request(client):
 #接收请求
 buf = client.recv(1024)
 print(buf)
 #返回信息
 client.send(bytes('<h1 id="welcome-liuyao-webserver">welcome liuyao webserver</h1>','utf8'))
def main():
 #创建sock对象
 sock = socket.socket()
 #监听80端口
 sock.bind(('localhost',8000))
 #最大连接数
 sock.listen(5)
 print('welcome nginx')
 #循环
 while True:
 #等待用户的连接,默认accept阻塞当有请求的时候往下执行
 connection,address = sock.accept()
 #把连接交给handle_request函数
 handle_request(connection)
 #关闭连接
 connection.close()
if __name__ == '__main__':
 main()
2.基于wsgi
WSGI,全称 Web Server Gateway Interface,或者 Python Web Server Gateway Interface ,是为 Python 语言定义的 Web 服务器和 Web 应用程序或框架之间的一种简单而通用的接口。自从 WSGI 被开发出来以后,许多其它语言中也出现了类似接口。
WSGI 的官方定义是,the Python Web Server Gateway Interface。从名字就可以看出来,这东西是一个Gateway,也就是网关。网关的作用就是在协议之间进行转换。
WSGI 是作为 Web 服务器与 Web 应用程序或应用框架之间的一种低级别的接口,以提升可移植 Web 应用开发的共同点。WSGI 是基于现存的 CGI 标准而设计的。
很多框架都自带了 WSGI server ,比如 Flask,webpy,Django、CherryPy等等。当然性能都不好,自带的 web server 更多的是测试用途,发布时则使用生产环境的 WSGI server或者是联合 nginx 做 uwsgi 。
python标准库提供的独立WSGI服务器称为wsgiref。
#!/usr/bin/env python
#coding:utf-8
#导入wsgi模块
from wsgiref.simple_server import make_server

def RunServer(environ, start_response):
 start_response('200 OK', [('Content-Type', 'text/html')])
 return [bytes("welcome webserver".encode('utf8'))]

if __name__ == '__main__':
 httpd = make_server('', 8000, RunServer)
 print ("Serving HTTP on port 8000...")
 httpd.serve_forever()
 #接收请求
 #预处理请求(封装了很多http请求的东西)
请求过来后就执行RunServer这个函数。
原理图:
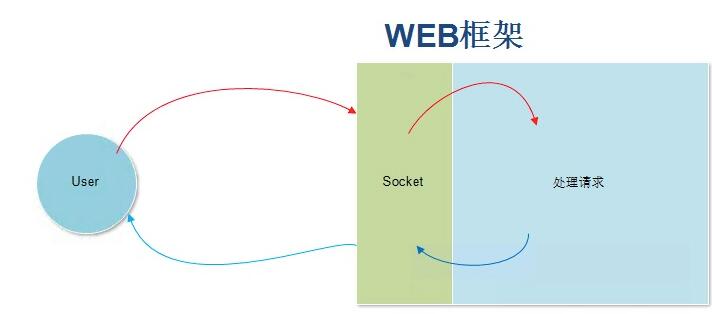
当用户发送请求,socket将请求交给函数处理,之后再返回给用户。
二、自定义web框架
python标准库提供的wsgiref模块开发一个自己的Web框架
之前的使用wsgiref只能访问一个url
下面这个可以根据你访问的不同url请求进行处理并且返回给用户
#!/usr/bin/env python
#coding:utf-8
from wsgiref.simple_server import make_server
def RunServer(environ, start_response):
 start_response('200 OK', [('Content-Type','text/html')])
 #根据url的不同,返回不同的字符串
 #1 获取URL[URL从哪里获取?当请求过来之后执行RunServer,
 #wsgi给咱们封装了这些请求,这些请求都封装到了,environ & start_response]
 request_url = environ['PATH_INFO']
 print (request_url)
 #2 根据URL做不同的相应
 #print environ #这里可以通过断点来查看它都封装了什么数据
 if request_url == '/login':
  return [bytes("welcome login",'utf8')]
 elif request_url == '/reg':
  return [bytes("welcome reg",'utf8')]
 else:
  return [bytes('<h1 id="no-found">404! no found</h1>','utf8')]

if __name__ == '__main__':
 httpd = make_server('', 8000, RunServer)
 print ("Serving HTTP on port 8000...")
 httpd.serve_forever()
当然 以上虽然根据不同url来进行处理,但是如果大量url的话,那么代码写起来就很繁琐。
所以使用下面方法进行处理
#!/usr/bin/env python
#coding:utf-8
from wsgiref.simple_server import make_server
def index():
return [bytes('<h1 id="index">index</h1>','utf8')]
def login():
return [bytes('<h1 id="login">login</h1>','utf8')]
def reg():
return [bytes('<h1 id="reg">reg</h1>','utf8')]
def layout():
return [bytes('<h1 id="layout">layout</h1>','utf8')]
#定义一个列表 把url和上面的函数做一个对应
urllist = [
('/index',index),
('/login',login),
('/reg',reg),
('/layout',layout),
]
def RunServer(environ, start_response):
start_response('200 OK', [('Content-Type','text/html')])
#根据url的不同,返回不同的字符串
#1 获取URL[URL从哪里获取?当请求过来之后执行RunServer,wsgi给咱们封装了这些请求,这些请求都封装到了,environ & start_response]
request_url = environ['PATH_INFO']
print (request_url)
#2 根据URL做不同的相应
#print environ #这里可以通过断点来查看它都封装了什么数据
#循环这个列表 找到你打开的url 返回url对应的函数
for url in urllist:
if request_url == url[0]:
return url[1]()
else:
#url_list列表里都没有返回404
return [bytes('<h1 id="not-found">404 not found</h1>','utf8')]
if __name__ == '__main__':
httpd = make_server('', 8000, RunServer)
print ("Serving HTTP on port 8000...")
httpd.serve_forever()
三、模板引擎
对应上面的操作 都是根据用户访问的url返回给用户一个字符串的 比如return xxx
案例:
首先写一个index.html页面
内容:
<!DOCTYPE html>
<html lang="en">
<head>
<meta charset="UTF-8">
<title>index</title>
</head>
<body>
<h1 id="welcome-index">welcome index</h1>
</body>
</html>
login.html页面
内容:
<!DOCTYPE html>
<html lang="en">
<head>
 <meta charset="UTF-8">
 <title>login</title>
</head>
<body>
 <h1 id="welcome-login">welcome login</h1>
 <form>
  user:<input type="text"/>
  pass:<input type="password"/>
  <button type="button">login in</button>
 </form>
</body>
</html>
python代码:
#!/usr/bin/env python
#coding:utf-8
from wsgiref.simple_server import make_server
def index():
 #把index页面读进来返回给用户
 indexfile = open('index.html','r+').read()
 return [bytes(indexfile,'utf8')]
def login():
 loginfile = open('login.html','r+').read()
 return [bytes(loginfile,'utf8')]
urllist = [
 ('/login',login),
 ('/index',index),
]
def RunServer(environ, start_response):
 start_response('200 OK', [('Content-Type','text/html')])
 #根据url的不同,返回不同的字符串
 #1 获取URL[URL从哪里获取?当请求过来之后执行RunServer,wsgi给咱们封装了这些请求,这些请求都封装到了,environ & start_response]
 request_url = environ['PATH_INFO']
 print (request_url)
 #2 根据URL做不同的相应
 #print environ #这里可以通过断点来查看它都封装了什么数据
 for url in urllist:
  #如果用户请求的url和咱们定义的rul匹配
  if request_url == url[0]:
   #执行
   return url[1]()
 else:
  #url_list列表里都没有返回404
  return [bytes('<h1 id="not-found">404 not found</h1>','utf8')]
if __name__ == '__main__':
 httpd = make_server('', 8000, RunServer)
 print ("Serving HTTP on port 8000...")
 httpd.serve_forever()
但是以上内容只能返回给静态内容,不能返回动态内容
那么如何返回动态内容呢
自定义一套特殊的语法,进行替换
使用开源工具jinja2,遵循其指定语法
index.html 遵循jinja语法进行替换、循环、判断
先展示大概效果,具体jinja2会在下章django笔记来进行详细说明
index.html页面
内容:
<!DOCTYPE html>
<html lang="en">
<head>
 <meta charset="UTF-8">
 <title>Title</title>
</head>
<body>
 <!--general replace-->
 <h1 id="name">{{ name }}</h1>
 <h1 id="age">{{ age }}</h1>
 <h1 id="time">{{ time }}</h1>

 <!--for circular replace-->
 <ul>
  {% for item in user_list %}
   <li>{{ item }}</li>
  {% endfor %}
 </ul>
 <!--if else judge-->
 {% if num == 1 %}
  <h1 id="num">num == 1</h1>
 {% else %}
  <h1 id="num">num == 2</h1>
 {% endif %}
</body>
</html>
python代码:
#!/usr/bin/env python
#-*- coding:utf-8 -*-
import time
#导入wsgi模块
from wsgiref.simple_server import make_server
#导入jinja模块
from jinja2 import Template
def index():
 #打开index.html
 data = open('index.html').read()
 #使用jinja2渲染
 template = Template(data)
 result = template.render(
  name = 'yaoyao',
  age = '18',
  time = str(time.time()),
  user_list = ['linux','python','bootstarp'],
  num = 1
 )
 #同样是替换为什么用jinja,因为他不仅仅是文本的他还支持if判断 & for循环 操作
 #这里需要注意因为默认是的unicode的编码所以设置为utf-8
 return [bytes(result,'utf8')]
urllist = [
 ('/index',index),
]
def RunServer(environ, start_response):
 start_response('200 OK', [('Content-Type', 'text/html')])
 #根据url的不同,返回不同的字符串
 #1 获取URL[URL从哪里获取?当请求过来之后执行RunServer,
 # wsgi给咱们封装了这些请求,这些请求都封装到了,environ & start_response]
 request_url = environ['PATH_INFO']
 print(request_url)
 #2 根据URL做不同的相应
 #循环这个列表
 for url in urllist:
  #如果用户请求的url和咱们定义的rul匹配
  if request_url == url[0]:
   print (url)
   return url[1]()
 else:
  #urllist列表里都没有返回404
  return [bytes('<h1 id="not-found">404 not found</h1>','utf8')]
if __name__ == '__main__':
 httpd = make_server('', 8000, RunServer)
 print ("Serving HTTP on port 8000...")
 httpd.serve_forever()
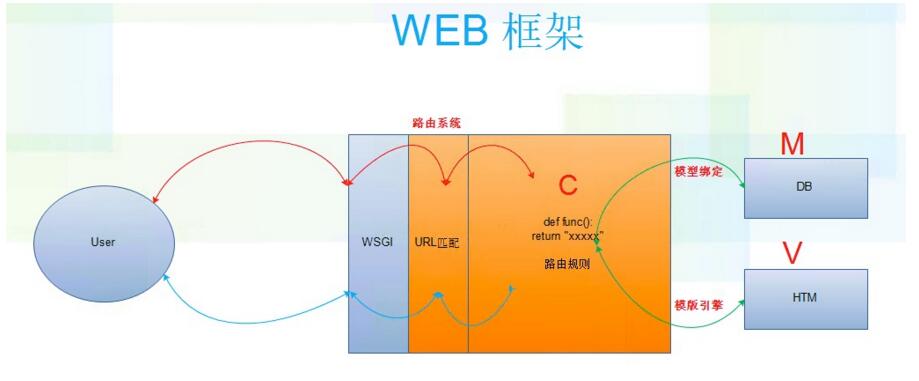
四、MVC和MTV
1.MVC
全名是Model View Controller,是模型(model)-视图(view)-控制器(controller)的缩写,一种软件设计典范,用一种业务逻辑、数据、界面显示分离的方法组织代码,将业务逻辑聚集到一个部件里面,在改进和个性化定制界面及用户交互的同时,不需要重新编写业务逻辑。MVC被独特的发展起来用于映射传统的输入、处理和输出功能在一个逻辑的图形化用户界面的结构中。
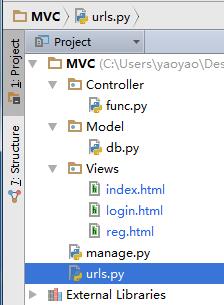
将路由规则放入urls.py
操作urls的放入controller里的func函数
将数据库操作党风model里的db.py里
将html页面等放入views里
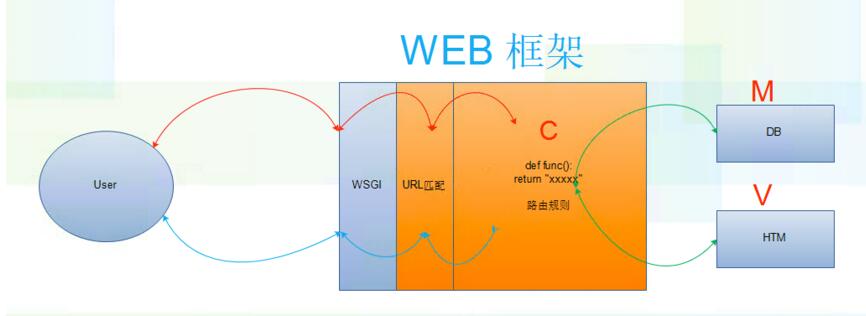
原理图:
2.MTV
Models 处理DB操作
Templates html模板
Views 处理函数请求
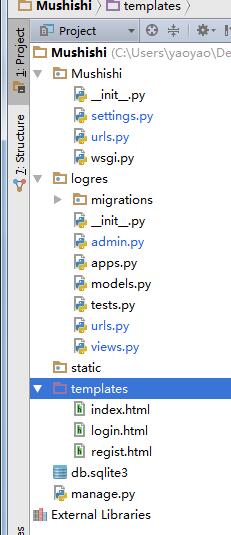
原理图:
以上就是本文的全部内容,希望对大家的学习有所帮助。

Hot AI Tools

Undresser.AI Undress
AI-powered app for creating realistic nude photos

AI Clothes Remover
Online AI tool for removing clothes from photos.

Undress AI Tool
Undress images for free

Clothoff.io
AI clothes remover

Video Face Swap
Swap faces in any video effortlessly with our completely free AI face swap tool!

Hot Article

Hot Tools

Notepad++7.3.1
Easy-to-use and free code editor

SublimeText3 Chinese version
Chinese version, very easy to use

Zend Studio 13.0.1
Powerful PHP integrated development environment

Dreamweaver CS6
Visual web development tools

SublimeText3 Mac version
God-level code editing software (SublimeText3)

Hot Topics
 1392
1392
 52
52
 PHP and Python: Different Paradigms Explained
Apr 18, 2025 am 12:26 AM
PHP is mainly procedural programming, but also supports object-oriented programming (OOP); Python supports a variety of paradigms, including OOP, functional and procedural programming. PHP is suitable for web development, and Python is suitable for a variety of applications such as data analysis and machine learning.
 Choosing Between PHP and Python: A Guide
Apr 18, 2025 am 12:24 AM
PHP is suitable for web development and rapid prototyping, and Python is suitable for data science and machine learning. 1.PHP is used for dynamic web development, with simple syntax and suitable for rapid development. 2. Python has concise syntax, is suitable for multiple fields, and has a strong library ecosystem.
 Can vs code run in Windows 8
Apr 15, 2025 pm 07:24 PM
VS Code can run on Windows 8, but the experience may not be great. First make sure the system has been updated to the latest patch, then download the VS Code installation package that matches the system architecture and install it as prompted. After installation, be aware that some extensions may be incompatible with Windows 8 and need to look for alternative extensions or use newer Windows systems in a virtual machine. Install the necessary extensions to check whether they work properly. Although VS Code is feasible on Windows 8, it is recommended to upgrade to a newer Windows system for a better development experience and security.
 Is the vscode extension malicious?
Apr 15, 2025 pm 07:57 PM
VS Code extensions pose malicious risks, such as hiding malicious code, exploiting vulnerabilities, and masturbating as legitimate extensions. Methods to identify malicious extensions include: checking publishers, reading comments, checking code, and installing with caution. Security measures also include: security awareness, good habits, regular updates and antivirus software.
 Can visual studio code be used in python
Apr 15, 2025 pm 08:18 PM
VS Code can be used to write Python and provides many features that make it an ideal tool for developing Python applications. It allows users to: install Python extensions to get functions such as code completion, syntax highlighting, and debugging. Use the debugger to track code step by step, find and fix errors. Integrate Git for version control. Use code formatting tools to maintain code consistency. Use the Linting tool to spot potential problems ahead of time.
 How to run programs in terminal vscode
Apr 15, 2025 pm 06:42 PM
In VS Code, you can run the program in the terminal through the following steps: Prepare the code and open the integrated terminal to ensure that the code directory is consistent with the terminal working directory. Select the run command according to the programming language (such as Python's python your_file_name.py) to check whether it runs successfully and resolve errors. Use the debugger to improve debugging efficiency.
 Can vscode be used for mac
Apr 15, 2025 pm 07:36 PM
VS Code is available on Mac. It has powerful extensions, Git integration, terminal and debugger, and also offers a wealth of setup options. However, for particularly large projects or highly professional development, VS Code may have performance or functional limitations.
 Python vs. JavaScript: The Learning Curve and Ease of Use
Apr 16, 2025 am 12:12 AM
Python is more suitable for beginners, with a smooth learning curve and concise syntax; JavaScript is suitable for front-end development, with a steep learning curve and flexible syntax. 1. Python syntax is intuitive and suitable for data science and back-end development. 2. JavaScript is flexible and widely used in front-end and server-side programming.


