python Django模板的使用方法
模板是一个文本,用于分离文档的表现形式和内容。 模板定义了占位符以及各种用于规范文档该如何显示的各部分基本逻辑(模板标签)。 模板通常用于产生HTML,但是Django的模板也能产生任何基于文本格式的文档。
来一个项目说明
1、建立MyDjangoSite项目具体不多说,参考前面。
2、在MyDjangoSite(包含四个文件的)文件夹目录下新建templates文件夹存放模版。
3、在刚建立的模版下建模版文件user_info.html
<html>
  <meta http-equiv="Content-type" content="text/html; charset=utf-8">
  <title>用户信息</title>
  <head></head>
  <body>
    <h3 id="用户信息">用户信息:</h3>
    <p>姓名:{{name}}</p>
    <p>年龄:{{age}}</p>
  </body>
</html>
说明:{{ name }}叫做模版变量;{% if xx %} ,{% for x in list %}模版标签。
4、修改settings.py 中的TEMPLATE_DIRS
导入import os.path
添加 os.path.join(os.path.dirname(__file__), ‘templates').replace(‘\\','/'),
TEMPLATE_DIRS = (
  # Put strings here, like "/home/html/django_templates" or "C:/www/django/templates".
  # Always use forward slashes, even on Windows.
  # Don't forget to use absolute paths, not relative paths.
  #"E:/workspace/pythonworkspace/MyDjangoSite/MyDjangoSite/templates",
  os.path.join(os.path.dirname(__file__), 'templates').replace('\\','/'),
)
说明:指定模版加载路径。其中os.path.dirname(__file__)为当前settings.py的文件路径,再连接上templates路径。
5、新建视图文件view.py
#vim: set fileencoding=utf-8:
#from django.template.loader import get_template
#from django.template import Context
#from django.http import HttpResponse
from django.shortcuts import render_to_response
def user_info(request):
  name = 'zbw'
  age = 24
  #t = get_template('user_info.html')
  #html = t.render(Context(locals()))
  #return HttpResponse(html)
  return render_to_response('user_info.html',locals())
说明:Django模板系统的基本规则: 写模板,创建 Template 对象,创建 Context , 调用 render() 方法。
可以看到上面代码中注释部分
#t = get_template(‘user_info.html') #html = t.render(Context(locals()))
#return HttpResponse(html)
get_template(‘user_info.html'),使用了函数 django.template.loader.get_template() ,而不是手动从文件系统加载模板。 该 get_template() 函数以模板名称为参数,在文件系统中找出模块的位置,打开文件并返回一个编译好的 Template 对象。
render(Context(locals()))方法接收传入一套变量context。它将返回一个基于模板的展现字符串,模板中的变量和标签会被context值替换。其中Context(locals())等价于Context({‘name':'zbw','age':24}) ,locals()它返回的字典对所有局部变量的名称与值进行映射。
render_to_response Django为此提供了一个捷径,让你一次性地载入某个模板文件,渲染它,然后将此作为 HttpResponse返回。
6、修改urls.py
from django.conf.urls import patterns, include, url
from MyDjangoSite.views import user_info
# Uncomment the next two lines to enable the admin:
# from django.contrib import admin
# admin.autodiscover()
urlpatterns = patterns('',
  # Examples:
  # url(r'^$', 'MyDjangoSite.views.home', name='home'),
  # url(r'^MyDjangoSite/', include('MyDjangoSite.foo.urls')),
  # Uncomment the admin/doc line below to enable admin documentation:
  # url(r'^admin/doc/', include('django.contrib.admindocs.urls')),
  # Uncomment the next line to enable the admin:
  # url(r'^admin/', include(admin.site.urls)),
  url(r'^u/$',user_info),

)
7、启动开发服务器
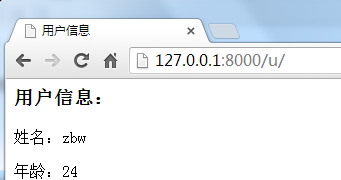
基本一个简单的模版应用就完成,启动服务看效果!
效果如图:

模版的继承
减少重复编写相同代码,以及降低维护成本。直接看应用。
1、新建/templates/base.html
<html>
  <meta http-equiv="Content-type" content="text/html; charset=utf-8">
  <title>{% block title %}{% endblock %}</title>
  <head></head>
  <body>
    <h3 id="block-headTitle-endblock">{% block headTitle %}{% endblock %}</h3>
    {% block content %} {% endblock %}
    {% block footer %}
      <h3 id="嘿-这是继承了模版">嘿,这是继承了模版</h3>
    {% endblock%}
  </body>
</html>
2、修改/template/user_info.html,以及新建product_info.html
urser_info.html
{% extends "base.html" %}
{% block title %}用户信息{% endblock %}

<h3 id="block-headTitle-用户信息-endblock">{% block headTitle %}用户信息:{% endblock %}</h3>
{% block content %}
<p>姓名:{{name}}</p>
<p>年龄:{{age}}</p>
{% endblock %}product_info.html
{% extends "base.html" %}
{% block title %}产品信息{% endblock %}
<h3 id="block-headTitle-产品信息-endblock">{% block headTitle %}产品信息:{% endblock %}</h3>
{% block content %}
  {{productName}}
{% endblock %}3、编写视图逻辑,修改views.py
#vim: set fileencoding=utf-8:
#from django.template.loader import get_template
#from django.template import Context
#from django.http import HttpResponse
from django.shortcuts import render_to_response
def user_info(request):
  name = 'zbw'
  age = 24
  #t = get_template('user_info.html')
  #html = t.render(Context(locals()))
  #return HttpResponse(html)
  return render_to_response('user_info.html',locals())
def product_info(request):
  productName = '阿莫西林胶囊'
  return render_to_response('product_info.html',{'productName':productName})
4、修改urls.py
from django.conf.urls import patterns, include, url
from MyDjangoSite.views import user_info,product_info
# Uncomment the next two lines to enable the admin:
# from django.contrib import admin
# admin.autodiscover()
urlpatterns = patterns('',
  # Examples:
  # url(r'^$', 'MyDjangoSite.views.home', name='home'),
  # url(r'^MyDjangoSite/', include('MyDjangoSite.foo.urls')),
  # Uncomment the admin/doc line below to enable admin documentation:
  # url(r'^admin/doc/', include('django.contrib.admindocs.urls')),
  # Uncomment the next line to enable the admin:
  # url(r'^admin/', include(admin.site.urls)),
  url(r'^u/$',user_info),
  url(r'^p/$',product_info),
)
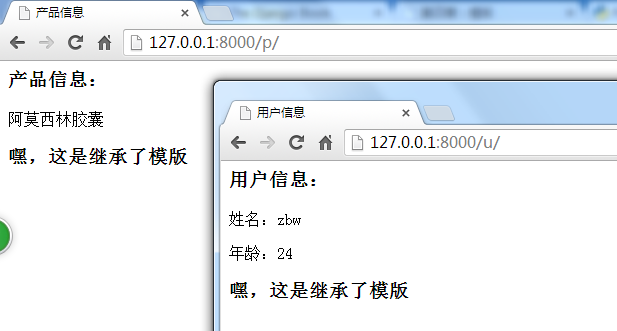
5、启动服务效果如下:

以上就是本文的全部内容,希望对大家的学习有所帮助。

Hot AI Tools

Undresser.AI Undress
AI-powered app for creating realistic nude photos

AI Clothes Remover
Online AI tool for removing clothes from photos.

Undress AI Tool
Undress images for free

Clothoff.io
AI clothes remover

AI Hentai Generator
Generate AI Hentai for free.

Hot Article

Hot Tools

Notepad++7.3.1
Easy-to-use and free code editor

SublimeText3 Chinese version
Chinese version, very easy to use

Zend Studio 13.0.1
Powerful PHP integrated development environment

Dreamweaver CS6
Visual web development tools

SublimeText3 Mac version
God-level code editing software (SublimeText3)

Hot Topics
 1385
1385
 52
52
 PHP and Python: Code Examples and Comparison
Apr 15, 2025 am 12:07 AM
PHP and Python have their own advantages and disadvantages, and the choice depends on project needs and personal preferences. 1.PHP is suitable for rapid development and maintenance of large-scale web applications. 2. Python dominates the field of data science and machine learning.
 Python vs. JavaScript: Community, Libraries, and Resources
Apr 15, 2025 am 12:16 AM
Python and JavaScript have their own advantages and disadvantages in terms of community, libraries and resources. 1) The Python community is friendly and suitable for beginners, but the front-end development resources are not as rich as JavaScript. 2) Python is powerful in data science and machine learning libraries, while JavaScript is better in front-end development libraries and frameworks. 3) Both have rich learning resources, but Python is suitable for starting with official documents, while JavaScript is better with MDNWebDocs. The choice should be based on project needs and personal interests.
 Detailed explanation of docker principle
Apr 14, 2025 pm 11:57 PM
Docker uses Linux kernel features to provide an efficient and isolated application running environment. Its working principle is as follows: 1. The mirror is used as a read-only template, which contains everything you need to run the application; 2. The Union File System (UnionFS) stacks multiple file systems, only storing the differences, saving space and speeding up; 3. The daemon manages the mirrors and containers, and the client uses them for interaction; 4. Namespaces and cgroups implement container isolation and resource limitations; 5. Multiple network modes support container interconnection. Only by understanding these core concepts can you better utilize Docker.
 How to run programs in terminal vscode
Apr 15, 2025 pm 06:42 PM
In VS Code, you can run the program in the terminal through the following steps: Prepare the code and open the integrated terminal to ensure that the code directory is consistent with the terminal working directory. Select the run command according to the programming language (such as Python's python your_file_name.py) to check whether it runs successfully and resolve errors. Use the debugger to improve debugging efficiency.
 Python: Automation, Scripting, and Task Management
Apr 16, 2025 am 12:14 AM
Python excels in automation, scripting, and task management. 1) Automation: File backup is realized through standard libraries such as os and shutil. 2) Script writing: Use the psutil library to monitor system resources. 3) Task management: Use the schedule library to schedule tasks. Python's ease of use and rich library support makes it the preferred tool in these areas.
 Is the vscode extension malicious?
Apr 15, 2025 pm 07:57 PM
VS Code extensions pose malicious risks, such as hiding malicious code, exploiting vulnerabilities, and masturbating as legitimate extensions. Methods to identify malicious extensions include: checking publishers, reading comments, checking code, and installing with caution. Security measures also include: security awareness, good habits, regular updates and antivirus software.
 What is vscode What is vscode for?
Apr 15, 2025 pm 06:45 PM
VS Code is the full name Visual Studio Code, which is a free and open source cross-platform code editor and development environment developed by Microsoft. It supports a wide range of programming languages and provides syntax highlighting, code automatic completion, code snippets and smart prompts to improve development efficiency. Through a rich extension ecosystem, users can add extensions to specific needs and languages, such as debuggers, code formatting tools, and Git integrations. VS Code also includes an intuitive debugger that helps quickly find and resolve bugs in your code.
 How to install nginx in centos
Apr 14, 2025 pm 08:06 PM
CentOS Installing Nginx requires following the following steps: Installing dependencies such as development tools, pcre-devel, and openssl-devel. Download the Nginx source code package, unzip it and compile and install it, and specify the installation path as /usr/local/nginx. Create Nginx users and user groups and set permissions. Modify the configuration file nginx.conf, and configure the listening port and domain name/IP address. Start the Nginx service. Common errors need to be paid attention to, such as dependency issues, port conflicts, and configuration file errors. Performance optimization needs to be adjusted according to the specific situation, such as turning on cache and adjusting the number of worker processes.


