深入源码解析Python中的对象与类型
对象
对象, 在C语言是如何实现的?
Python中对象分为两类: 定长(int等), 非定长(list/dict等)
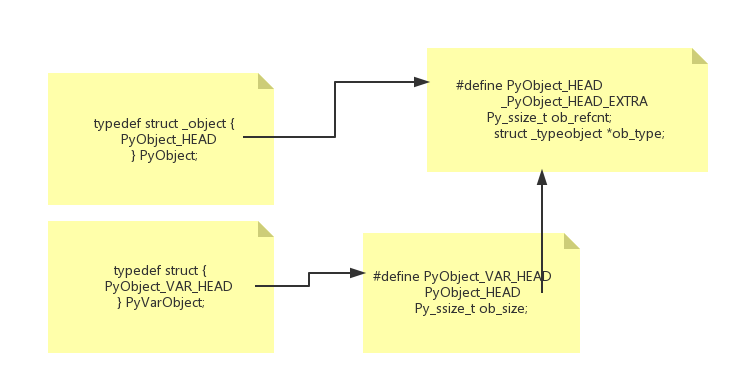
所有对象都有一些相同的东西, 源码中定义为PyObject和PyVarObject, 两个定义都有一个共同的头部定义PyObject_HEAD(其实PyVarObject有自己的头部定义PyObject_VAR_HEAD, 但其实际上用的也是PyObject_HEAD).
源码位置: Include/object.h
PyObject_HEAD
Python 内部, 每个对象拥有相同的头部.
定义
/* PyObject_HEAD defines the initial segment of every PyObject. */
#define PyObject_HEAD          \
  _PyObject_HEAD_EXTRA        \
  Py_ssize_t ob_refcnt;        \
  struct _typeobject *ob_type;
说明
1. _PyObject_HEAD_EXTRA
先忽略, 双向链表结构, 后面垃圾回收再说
2. Py_ssize_t ob_refcnt
Py_ssize_t在编译时确定, 整型
ob_refcnt, 引用计数, 跟Python的内存管理机制相关(基于引用计数的垃圾回收)
3. struct _typeobject *ob_type
*ob_type 指向类型对象的指针(指向_typeobject结构体)
决定了这个对象的类型!
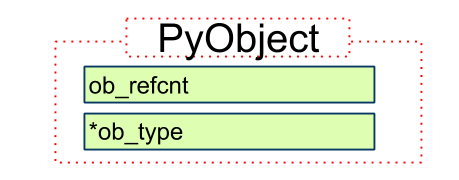
PyObject
定义
 typedef struct _object {
   PyObject_HEAD
 } PyObject;
说明
1. 依赖关系
PyObject -> PyObject_HEAD
结构
PyVarObject
定义
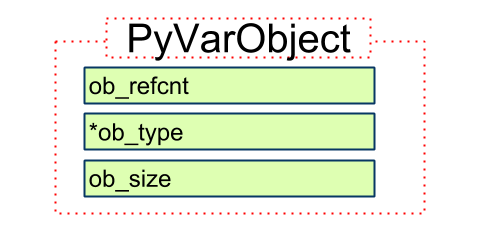
typedef struct {
  PyObject_VAR_HEAD
} PyVarObject;

#define PyObject_VAR_HEAD        \
 PyObject_HEAD            \
 Py_ssize_t ob_size; /* Number of items in variable part */
说明
1. 依赖关系
PyVarObject -> PyObject_VAR_HEAD -> PyObject_HEAD
2.Py_ssize_t ob_size
ob_size, 变长对象容纳的元素个数
结构
代码关系
几个方法
跟对象相关的方法
#define Py_REFCNT(ob) (((PyObject*)(ob))->ob_refcnt)
读取引用计数
#define Py_TYPE(ob) (((PyObject*)(ob))->ob_type)
获取对象类型
#define Py_SIZE(ob) (((PyVarObject*)(ob))->ob_size)
读取元素个数(len)
跟引用计数相关的方法
Py_INCREF(op) 增加对象引用计数
Py_DECREF(op) 减少对象引用计数, 如果计数位0, 调用_Py_Dealloc
_Py_Dealloc(op) 调用对应类型的 tp_dealloc 方法(每种类型回收行为不一样的, 各种缓存池机制, 后面看)
其他
几个参数涉及
ob_refcnt 引用计数, 与内存管理/垃圾回收相关
ob_type 类型, 涉及Python的类型系统
类型
一个例子
>>> a = 1
>>> a
1

>>> type(a)
<type 'int'>

#等价的两个
>>> type(type(a))
<type 'type'>
>>> type(int)
<type 'type'>

#还是等价的两个
>>> type(type(type(a)))
<type 'type'>
>>> type(type(int))
<type 'type'>
我们反向推导一个int对象是怎么生成的.
1. 首先, 定义一种类型叫PyTypeObject
代码位置 Include/object.h
定义
typedef struct _typeobject {

 /* MARK: base, 注意, 是个变长对象*/
 PyObject_VAR_HEAD
 const char *tp_name; /* For printing, in format "<module>.<name>" */ //类型名
 Py_ssize_t tp_basicsize, tp_itemsize; /* For allocation */ // 创建该类型对象时分配的内存空间大小


 // 一堆方法定义, 函数和指针
 /* Methods to implement standard operations */
 printfunc tp_print;
 hashfunc tp_hash;

 /* Method suites for standard classes */
 PyNumberMethods *tp_as_number;  // 数值对象操作
 PySequenceMethods *tp_as_sequence; // 序列对象操作
 PyMappingMethods *tp_as_mapping; // 字典对象操作

 // 一堆属性定义
 ....

} PyTypeObject;
说明
1. PyObject_VAR_HEAD
变长对象
2. const char *tp_name
tp_name, 类型名字符串数组
所有Type都是PyTypeObject的"实例": PyType_Type/PyInt_Type
2. 然后, 用PyTypeObject初始化得到一个对象PyType_Type
代码位置 Objects/typeobject.c
定义
PyTypeObject PyType_Type = {
 PyVarObject_HEAD_INIT(&PyType_Type, 0)
 "type",                   /* tp_name */
 sizeof(PyHeapTypeObject),          /* tp_basicsize */
 sizeof(PyMemberDef),            /* tp_itemsize */
 (destructor)type_dealloc,          /* tp_dealloc */

 // type对象的方法和属性初始化值
 .....

};
说明
1. tp_name
类型名, 这里是"type"
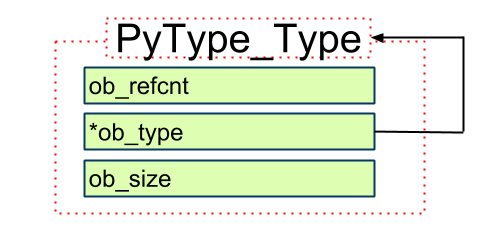
2. PyVarObject_HEAD_INIT(&PyType_Type, 0)
PyVarObject_HEAD_INIT, 这个方法在 Include/object.h中,
等价于
ob_refcnt = 1
*ob_type = &PyType_Type
ob_size = 0
即, PyType_Type的类型是其本身!
结构
第一张图, 箭头表示实例化(google doc用不是很熟找不到对应类型的箭头)
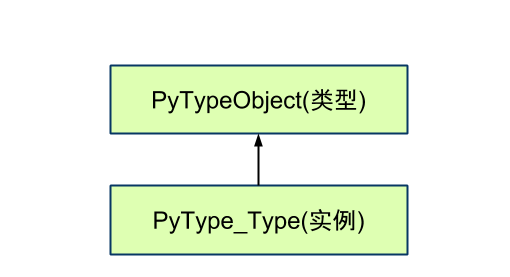
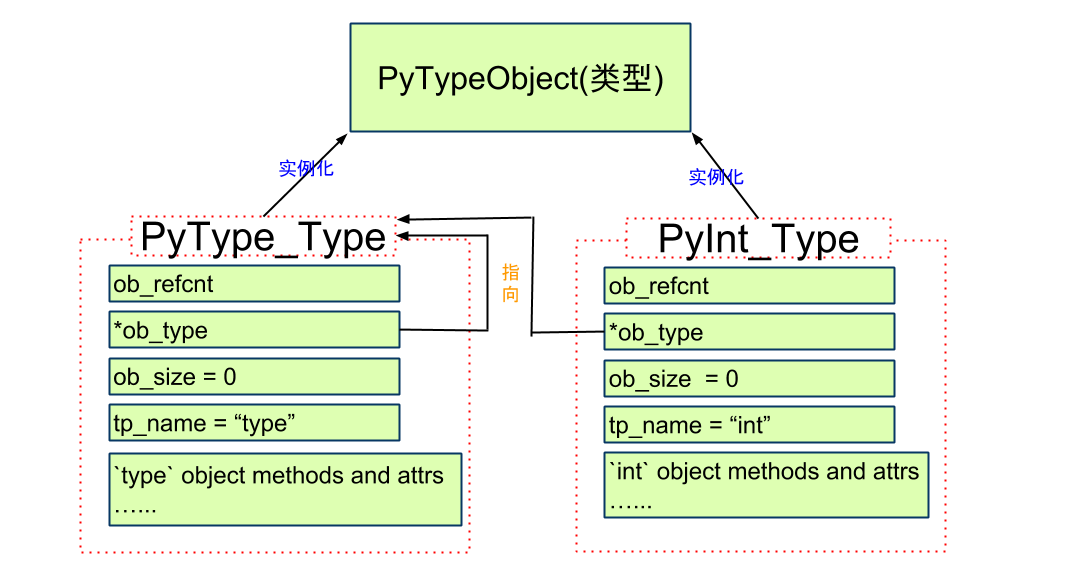
第二张图, 箭头表示指向
使用
# 1. int 的 类型 是`type`
>>> type(int)
<type 'type'>

# 2. type 的类型 还是`type`, 对应上面说明第二点
>>> type(type(int))
<type 'type'>
注意: 无论任何时候, ob_type指向的是 PyTypeObject的实例: PyType_Type/PyInt_Type...
3. 再然后, 定义具体的类型, 这里以PyInt_Type为例子
代码位置 Objects/intobject.c
定义
PyTypeObject PyInt_Type = {
 PyVarObject_HEAD_INIT(&PyType_Type, 0)
 "int",
 sizeof(PyIntObject),
 0,

 // int类型的相关方法和属性值
 ....

 (hashfunc)int_hash,             /* tp_hash */

};
说明
1. "int"
PyInt_Type的类型名是int
2.PyVarObject_HEAD_INIT(&PyType_Type, 0)
PyInt_Type的
*ob_type = &PyType_Type
结构
使用
>>> type(1)
<type 'int'>

>>> type(type(1))
<type 'type'>
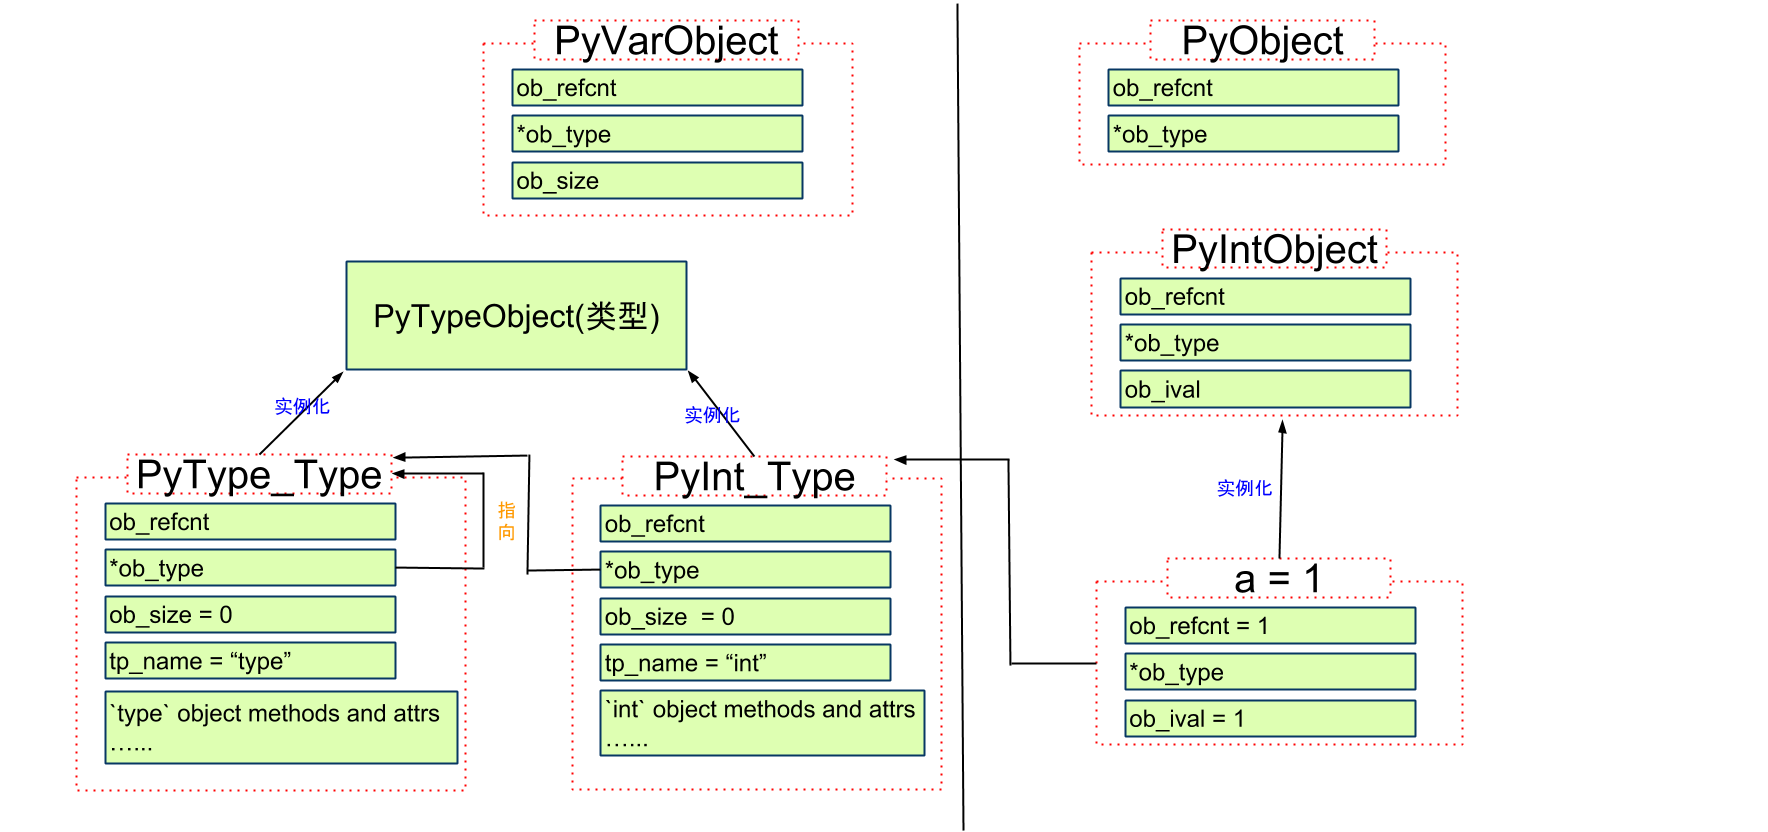
4. 最后, 生成一个整数对象int
代码位置 Include/intobject.h
定义
typedef struct {
  PyObject_HEAD
  long ob_ival;
} PyIntObject;
结构

Hot AI Tools

Undresser.AI Undress
AI-powered app for creating realistic nude photos

AI Clothes Remover
Online AI tool for removing clothes from photos.

Undress AI Tool
Undress images for free

Clothoff.io
AI clothes remover

AI Hentai Generator
Generate AI Hentai for free.

Hot Article

Hot Tools

Notepad++7.3.1
Easy-to-use and free code editor

SublimeText3 Chinese version
Chinese version, very easy to use

Zend Studio 13.0.1
Powerful PHP integrated development environment

Dreamweaver CS6
Visual web development tools

SublimeText3 Mac version
God-level code editing software (SublimeText3)

Hot Topics
 1385
1385
 52
52
 PHP and Python: Code Examples and Comparison
Apr 15, 2025 am 12:07 AM
PHP and Python have their own advantages and disadvantages, and the choice depends on project needs and personal preferences. 1.PHP is suitable for rapid development and maintenance of large-scale web applications. 2. Python dominates the field of data science and machine learning.
 Python vs. JavaScript: Community, Libraries, and Resources
Apr 15, 2025 am 12:16 AM
Python and JavaScript have their own advantages and disadvantages in terms of community, libraries and resources. 1) The Python community is friendly and suitable for beginners, but the front-end development resources are not as rich as JavaScript. 2) Python is powerful in data science and machine learning libraries, while JavaScript is better in front-end development libraries and frameworks. 3) Both have rich learning resources, but Python is suitable for starting with official documents, while JavaScript is better with MDNWebDocs. The choice should be based on project needs and personal interests.
 Detailed explanation of docker principle
Apr 14, 2025 pm 11:57 PM
Docker uses Linux kernel features to provide an efficient and isolated application running environment. Its working principle is as follows: 1. The mirror is used as a read-only template, which contains everything you need to run the application; 2. The Union File System (UnionFS) stacks multiple file systems, only storing the differences, saving space and speeding up; 3. The daemon manages the mirrors and containers, and the client uses them for interaction; 4. Namespaces and cgroups implement container isolation and resource limitations; 5. Multiple network modes support container interconnection. Only by understanding these core concepts can you better utilize Docker.
 Python: Automation, Scripting, and Task Management
Apr 16, 2025 am 12:14 AM
Python excels in automation, scripting, and task management. 1) Automation: File backup is realized through standard libraries such as os and shutil. 2) Script writing: Use the psutil library to monitor system resources. 3) Task management: Use the schedule library to schedule tasks. Python's ease of use and rich library support makes it the preferred tool in these areas.
 How to run programs in terminal vscode
Apr 15, 2025 pm 06:42 PM
In VS Code, you can run the program in the terminal through the following steps: Prepare the code and open the integrated terminal to ensure that the code directory is consistent with the terminal working directory. Select the run command according to the programming language (such as Python's python your_file_name.py) to check whether it runs successfully and resolve errors. Use the debugger to improve debugging efficiency.
 What is vscode What is vscode for?
Apr 15, 2025 pm 06:45 PM
VS Code is the full name Visual Studio Code, which is a free and open source cross-platform code editor and development environment developed by Microsoft. It supports a wide range of programming languages and provides syntax highlighting, code automatic completion, code snippets and smart prompts to improve development efficiency. Through a rich extension ecosystem, users can add extensions to specific needs and languages, such as debuggers, code formatting tools, and Git integrations. VS Code also includes an intuitive debugger that helps quickly find and resolve bugs in your code.
 Is the vscode extension malicious?
Apr 15, 2025 pm 07:57 PM
VS Code extensions pose malicious risks, such as hiding malicious code, exploiting vulnerabilities, and masturbating as legitimate extensions. Methods to identify malicious extensions include: checking publishers, reading comments, checking code, and installing with caution. Security measures also include: security awareness, good habits, regular updates and antivirus software.
 Can visual studio code be used in python
Apr 15, 2025 pm 08:18 PM
VS Code can be used to write Python and provides many features that make it an ideal tool for developing Python applications. It allows users to: install Python extensions to get functions such as code completion, syntax highlighting, and debugging. Use the debugger to track code step by step, find and fix errors. Integrate Git for version control. Use code formatting tools to maintain code consistency. Use the Linting tool to spot potential problems ahead of time.


