使用PyCharm配合部署Python的Django框架的配置纪实
安装软件
安装 Python 2.7、PyCharm、pip(Python包管理工具)、Django ( pip install Django)
部署
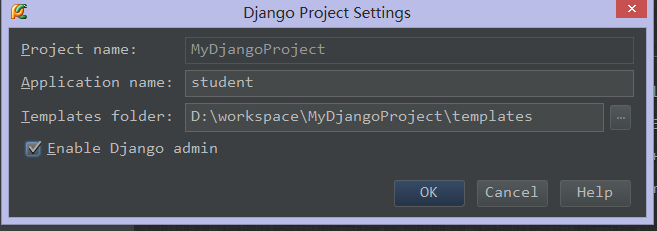
PyCharm 新建Django工程

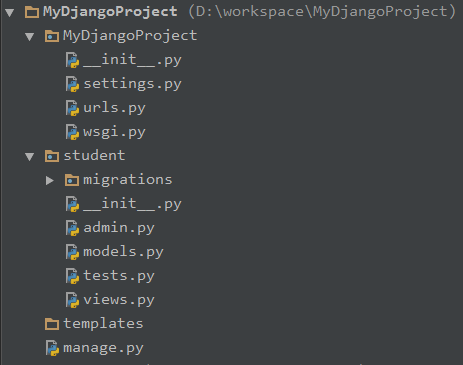
完成后,其目录如下:

子目录MyDjangoProject下表示工程的全局配置,分别为setttings.py、urls.py和wsgi.py,其中setttings.py包括了系统的数据库配置、应用配置和其他配置,urls.py则
表示web工程Url映射的配置。
子目录student则是在该工程下创建的app,包含了models.py、tests.py和views.py等文件
templates目录则为模板文件的目录
manage.py是Django提供的一个管理工具,可以同步数据库等等
启动
创建完成后,就可以正常启动了。点击Run 按钮,启动时报错了:
Traceback (most recent call last):
 File "D:/workspace/MyDjangoProject/manage.py", line 10, in <module>
  execute_from_command_line(sys.argv)
 File "D:\Python27\lib\site-packages\django\core\management\__init__.py", line 338, in execute_from_command_line
  utility.execute()
 File "D:\Python27\lib\site-packages\django\core\management\__init__.py", line 312, in execute
  django.setup()
 File "D:\Python27\lib\site-packages\django\__init__.py", line 18, in setup
  apps.populate(settings.INSTALLED_APPS)
 File "D:\Python27\lib\site-packages\django\apps\registry.py", line 89, in populate
  "duplicates: %s" % app_config.label)
django.core.exceptions.ImproperlyConfigured: Application labels aren't unique, duplicates: admin
应该是admin配置冲突了,打开setttings.py文件,发现admin配置重复了
INSTALLED_APPS = (
  'django.contrib.admin',
  'django.contrib.auth',
  'django.contrib.contenttypes',
  'django.contrib.sessions',
  'django.contrib.messages',
  'django.contrib.staticfiles',
  'django.contrib.admin',
  'student',
)

web工程添加页面
此时,我们尚没有写一行代码,程序就duang跑起来了! 快添加一个Hello World的页面吧。
打开student/views.py文件,输入以下内容
def sayHello(request):
  s = 'Hello World!'
  current_time = datetime.datetime.now()
  html = '<html><head></head><body><h1 id="s"> %s </h1><p> %s </p></body></html>' % (s, current_time)
  return HttpResponse(html)
url(r'^student/', sayHello)
当用户输入http://**/student 时,便会调用sayHello方法,该方法通过HttpResponse()将页面内容作为响应返回。
重启服务,访问http://localhost:8000/student/

在views.py页面可以将页面需要的元素通过字符串的形式,调用HttpResponse()类作为响应返回到浏览器。但这样,页面逻辑和页面混合在一起,手写起来很繁琐,工作量比较大。如果我们需要展示一些动态的数据,而页面基本不改变的情况下,该怎么做呢?
比如在用户访问 http://localhost:8000/student/ 时,我们想动态展示一些学生的数据。可以这样做:
首先在templates目录下,新建 student.html文件,该文件作为模板,内容如下:
<!DOCTYPE html>
<html>
<head>
  <title></title>
</head>
<body>
  <ul>
    {% for student in students %}
    <li>
      id:{{ student.id }},姓名:{{ student.name }},age: {{ student.age }}
    </li>
    {% endfor %}
  </ul>
</body>
</html>
修改 views.py文件,添加方法showStudents()
def showStudents(request):
  list = [{id: 1, 'name': 'Jack'}, {id: 2, 'name': 'Rose'}]
  return render_to_response('student.html',{'students': list})
该方法将list作为动态数据,通过render_to_response方法绑定到模板页面student.html上。
添加url映射,url(r'^showStudents/$', showStudents)
修改settings.py模板配置:'DIRS': [BASE_DIR+r'\templates'],
重启服务,访问http://localhost:8000/showStudents,出现:

至此,我们已可以正常将一些“动态”数据绑定到模板上了。但是怎么样访问数据库呢?
从数据库获取需要的数据,展示在页面上?
首先需要安装数据库驱动啦,即mysql_python,
接着配置数据库连接:
DATABASES = {
  'default': {
    'ENGINE': 'django.db.backends.mysql',
    'NAME': 'student',
    'USER': 'root',
    'PASSWORD': '1234',
    'HOST': '127.0.0.1',
    'PORT': '3306',
    #'NAME': os.path.join(BASE_DIR, 'db.sqlite3'),
  }
}
配置完成之后,需要检测数据库配置是否正确,使用 manage.py shell命令,进入shell交互界面:
输入:
from django.db import connection
cursor = connection.cursor()
如果不报错,说明配置正确。
创建model,打开models.py,定义model如下:
class Student(models.Model)
  id = models.BigIntegerField
  name = models.CharField(max_length=20, default='a')
然后调用 manage.py syncdb
正常情况下,该步骤做完之后,model 会和数据库保持一致性。但是在测试中,命令执行成功后,却发现数据库并没有建立该表。
对于该种情况,做如下操作即可正常:
(1)注释掉models.py文件代码,执行 manage.py makemigerations student
【和manage.py migerate --fake】
(2)打开注释,执行【 manage.py makemigerations student和 】manage.py migerate命令
通过以上两步,便可正常操作了
views.py中添加方法:showRealStudents
def showRealStudents(request):
  list = Student.objects.all()
  return render_to_response('student.html', {'students': list})
urls.py添加映射 url(r'^showRealStudents/$', showRealStudents)
重启服务,打开连接:http://localhost:8000/showRealStudents
页面输出正常。
至此,使用Django,可以正常操作数据库,自定义模板,在页面展示数据了。
服务器
由于Django自带轻量级的server,因此默认使用该server,但实际生产中是不允许这么干的,生产环境中通常使用Apache Httpd Server结合mod_wsgi.so来做后端服务器。
以下部署环境为:Python2.7.6
1、安装httpd-2.2.25-win32-x86-no_ssl.msi
2、将下载好的mod_wsgi.so 放在 D:\Program Files\Apache Software Foundation\Apache2.2\modules 模块下。
3、在新建的web工程 MyDjangoProject目录下新建 django.wsgi文件
内容如下(相应的目录需要修改):
import os
import sys

djangopath = "D:/Python27/Lib/site-packages/django/bin"
if djangopath not in sys.path:
  sys.path.append(djangopath)

projectpath = 'D:/workspace/MyDjangoProject'
if projectpath not in sys.path:
  sys.path.append(projectpath)

apppath = 'D:/workspace/MyDjangoProject/MyDjangoProject'
if apppath not in sys.path:
  sys.path.append(apppath)
os.environ['DJANGO_SETTINGS_MODULE']='MyDjangoProject.settings'

from django.core.wsgi import get_wsgi_application
application = get_wsgi_application()
4、修改httpd.conf ,添加如下:
LoadModule wsgi_module modules/mod_wsgi.so
WSGIScriptAlias / "D:/workspace/MyDjangoProject/django.wsgi"
<Directory "D:/workspace/MyDjangoProject/">
  Options FollowSymLinks
  AllowOverride None
  Order deny,allow
  Allow from all
</Directory>
ok,重启server,页面正常了。
在部署的过程中,遇到一个异常,如下:
The translation infrastructure cannot be initialized before the apps registry is ready
原因是django.wsgi一开始按照较为古老的写法,改为新版本的写法就Ok了。

Hot AI Tools

Undresser.AI Undress
AI-powered app for creating realistic nude photos

AI Clothes Remover
Online AI tool for removing clothes from photos.

Undress AI Tool
Undress images for free

Clothoff.io
AI clothes remover

AI Hentai Generator
Generate AI Hentai for free.

Hot Article

Hot Tools

Notepad++7.3.1
Easy-to-use and free code editor

SublimeText3 Chinese version
Chinese version, very easy to use

Zend Studio 13.0.1
Powerful PHP integrated development environment

Dreamweaver CS6
Visual web development tools

SublimeText3 Mac version
God-level code editing software (SublimeText3)

Hot Topics
 1359
1359
 52
52
 Is the conversion speed fast when converting XML to PDF on mobile phone?
Apr 02, 2025 pm 10:09 PM
The speed of mobile XML to PDF depends on the following factors: the complexity of XML structure. Mobile hardware configuration conversion method (library, algorithm) code quality optimization methods (select efficient libraries, optimize algorithms, cache data, and utilize multi-threading). Overall, there is no absolute answer and it needs to be optimized according to the specific situation.
 How to convert XML files to PDF on your phone?
Apr 02, 2025 pm 10:12 PM
It is impossible to complete XML to PDF conversion directly on your phone with a single application. It is necessary to use cloud services, which can be achieved through two steps: 1. Convert XML to PDF in the cloud, 2. Access or download the converted PDF file on the mobile phone.
 What is the function of C language sum?
Apr 03, 2025 pm 02:21 PM
There is no built-in sum function in C language, so it needs to be written by yourself. Sum can be achieved by traversing the array and accumulating elements: Loop version: Sum is calculated using for loop and array length. Pointer version: Use pointers to point to array elements, and efficient summing is achieved through self-increment pointers. Dynamically allocate array version: Dynamically allocate arrays and manage memory yourself, ensuring that allocated memory is freed to prevent memory leaks.
 Is there a mobile app that can convert XML into PDF?
Apr 02, 2025 pm 09:45 PM
There is no APP that can convert all XML files into PDFs because the XML structure is flexible and diverse. The core of XML to PDF is to convert the data structure into a page layout, which requires parsing XML and generating PDF. Common methods include parsing XML using Python libraries such as ElementTree and generating PDFs using ReportLab library. For complex XML, it may be necessary to use XSLT transformation structures. When optimizing performance, consider using multithreaded or multiprocesses and select the appropriate library.
 Recommended XML formatting tool
Apr 02, 2025 pm 09:03 PM
XML formatting tools can type code according to rules to improve readability and understanding. When selecting a tool, pay attention to customization capabilities, handling of special circumstances, performance and ease of use. Commonly used tool types include online tools, IDE plug-ins, and command-line tools.
 How to convert XML to PDF on your phone?
Apr 02, 2025 pm 10:18 PM
It is not easy to convert XML to PDF directly on your phone, but it can be achieved with the help of cloud services. It is recommended to use a lightweight mobile app to upload XML files and receive generated PDFs, and convert them with cloud APIs. Cloud APIs use serverless computing services, and choosing the right platform is crucial. Complexity, error handling, security, and optimization strategies need to be considered when handling XML parsing and PDF generation. The entire process requires the front-end app and the back-end API to work together, and it requires some understanding of a variety of technologies.
 How to convert xml into pictures
Apr 03, 2025 am 07:39 AM
XML can be converted to images by using an XSLT converter or image library. XSLT Converter: Use an XSLT processor and stylesheet to convert XML to images. Image Library: Use libraries such as PIL or ImageMagick to create images from XML data, such as drawing shapes and text.
 Is there any mobile app that can convert XML into PDF?
Apr 02, 2025 pm 08:54 PM
An application that converts XML directly to PDF cannot be found because they are two fundamentally different formats. XML is used to store data, while PDF is used to display documents. To complete the transformation, you can use programming languages and libraries such as Python and ReportLab to parse XML data and generate PDF documents.


