用Python的Flask框架结合MySQL写一个内存监控程序
这里以监控内存使用率为例,写的一个简单demo性程序,具体操作根据51reboot提供的教程写如下。
一、建库建表
创建falcon数据库:
mysql> create database falcon character set utf8;
Query OK, 1 row affected (0.00 sec)
创建内存监控使用的表stat,表结构如下:
CREATE TABLE `stat` (
 `id` int(11) unsigned NOT NULL AUTO_INCREMENT,
 `host` varchar(256) DEFAULT NULL,
 `mem_free` int(11) DEFAULT NULL,
 `mem_usage` int(11) DEFAULT NULL,
 `mem_total` int(11) DEFAULT NULL,
 `load_avg` varchar(128) DEFAULT NULL,
 `time` bigint(11) DEFAULT NULL,
 PRIMARY KEY (`id`),
 KEY `host` (`host`(255))
) ENGINE=InnoDB AUTO_INCREMENT=0 DEFAULT CHARSET=utf8;
二、flask web端设置
首先我们设计一个web服务,实现如下功能:
完成监控页面展示
接受POST提交上来的数据
提供json数据GET接口
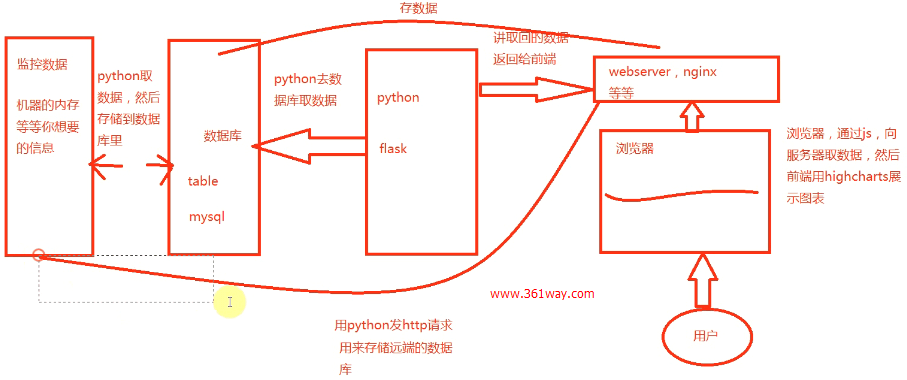
具体框架结构图如下:

目录结构如下:
web
├── flask_web.py
└── templates
 └── mon.html
flask_web代码如下:
import MySQLdb as mysql
import json
from flask import Flask, request, render_template
app = Flask(__name__)
db = mysql.connect(user="361way", passwd="123456", \
  db="falcon", charset="utf8")
db.autocommit(True)
c = db.cursor()
@app.route("/", methods=["GET", "POST"])
def hello():
 sql = ""
 if request.method == "POST":
  data = request.json
  try:
   sql = "INSERT INTO `stat` (`host`,`mem_free`,`mem_usage`,`mem_total`,`load_avg`,`time`) VALUES('%s', '%d', '%d', '%d', '%s', '%d')" % (data['Host'], data['MemFree'], data['MemUsage'], data['MemTotal'], data['LoadAvg'], int(data['Time']))
   ret = c.execute(sql)
  except mysql.IntegrityError:
   pass
  return "OK"
 else:
  return render_template("mon.html")
@app.route("/data", methods=["GET"])
def getdata():
 c.execute("SELECT `time`,`mem_usage` FROM `stat`")
 ones = [[i[0]*1000, i[1]] for i in c.fetchall()]
 return "%s(%s);" % (request.args.get('callback'), json.dumps(ones))
if __name__ == "__main__":
 app.run(host="0.0.0.0", port=8888, debug=True)
这里使用的汇图JS为highcharts、highstock ,具体模板页面内容如下:
[root@91it templates]# cat mon.html
<title>memory monitor</title>
<!DOCTYPE HTML>
<html>
<head>
<meta http-equiv="Content-Type" content="text/html; charset=utf-8">
<title>Highstock Example</title>
<!-- <script type="text/javascript" src="{{ url_for('static', filename='jquery.min.js') }}"></script> -->
<script type="text/javascript" src="http://ajax.useso.com/ajax/libs/jquery/1.8.2/jquery.min.js"></script>
<style type="text/css">
${demo.css}
</style>
<script type="text/javascript">
$(function () {
$.getJSON('/data?callback=?', function (data) {
// Create the chart
$('#container').highcharts('StockChart', {
rangeSelector: {
inputEnabled: $('#container').width() > 480,
selected: 1
},
title: {
text: 'memory monitor'
},
series: [{
name: 'memory monitor',
data: data,
type: 'spline',
tooltip: {
valueDecimals: 2
}
}]
});
});
});
</script>
</head>
<body>
<!-- <script src="{{ url_for('static', filename='highstock.js') }}"></script> -->
<script src="http://cdnjs.cloudflare.com/ajax/libs/highstock/2.0.4/highstock.js"></script>
<!-- <script src="{{ url_for('static', filename='exporting.js') }}"></script> -->
<script src="http://code.highcharts.com/modules/exporting.js"></script>
<div id="container" style="height: 400px"></div>
</body>
</html>
注:这里的JS代码都直接使用互联网上的代码,如果主机无法连接互联网的,可以将上面的三段代取取下来,在templates 的同级目录创建static 目录,将下载下来的三个文件放到该目录,删除模板中三处引用javascript处的代码,使用当前注释的三段。
三、agent被监控端设置
web展示页面完成了,运行起来:python flask_web.py 监听在8888端口上。我们需要做一个agent来采集数据,并通过post方法请求flask_web页面,将数据上传写入数据库。这里以监控内存为例,具体监控代码如下:
#!/usr/bin/env python
#coding=utf-8
import inspect
import time
import urllib, urllib2
import json
import socket
class mon:
 def __init__(self):
  self.data = {}
 def getTime(self):
  return str(int(time.time()) + 8 * 3600)
 def getHost(self):
  return socket.gethostname()
 def getLoadAvg(self):
  with open('/proc/loadavg') as load_open:
   a = load_open.read().split()[:3]
   return ','.join(a)
 def getMemTotal(self):
  with open('/proc/meminfo') as mem_open:
   a = int(mem_open.readline().split()[1])
   return a / 1024
 def getMemUsage(self, noBufferCache=True):
  if noBufferCache:
   with open('/proc/meminfo') as mem_open:
    T = int(mem_open.readline().split()[1])
    F = int(mem_open.readline().split()[1])
    B = int(mem_open.readline().split()[1])
    C = int(mem_open.readline().split()[1])
    return (T-F-B-C)/1024
  else:
   with open('/proc/meminfo') as mem_open:
    a = int(mem_open.readline().split()[1]) - int(mem_open.readline().split()[1])
    return a / 1024
 def getMemFree(self, noBufferCache=True):
  if noBufferCache:
   with open('/proc/meminfo') as mem_open:
    T = int(mem_open.readline().split()[1])
    F = int(mem_open.readline().split()[1])
    B = int(mem_open.readline().split()[1])
    C = int(mem_open.readline().split()[1])
    return (F+B+C)/1024
  else:
   with open('/proc/meminfo') as mem_open:
    mem_open.readline()
    a = int(mem_open.readline().split()[1])
    return a / 1024
 def runAllGet(self):
  #自动获取mon类里的所有getXXX方法,用XXX作为key,getXXX()的返回值作为value,构造字典
  for fun in inspect.getmembers(self, predicate=inspect.ismethod):
   if fun[0][:3] == 'get':
    self.data[fun[0][3:]] = fun[1]()
  return self.data
if __name__ == "__main__":
 while True:
  m = mon()
  data = m.runAllGet()
  print data
  req = urllib2.Request("http://test.361way.com:8888", json.dumps(data), {'Content-Type': 'application/json'})
  f = urllib2.urlopen(req)
  response = f.read()
  print response
  f.close()
  time.sleep(60)
nohup python moniItems.py >/dev/null 2>&1 & 在被监控主机上运行,如果出于实验目的,想尽快的看到展示效果,可以将time.sleep(60) 改为time.sleep(2) ,这样每2秒就会取一次数据写入数据库。
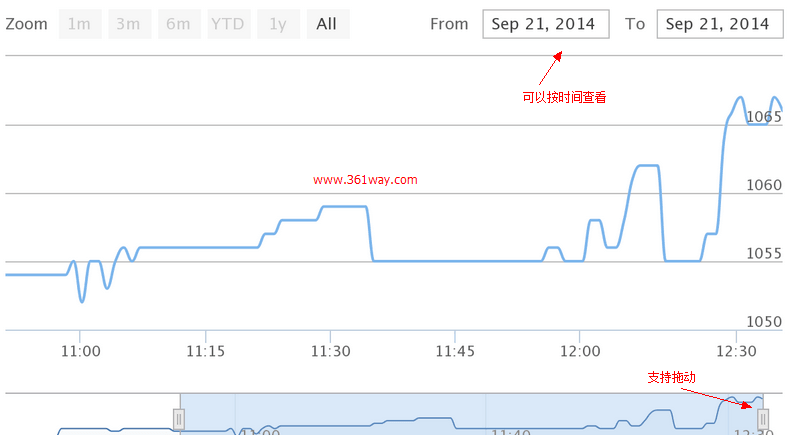
访问 http://test.361way.com:8888 就可以看到我们的监控数据了:效果图如下

highcharts支持将按时间拖动,也支持按指定时间段查看。并且查看到的图片可以直接保存为png、jpg或pdf、csv等格式查看。

Hot AI Tools

Undresser.AI Undress
AI-powered app for creating realistic nude photos

AI Clothes Remover
Online AI tool for removing clothes from photos.

Undress AI Tool
Undress images for free

Clothoff.io
AI clothes remover

AI Hentai Generator
Generate AI Hentai for free.

Hot Article

Hot Tools

Notepad++7.3.1
Easy-to-use and free code editor

SublimeText3 Chinese version
Chinese version, very easy to use

Zend Studio 13.0.1
Powerful PHP integrated development environment

Dreamweaver CS6
Visual web development tools

SublimeText3 Mac version
God-level code editing software (SublimeText3)

Hot Topics
 PHP's big data structure processing skills
May 08, 2024 am 10:24 AM
Big data structure processing skills: Chunking: Break down the data set and process it in chunks to reduce memory consumption. Generator: Generate data items one by one without loading the entire data set, suitable for unlimited data sets. Streaming: Read files or query results line by line, suitable for large files or remote data. External storage: For very large data sets, store the data in a database or NoSQL.
 How to use MySQL backup and restore in PHP?
Jun 03, 2024 pm 12:19 PM
Backing up and restoring a MySQL database in PHP can be achieved by following these steps: Back up the database: Use the mysqldump command to dump the database into a SQL file. Restore database: Use the mysql command to restore the database from SQL files.
 How to optimize MySQL query performance in PHP?
Jun 03, 2024 pm 08:11 PM
MySQL query performance can be optimized by building indexes that reduce lookup time from linear complexity to logarithmic complexity. Use PreparedStatements to prevent SQL injection and improve query performance. Limit query results and reduce the amount of data processed by the server. Optimize join queries, including using appropriate join types, creating indexes, and considering using subqueries. Analyze queries to identify bottlenecks; use caching to reduce database load; optimize PHP code to minimize overhead.
 How to insert data into a MySQL table using PHP?
Jun 02, 2024 pm 02:26 PM
How to insert data into MySQL table? Connect to the database: Use mysqli to establish a connection to the database. Prepare the SQL query: Write an INSERT statement to specify the columns and values to be inserted. Execute query: Use the query() method to execute the insertion query. If successful, a confirmation message will be output.
 How to create a MySQL table using PHP?
Jun 04, 2024 pm 01:57 PM
Creating a MySQL table using PHP requires the following steps: Connect to the database. Create the database if it does not exist. Select a database. Create table. Execute the query. Close the connection.
 How to use MySQL stored procedures in PHP?
Jun 02, 2024 pm 02:13 PM
To use MySQL stored procedures in PHP: Use PDO or the MySQLi extension to connect to a MySQL database. Prepare the statement to call the stored procedure. Execute the stored procedure. Process the result set (if the stored procedure returns results). Close the database connection.
 How to fix mysql_native_password not loaded errors on MySQL 8.4
Dec 09, 2024 am 11:42 AM
One of the major changes introduced in MySQL 8.4 (the latest LTS release as of 2024) is that the "MySQL Native Password" plugin is no longer enabled by default. Further, MySQL 9.0 removes this plugin completely. This change affects PHP and other app
 The difference between oracle database and mysql
May 10, 2024 am 01:54 AM
Oracle database and MySQL are both databases based on the relational model, but Oracle is superior in terms of compatibility, scalability, data types and security; while MySQL focuses on speed and flexibility and is more suitable for small to medium-sized data sets. . ① Oracle provides a wide range of data types, ② provides advanced security features, ③ is suitable for enterprise-level applications; ① MySQL supports NoSQL data types, ② has fewer security measures, and ③ is suitable for small to medium-sized applications.


