

Python的Django框架下管理站点的基本方法

对于某一类网站, 管理界面 是基础设施中非常重要的一部分。 这是以网页和有限的可信任管理者为基础的界面,它可以让你添加,编辑和删除网站内容。 一些常见的例子: 你可以用这个界面发布博客,后台的网站管理者用它来润色读者提交的内容,你的客户用你给他们建立的界面工具更新新闻并发布在网站上,这些都是使用管理界面的例子。
但是管理界面有一问题: 创建它太繁琐。 当你开发对公众的功能时,网页开发是有趣的,但是创建管理界面通常是千篇一律的。 你必须认证用户,显示并管理表格,验证输入的有效性诸如此类。 这很繁琐而且是重复劳动。
Django 在对这些繁琐和重复的工作进行了哪些改进? 它用不能再少的代码为你做了所有的一切。 Django 中创建管理界面已经不是问题。
这一章是关于 Django 的自动管理界面。 这个特性是这样起作用的: 它读取你模式中的元数据,然后提供给你一个强大而且可以使用的界面,网站管理者可以用它立即工作。
请注意我们建议你读这章,即使你不打算用admin。因为我们将介绍一些概念,这些概念可以应用到Django的所有方面,而不仅仅是admin
django.contrib 包
Django自动管理工具是django.contrib的一部分。django.contrib是一套庞大的功能集,它是Django基本代码的组成部分,Django框架就是由众多包含附加组件(add-on)的基本代码构成的。 你可以把django.contrib看作是可选的Python标准库或普遍模式的实际实现。 它们与Django捆绑在一起,这样你在开发中就不用“重复发明轮子”了。
管理工具是本书讲述django.contrib的第一个部分。从技术层面上讲,它被称作django.contrib.admin。django.contrib中其它可用的特性,如用户鉴别系统(django.contrib.auth)、支持匿名会话(django.contrib.sessioins)以及用户评注系统(django.contrib.comments)。这些,我们将在第十六章详细讨论。在成为一个Django专家以前,你将会知道更多django.contrib的特性。 目前,你只需要知道Django自带很多优秀的附加组件,它们都存在于django.contrib包里。
激活管理界面
Django管理站点完全是可选择的,因为仅仅某些特殊类型的站点才需要这些功能。 这意味着你需要在你的项目中花费几个步骤去激活它。
第一步,对你的settings文件做如下这些改变:
将'django.contrib.admin'加入setting的INSTALLED_APPS配置中 (INSTALLED_APPS中的配置顺序是没有关系的, 但是我们喜欢保持一定顺序以方便人来阅读)
保证INSTALLED_APPS中包含'django.contrib.auth','django.contrib.contenttypes'和'django.contrib.sessions',Django的管理工具需要这3个包。 (如果你跟随本文制作mysite项目的话,那么请注意我们在第五章的时候把这三项INSTALLED_APPS条目注释了。现在,请把注释取消。)
确保MIDDLEWARE_CLASSES 包含'django.middleware.common.CommonMiddleware' 、'django.contrib.sessions.middleware.SessionMiddleware' 和'django.contrib.auth.middleware.AuthenticationMiddleware' 。(再次提醒,如果有跟着做mysite的话,请把在第五章做的注释取消。)
运行 python manage.py syncdb 。这一步将生成管理界面使用的额外数据库表。 当你把'django.contrib.auth'加进INSTALLED_APPS后,第一次运行syncdb命令时, 系统会请你创建一个超级用户。 如果你不这么作,你需要运行python manage.py createsuperuser来另外创建一个admin的用户帐号,否则你将不能登入admin (提醒一句: 只有当INSTALLED_APPS包含'django.contrib.auth'时,python manage.py createsuperuser这个命令才可用.)
第三,将admin访问配置在URLconf(记住,在urls.py中). 默认情况下,命令django-admin.py startproject生成的文件urls.py是将Django admin的路径注释掉的,你所要做的就是取消注释。 请注意,以下内容是必须确保存在的:
# Include these import statements...
from django.contrib import admin
admin.autodiscover()

# And include this URLpattern...
urlpatterns = patterns('',
 # ...
 (r'^admin/', include(admin.site.urls)),
 # ...
)
当这一切都配置好后,现在你将发现Django管理工具可以运行了。 启动开发服务器(如前:`` python manage.py runserver`` ),然后在浏览器中访问:http://127.0.0.1:8000/admin/
将你的Models加入到Admin管理中
有一个关键步骤我们还没做。 让我们将自己的模块加入管理工具中,这样我们就能够通过这个漂亮的界面添加、修改和删除数据库中的对象了。
在其中,我们定义了三个模块: Publisher 、 Author 和 Book 。
在`` books`` 目录下(`` mysite/books`` ),创建一个文件:`` admin.py`` ,然后输入以下代码:
from django.contrib import admin
from mysite.books.models import Publisher, Author, Book

admin.site.register(Publisher)
admin.site.register(Author)
admin.site.register(Book)
这些代码通知管理工具为这些模块逐一提供界面。
完成后,打开页面 `` http://127.0.0.1:8000/admin/`` ,你会看到一个Books区域,其中包含Authors、Books和Publishers。 (你可能需要先停止,然后再启动服务(`` runserver`` ),才能使其生效。)
现在你拥有一个功能完整的管理界面来管理这三个模块了。 很简单吧!
花点时间添加和修改记录,以填充数据库。 如果你跟着第五章的例子一起创建Publisher对象的话(并且没有删除),你会在列表中看到那些记录。
这里需要提到的一个特性是,管理工具处理外键和多对多关系(这两种关系可以在`` Book`` 模块中找到)的方法。 作为提醒,这里有个`` Book`` 模块的例子:
class Book(models.Model):
  title = models.CharField(max_length=100)
  authors = models.ManyToManyField(Author)
  publisher = models.ForeignKey(Publisher)
  publication_date = models.DateField()

  def __unicode__(self):
    return self.title
在Add book页面中(`` http://127.0.0.1:8000/admin/books/book/add/`` ),`` 外键`` publisher用一个选择框显示,`` 多对多`` 字段author用一个多选框显示。 点击两个字段后面的绿色加号,可以让你添加相关的记录。 举个例子,如果你点击Publisher后面的加号,你将会得到一个弹出窗口来添加一个publisher。 当你在那个窗口中成功创建了一个publisher后,Add book表单会自动把它更新到字段上去 花巧.

Hot AI Tools

Undresser.AI Undress
AI-powered app for creating realistic nude photos

AI Clothes Remover
Online AI tool for removing clothes from photos.

Undress AI Tool
Undress images for free

Clothoff.io
AI clothes remover

AI Hentai Generator
Generate AI Hentai for free.

Hot Article
Hot Tools

Notepad++7.3.1
Easy-to-use and free code editor

SublimeText3 Chinese version
Chinese version, very easy to use

Zend Studio 13.0.1
Powerful PHP integrated development environment

Dreamweaver CS6
Visual web development tools

SublimeText3 Mac version
God-level code editing software (SublimeText3)
Hot Topics


 Django vs. Flask: A comparative analysis of Python web frameworks
Jan 19, 2024 am 08:36 AM
Django vs. Flask: A comparative analysis of Python web frameworks
Jan 19, 2024 am 08:36 AM
Django and Flask are both leaders in Python Web frameworks, and they both have their own advantages and applicable scenarios. This article will conduct a comparative analysis of these two frameworks and provide specific code examples. Development Introduction Django is a full-featured Web framework, its main purpose is to quickly develop complex Web applications. Django provides many built-in functions, such as ORM (Object Relational Mapping), forms, authentication, management backend, etc. These features allow Django to handle large
 Django Framework Pros and Cons: Everything You Need to Know
Jan 19, 2024 am 09:09 AM
Django Framework Pros and Cons: Everything You Need to Know
Jan 19, 2024 am 09:09 AM
Django is a complete development framework that covers all aspects of the web development life cycle. Currently, this framework is one of the most popular web frameworks worldwide. If you plan to use Django to build your own web applications, then you need to understand the advantages and disadvantages of the Django framework. Here's everything you need to know, including specific code examples. Django advantages: 1. Rapid development-Djang can quickly develop web applications. It provides a rich library and internal
 How to upgrade Django version: steps and considerations
Jan 19, 2024 am 10:16 AM
How to upgrade Django version: steps and considerations
Jan 19, 2024 am 10:16 AM
How to upgrade Django version: steps and considerations, specific code examples required Introduction: Django is a powerful Python Web framework that is continuously updated and upgraded to provide better performance and more features. However, for developers using older versions of Django, upgrading Django may face some challenges. This article will introduce the steps and precautions on how to upgrade the Django version, and provide specific code examples. 1. Back up project files before upgrading Djan
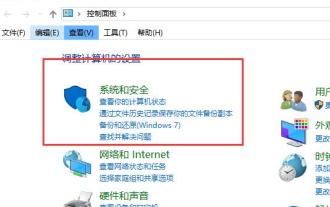 What to do if the right-click menu management cannot be opened in Windows 10
Jan 04, 2024 pm 07:07 PM
What to do if the right-click menu management cannot be opened in Windows 10
Jan 04, 2024 pm 07:07 PM
When we use the win10 system, when we use the mouse to right-click the desktop or the right-click menu, we find that the menu cannot be opened and we cannot use the computer normally. At this time, we need to restore the system to solve the problem. Win10 right-click menu management cannot be opened: 1. First open our control panel, and then click. 2. Then click under Security and Maintenance. 3. Click on the right to restore the system. 4. If it still cannot be used, check whether there is something wrong with the mouse itself. 5. If you are sure there is no problem with the mouse, press + and enter. 6. After the execution is completed, restart the computer.
 Is Django front-end or back-end? check it out!
Jan 19, 2024 am 08:37 AM
Is Django front-end or back-end? check it out!
Jan 19, 2024 am 08:37 AM
Django is a web application framework written in Python that emphasizes rapid development and clean methods. Although Django is a web framework, to answer the question whether Django is a front-end or a back-end, you need to have a deep understanding of the concepts of front-end and back-end. The front end refers to the interface that users directly interact with, and the back end refers to server-side programs. They interact with data through the HTTP protocol. When the front-end and back-end are separated, the front-end and back-end programs can be developed independently to implement business logic and interactive effects respectively, and data exchange.
 How to install django
Dec 19, 2023 am 11:38 AM
How to install django
Dec 19, 2023 am 11:38 AM
To install Django, you can follow the following steps: 1. Open the terminal and enter the "python --version" command to check whether Python is installed; 2. Enter the "pip install django" command on the command line to install Django; 3. Wait for the installation to complete , a success message will appear.
 How to use the Django framework to create a project in PyCharm
Feb 19, 2024 am 08:56 AM
How to use the Django framework to create a project in PyCharm
Feb 19, 2024 am 08:56 AM
Tips on how to create projects using the Django framework in PyCharm, requiring specific code examples. Django is a powerful Python Web framework that provides a series of tools and functions for quickly developing Web applications. PyCharm is an integrated development environment (IDE) developed in Python, which provides a series of convenient functions and tools to increase development efficiency. Combining Django and PyCharm makes it faster and more convenient to create projects
 Learn to use pipenv: Create and manage virtual environments
Jan 16, 2024 am 09:34 AM
Learn to use pipenv: Create and manage virtual environments
Jan 16, 2024 am 09:34 AM
pipenv tutorial: Create and manage virtual environments, specific code examples are required Introduction: With the popularity of Python, the number of project development is also increasing. In order to effectively manage the Python packages used in projects, virtual environments have become an essential tool. In this article, we'll cover how to use pipenv to create and manage virtual environments, and provide practical code examples. What is pipenv? pipenv is a virtual environment management tool widely used by the Python community. It integrates p
