自动化Nginx服务器的反向代理的配置方法

如果可以减少过多的外部隔离的API和简化部署的细节 这会是非常好的。
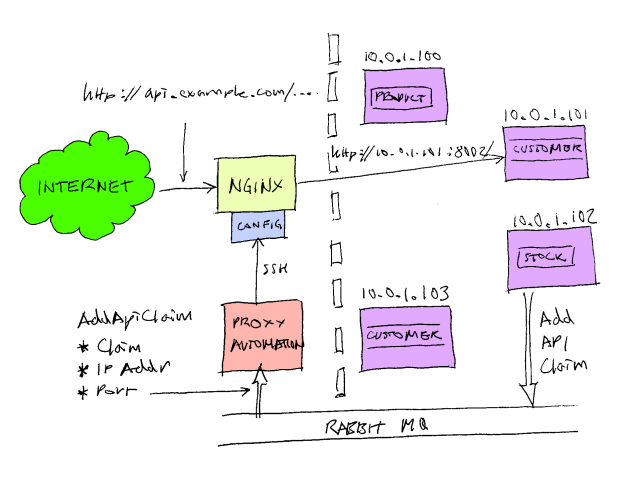
在以前的文章中,我解释了"一些使用反向代理的好处"。在我目前的项目里,我们已经构建分布式面向服务的架构,也显式提供了一个HTTP API,我们使用反向代理将请求路由通过API路由给单个组件。我们选择了Nginx Web这个优秀的服务器作为我们的反向代理,它快速、可靠且易于配置。我们通过它将多个HTTP的API服务聚合到一个URL空间。举例来说,当你键入:
http://api.example.com/product/pinstripe_suit
它将被路由到:
http://10.0.1.101:8001/product/pinstripe_suit
但当你访问:
http://api.example.com/customer/103474783
它将被路由到:
http://10.0.1.104:8003/customer/103474783
对使用者来言,他们觉得是在使用同一个URL空间(http://api.example.com/blah/blah),但在后端不同的顶级分类的URL被路由到不同的后端服务器。 /prodect/...路由到 10.0.1.101:8001, /customer/…则路由到10.0.1.104:8003。 我们也希望这是自动配置。比如说我想创建一个新的组件来记录的库存水平。相比于扩展现有的组件,我更希望能够写另一个独立的可执行文件或提供服务的HTTP端点,然后自动部署成为我的云计算基础架构中的主机之一,并使Nginx的自动将http ://api.example.com/sock/whatever 路由我新组件。 我们也想进行 后端服务的负载平衡,我们也想部署我们的股票 新API的多个服务实例间的Nginx自动轮询。
我们称每个顶级分类(/stock、/produck、/customer)为一个声明。 A组件上线时通过RabbitMQ发布了一个'AddApiClaim'。此消息有3个字段:'声明','IP地址','端口地址'。我们有一个'ProxyAutomation'的特殊组件,这个组件接收这些消息并按要求重写Nginx配置项。它使用SSH和SCP登录到nginx服务器,传输各种配置文件,并指示Nginx的重新加载配置。我们使用the excellent SSH.NET库来进行自动化。
Nginx的配置是一个非常好的事情是支持通配符。看一看我们的顶级配置文件:
...
http {
include /etc/nginx/mime.types;
default_type application/octet-stream;
log_format main '$remote_addr - $remote_user [$time_local] "$request" '
'$status $body_bytes_sent "$http_referer" '
'"$http_user_agent" "$http_x_forwarded_for"';
access_log /var/log/nginx/access.log main;
sendfile on;
keepalive_timeout 65;
include /etc/nginx/conf.d/*.conf;
}
如16行所描述, 将conf.d目录的所有.conf引用到此处.
在conf.d文件夹内,有一个文件包含了所有api.example.com的请求配置:
include /etc/nginx/conf.d/api.example.com.conf.d/upstream.*.conf;
server {
listen 80;
server_name api.example.com;
include /etc/nginx/conf.d/api.example.com.conf.d/location.*.conf;
location / {
root /usr/share/nginx/api.example.com;
index index.html index.htm;
}
}
这段配置让 Nginx 侦听来自 80 端口的 api.example.com 的请求。
这里包括两部分。第一个部分是第一行,我将在以后讨论。第7行表述了将子目录"api.example.com.conf.d"中的location.*.conf引用到配置中来。我们代理服务器的自动化组件添加新的组件(AKA API claims)通过引入新的location.*.conf。举个例子,我们的股票组件可能创建一个location.stock.conf配置文件,像这样:
location /stock/ {
proxy_pass http://stock;
}
这只是简单的告诉Nginx将所有api.example.com/stock/…的代理请求转发到'stock'中定义的后端服务器,这些定义存放在'upstream.*.conf'中。代理自动化组件也引入了一个名为upstream.stock.conf文件,它看起来像这样:
upstream stock {
server 10.0.0.23:8001;
server 10.0.0.23:8002;
}
这些配置告诉Nginx将所有到api.example.com/stock/的请求轮询到给定的地址,在这个例子中两个实例在同一台机器(10.0.0.23)上,一个在8001端口,一个在8002端口。
正如股票组件的部署一样,添加新条目可以同样增加到upstream.stock.conf中。同样,当组件卸载时,只要删除对应条目就可以了,当所有组件移除时,将整个文件已就删除。
这种基础架构可以让我们聚合组件的基础设备。我们可以 通过简单地添加新的组件实例来扩展应用程序。作为组件开发人员也不需要做任何代理配置,只需要确保组件发送了添加或删除API声明的消息就可以了。

Hot AI Tools

Undresser.AI Undress
AI-powered app for creating realistic nude photos

AI Clothes Remover
Online AI tool for removing clothes from photos.

Undress AI Tool
Undress images for free

Clothoff.io
AI clothes remover

AI Hentai Generator
Generate AI Hentai for free.

Hot Article

Hot Tools

Notepad++7.3.1
Easy-to-use and free code editor

SublimeText3 Chinese version
Chinese version, very easy to use

Zend Studio 13.0.1
Powerful PHP integrated development environment

Dreamweaver CS6
Visual web development tools

SublimeText3 Mac version
God-level code editing software (SublimeText3)

Hot Topics
 1376
1376
 52
52
 How to allow external network access to tomcat server
Apr 21, 2024 am 07:22 AM
To allow the Tomcat server to access the external network, you need to: modify the Tomcat configuration file to allow external connections. Add a firewall rule to allow access to the Tomcat server port. Create a DNS record pointing the domain name to the Tomcat server public IP. Optional: Use a reverse proxy to improve security and performance. Optional: Set up HTTPS for increased security.
 How to run thinkphp
Apr 09, 2024 pm 05:39 PM
Steps to run ThinkPHP Framework locally: Download and unzip ThinkPHP Framework to a local directory. Create a virtual host (optional) pointing to the ThinkPHP root directory. Configure database connection parameters. Start the web server. Initialize the ThinkPHP application. Access the ThinkPHP application URL and run it.
 Welcome to nginx!How to solve it?
Apr 17, 2024 am 05:12 AM
To solve the "Welcome to nginx!" error, you need to check the virtual host configuration, enable the virtual host, reload Nginx, if the virtual host configuration file cannot be found, create a default page and reload Nginx, then the error message will disappear and the website will be normal show.
 How to generate URL from html file
Apr 21, 2024 pm 12:57 PM
Converting an HTML file to a URL requires a web server, which involves the following steps: Obtain a web server. Set up a web server. Upload HTML file. Create a domain name. Route the request.
 How to deploy nodejs project to server
Apr 21, 2024 am 04:40 AM
Server deployment steps for a Node.js project: Prepare the deployment environment: obtain server access, install Node.js, set up a Git repository. Build the application: Use npm run build to generate deployable code and dependencies. Upload code to the server: via Git or File Transfer Protocol. Install dependencies: SSH into the server and use npm install to install application dependencies. Start the application: Use a command such as node index.js to start the application, or use a process manager such as pm2. Configure a reverse proxy (optional): Use a reverse proxy such as Nginx or Apache to route traffic to your application
 What are the most common instructions in a dockerfile
Apr 07, 2024 pm 07:21 PM
The most commonly used instructions in Dockerfile are: FROM: Create a new image or derive a new image RUN: Execute commands (install software, configure the system) COPY: Copy local files to the image ADD: Similar to COPY, it can automatically decompress tar archives or obtain URL files CMD: Specify the command when the container starts EXPOSE: Declare the container listening port (but not public) ENV: Set the environment variable VOLUME: Mount the host directory or anonymous volume WORKDIR: Set the working directory in the container ENTRYPOINT: Specify what to execute when the container starts Executable file (similar to CMD, but cannot be overwritten)
 Can nodejs be accessed from the outside?
Apr 21, 2024 am 04:43 AM
Yes, Node.js can be accessed from the outside. You can use the following methods: Use Cloud Functions to deploy the function and make it publicly accessible. Use the Express framework to create routes and define endpoints. Use Nginx to reverse proxy requests to Node.js applications. Use Docker containers to run Node.js applications and expose them through port mapping.
 How to deploy and maintain a website using PHP
May 03, 2024 am 08:54 AM
To successfully deploy and maintain a PHP website, you need to perform the following steps: Select a web server (such as Apache or Nginx) Install PHP Create a database and connect PHP Upload code to the server Set up domain name and DNS Monitoring website maintenance steps include updating PHP and web servers, and backing up the website , monitor error logs and update content.


