

初步探究Python程序的执行原理

1. 过程概述
Python先把代码(.py文件)编译成字节码,交给字节码虚拟机,然后虚拟机一条一条执行字节码指令,从而完成程序的执行。
2. 字节码
字节码在Python虚拟机程序里对应的是PyCodeObject对象。
.pyc文件是字节码在磁盘上的表现形式。
3. pyc文件
PyCodeObject对象的创建时机是模块加载的时候,即import。
Python test.py会对test.py进行编译成字节码并解释执行,但是不会生成test.pyc。
如果test.py加载了其他模块,如import util,Python会对util.py进行编译成字节码,生成util.pyc,然后对字节码解释执行。
如果想生成test.pyc,我们可以使用Python内置模块py_compile来编译。
加载模块时,如果同时存在.py和.pyc,Python会尝试使用.pyc,如果.pyc的编译时间早于.py的修改时间,则重新编译.py并更新.pyc。
4. PyCodeObject
Python代码的编译结果就是PyCodeObject对象。
typedef struct {
  PyObject_HEAD
  int co_argcount;    /* 位置参数个数 */
  int co_nlocals;     /* 局部变量个数 */
  int co_stacksize;    /* 栈大小 */
  int co_flags;
  PyObject *co_code;   /* 字节码指令序列 */
  PyObject *co_consts;  /* 所有常量集合 */
  PyObject *co_names;   /* 所有符号名称集合 */
  PyObject *co_varnames; /* 局部变量名称集合 */
  PyObject *co_freevars; /* 闭包用的的变量名集合 */
  PyObject *co_cellvars; /* 内部嵌套函数引用的变量名集合 */
  /* The rest doesn't count for hash/cmp */
  PyObject *co_filename; /* 代码所在文件名 */
  PyObject *co_name;   /* 模块名|函数名|类名 */
  int co_firstlineno;   /* 代码块在文件中的起始行号 */
  PyObject *co_lnotab;  /* 字节码指令和行号的对应关系 */
  void *co_zombieframe;  /* for optimization only (see frameobject.c) */
} PyCodeObject;
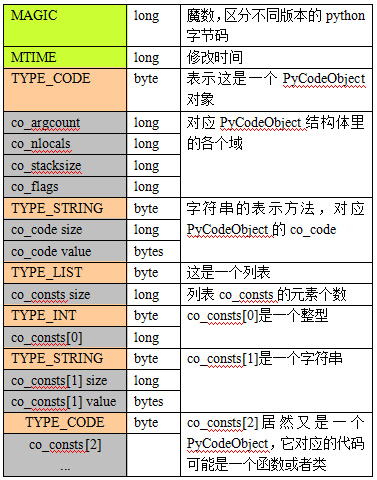
5. pyc文件格式
加载模块时,模块对应的PyCodeObject对象被写入.pyc文件,格式如下:
6. 分析字节码
6.1 解析PyCodeObject
Python提供了内置函数compile可以编译Python代码和查看PyCodeObject对象,如下:
Python代码[test.py]
s = ”hello”

def func():
  print s

func()

s = ”hello”

def func():
  print s

func()
在Python交互式shell里编译代码得到PyCodeObject对象:

dir(co)已经列出co的各个域,想查看某个域直接在终端输出即可:

test.py的PyCodeObject
co.co_argcount  0
co.co_nlocals   0
co.co_names    (‘s', 'func')
co.co_varnames  (‘s', 'func')
co.co_consts   (‘hello', <code object func at 0x2aaeeec57110, file ”test.py”, line 3>, None)
co.co_code    'd\x00\x00Z\x00\x00d\x01\x00\x84\x00\x00Z\x01\x00e\x01\x00\x83\x00\x00\x01d\x02\x00S'

co.co_argcount  0
co.co_nlocals   0
co.co_names    (‘s', 'func')
co.co_varnames  (‘s', 'func')
co.co_consts   (‘hello', <code object func at 0x2aaeeec57110, file ”test.py”, line 3>, None)
co.co_code    'd\x00\x00Z\x00\x00d\x01\x00\x84\x00\x00Z\x01\x00e\x01\x00\x83\x00\x00\x01d\x02\x00S'
Python解释器会为函数也生成的字节码PyCodeObject对象,见上面的co_consts[1]
func的PyCodeObject
func.co_argcount  0
func.co_nlocals  0
func.co_names   (‘s',)
func.co_varnames  ()
func.co_consts   (None,)
func.co_code    ‘t\x00\x00GHd\x00\x00S'

func.co_argcount  0
func.co_nlocals  0
func.co_names   (‘s',)
func.co_varnames  ()
func.co_consts   (None,)
func.co_code    ‘t\x00\x00GHd\x00\x00S'
co_code是指令序列,是一串二进制流,它的格式和解析方法见6.2。
6.2 解析指令序列
指令序列co_code的格式

Python内置的dis模块可以解析co_code,如下图:
test.py的指令序列

func函数的指令序列

第一列表示以下几个指令在py文件中的行号;
第二列是该指令在指令序列co_code里的偏移量;
第三列是指令opcode的名称,分为有操作数和无操作数两种,opcode在指令序列中是一个字节的整数;
第四列是操作数oparg,在指令序列中占两个字节,基本都是co_consts或者co_names的下标;
第五列带括号的是操作数说明。
7. 执行字节码
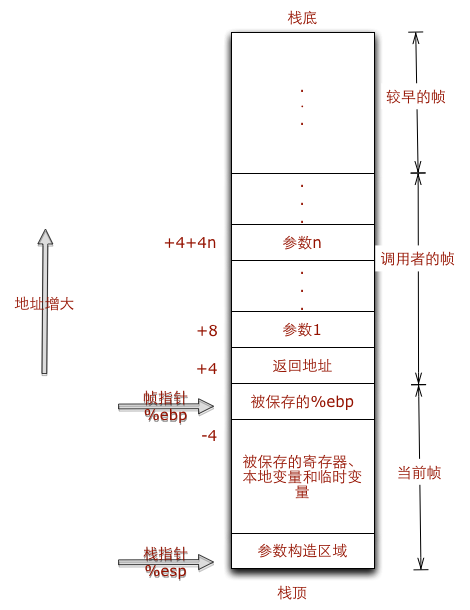
Python虚拟机的原理就是模拟可执行程序再X86机器上的运行,X86的运行时栈帧如下图:
假如test.py用C语言来实现,会是下面这个样子:
const char *s = “hello”;

void func() {
  printf(“%s\n”, s);
}

int main() {
  func();
  return 0;
}

const char *s = “hello”;

void func() {
  printf(“%s\n”, s);
}

int main() {
  func();
  return 0;
}
Python虚拟机的原理就是模拟上述行为。当发生函数调用时,创建新的栈帧,对应Python的实现就是PyFrameObject对象。
7.1 PyFrameObject
typedef struct _frame {
  PyObject_VAR_HEAD
  struct _frame *f_back;  /* 调用者的帧 */
  PyCodeObject *f_code;   /* 帧对应的字节码对象 */
  PyObject *f_builtins;   /* 内置名字空间 */
  PyObject *f_globals;   /* 全局名字空间 */
  PyObject *f_locals;    /* 本地名字空间 */
  PyObject **f_valuestack; /* 运行时栈底 */
  PyObject **f_stacktop;  /* 运行时栈顶 */
  …….
}
那么对应Python的运行时栈就是这样子:

7.2 执行指令
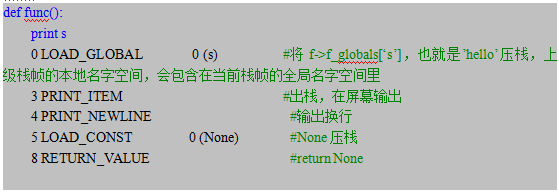
执行test.py的字节码时,会先创建一个栈帧,以下用f表示当前栈帧,执行过程注释如下:
test.py的符号名集合和常量集合
co.co_names  (‘s', 'func')
co.co_consts (‘hello', <code object func at 0x2aaeeec57110, file ”test.py”, line 3>, None)

co.co_names  (‘s', 'func')
co.co_consts (‘hello', <code object func at 0x2aaeeec57110, file ”test.py”, line 3>, None)
test.py的指令序列

上面的CALL_FUNCTION指令执行时,会创建新的栈帧,并执行func的字节码指令,以下用f表示当前栈帧,func的字节码执行过程如下:
func函数的符号名集合和常量集合
func.co_names    (‘s',)
func.co_consts   (None,)

func.co_names    (‘s',)
func.co_consts   (None,)
func函数的指令序列
7.3 查看栈帧
如果你想查看当前栈帧,Python提供了sys._getframe()方法可以获取当前栈帧,你只需要在代码里加入代码如下:
def func():
  import sys
  frame = sys._getframe()
  print frame.f_locals
  print frame.f_globals
  print frame.f_back.f_locals
  #你可以打印frame的各个域
  print s

Hot AI Tools

Undresser.AI Undress
AI-powered app for creating realistic nude photos

AI Clothes Remover
Online AI tool for removing clothes from photos.

Undress AI Tool
Undress images for free

Clothoff.io
AI clothes remover

AI Hentai Generator
Generate AI Hentai for free.

Hot Article
Hot Tools

Notepad++7.3.1
Easy-to-use and free code editor

SublimeText3 Chinese version
Chinese version, very easy to use

Zend Studio 13.0.1
Powerful PHP integrated development environment

Dreamweaver CS6
Visual web development tools

SublimeText3 Mac version
God-level code editing software (SublimeText3)
Hot Topics
 1377
1377
 52
52

 Do mysql need to pay
Apr 08, 2025 pm 05:36 PM
Do mysql need to pay
Apr 08, 2025 pm 05:36 PM
MySQL has a free community version and a paid enterprise version. The community version can be used and modified for free, but the support is limited and is suitable for applications with low stability requirements and strong technical capabilities. The Enterprise Edition provides comprehensive commercial support for applications that require a stable, reliable, high-performance database and willing to pay for support. Factors considered when choosing a version include application criticality, budgeting, and technical skills. There is no perfect option, only the most suitable option, and you need to choose carefully according to the specific situation.
 How to use mysql after installation
Apr 08, 2025 am 11:48 AM
How to use mysql after installation
Apr 08, 2025 am 11:48 AM
The article introduces the operation of MySQL database. First, you need to install a MySQL client, such as MySQLWorkbench or command line client. 1. Use the mysql-uroot-p command to connect to the server and log in with the root account password; 2. Use CREATEDATABASE to create a database, and USE select a database; 3. Use CREATETABLE to create a table, define fields and data types; 4. Use INSERTINTO to insert data, query data, update data by UPDATE, and delete data by DELETE. Only by mastering these steps, learning to deal with common problems and optimizing database performance can you use MySQL efficiently.
 MySQL can't be installed after downloading
Apr 08, 2025 am 11:24 AM
MySQL can't be installed after downloading
Apr 08, 2025 am 11:24 AM
The main reasons for MySQL installation failure are: 1. Permission issues, you need to run as an administrator or use the sudo command; 2. Dependencies are missing, and you need to install relevant development packages; 3. Port conflicts, you need to close the program that occupies port 3306 or modify the configuration file; 4. The installation package is corrupt, you need to download and verify the integrity; 5. The environment variable is incorrectly configured, and the environment variables must be correctly configured according to the operating system. Solve these problems and carefully check each step to successfully install MySQL.
 MySQL download file is damaged and cannot be installed. Repair solution
Apr 08, 2025 am 11:21 AM
MySQL download file is damaged and cannot be installed. Repair solution
Apr 08, 2025 am 11:21 AM
MySQL download file is corrupt, what should I do? Alas, if you download MySQL, you can encounter file corruption. It’s really not easy these days! This article will talk about how to solve this problem so that everyone can avoid detours. After reading it, you can not only repair the damaged MySQL installation package, but also have a deeper understanding of the download and installation process to avoid getting stuck in the future. Let’s first talk about why downloading files is damaged. There are many reasons for this. Network problems are the culprit. Interruption in the download process and instability in the network may lead to file corruption. There is also the problem with the download source itself. The server file itself is broken, and of course it is also broken when you download it. In addition, excessive "passionate" scanning of some antivirus software may also cause file corruption. Diagnostic problem: Determine if the file is really corrupt
 Does mysql need the internet
Apr 08, 2025 pm 02:18 PM
Does mysql need the internet
Apr 08, 2025 pm 02:18 PM
MySQL can run without network connections for basic data storage and management. However, network connection is required for interaction with other systems, remote access, or using advanced features such as replication and clustering. Additionally, security measures (such as firewalls), performance optimization (choose the right network connection), and data backup are critical to connecting to the Internet.
 How to optimize database performance after mysql installation
Apr 08, 2025 am 11:36 AM
How to optimize database performance after mysql installation
Apr 08, 2025 am 11:36 AM
MySQL performance optimization needs to start from three aspects: installation configuration, indexing and query optimization, monitoring and tuning. 1. After installation, you need to adjust the my.cnf file according to the server configuration, such as the innodb_buffer_pool_size parameter, and close query_cache_size; 2. Create a suitable index to avoid excessive indexes, and optimize query statements, such as using the EXPLAIN command to analyze the execution plan; 3. Use MySQL's own monitoring tool (SHOWPROCESSLIST, SHOWSTATUS) to monitor the database health, and regularly back up and organize the database. Only by continuously optimizing these steps can the performance of MySQL database be improved.
 How to optimize MySQL performance for high-load applications?
Apr 08, 2025 pm 06:03 PM
How to optimize MySQL performance for high-load applications?
Apr 08, 2025 pm 06:03 PM
MySQL database performance optimization guide In resource-intensive applications, MySQL database plays a crucial role and is responsible for managing massive transactions. However, as the scale of application expands, database performance bottlenecks often become a constraint. This article will explore a series of effective MySQL performance optimization strategies to ensure that your application remains efficient and responsive under high loads. We will combine actual cases to explain in-depth key technologies such as indexing, query optimization, database design and caching. 1. Database architecture design and optimized database architecture is the cornerstone of MySQL performance optimization. Here are some core principles: Selecting the right data type and selecting the smallest data type that meets the needs can not only save storage space, but also improve data processing speed.
 Solutions to the service that cannot be started after MySQL installation
Apr 08, 2025 am 11:18 AM
Solutions to the service that cannot be started after MySQL installation
Apr 08, 2025 am 11:18 AM
MySQL refused to start? Don’t panic, let’s check it out! Many friends found that the service could not be started after installing MySQL, and they were so anxious! Don’t worry, this article will take you to deal with it calmly and find out the mastermind behind it! After reading it, you can not only solve this problem, but also improve your understanding of MySQL services and your ideas for troubleshooting problems, and become a more powerful database administrator! The MySQL service failed to start, and there are many reasons, ranging from simple configuration errors to complex system problems. Let’s start with the most common aspects. Basic knowledge: A brief description of the service startup process MySQL service startup. Simply put, the operating system loads MySQL-related files and then starts the MySQL daemon. This involves configuration
