
 Web Front-end
JS Tutorial
jQuery example of the effect of enlarging the picture when the mouse is hovered_jquery
Web Front-end
JS Tutorial
jQuery example of the effect of enlarging the picture when the mouse is hovered_jquery
jQuery example of the effect of enlarging the picture when the mouse is hovered_jquery

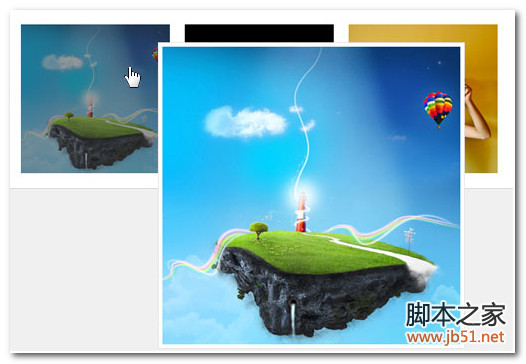
This effect originally originated from an idea of Comrade Xiao Min. When I first started doing it, I could only achieve that the pop-up picture was fixed and could not move with the mouse. Finally, I improved it and finally achieved a more ideal effect. Today I will share my experience in creating this effect with you. Let’s take a look at the final effect demonstration first:
HTML structure part:
First write an unordered list structure. The img tag in the a tag is used to store small pictures. The a tag adds a rel attribute to store the path of the large picture.


< ;LI sizcache="6" sizset="9">
CSS style sheet part:
bigimage uses jQuery Create the id of a p tag to store large pictures, set its style to absolute positioning, and hide it first. Adding a black background to the a tag is to pave the way for the darkening effect of the image. Just like that, a simple photo album effect is ready.
ul#gallery { list-style:none; width: 660px; margin:0 auto 10px; padding-left:20px; border:1px solid #d3d3d3; background:#fff; overflow:hidden; }
ul#gallery li { width:200px; height:200px; float:left ; margin:20px 20px 20px 0; }
ul#gallery li a.smallimage { background:#333; /*Add a black background to pave the way for the darkening effect of the image*/ display:block; width:200px; height:200px; }
#bigimage { position:absolute; display:none; /*Set the parent label of the large image to relative positioning and set the display style to hidden*/ }
#bigimage img { width:400px; height:400px; padding:5px; background:#fff; border:1px solid #e3e3e3; }
jQuery code part:
First declare 2 variables x and y to store large images The distance from the mouse. Add a p tag with the ID bigimage to the body to store the large image. The path of the large image is included in the rel attribute of the a tag. When the mouse hovers over the small picture, the obtained coordinates of the mouse in the browser are assigned to the coordinates of the absolute positioning of the large picture, and displayed with a fade-in effect. After that, bind a mousemove event to the small picture, that is, when the mouse moves, the large picture will move with the mouse. Look at the following code:
At this point, the effect is almost there, but as Comrade Lan Qiufeng mentioned, The effect is not perfect yet. If the large picture that pops up exceeds the width of the browser, a scroll bar will appear, which is really bad for the user experience. I took advantage of the time on the weekend and made modifications based on the original.
Let’s analyze the idea first. By default, the position of the large picture that pops up is always to the right of the current mouse pointer. If the width of the current mouse pointer from the right border of the browser is less than the width of the large picture that pops up, then Pictures may overflow the browser. Then just write a statement to determine whether the width of the current mouse pointer from the border on the right side of the browser is smaller than the width of the large image, and then display it based on this judgment.
With the above idea, it is easy to handle. In order to make the code more concise and improve reusability, I added a new widthJudge function to judge the width:
function widthJudge(e){
//The total width of the page minus the current X coordinate of the mouse is the width of the right border
var marginRight = document.documentElement.clientWidth - e.pageX;
// The width of the large picture of the pop -up
var ImageWidth = $ ("#Bigimage"). Width ()
// > if(marginRight < imageWidth)
{
//Recalculate the value of variable x
x = imageWidth 22;
Get the new value of x
$("#bigimage").css({top:(e.pageY - y ) 'px',left:(e.pageX - x ) 'px'});
If the value is enough to display a large image, it will still be displayed in its original position
$("#bigimage").css({top:(e.pageY - y ) 'px',left:(e.pageX x ) 'px '});
};
}
Finally combined with the above code, the complete jQuery code part is as follows:
Copy code

Hot AI Tools

Undresser.AI Undress
AI-powered app for creating realistic nude photos

AI Clothes Remover
Online AI tool for removing clothes from photos.

Undress AI Tool
Undress images for free

Clothoff.io
AI clothes remover

Video Face Swap
Swap faces in any video effortlessly with our completely free AI face swap tool!

Hot Article
Hot Tools

Notepad++7.3.1
Easy-to-use and free code editor

SublimeText3 Chinese version
Chinese version, very easy to use

Zend Studio 13.0.1
Powerful PHP integrated development environment

Dreamweaver CS6
Visual web development tools

SublimeText3 Mac version
God-level code editing software (SublimeText3)
Hot Topics
 1387
1387
 52
52

 How to disable taskbar thumbnail preview in Win11? Turn off the taskbar icon display thumbnail technique by moving the mouse
Feb 29, 2024 pm 03:20 PM
How to disable taskbar thumbnail preview in Win11? Turn off the taskbar icon display thumbnail technique by moving the mouse
Feb 29, 2024 pm 03:20 PM
This article will introduce how to turn off the thumbnail function displayed when the mouse moves the taskbar icon in Win11 system. This feature is turned on by default and displays a thumbnail of the application's current window when the user hovers the mouse pointer over an application icon on the taskbar. However, some users may find this feature less useful or disruptive to their experience and want to turn it off. Taskbar thumbnails can be fun, but they can also be distracting or annoying. Considering how often you hover over this area, you may have inadvertently closed important windows a few times. Another drawback is that it uses more system resources, so if you've been looking for a way to be more resource efficient, we'll show you how to disable it. but
 How to solve the problem of automatically saving pictures when publishing on Xiaohongshu? Where is the automatically saved image when posting?
Mar 22, 2024 am 08:06 AM
How to solve the problem of automatically saving pictures when publishing on Xiaohongshu? Where is the automatically saved image when posting?
Mar 22, 2024 am 08:06 AM
With the continuous development of social media, Xiaohongshu has become a platform for more and more young people to share their lives and discover beautiful things. Many users are troubled by auto-save issues when posting images. So, how to solve this problem? 1. How to solve the problem of automatically saving pictures when publishing on Xiaohongshu? 1. Clear the cache First, we can try to clear the cache data of Xiaohongshu. The steps are as follows: (1) Open Xiaohongshu and click the "My" button in the lower right corner; (2) On the personal center page, find "Settings" and click it; (3) Scroll down and find the "Clear Cache" option. Click OK. After clearing the cache, re-enter Xiaohongshu and try to post pictures to see if the automatic saving problem is solved. 2. Update the Xiaohongshu version to ensure that your Xiaohongshu
 How to post pictures in TikTok comments? Where is the entrance to the pictures in the comment area?
Mar 21, 2024 pm 09:12 PM
How to post pictures in TikTok comments? Where is the entrance to the pictures in the comment area?
Mar 21, 2024 pm 09:12 PM
With the popularity of Douyin short videos, user interactions in the comment area have become more colorful. Some users wish to share images in comments to better express their opinions or emotions. So, how to post pictures in TikTok comments? This article will answer this question in detail and provide you with some related tips and precautions. 1. How to post pictures in Douyin comments? 1. Open Douyin: First, you need to open Douyin APP and log in to your account. 2. Find the comment area: When browsing or posting a short video, find the place where you want to comment and click the "Comment" button. 3. Enter your comment content: Enter your comment content in the comment area. 4. Choose to send a picture: In the interface for entering comment content, you will see a "picture" button or a "+" button, click
 Razer | Pokémon Gengar wireless mouse and mouse pad are now available, with a set price of 1,549 yuan
Jul 19, 2024 am 04:17 AM
Razer | Pokémon Gengar wireless mouse and mouse pad are now available, with a set price of 1,549 yuan
Jul 19, 2024 am 04:17 AM
According to news from this site on July 12, Razer today announced the launch of the Razer|Pokémon Gengar wireless mouse and mouse pad. The single product prices are 1,299 yuan and 299 yuan respectively, and the package price including the two products is 1,549 yuan. This is not the first time that Razer has launched Gengar co-branded peripheral products. In 2023, Razer launched the Gengar-style Yamata Orochi V2 gaming mouse. The two new products launched this time all use a dark purple background similar to the appearance of the Ghost, Ghost, and Gengar families. They are printed with the outlines of these three Pokémon and Poké Balls, with the character Gengar in the middle. A large, colorful image of a classic ghost-type Pokémon. This site found that the Razer|Pokémon Gengar wireless mouse is based on the previously released Viper V3 Professional Edition. Its overall weight is 55g and equipped with Razer’s second-generation FOC
 HP launches Professor 1 three-mode soft mouse: 4000DPI, Blue Shadow RAW3220, initial price 99 yuan
Apr 01, 2024 am 09:11 AM
HP launches Professor 1 three-mode soft mouse: 4000DPI, Blue Shadow RAW3220, initial price 99 yuan
Apr 01, 2024 am 09:11 AM
According to news from this website on March 31, HP recently launched a Professor1 three-mode Bluetooth mouse on JD.com, available in black and white milk tea colors, with an initial price of 99 yuan, and a deposit of 10 yuan is required. According to reports, this mouse weighs 106 grams, adopts ergonomic design, measures 127.02x79.59x51.15mm, has seven optional 4000DPI levels, is equipped with a Blue Shadow RAW3220 sensor, and uses a 650 mAh battery. It is said that it can be used on a single charge. 2 months. The mouse parameter information attached to this site is as follows:
 6 Ways to Make Pictures Sharper on iPhone
Mar 04, 2024 pm 06:25 PM
6 Ways to Make Pictures Sharper on iPhone
Mar 04, 2024 pm 06:25 PM
Apple's recent iPhones capture memories with crisp detail, saturation and brightness. But sometimes, you may encounter some issues that may cause the image to look less clear. While autofocus on iPhone cameras has come a long way, allowing you to take photos quickly, the camera can mistakenly focus on the wrong subject in certain situations, making the photo blurry in unwanted areas. If your photos on your iPhone look out of focus or lack sharpness overall, the following post should help you make them sharper. How to Make Pictures Clearer on iPhone [6 Methods] You can try using the native Photos app to clean up your photos. If you want more features and options
 How to make ppt pictures appear one by one
Mar 25, 2024 pm 04:00 PM
How to make ppt pictures appear one by one
Mar 25, 2024 pm 04:00 PM
In PowerPoint, it is a common technique to display pictures one by one, which can be achieved by setting animation effects. This guide details the steps to implement this technique, including basic setup, image insertion, adding animation, and adjusting animation order and timing. Additionally, advanced settings and adjustments are provided, such as using triggers, adjusting animation speed and order, and previewing animation effects. By following these steps and tips, users can easily set up pictures to appear one after another in PowerPoint, thereby enhancing the visual impact of the presentation and grabbing the attention of the audience.
 VGN co-branded 'Elden's Circle' keyboard and mouse series products are now on the shelves: Lani / Faded One custom theme, starting from 99 yuan
Aug 12, 2024 pm 10:45 PM
VGN co-branded 'Elden's Circle' keyboard and mouse series products are now on the shelves: Lani / Faded One custom theme, starting from 99 yuan
Aug 12, 2024 pm 10:45 PM
According to news from this site on August 12, VGN launched the co-branded "Elden Ring" keyboard and mouse series on August 6, including keyboards, mice and mouse pads, designed with a customized theme of Lani/Faded One. The current series of products It has been put on JD.com, priced from 99 yuan. The co-branded new product information attached to this site is as follows: VGN丨Elden Law Ring S99PRO Keyboard This keyboard uses a pure aluminum alloy shell, supplemented by a five-layer silencer structure, uses a GASKET leaf spring structure, has a single-key slotted PCB, and the original height PBT material Keycaps, aluminum alloy personalized backplane; supports three-mode connection and SMARTSPEEDX low-latency technology; connected to VHUB, it can manage multiple devices in one stop, starting at 549 yuan. VGN丨Elden French Ring F1PROMAX wireless mouse the mouse
