
 System Tutorial
Windows Series
ASUS Tianxuan 4_Plus13 generation how to reinstall the system win7
System Tutorial
Windows Series
ASUS Tianxuan 4_Plus13 generation how to reinstall the system win7
ASUS Tianxuan 4_Plus13 generation how to reinstall the system win7
May 30, 2024 am 11:56 AM
First of all, let us talk about the 13th generation of ASUS Tianxuan 4 Plus. This is a powerful computer! Its performance is excellent and gives you a smooth usage experience. But over time, the system may become slow, unstable, or even have various problems. Sometimes we need to give the computer a "general cleaning" to make it rejuvenated! How to reinstall the system win7 on the ASUS Select 4 Plus 13th generation? You don't have to worry too much, this process may be much simpler than you think. For specific tutorials, please read below
How to reinstall win7 system on ASUS Tianxuan 4 Plus 13th generation?
Dear friends, hello everyone! Today I will bring you an article about ASUS This tutorial on how to reinstall win7 system on Tianxuan 4 Plus 13th generation, I hope it will be helpful to everyone!
1. Preparation:
1. Download the Windows 7 Ultimate image file.
2. Prepare a USB flash drive with a capacity of at least 8G for making a boot disk.
3. Back up important data on your phone just in case.
2. Detailed explanation of the steps:
1. Insert the USB flash drive into the computer, open the settings of ASUS Tianxuan 4 Plus 13th generation, select the storage device, and set the USB flash drive as the first startup item. This step is very important, otherwise you cannot enter the PE system for operation.
2. Download and install one-click U disk creation tools, such as Chinese cabbage, Laomaotao, etc. Taking Chinese cabbage as an example, open the Chinese cabbage USB flash drive creation tool, select the Windows 7 Ultimate image file, and click to start creating.
3. Wait for the creation to be completed. At this time, your USB flash drive has become a boot disk that can boot Windows 7 system.
4. Restart ASUS Tianxuan 4 Plus 13th generation, enter the BIOS settings according to the startup sequence just set, and change the startup item to USB disk.
6. After entering the PE system, open the "PE One-click Installation" icon on the desktop, select the one-click partition of the disk, and format the C drive into NTFS format. Then open "My Computer", find the Windows 7 image file you just downloaded, and double-click to run the installer.
7. Follow the installation program prompts, select settings such as language, time and currency format, keyboard input method, etc., and then click "Next".
The above is the detailed content of ASUS Tianxuan 4_Plus13 generation how to reinstall the system win7. For more information, please follow other related articles on the PHP Chinese website!

Hot Article

Hot tools Tags

Hot Article

Hot Article Tags

Notepad++7.3.1
Easy-to-use and free code editor

SublimeText3 Chinese version
Chinese version, very easy to use

Zend Studio 13.0.1
Powerful PHP integrated development environment

Dreamweaver CS6
Visual web development tools

SublimeText3 Mac version
God-level code editing software (SublimeText3)
Hot Topics


 PowerToys Is the Ultimate Work From Home Companion App
Mar 03, 2025 am 10:07 AM
PowerToys Is the Ultimate Work From Home Companion App
Mar 03, 2025 am 10:07 AM
PowerToys Is the Ultimate Work From Home Companion App
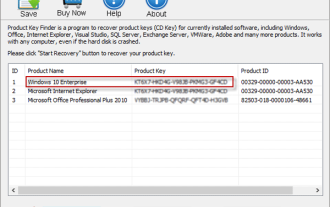 How to Find the Product Key for Windows 10
Mar 04, 2025 am 01:46 AM
How to Find the Product Key for Windows 10
Mar 04, 2025 am 01:46 AM
How to Find the Product Key for Windows 10
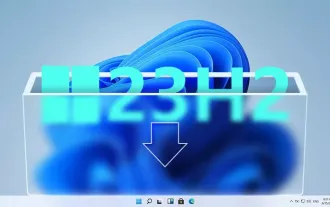 How to Install Windows 11 23H2 on Unsupported PC
Mar 03, 2025 pm 12:55 PM
How to Install Windows 11 23H2 on Unsupported PC
Mar 03, 2025 pm 12:55 PM
How to Install Windows 11 23H2 on Unsupported PC
 How to Change the Font and Layout of PowerShell Window
Mar 03, 2025 pm 01:03 PM
How to Change the Font and Layout of PowerShell Window
Mar 03, 2025 pm 01:03 PM
How to Change the Font and Layout of PowerShell Window
 Top 3 Windows 11 Gaming Features That Outshine Windows 10
Mar 16, 2025 am 12:17 AM
Top 3 Windows 11 Gaming Features That Outshine Windows 10
Mar 16, 2025 am 12:17 AM
Top 3 Windows 11 Gaming Features That Outshine Windows 10

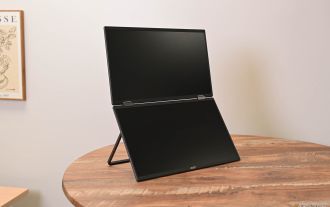 Acer PD163Q Dual Portable Monitor Review: I Really Wanted to Love This
Mar 18, 2025 am 03:04 AM
Acer PD163Q Dual Portable Monitor Review: I Really Wanted to Love This
Mar 18, 2025 am 03:04 AM
Acer PD163Q Dual Portable Monitor Review: I Really Wanted to Love This
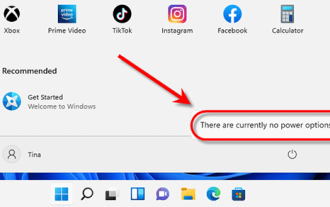 Fix 'There Are Currently No Power Options Available' in Windows 11
Mar 03, 2025 pm 12:58 PM
Fix 'There Are Currently No Power Options Available' in Windows 11
Mar 03, 2025 pm 12:58 PM
Fix 'There Are Currently No Power Options Available' in Windows 11
