
 System Tutorial
LINUX
Application of PXE network installation and initialization of memory disk in CentOS7
System Tutorial
LINUX
Application of PXE network installation and initialization of memory disk in CentOS7
Application of PXE network installation and initialization of memory disk in CentOS7

Answer 2: The PXE network installation of CentOS7 includes the following steps: 1. Plan a chemical machine with CentOS7 installed as a PXE server. Make sure the machine has enough C drive space to store the installation image and other files. 2. Install and configure DHCP and TFTP services on the PXE server. DHCP is used to assign IP addresses to clients and provide boot information; TFTP is used to transfer boot loaders and installation images. 3. Create the TFTP root directory linux on the PXE server to view the operating system, and copy the CentOS7 boot loader and installation image to this directory. 4. Go into the PXE server's DHCP configuration file and configure the IP address range and the path to the boot loader and installation image. Make sure the path to the bootloader is correct and points to the file in the TFTP root directory.
5. Start the DHCP and TFTP services on the PXE server. 6. Start on the client computer where network installation is to be performed, and set the boot order to network boot in the BIOS or UEFI settings. 7. The client obtains an IP address through DHCP request, and then downloads the bootloader through TFTP. 8. The boot loader downloads the core installation program (vmlinuz) and initializes the video memory c drive (initrd.img) from the TFTP server. 9. After the client computer is downloaded through TFTP, the bootloader will load the core installation program and initialize the video memory c drive. 10. The boot loader will step into a graphical or text interface and the user can select the installation type, partitioning and other installation options. 11. After the user settings are completed, the installer will start to manually install CentOS7. 12. Finally, the system will restart and step into the newly installed CentOS7 operating system. The above are the steps for PXE network installation of CentOS7. Depending on the actual environment and needs, additional configuration and steps may be required. Please note that PXE network installation requires certain network and system management knowledge to ensure correct configuration and smooth installation.  Answer 3: Installing CentOS7 using PXE network is a convenient and fast installation method. The following are the steps for CentOS7PXE network installation: 1. First, you need a server with CentOS7 installed as a PXE server. Make sure the server is connected to the network and has DHCP and TFTP services.
2. Install and configure DHCP server. A DHCP server is used to assign IP addresses to newly installed computers. To batch install linux
on CentOS7, you can use the yum command to install the dhcp software package. After the installation is complete, edit the DHCP configuration in the /etc/dhcp/dhcpd.conf file, specify the relevant information of the DHCP server such as subnet, gateway, DNS, etc., and specify the location of the PXE initiator. 3. Install and configure the TFTP server. A TFTP server is used to transfer the launcher and related files. You can also use the yum command to install the tftp package. After the installation is complete, edit the configuration of the TFTP service in the /etc/xinetd.d/tftp file and specify the relevant information of the TFTP server. 4. Prepare the PXE initiator and related files on the PXE server. PXE launcher is a program used to boot a newly installed computer. First, mount the CentOS7 installation CD image file to a directory. After that, copy the PXE-related files to the root directory of the TFTP server, including pxelinux.0, vmlinuz, initrd.img, etc. 5. Configure the BIOS of the newly installed computer. Make sure that the linux shell in the BIOS settings of the newly installed computer has the PXE boot function enabled and the PXE boot device is set as preferred. 6. Start installing the new computer. When a new computer boots up, it sends a DHCP request and receives information back from the PXE server. After getting the response from the TFTP server, the new computer will download the PXE launcher and related filesBatch installation of linux###, and install it according to the instructions of the launcher. Through the above steps, you can implement PXE network installation of CentOS7. These methods can greatly simplify the installation process of a large number of computers and improve work efficiency. ### ###The above is the detailed content of Application of PXE network installation and initialization of memory disk in CentOS7. For more information, please follow other related articles on the PHP Chinese website!

Hot AI Tools

Undresser.AI Undress
AI-powered app for creating realistic nude photos

AI Clothes Remover
Online AI tool for removing clothes from photos.

Undress AI Tool
Undress images for free

Clothoff.io
AI clothes remover

Video Face Swap
Swap faces in any video effortlessly with our completely free AI face swap tool!

Hot Article
Hot Tools

Notepad++7.3.1
Easy-to-use and free code editor

SublimeText3 Chinese version
Chinese version, very easy to use

Zend Studio 13.0.1
Powerful PHP integrated development environment

Dreamweaver CS6
Visual web development tools

SublimeText3 Mac version
God-level code editing software (SublimeText3)
Hot Topics
 1392
1392
 52
36
110
52
36
110

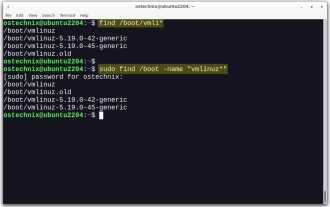 How To List Or Check All Installed Linux Kernels From Commandline
Mar 23, 2025 am 10:43 AM
How To List Or Check All Installed Linux Kernels From Commandline
Mar 23, 2025 am 10:43 AM
Linux Kernel is the core component of a GNU/Linux operating system. Developed by Linus Torvalds in 1991, it is a free, open-source, monolithic, modular, and multitasking Unix-like kernel. In Linux, it is possible to install multiple kernels on a sing
 What is the Linux best used for?
Apr 03, 2025 am 12:11 AM
What is the Linux best used for?
Apr 03, 2025 am 12:11 AM
Linux is best used as server management, embedded systems and desktop environments. 1) In server management, Linux is used to host websites, databases, and applications, providing stability and reliability. 2) In embedded systems, Linux is widely used in smart home and automotive electronic systems because of its flexibility and stability. 3) In the desktop environment, Linux provides rich applications and efficient performance.
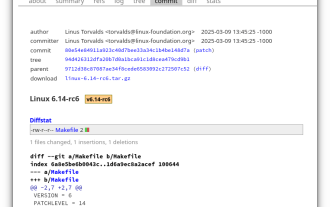 Linux Kernel 6.14 RC6 Released
Mar 24, 2025 am 10:21 AM
Linux Kernel 6.14 RC6 Released
Mar 24, 2025 am 10:21 AM
Linus Torvalds has released Linux Kernel 6.14 Release Candidate 6 (RC6), reporting no significant issues and keeping the release on track. The most notable change in this update addresses an AMD microcode signing issue, while the rest of the updates
 What are the 5 basic components of Linux?
Apr 06, 2025 am 12:05 AM
What are the 5 basic components of Linux?
Apr 06, 2025 am 12:05 AM
The five basic components of Linux are: 1. The kernel, managing hardware resources; 2. The system library, providing functions and services; 3. Shell, the interface for users to interact with the system; 4. The file system, storing and organizing data; 5. Applications, using system resources to implement functions.
 LocalSend - The Open-Source Airdrop Alternative For Secure File Sharing
Mar 24, 2025 am 09:20 AM
LocalSend - The Open-Source Airdrop Alternative For Secure File Sharing
Mar 24, 2025 am 09:20 AM
If you're familiar with AirDrop, you know it's a popular feature developed by Apple Inc. that enables seamless file transfer between supported Macintosh computers and iOS devices using Wi-Fi and Bluetooth. However, if you're using Linux and missing o
 How To Monitor Battery Level And Get Notifications On Linux Using battmon
Mar 24, 2025 am 10:23 AM
How To Monitor Battery Level And Get Notifications On Linux Using battmon
Mar 24, 2025 am 10:23 AM
Keeping your Laptop battery in check is very important for maintaining its longevity and ensuring you're never caught off guard by a sudden shutdown. If you’re a Linux user, you can easily monitor your Laptop's battery level and receive notifications
 What is the most use of Linux?
Apr 09, 2025 am 12:02 AM
What is the most use of Linux?
Apr 09, 2025 am 12:02 AM
Linux is widely used in servers, embedded systems and desktop environments. 1) In the server field, Linux has become an ideal choice for hosting websites, databases and applications due to its stability and security. 2) In embedded systems, Linux is popular for its high customization and efficiency. 3) In the desktop environment, Linux provides a variety of desktop environments to meet the needs of different users.
 What is basic Linux administration?
Apr 02, 2025 pm 02:09 PM
What is basic Linux administration?
Apr 02, 2025 pm 02:09 PM
Linux system management ensures the system stability, efficiency and security through configuration, monitoring and maintenance. 1. Master shell commands such as top and systemctl. 2. Use apt or yum to manage the software package. 3. Write automated scripts to improve efficiency. 4. Common debugging errors such as permission problems. 5. Optimize performance through monitoring tools.
