 Software Tutorial
 Computer Software
 Specific steps of PS Gaussian microdermabrasion_lHistory brush is the most important
Specific steps of PS Gaussian microdermabrasion_lHistory brush is the most important
Want to know how to use the Gaussian dermabrasion tool to create stunning image effects? Don’t miss this tutorial brought by PHP editor Zimo. It will guide you step by step to use the Gaussian microdermabrasion tool and reveal its specific steps, allowing you to easily master this powerful tool. Next, we will conduct an in-depth analysis of Gaussian microdermabrasion, discuss its working principle and application scenarios, and help you improve your image processing technology.
1. First put the photo into PS, then copy the background layer as [Layer 1]
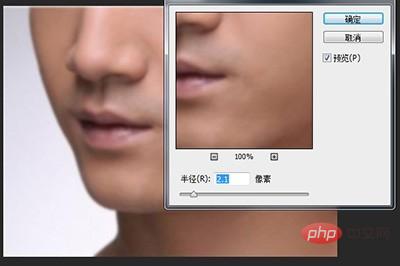
2. Use [Filter] - [Blur] - [Gaussian Blur], adjust [Radius] pixels until the facial skin becomes blurred and wrinkles cannot be seen.

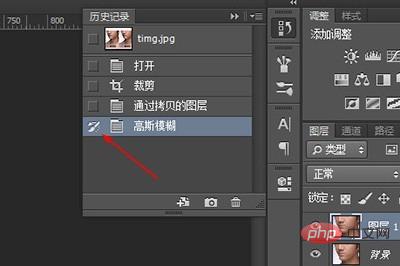
3. Click [Window]-[History] to open the window, and click the small box on the left in the previous options of Gaussian Blur to transfer the brush to Gaussian Blur. A step of.

#4. Then in the history window, click on the upper layer of the Gaussian blur option. Return the image to the effect it had before Gaussian blur processing.
5. Use the [History Brush] in the toolbar (shortcut key Y)

6. Use the History Brush to paint on the character’s face , until the freckles and wrinkles on the character’s face disappear. Please see the comparison picture, the original picture is above.


The above is the detailed content of Specific steps of PS Gaussian microdermabrasion_lHistory brush is the most important. For more information, please follow other related articles on the PHP Chinese website!

Hot AI Tools

Undresser.AI Undress
AI-powered app for creating realistic nude photos

AI Clothes Remover
Online AI tool for removing clothes from photos.

Undress AI Tool
Undress images for free

Clothoff.io
AI clothes remover

Video Face Swap
Swap faces in any video effortlessly with our completely free AI face swap tool!

Hot Article

Hot Tools

Notepad++7.3.1
Easy-to-use and free code editor

SublimeText3 Chinese version
Chinese version, very easy to use

Zend Studio 13.0.1
Powerful PHP integrated development environment

Dreamweaver CS6
Visual web development tools

SublimeText3 Mac version
God-level code editing software (SublimeText3)

Hot Topics
 1664
1664
 14
14
 1422
1422
 52
52
 1316
1316
 25
25
 1267
1267
 29
29
 1239
1239
 24
24
 How much does Microsoft PowerToys cost?
Apr 09, 2025 am 12:03 AM
Microsoft PowerToys is free. This collection of tools developed by Microsoft is designed to enhance Windows system functions and improve user productivity. By installing and using features such as FancyZones, users can customize window layouts and optimize workflows.


