

How to remove laptop battery


Where is the ASUS laptop battery and how to remove it
1. First, you need to turn to the back of the ASUS laptop and then find the battery buckle on the back. Then use a screwdriver or pen to push the buckle aside to unlock it and release the battery.
2. First, let’s take a look at the ASUS mirror cover. When taking pictures, it looks like a mirror and can capture anything. Then look at the model number on the back. After confirming that the model number is correct, we start to disassemble the computer. .
3. The battery of ASUS Flying Fortress 7 is inside the machine. After opening the back cover, as shown in the figure, you can take out the battery by removing the mainboard wiring of the battery.
4. The fully openable lock of the ASUS laptop is on the left side of the battery card slot, so first push the switch gently, and then you can open the lock on one side. Then open the lock on the other side. The method is the same as above, but this lock must be pressed all the time, because once you let go, the lock will reset.
5. Steps to open the back cover of ASUS laptop: first turn off the computer, then remove the battery, put on the power supply of the motherboard, and then start disassembling the machine. On the back cover, you can see the screws that need to be removed. The middle piece is the optical drive screw that needs to be removed. The memory and hard drive must be removed one by one.
6. Asus laptops support notebook models with self-removable batteries. After pushing the battery lock to the unlocked state, you can take out the battery horizontally: or lift the battery: If the ASUS laptop is equipped with a built-in battery, then It cannot be taken out by oneself. If the battery fails, the machine can be sent to the local service center for testing.
How to remove Acer laptop battery
1. Put your finger in the groove of the hidden switch, and then slide the switch to the right. Do not let go, just pull the battery out and the battery will be removed. was removed.
2. Turn the back of the laptop upward and find the battery buckle. Then watch the instructions above the buckle. Then use a hard stick to unlock the buckle. After successfully unlocking the latch, pull the battery cell down. The battery can then be successfully removed.
3. First, turn the laptop over to the back and open the switch lock on the bottom plate; insert the tip of a pen into the hole with your right hand and slide it forcefully in the direction of the right arrow; press and hold the lower end of the arrow with your left hand The battery can be removed by pushing it out in the direction of the arrow.
How to take out the computer battery
Open the motherboard, as shown in the picture. Near the south bridge of the motherboard, there is a silver-white disc button battery with a plus sign on the back and about two centimeters in diameter. Use a flat tool to press the latch on the CMOS battery holder. The battery on the motherboard pops up automatically and can be taken out by hand, as shown in the picture.
Push the keyhole of the battery to both sides, and then the battery can be removed. Shut down the laptop first. If there are unsaved data, you need to save it first. After shutting down the computer, move it to the back of the laptop, and you can see the location of the battery slot, as shown in the picture below.
First disconnect the power supply of the host computer. Find the battery on the motherboard. Use your fingers to open the buckle. When the buckle is opened, the battery will pop up. After the battery pops up, just take it off with your hands. Replace the battery with the same model and put the battery on the buckle when putting it back.
Find the screws on the back cover of the chassis and remove the screws on the back cover of the chassis. Find the motherboard in the console. Find the motherboard from the disassembled console. Find the round white one on the motherboard which is the battery. There is a latch on the CMOS battery holder to fix the battery. You can remove the battery by pressing it with your hands or tweezers.
Laptop battery removal method
First, make sure the computer is turned off and the power adapter is unplugged. Find the battery locking gear on the bottom of the laptop and move it in the direction to unlock it (usually outward). Press and hold the locking gear and gently push the battery to pop it out of the computer.
First close all programs on the laptop desktop, then shut down the laptop, wait until the computer is shut down and then disconnect the laptop's power plug. Turn to the back of the laptop and you can see the location of the laptop battery.
Taking a Lenovo laptop as an example, the steps to remove the battery are as follows: Shut down the laptop first, and then disconnect the power cable of the laptop, as shown in the figure below. After shutting down the laptop completely, turn it over to the back of the laptop. The battery of the notebook is at the bottom and is held in place by two buckles.
Shut down the laptop first. If there are unsaved data, you need to save it first. After shutting down the computer, move it to the back of the laptop, and you can see the location of the battery slot, as shown in the picture below. Press the two buckles of the battery in the direction shown below and push outward, then push the battery down to remove it.
First, unplug the laptop’s external power supply. Turn the notebook over and lay it flat on the table. Then find the switches on both ends of the battery. Then follow the icon prompts and push the left buckle to the right to unlock it.
First, loosen all the back screws, but be careful not to remove them. Then remove the rear battery first. Then remember to remove the card slot on one side first. You need to push out with a fine needle to remove this card slot. Then started to remove the back cover.
How to remove the laptop motherboard battery
1. Look for the plus sign. Near the "South Bridge" of the motherboard, there is a silver-white disc button battery with a plus sign on the back and about two centimeters in diameter. 2. Press the latch. Use a flat tool to press the latch on the CMOS battery holder. 3. Take it out by hand. The battery on the motherboard will pop up automatically, and then take it out by hand.
2. First unscrew the screws on the back of the computer host and open the host case, near the south bridge on the motherboard. Then there will be a silver-white disc button battery with a plus sign on the back and about two centimeters in diameter. First, look at the CMOS battery holder. There is a latch that fixes the battery. You can use a screwdriver or directly press the latch with your hands.
3. Turn off the power and remove all wires and related equipment plugged into the chassis. Use a Phillips screwdriver to open the computer case and put the case aside. Be sure to touch metal objects before touching the computer hardware to prevent static electricity from causing damage to the hardware. After opening the case, you can see the motherboard battery.
4. The button battery on the computer motherboard has a circular slot. There is a protrusion on the edge of the slot. There is a metal piece on the inside of the protrusion. Pull the metal piece outward and the battery can be removed. . The button battery on the motherboard is also a CMOS battery. It is used to store data in part of the CMOS flash memory.
How to remove the Dell laptop battery
Put the notebook face down, take out the rubber plug according to the position in the picture, and use a screwdriver to remove the screws. Remove the only cover on the back and the memory to avoid accidental damage; and remove the screws under the yellow tape behind the memory. Use tweezers to push the optical drive retaining piece and take out the optical drive.
There are 5 steps to remove the Dell laptop battery. You need to prepare a screwdriver. The specific operations are as follows: turn the notebook face down, take out the rubber plug, and use a screwdriver to remove the screws. Use tweezers to push the optical drive retaining piece and take out the optical drive.
The method to remove the battery from a Dell laptop is: first remove the back cover of the computer and unscrew the three screws that secure the battery. The battery can then be removed. Dell Computer Company was founded in 1984 by Michael Dell. He is currently the longest-serving CEO in the computer industry.
First remove the battery, then remove all the small covers on the bottom case, and then unscrew all the screws on the bottom case. The optical drive is only fixed with one screw. After unscrewing, pull it out directly. After taking out the optical drive, unscrew the three screws under the optical drive. Remove the keyboard frame.
How to disassemble the computer Dell Inspiron 15? The first step: Preparation. Prepare the tools (thin Phillips screwdriver, slotted screwdriver, tweezers, blade, soft cloth) and the notebook to be disassembled. Step 2: Remove the battery. Turn the back of the notebook upward, unlock the battery lock, and take out the battery.
The above is the detailed content of How to remove laptop battery. For more information, please follow other related articles on the PHP Chinese website!

Hot AI Tools

Undresser.AI Undress
AI-powered app for creating realistic nude photos

AI Clothes Remover
Online AI tool for removing clothes from photos.

Undress AI Tool
Undress images for free

Clothoff.io
AI clothes remover

AI Hentai Generator
Generate AI Hentai for free.

Hot Article
Hot Tools

Notepad++7.3.1
Easy-to-use and free code editor

SublimeText3 Chinese version
Chinese version, very easy to use

Zend Studio 13.0.1
Powerful PHP integrated development environment

Dreamweaver CS6
Visual web development tools

SublimeText3 Mac version
God-level code editing software (SublimeText3)
Hot Topics
 1377
1377
 52
52

 AirPods Max With Lightning vs. USB-C Buyer's Guide: All Differences Compared
Mar 25, 2025 am 03:01 AM
AirPods Max With Lightning vs. USB-C Buyer's Guide: All Differences Compared
Mar 25, 2025 am 03:01 AM
Apple just announced a notable firmware update for the AirPods Max with USB-C as part of iOS 18.4, so how does the new model now compare to the original Lightning version of AirPods Max?In late 2020, Apple announced the AirPods Max, a whole new AirPo
 How to Get Visual Intelligence on iPhone 15 Pro
Mar 14, 2025 am 03:03 AM
How to Get Visual Intelligence on iPhone 15 Pro
Mar 14, 2025 am 03:03 AM
On iPhone 16 models, Visual Intelligence lets you use the camera to learn more about places and objects around you. It can also summarize text, read text out loud, translate text, search Google for items, ask ChatGPT, and more. And thanks to iOS 18.4
 iPhone 16e vs. iPhone 15 Pro Buyer's Guide: Which Is Best for $599?
Mar 25, 2025 am 02:28 AM
iPhone 16e vs. iPhone 15 Pro Buyer's Guide: Which Is Best for $599?
Mar 25, 2025 am 02:28 AM
The iPhone 16e is now Apple's lowest-cost iPhone at $599. However, 2023's iPhone 15 Pro is now available for very similar approximate prices from third parties. There are at least 50 differences between the two devices, so which should you choose?The
 iPad Keyboards Buyer's Guide: 10 Differences Compared
Mar 19, 2025 am 01:47 AM
iPad Keyboards Buyer's Guide: 10 Differences Compared
Mar 19, 2025 am 01:47 AM
Apple now sells three different keyboards, with one for each member of the iPad lineup with the exception of the iPad mini, which is too small for a keyboard. The iPad mini is compatible with Bluetooth keyboards only.While choosing between iPad keybo
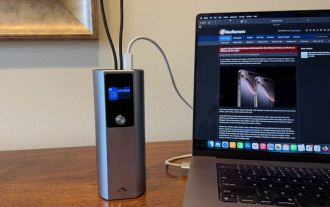 Review: Alogic's Ark Pro Packs a Punch With Portable Power
Mar 18, 2025 am 06:01 AM
Review: Alogic's Ark Pro Packs a Punch With Portable Power
Mar 18, 2025 am 06:01 AM
Powerful multi-port power banks are becoming increasingly popular to keep our ever-growing array of gadgets charged up, and Alogic's new Ark Pro power bank brings some nice versatility to the table.I've spent a few weeks testing out the Ark Pro, and
 Apple Now Selling USB-C to 3.5mm Audio Cable
Mar 25, 2025 am 02:44 AM
Apple Now Selling USB-C to 3.5mm Audio Cable
Mar 25, 2025 am 02:44 AM
Following today's announcement of Lossless audio and Personalized Spatial Audio for the AirPods Max, Apple today released a USB-C to 3.5mm audio cable.The cable is designed for the AirPods Max with USB-C and Beats Studio Pro headphones, allowing them
 Customize Adaptive Audio on AirPods 4 and AirPods Pro 2
Mar 25, 2025 pm 09:02 PM
Customize Adaptive Audio on AirPods 4 and AirPods Pro 2
Mar 25, 2025 pm 09:02 PM
Apple's AirPods 4 and second-generation AirPods Pro have an Adaptive Audio feature that includes Adaptive Noise Control, Personalized Volume, and Conversation Awareness, which are all features that adjust sound and Active Noise Cancellation in respon
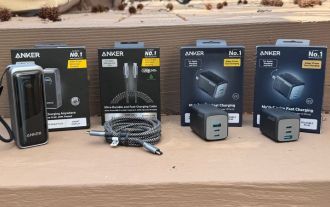 Review: Anker's Prime Lineup of Travel Charging Accessories Delivers Advanced Tech in Small Packages
Mar 20, 2025 am 06:05 AM
Review: Anker's Prime Lineup of Travel Charging Accessories Delivers Advanced Tech in Small Packages
Mar 20, 2025 am 06:05 AM
While Anker is known for a broad array of charging accessories, the Anker Prime family features some of the company's most advanced technology and feature sets to deliver a premium experience.I've been testing out a few Anker Prime travel accessories
