How to add borders to pictures in PS_A few steps
Troubled by the lack of beautiful borders on pictures? No need to worry, PHP editor Apple has brought you a simple and easy-to-understand guide that will guide you step by step on how to easily add borders to your images to help you improve the visual effect of your images. Read on to master these simple steps and add borders to your images with ease!
First of all, let’s talk about drawing the border first. You can directly create a new layer and select [Custom Shape Tool], then in the [Shape] above, click the small arrow on the right, and select [Draw] in the pop-up menu. frame】.

After selecting a suitable frame to adjust the color, you can drag a frame out of the canvas and adjust the size.
Finally, you can import your photos. Note here that the photo layer must be under the frame layer. Isn’t it very simple?

Next, there is another method, you can import your photos into PS canvas in advance. What you need to do next is to use the [Brush Tool] and open the brush settings. Here you can set the style of your frame according to your preferences.

After you are done, use CTRL+left mouse button to select your photo layer, let your photo get a frame, and create a new layer.

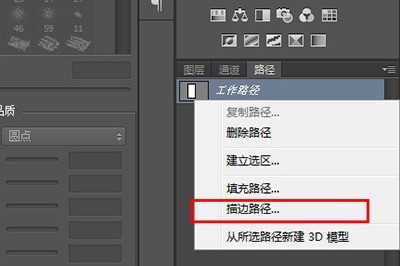
Then use the [Marquee Tool] to right-click on the selection and [Create Working Path]. Then on the [Path] page, right-click the path you just created, select [Stroke Path] in the menu, and then select the brush in the stroke tool.

#Finally confirmed, your photo will suddenly have an extra frame.

The above is the detailed content of How to add borders to pictures in PS_A few steps. For more information, please follow other related articles on the PHP Chinese website!

Hot AI Tools

Undresser.AI Undress
AI-powered app for creating realistic nude photos

AI Clothes Remover
Online AI tool for removing clothes from photos.

Undress AI Tool
Undress images for free

Clothoff.io
AI clothes remover

Video Face Swap
Swap faces in any video effortlessly with our completely free AI face swap tool!

Hot Article

Hot Tools

Notepad++7.3.1
Easy-to-use and free code editor

SublimeText3 Chinese version
Chinese version, very easy to use

Zend Studio 13.0.1
Powerful PHP integrated development environment

Dreamweaver CS6
Visual web development tools

SublimeText3 Mac version
God-level code editing software (SublimeText3)

Hot Topics
 1664
1664
 14
14
 1423
1423
 52
52
 1317
1317
 25
25
 1268
1268
 29
29
 1246
1246
 24
24


