 Computer Tutorials
 Computer Knowledge
 How to change the IP address of the network in Win11? How to change ip address in win11 system
How to change the IP address of the network in Win11? How to change ip address in win11 system
Want to increase your network speed? Adjusting your IP address in Win11 could be key. In this article, PHP editor Xigua will guide you step by step to modify the IP address in the Win11 system to make your network experience smoother. This article details how to easily do this in your network and Internet settings, giving you practical ways to increase your network speed and optimize your online experience.
How to change the IP address in win11 system
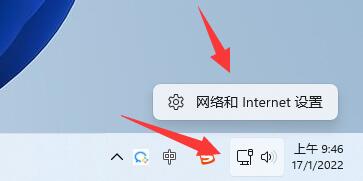
Step one: Right-click the network icon in the lower right corner and open the network and internet settings (as shown in the picture).
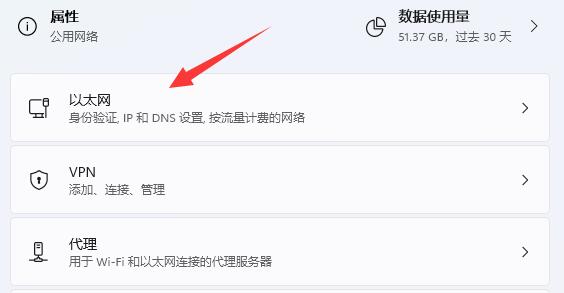
Step 2: Click Ethernet above to enter the network you are connecting to (as shown in the picture).
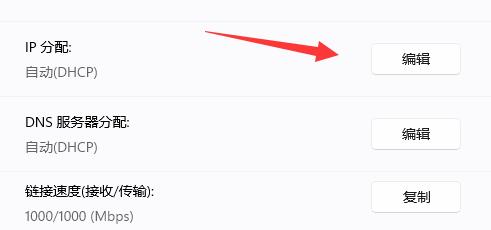
Step 3: Scroll down the list, find the IP assignment, and click Edit (as shown in the picture).
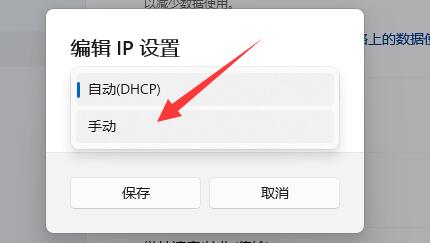
Step 4: Change automatic (DHCP) to manual (as shown in the picture).
Step 5: Enable IPv4 or IPv6 (as shown in the picture).
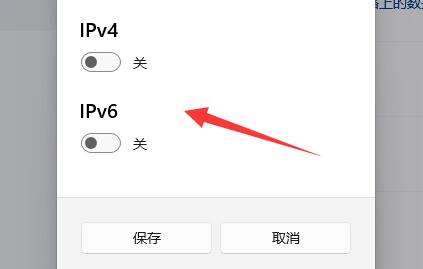
# Step 6: Enter the IP address to be modified below and click OK to complete the modification (as shown in the picture).

The above is the detailed content of How to change the IP address of the network in Win11? How to change ip address in win11 system. For more information, please follow other related articles on the PHP Chinese website!

Hot AI Tools

Undresser.AI Undress
AI-powered app for creating realistic nude photos

AI Clothes Remover
Online AI tool for removing clothes from photos.

Undress AI Tool
Undress images for free

Clothoff.io
AI clothes remover

AI Hentai Generator
Generate AI Hentai for free.

Hot Article

Hot Tools

Notepad++7.3.1
Easy-to-use and free code editor

SublimeText3 Chinese version
Chinese version, very easy to use

Zend Studio 13.0.1
Powerful PHP integrated development environment

Dreamweaver CS6
Visual web development tools

SublimeText3 Mac version
God-level code editing software (SublimeText3)

Hot Topics
 1359
1359
 52
52
 How to Solve Windows Error Code "INVALID_DATA_ACCESS_TRAP" (0x00000004)
Mar 11, 2025 am 11:26 AM
This article addresses the Windows "INVALID_DATA_ACCESS_TRAP" (0x00000004) error, a critical BSOD. It explores common causes like faulty drivers, hardware malfunctions (RAM, hard drive), software conflicts, overclocking, and malware. Trou
 How do I edit the Registry? (Warning: Use with caution!)
Mar 21, 2025 pm 07:46 PM
Article discusses editing Windows Registry, precautions, backup methods, and potential issues from incorrect edits. Main issue: risks of system instability and data loss from improper changes.
 How do I manage services in Windows?
Mar 21, 2025 pm 07:52 PM
Article discusses managing Windows services for system health, including starting, stopping, restarting services, and best practices for stability.
 Discover How to Fix Drive Health Warning in Windows Settings
Mar 19, 2025 am 11:10 AM
What does the drive health warning in Windows Settings mean and what should you do when you receive the disk warning? Read this php.cn tutorial to get step-by-step instructions to cope with this situation.
 which application uses ene.sys
Mar 12, 2025 pm 01:25 PM
This article identifies ene.sys as a Realtek High Definition Audio driver component. It details its function in managing audio hardware, emphasizing its crucial role in audio functionality. The article also guides users on verifying its legitimacy
 why won't driver asio.sys load
Mar 10, 2025 pm 07:58 PM
This article addresses the failure of the Windows asio.sys audio driver. Common causes include corrupted system files, hardware/driver incompatibility, software conflicts, registry issues, and malware. Troubleshooting involves SFC scans, driver upda
 How do I use the Group Policy Editor (gpedit.msc)?
Mar 21, 2025 pm 07:48 PM
The article explains how to use the Group Policy Editor (gpedit.msc) in Windows for managing system settings, highlighting common configurations and troubleshooting methods. It notes that gpedit.msc is unavailable in Windows Home editions, suggesting
 How do I change the default app for a file type?
Mar 21, 2025 pm 07:48 PM
Article discusses changing default apps for file types on Windows, including reverting and bulk changes. Main issue: no built-in bulk change option.


