 Software Tutorial
 Computer Software
 How to display the auxiliary grid in photoshop cc 2018 How to display the auxiliary grid in photoshop cc 2018
How to display the auxiliary grid in photoshop cc 2018 How to display the auxiliary grid in photoshop cc 2018
When many people use Photoshop CC 2018, they often suffer from the inability to display the auxiliary grid, resulting in low design efficiency. In this regard, PHP editor Zimo specially compiled the method of displaying the auxiliary grid in Photoshop CC 2018 to help everyone solve this problem. Now, let’s take a look at the specific steps.
Step 1: First open photoshop cc 2018, click the [File>New] command to create a new document, as shown in the figure below.

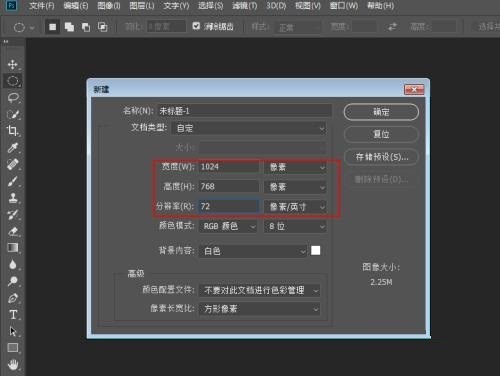
Step 2: Then set the document size to [1024*768] and the resolution to [72 pixels/inch], as shown in the figure below.

Step 3: Click the [Edit>Preferences>General] command in sequence to bring up the general settings panel, as shown in the figure below.

Step 4: Switch to the [Guidelines, Grids and Slices] option menu and click the left mouse button, as shown in the figure below.

Step 5: Here we set the grid interval to [5 cm] and the sub-grid to [1], click OK, as shown in the figure below.

Step 6: Click the [View>Display>Grid] option to display the effect of grid assistance and network display, as shown in the figure below.

The above is the detailed content of How to display the auxiliary grid in photoshop cc 2018 How to display the auxiliary grid in photoshop cc 2018. For more information, please follow other related articles on the PHP Chinese website!

Hot AI Tools

Undresser.AI Undress
AI-powered app for creating realistic nude photos

AI Clothes Remover
Online AI tool for removing clothes from photos.

Undress AI Tool
Undress images for free

Clothoff.io
AI clothes remover

Video Face Swap
Swap faces in any video effortlessly with our completely free AI face swap tool!

Hot Article

Hot Tools

Notepad++7.3.1
Easy-to-use and free code editor

SublimeText3 Chinese version
Chinese version, very easy to use

Zend Studio 13.0.1
Powerful PHP integrated development environment

Dreamweaver CS6
Visual web development tools

SublimeText3 Mac version
God-level code editing software (SublimeText3)

Hot Topics
 1664
1664
 14
14
 1421
1421
 52
52
 1315
1315
 25
25
 1266
1266
 29
29
 1239
1239
 24
24
 How much does Microsoft PowerToys cost?
Apr 09, 2025 am 12:03 AM
Microsoft PowerToys is free. This collection of tools developed by Microsoft is designed to enhance Windows system functions and improve user productivity. By installing and using features such as FancyZones, users can customize window layouts and optimize workflows.


