
 Backend Development
Python Tutorial
AdaBoost - Ensemble Method, Classification: Supervised Machine Learning
Backend Development
Python Tutorial
AdaBoost - Ensemble Method, Classification: Supervised Machine Learning
AdaBoost - Ensemble Method, Classification: Supervised Machine Learning

Boosting
Definition and Purpose
Boosting is an ensemble learning technique used in machine learning to improve the accuracy of models. It combines multiple weak classifiers (models that perform slightly better than random guessing) to create a strong classifier. The main purpose of boosting is to sequentially apply the weak classifiers to the data, correcting the errors made by the previous classifiers, and thus improve overall performance.
Key Objectives:
- Improve Accuracy: Enhance the prediction accuracy by combining the outputs of several weak classifiers.
- Reduce Bias and Variance: Address issues of bias and variance to achieve a better generalization of the model.
- Handle Complex Data: Effectively model complex relationships in the data.
AdaBoost (Adaptive Boosting)
Definition and Purpose
AdaBoost, short for Adaptive Boosting, is a popular boosting algorithm. It adjusts the weights of incorrectly classified instances so that subsequent classifiers focus more on difficult cases. The main purpose of AdaBoost is to improve the performance of weak classifiers by emphasizing the hard-to-classify examples in each iteration.
Key Objectives:
- Weight Adjustment: Increase the weight of misclassified instances to ensure the next classifier focuses on them.
- Sequential Learning: Build classifiers sequentially, where each new classifier corrects the errors of its predecessor.
- Improved Performance: Combine weak classifiers to form a strong classifier with better predictive power.
How AdaBoost Works
-
Initialize Weights:
- Assign equal weights to all training instances. For a dataset with n instances, each instance has a weight of 1/n.
-
Train Weak Classifier:
- Train a weak classifier using the weighted dataset.
-
Calculate Classifier Error:
- Compute the error of the weak classifier, which is the sum of the weights of misclassified instances.
-
Compute Classifier Weight:
- Calculate the weight of the classifier based on its error. The weight is given by: alpha = 0.5 * log((1 - error) / error)
- A lower error results in a higher classifier weight.
-
Update Weights of Instances:
- Adjust the weights of the instances. Increase the weights of misclassified instances and decrease the weights of correctly classified instances.
- The updated weight for instance i is: weight[i] = weight[i] * exp(alpha * (misclassified ? 1 : -1))
- Normalize the weights to ensure they sum to 1.
-
Combine Weak Classifiers:
- The final strong classifier is a weighted sum of the weak classifiers: Final classifier = sign(sum(alpha * weak_classifier))
- The sign function determines the class label based on the sum.
AdaBoost (Binary Classification) Example
AdaBoost, short for Adaptive Boosting, is an ensemble technique that combines multiple weak classifiers to create a strong classifier. This example demonstrates how to implement AdaBoost for binary classification using synthetic data, evaluate the model's performance, and visualize the decision boundary.
Python Code Example
1. Import Libraries
import numpy as np
import matplotlib.pyplot as plt
from sklearn.model_selection import train_test_split
from sklearn.ensemble import AdaBoostClassifier
from sklearn.tree import DecisionTreeClassifier
from sklearn.metrics import accuracy_score, confusion_matrix, classification_report
This block imports the necessary libraries for data manipulation, plotting, and machine learning.
2. Generate Sample Data
np.random.seed(42)  # For reproducibility

# Generate synthetic data for 2 classes
n_samples = 1000
n_samples_per_class = n_samples // 2

# Class 0: Centered around (-1, -1)
X0 = np.random.randn(n_samples_per_class, 2) * 0.7 + [-1, -1]

# Class 1: Centered around (1, 1)
X1 = np.random.randn(n_samples_per_class, 2) * 0.7 + [1, 1]

# Combine the data
X = np.vstack([X0, X1])
y = np.hstack([np.zeros(n_samples_per_class), np.ones(n_samples_per_class)])

# Shuffle the dataset
shuffle_idx = np.random.permutation(n_samples)
X, y = X[shuffle_idx], y[shuffle_idx]
This block generates synthetic data with two features, where the target variable y is defined based on the class center, simulating a binary classification scenario.
3. Split the Dataset
X_train, X_test, y_train, y_test = train_test_split(X, y, test_size=0.2, random_state=42)
This block splits the dataset into training and testing sets for model evaluation.
4. Create and Train the AdaBoost Classifier
base_estimator = DecisionTreeClassifier(max_depth=1)  # Decision stump
model = AdaBoostClassifier(estimator=base_estimator, n_estimators=3, random_state=42)
model.fit(X_train, y_train)
This block initializes the AdaBoost model with a decision stump as the base estimator and trains it using the training dataset.
5. Make Predictions
y_pred = model.predict(X_test)
This block uses the trained model to make predictions on the test set.
6. Evaluate the Model
accuracy = accuracy_score(y_test, y_pred)
conf_matrix = confusion_matrix(y_test, y_pred)
class_report = classification_report(y_test, y_pred)

print(f"Accuracy: {accuracy:.4f}")
print("\nConfusion Matrix:")
print(conf_matrix)
print("\nClassification Report:")
print(class_report)
Output:
Accuracy: 0.9400

Confusion Matrix:
[[96  8]
 [ 4 92]]

Classification Report:
              precision    recall  f1-score   support

         0.0       0.96      0.92      0.94       104
         1.0       0.92      0.96      0.94        96

    accuracy                           0.94       200
   macro avg       0.94      0.94      0.94       200
weighted avg       0.94      0.94      0.94       200
This block calculates and prints the accuracy, confusion matrix, and classification report, providing insights into the model's performance.
7. Visualize the Decision Boundary
x_min, x_max = X[:, 0].min() - 1, X[:, 0].max() + 1
y_min, y_max = X[:, 1].min() - 1, X[:, 1].max() + 1
xx, yy = np.meshgrid(np.arange(x_min, x_max, 0.1),
                     np.arange(y_min, y_max, 0.1))
Z = model.predict(np.c_[xx.ravel(), yy.ravel()])
Z = Z.reshape(xx.shape)

plt.figure(figsize=(10, 8))
plt.contourf(xx, yy, Z, alpha=0.4, cmap='RdYlBu')
scatter = plt.scatter(X[:, 0], X[:, 1], c=y, cmap='RdYlBu', edgecolor='black')
plt.xlabel("Feature 1")
plt.ylabel("Feature 2")
plt.title("AdaBoost Binary Classification")
plt.colorbar(scatter)
plt.show()
This block visualizes the decision boundary created by the AdaBoost model, illustrating how the model separates the two classes in the feature space.
Output:

This structured approach demonstrates how to implement and evaluate AdaBoost for binary classification tasks, providing a clear understanding of its capabilities. The visualization of the decision boundary aids in interpreting the model's predictions.
AdaBoost (Multiclass Classification) Example
AdaBoost is an ensemble learning technique that combines multiple weak classifiers to create a strong classifier. This example demonstrates how to implement AdaBoost for multiclass classification using synthetic data, evaluate the model's performance, and visualize the decision boundary for five classes.
Python Code Example
1. Import Libraries
import numpy as np
import matplotlib.pyplot as plt
from sklearn.model_selection import train_test_split
from sklearn.ensemble import AdaBoostClassifier
from sklearn.tree import DecisionTreeClassifier
from sklearn.metrics import accuracy_score, confusion_matrix, classification_report
This block imports the necessary libraries for data manipulation, plotting, and machine learning.
2. Generate Sample Data with 5 Classes
np.random.seed(42)  # For reproducibility
n_samples = 2500  # Total number of samples
n_samples_per_class = n_samples // 5  # Ensure this is exactly n_samples // 5

# Class 0: Centered around (-2, -2)
X0 = np.random.randn(n_samples_per_class, 2) * 0.5 + [-2, -2]

# Class 1: Centered around (0, -2)
X1 = np.random.randn(n_samples_per_class, 2) * 0.5 + [0, -2]

# Class 2: Centered around (2, -2)
X2 = np.random.randn(n_samples_per_class, 2) * 0.5 + [2, -2]

# Class 3: Centered around (-1, 2)
X3 = np.random.randn(n_samples_per_class, 2) * 0.5 + [-1, 2]

# Class 4: Centered around (1, 2)
X4 = np.random.randn(n_samples_per_class, 2) * 0.5 + [1, 2]

# Combine the data
X = np.vstack([X0, X1, X2, X3, X4])
y = np.hstack([np.zeros(n_samples_per_class),
               np.ones(n_samples_per_class),
               np.full(n_samples_per_class, 2),
               np.full(n_samples_per_class, 3),
               np.full(n_samples_per_class, 4)])

# Shuffle the dataset
shuffle_idx = np.random.permutation(n_samples)
X, y = X[shuffle_idx], y[shuffle_idx]
This block generates synthetic data for five classes located in different regions of the feature space.
3. Split the Dataset
X_train, X_test, y_train, y_test = train_test_split(X, y, test_size=0.2, random_state=42)
This block splits the dataset into training and testing sets for model evaluation.
4. Create and Train the AdaBoost Classifier
base_estimator = DecisionTreeClassifier(max_depth=1)  # Decision stump
model = AdaBoostClassifier(estimator=base_estimator, n_estimators=10, random_state=42)
model.fit(X_train, y_train)
This block initializes the AdaBoost classifier with a weak learner (decision stump) and trains it using the training dataset.
5. Make Predictions
y_pred = model.predict(X_test)
This block uses the trained model to make predictions on the test set.
6. Evaluate the Model
accuracy = accuracy_score(y_test, y_pred)
conf_matrix = confusion_matrix(y_test, y_pred)
class_report = classification_report(y_test, y_pred)

print(f"Accuracy: {accuracy:.4f}")
print("\nConfusion Matrix:")
print(conf_matrix)
print("\nClassification Report:")
print(class_report)
Output:
Accuracy: 0.9540

Confusion Matrix:
[[ 97   2   0   0   0]
 [  0  92   3   0   0]
 [  0   4  92   0   0]
 [  0   0   0  86  14]
 [  0   0   0   0 110]]

Classification Report:
              precision    recall  f1-score   support

         0.0       1.00      0.98      0.99        99
         1.0       0.94      0.97      0.95        95
         2.0       0.97      0.96      0.96        96
         3.0       1.00      0.86      0.92       100
         4.0       0.89      1.00      0.94       110

    accuracy                           0.95       500
   macro avg       0.96      0.95      0.95       500
weighted avg       0.96      0.95      0.95       500
This block calculates and prints the accuracy, confusion matrix, and classification report, providing insights into the model's performance.
7. Visualize the Decision Boundary
x_min, x_max = X[:, 0].min() - 1, X[:, 0].max() + 1
y_min, y_max = X[:, 1].min() - 1, X[:, 1].max() + 1
xx, yy = np.meshgrid(np.arange(x_min, x_max, 0.1),
                     np.arange(y_min, y_max, 0.1))
Z = model.predict(np.c_[xx.ravel(), yy.ravel()])
Z = Z.reshape(xx.shape)

plt.figure(figsize=(12, 10))
plt.contourf(xx, yy, Z, alpha=0.4, cmap='viridis')
scatter = plt.scatter(X[:, 0], X[:, 1], c=y, cmap='viridis', edgecolor='black')
plt.xlabel("Feature 1")
plt.ylabel("Feature 2")
plt.title("AdaBoost Multiclass Classification (5 Classes)")
plt.colorbar(scatter)
plt.show()
This block visualizes the decision boundaries created by the AdaBoost classifier, illustrating how the model separates the five classes in the feature space.
Output:
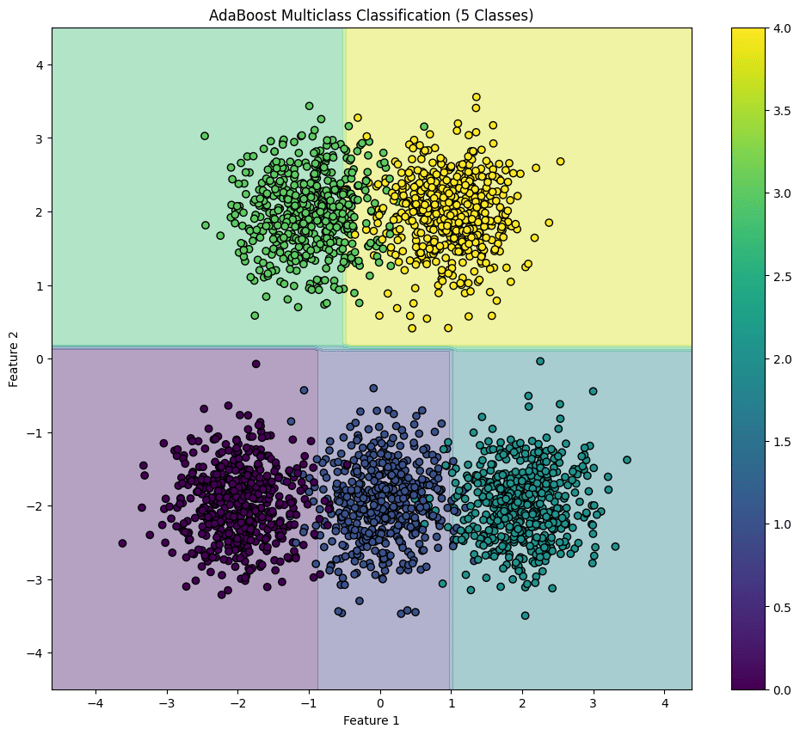
This structured approach demonstrates how to implement and evaluate AdaBoost for multiclass classification tasks, providing a clear understanding of its capabilities and the effectiveness of visualizing decision boundaries.
The above is the detailed content of AdaBoost - Ensemble Method, Classification: Supervised Machine Learning. For more information, please follow other related articles on the PHP Chinese website!

Hot AI Tools

Undresser.AI Undress
AI-powered app for creating realistic nude photos

AI Clothes Remover
Online AI tool for removing clothes from photos.

Undress AI Tool
Undress images for free

Clothoff.io
AI clothes remover

Video Face Swap
Swap faces in any video effortlessly with our completely free AI face swap tool!

Hot Article
Hot Tools

Notepad++7.3.1
Easy-to-use and free code editor

SublimeText3 Chinese version
Chinese version, very easy to use

Zend Studio 13.0.1
Powerful PHP integrated development environment

Dreamweaver CS6
Visual web development tools

SublimeText3 Mac version
God-level code editing software (SublimeText3)
Hot Topics
 1664
1664
 14
1423
52
1317
25
1268
29
1246
24
14
1423
52
1317
25
1268
29
1246
24

 Python vs. C : Applications and Use Cases Compared
Apr 12, 2025 am 12:01 AM
Python vs. C : Applications and Use Cases Compared
Apr 12, 2025 am 12:01 AM
Python is suitable for data science, web development and automation tasks, while C is suitable for system programming, game development and embedded systems. Python is known for its simplicity and powerful ecosystem, while C is known for its high performance and underlying control capabilities.
 Python: Games, GUIs, and More
Apr 13, 2025 am 12:14 AM
Python: Games, GUIs, and More
Apr 13, 2025 am 12:14 AM
Python excels in gaming and GUI development. 1) Game development uses Pygame, providing drawing, audio and other functions, which are suitable for creating 2D games. 2) GUI development can choose Tkinter or PyQt. Tkinter is simple and easy to use, PyQt has rich functions and is suitable for professional development.
 Python vs. C : Learning Curves and Ease of Use
Apr 19, 2025 am 12:20 AM
Python vs. C : Learning Curves and Ease of Use
Apr 19, 2025 am 12:20 AM
Python is easier to learn and use, while C is more powerful but complex. 1. Python syntax is concise and suitable for beginners. Dynamic typing and automatic memory management make it easy to use, but may cause runtime errors. 2.C provides low-level control and advanced features, suitable for high-performance applications, but has a high learning threshold and requires manual memory and type safety management.
 The 2-Hour Python Plan: A Realistic Approach
Apr 11, 2025 am 12:04 AM
The 2-Hour Python Plan: A Realistic Approach
Apr 11, 2025 am 12:04 AM
You can learn basic programming concepts and skills of Python within 2 hours. 1. Learn variables and data types, 2. Master control flow (conditional statements and loops), 3. Understand the definition and use of functions, 4. Quickly get started with Python programming through simple examples and code snippets.
 Python and Time: Making the Most of Your Study Time
Apr 14, 2025 am 12:02 AM
Python and Time: Making the Most of Your Study Time
Apr 14, 2025 am 12:02 AM
To maximize the efficiency of learning Python in a limited time, you can use Python's datetime, time, and schedule modules. 1. The datetime module is used to record and plan learning time. 2. The time module helps to set study and rest time. 3. The schedule module automatically arranges weekly learning tasks.
 Python vs. C : Exploring Performance and Efficiency
Apr 18, 2025 am 12:20 AM
Python vs. C : Exploring Performance and Efficiency
Apr 18, 2025 am 12:20 AM
Python is better than C in development efficiency, but C is higher in execution performance. 1. Python's concise syntax and rich libraries improve development efficiency. 2.C's compilation-type characteristics and hardware control improve execution performance. When making a choice, you need to weigh the development speed and execution efficiency based on project needs.
 Python: Automation, Scripting, and Task Management
Apr 16, 2025 am 12:14 AM
Python: Automation, Scripting, and Task Management
Apr 16, 2025 am 12:14 AM
Python excels in automation, scripting, and task management. 1) Automation: File backup is realized through standard libraries such as os and shutil. 2) Script writing: Use the psutil library to monitor system resources. 3) Task management: Use the schedule library to schedule tasks. Python's ease of use and rich library support makes it the preferred tool in these areas.
 Python: Exploring Its Primary Applications
Apr 10, 2025 am 09:41 AM
Python: Exploring Its Primary Applications
Apr 10, 2025 am 09:41 AM
Python is widely used in the fields of web development, data science, machine learning, automation and scripting. 1) In web development, Django and Flask frameworks simplify the development process. 2) In the fields of data science and machine learning, NumPy, Pandas, Scikit-learn and TensorFlow libraries provide strong support. 3) In terms of automation and scripting, Python is suitable for tasks such as automated testing and system management.
