

How to Enable or Disable User Accounts in Windows 10

If you want a user account on Windows 10 to be unavailable, you don't have to delete it, but just disable it. This way, whenever you need the user account back, you can re-enable it. You won't lose any data. Now, this article will show you how to enable or disable a user account in Windows 10.
Related: Enable or Disable Built-in Administrator Account in Windows 10
Top 3 ways to enable or disable a user account in Windows 10:
- Way 1: to enable or disable a user account using the command
- Way 2: to enable or disable a user account using Group Policy
- Way 3: to enable or disable a user account in Registry Editor
How to enable or disable a user account in Command Prompt
Step 1: Start Command Prompt as an administrator.
Press "Windows key + X" shortcut keys, then enter A key.

Step 2: Type the command below in the command prompt, press Enter.
To disable a user account: Net user "User Name" /active:no
Tips: "User name" is the actual user name (ex: isum) of the account you want to disable or enable.

Step 3: When finished, you can close the Command Prompt window.
When a user account is disabled, its name will be removed from the sign-in screen and Start menu switch user areas so that it can no longer be signed in to.

To re-enable a user account: Net user "User Name" /active:yes

How to enable or disable a user account using Group Policy
You can easily enable or disable a user account in Local Users and Groups.
Step 1: Open the Local Users and Groups.
Press the Windows key + R keys to open the Run dialog, type lusrmgr.msc.

Step 2: Click on Users in the left pane, and double-click on the Name of the user account you want.

Step 3: In the opening Properties window, you can see the Account is disabled box is unchecked by default. To disable user account, check on that box.

When finished, you can close the Local Users and Groups.
How to Hide or Unhide User Account via Registry Editor
With this option, the account's details will be easily shown or hidden from the sign-in screen.
Step 1: Open the Registry Editor.
Press Win + R keys to bring out the Run dialog box. Then type regedit, then press Enter.

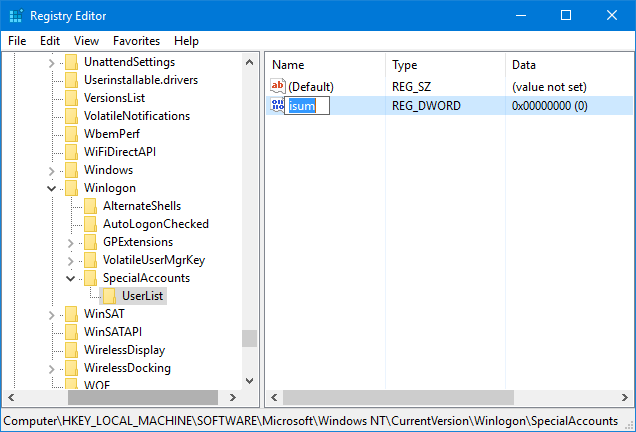
Step 2: When the Registry Editor opens, head to the following path: HKEY_LOCAL_MACHINESOFTWAREMicrosoftWindows NTCurrentVersionWinlogon
Right-click the Winlogon folder, then click New > Key. Name this new key as SpecialAccounts.

Step 3: Right-click the SpecialAccounts folder, then click New > Key. Name this new key as UserList. On the right pane of UserList, select New > DWORD (32-bit) Value. Name it with the user account that you want to hide on Windows 10 sign-in screen.
Tips: If you ever want to reverse this change and Unhide user account on the sign-in screen, navigate back to the UserList key, right-click on the name of the user account you want to unhide and click on Delete.

Click on Yes to confirm. Restart your computer to make the changes take effect.

The above is the detailed content of How to Enable or Disable User Accounts in Windows 10. For more information, please follow other related articles on the PHP Chinese website!

Hot AI Tools

Undresser.AI Undress
AI-powered app for creating realistic nude photos

AI Clothes Remover
Online AI tool for removing clothes from photos.

Undress AI Tool
Undress images for free

Clothoff.io
AI clothes remover

AI Hentai Generator
Generate AI Hentai for free.

Hot Article
Hot Tools

Notepad++7.3.1
Easy-to-use and free code editor

SublimeText3 Chinese version
Chinese version, very easy to use

Zend Studio 13.0.1
Powerful PHP integrated development environment

Dreamweaver CS6
Visual web development tools

SublimeText3 Mac version
God-level code editing software (SublimeText3)
Hot Topics
 1376
1376
 52
52

 win11 activation key permanent 2025
Mar 18, 2025 pm 05:57 PM
win11 activation key permanent 2025
Mar 18, 2025 pm 05:57 PM
Article discusses sources for a permanent Windows 11 key valid until 2025, legal issues, and risks of using unofficial keys. Advises caution and legality.
 win11 activation key permanent 2024
Mar 18, 2025 pm 05:56 PM
win11 activation key permanent 2024
Mar 18, 2025 pm 05:56 PM
Article discusses reliable sources for permanent Windows 11 activation keys in 2024, legal implications of third-party keys, and risks of using unofficial keys.
 Acer PD163Q Dual Portable Monitor Review: I Really Wanted to Love This
Mar 18, 2025 am 03:04 AM
Acer PD163Q Dual Portable Monitor Review: I Really Wanted to Love This
Mar 18, 2025 am 03:04 AM
The Acer PD163Q Dual Portable Monitor: A Connectivity Nightmare I had high hopes for the Acer PD163Q. The concept of dual portable displays, conveniently connecting via a single cable, was incredibly appealing. Unfortunately, this alluring idea quic
 Top 3 Windows 11 Gaming Features That Outshine Windows 10
Mar 16, 2025 am 12:17 AM
Top 3 Windows 11 Gaming Features That Outshine Windows 10
Mar 16, 2025 am 12:17 AM
Upgrade to Windows 11: Enhance Your PC Gaming Experience Windows 11 offers exciting new gaming features that significantly improve your PC gaming experience. This upgrade is worth considering for any PC gamer moving from Windows 10. Auto HDR: Eleva
 This Wild Ultra-Wide Alienware Monitor is $300 Off Today
Mar 13, 2025 pm 12:21 PM
This Wild Ultra-Wide Alienware Monitor is $300 Off Today
Mar 13, 2025 pm 12:21 PM
Alienware AW3225QF: The best curved 4K display, is it worth buying? The Alienware AW3225QF is known as the best curved 4K display, and its powerful performance is unquestionable. The fast response time, stunning HDR effects and unlimited contrast, coupled with excellent color performance, are the advantages of this monitor. Although it is mainly aimed at gamers, if you can accept the shortcomings of OLED, it is also suitable for office workers who pursue high efficiency. Widescreen monitors are not only loved by gamers, but also favored by users who value productivity improvement. They are great for work and enhance anyone’s desktop experience. This Alienware monitor is usually expensive, but is currently enjoying it
 How to Create a Dynamic Table of Contents in Excel
Mar 24, 2025 am 08:01 AM
How to Create a Dynamic Table of Contents in Excel
Mar 24, 2025 am 08:01 AM
A table of contents is a total game-changer when working with large files – it keeps everything organized and easy to navigate. Unfortunately, unlike Word, Microsoft Excel doesn’t have a simple “Table of Contents” button that adds t
 ReactOS, the Open-Source Windows, Just Got an Update
Mar 25, 2025 am 03:02 AM
ReactOS, the Open-Source Windows, Just Got an Update
Mar 25, 2025 am 03:02 AM
ReactOS 0.4.15 includes new storage drivers, which should help with overall stability and UDB drive compatibility, as well as new drivers for networking. There are also many updates to fonts support, the desktop shell, Windows APIs, themes, and file
 Shopping for a New Monitor? 8 Mistakes to Avoid
Mar 18, 2025 am 03:01 AM
Shopping for a New Monitor? 8 Mistakes to Avoid
Mar 18, 2025 am 03:01 AM
Buying a new monitor isn't a frequent occurrence. It's a long-term investment that often moves between computers. However, upgrading is inevitable, and the latest screen technology is tempting. But making the wrong choices can leave you with regret
