
 System Tutorial
Windows Series
How to Set Windows Photo Viewer as Default Image Viewer in Windows 10
System Tutorial
Windows Series
How to Set Windows Photo Viewer as Default Image Viewer in Windows 10
How to Set Windows Photo Viewer as Default Image Viewer in Windows 10

The default image viewer in Windows 10 is the new Metro Photos app instead of the classical Windows Photo Viewer. When you double-click on one picture to view it, by default Windows 10 will automatically run the Photos app to open the picture. However, some users are used to the old Windows Photo Viewer and want to make it as default image viewer in Windows 10. Now, this page will show you how to set Windows Photo Viewer as default image viewer in Windows 10. Three ways are illustrated below.
- Way 1: through "Open with"
- Way 2: through Control Panel
- Way 3: through Settings
Way 1: Set Windows Photo Viewer as default app through "Open with"
Step 1: Right-click on one picture (.jpg, .jpeg, .gif, .png, .bmp, .etc.), point to Open with and select Choose another app.

Step 2: Select Windows Photo Viewer option, check Always use this app to open .jpg files, and then click OK. (If you can't see "Windows Photo Viewer" under other options, click on More apps to find it.)

Then your Windows 10 will open photos in JPG format with Windows Photo Viewer app by default. Similarly, you can also set it to use Windows Photo Viewer to open pictures in PNG, GIF, .etc. format by default.
Way 2: Set Windows Photo Viewer as default app through Control Panel
Step 1: Open Windows 10 Control Panel. Type default programs in the search box. Then click the Set your default programs link under Default Programs.

Step 2: Select Windows Photo Viewer from the box on the left pane, click Set this program as default on the right pane and click OK. Then Windows 10 will use Windows Photo Viewer to open all image files by default.

Way 3: Set Windows Photo Viewer as default image viewer through Settings
Step 1: Press the key combination ''Win + I'' to open Settings panel, and then click the first item titled System.
Step 2: Select Default apps on the left pane, on the right pane, click the Choose a default under Photo viewer and then select Windows Photo Viewer from the app list. Then all image files will open with Windows Photo Viewer by default.

Tips: If the Windows Photo Viewer option can't appear when you use either way above to set Windows Photo Viewer as default, that's because Windows Photo Viewer is not yet activated and unavailable in your Windows 10. In this case, you need to firstly get Windows Photo Viewer working in Windows 10.
The above is the detailed content of How to Set Windows Photo Viewer as Default Image Viewer in Windows 10. For more information, please follow other related articles on the PHP Chinese website!

Hot AI Tools

Undresser.AI Undress
AI-powered app for creating realistic nude photos

AI Clothes Remover
Online AI tool for removing clothes from photos.

Undress AI Tool
Undress images for free

Clothoff.io
AI clothes remover

Video Face Swap
Swap faces in any video effortlessly with our completely free AI face swap tool!

Hot Article
Hot Tools

Notepad++7.3.1
Easy-to-use and free code editor

SublimeText3 Chinese version
Chinese version, very easy to use

Zend Studio 13.0.1
Powerful PHP integrated development environment

Dreamweaver CS6
Visual web development tools

SublimeText3 Mac version
God-level code editing software (SublimeText3)
Hot Topics
 1664
1664
 14
1423
52
1317
25
1268
29
1248
24
14
1423
52
1317
25
1268
29
1248
24

 Windows kb5054979 update information Update content list
Apr 15, 2025 pm 05:36 PM
Windows kb5054979 update information Update content list
Apr 15, 2025 pm 05:36 PM
KB5054979 is a cumulative security update released on March 27, 2025, for Windows 11 version 24H2. It targets .NET Framework versions 3.5 and 4.8.1, enhancing security and overall stability. Notably, the update addresses an issue with file and directory operations on UNC shares using System.IO APIs. Two installation methods are provided: one through Windows Settings by checking for updates under Windows Update, and the other via a manual download from the Microsoft Update Catalog.
 Nanoleaf Wants to Change How You Charge Your Tech
Apr 17, 2025 am 01:03 AM
Nanoleaf Wants to Change How You Charge Your Tech
Apr 17, 2025 am 01:03 AM
Nanoleaf's Pegboard Desk Dock: A Stylish and Functional Desk Organizer Tired of the same old charging setup? Nanoleaf's new Pegboard Desk Dock offers a stylish and functional alternative. This multifunctional desk accessory boasts 32 full-color RGB
 Got an AMD CPU and Aren't Using PBO? You're Missing Out
Apr 12, 2025 pm 09:02 PM
Got an AMD CPU and Aren't Using PBO? You're Missing Out
Apr 12, 2025 pm 09:02 PM
Unlocking Ryzen's Potential: A Simple Guide to Precision Boost Overdrive (PBO) Overclocking your new PC can seem daunting. While performance gains might feel elusive, leaving potential untapped is even less appealing. Fortunately, AMD Ryzen processo
 ASUS' ROG Zephyrus G14 OLED Gaming Laptop Is $300 Off
Apr 16, 2025 am 03:01 AM
ASUS' ROG Zephyrus G14 OLED Gaming Laptop Is $300 Off
Apr 16, 2025 am 03:01 AM
ASUS ROG Zephyrus G14 Esports Laptop Special Offer! Buy ASUS ROG Zephyrus G14 Esports Laptop now and enjoy a $300 offer! Original price is $1999, current price is only $1699! Enjoy immersive gaming experience anytime, anywhere, or use it as a reliable portable workstation. Best Buy currently offers offers on this 2024 14-inch ASUS ROG Zephyrus G14 e-sports laptop. Its powerful configuration and performance are impressive. This ASUS ROG Zephyrus G14 e-sports laptop costs 16 on Best Buy
 How to Use Windows 11 as a Bluetooth Audio Receiver
Apr 15, 2025 am 03:01 AM
How to Use Windows 11 as a Bluetooth Audio Receiver
Apr 15, 2025 am 03:01 AM
Turn your Windows 11 PC into a Bluetooth speaker and enjoy your favorite music from your phone! This guide shows you how to easily connect your iPhone or Android device to your computer for audio playback. Step 1: Pair Your Bluetooth Device First, pa
 5 Hidden Windows Features You Should Be Using
Apr 16, 2025 am 12:57 AM
5 Hidden Windows Features You Should Be Using
Apr 16, 2025 am 12:57 AM
Unlock Hidden Windows Features for a Smoother Experience! Discover surprisingly useful Windows functionalities that can significantly enhance your computing experience. Even seasoned Windows users might find some new tricks here. Dynamic Lock: Auto
 5 Windows Settings to Change to Improve Laptop Battery Life
Apr 12, 2025 am 06:04 AM
5 Windows Settings to Change to Improve Laptop Battery Life
Apr 12, 2025 am 06:04 AM
Is your Windows laptop battery draining faster than you'd like? Don't worry, you can significantly extend its life with a few simple tweaks to Windows' built-in power management features. Here's how to maximize your laptop's battery life on a singl
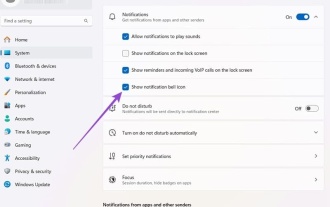 How to Customize Your Windows 11 Notifications
Apr 14, 2025 am 04:05 AM
How to Customize Your Windows 11 Notifications
Apr 14, 2025 am 04:05 AM
Detailed explanation of Windows 11 notification settings: Create a personalized notification experience Windows 11 integrates the Notification Center into the calendar, and although it takes some time to adapt, the frequency of notifications has not changed. If you are tired of the constantly popping up system updates and useless application notifications, this article will guide you to customize Windows 11 notifications and optimize your workflow. Global notification settings Almost all notification-related options are located in Settings in Windows 11. Step 1: Click the "Start" menu and select "Settings" (or press "Windows I"). Step 2: Select System in the left sidebar. Step 3: Click "Notification" to access all notification options.
