By default, there is a Network icon displaying at the bottom right of the Windows 10 login/lock screen, which allows you to change your PC's network connectivity state without requiring signing into Windows 10. It is handy. But sometimes you may want to hide or remove the Network icon from the login/lock screen, in case others disconnect your PC from the network or connect the PC to other networks without signing into Windows. If you want to remove the Network icon from Windows 10 login/lock screen, follow any of the two ways.

Step 1: Open the Local Group Policy Editor in Windows 10.
Step 2: In the left pane of Group Policy Editor, expand Computer Configuration, Administrative Templates, System, and then select Logon. With Logon selected, look for the policy setting named "Do not display network section UI" on the right-side pane and then double-click this policy setting, which is not configured by default, to configure it.

Step 3: Select Enabled option, and click Apply followed by OK.

Step 4: That's it. Changes will take effect immediately. Now, sign out or lock Windows 10 using Win + L, to check if the Network icon is disappeared from the login/lock screen.
If you want to display the Network icon on the login/lock screen, just disable or don't configure this policy.
Windows 10 Home does not include Group Policy Editor by default. If you are using Windows 10 Home and want to remove the Network icon from the login/lock screen, you have to do that using the Registry Editor.
Step 1: Open the Registry Editor in Windows 10.
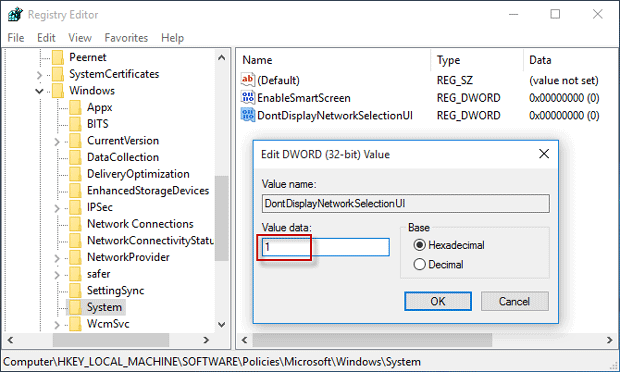
Step 2: In the left-side pane of Registry Editor, navigate to the key: ComputerHKEY_LOCAL_MACHINESOFTWAREPoliciesMicrosoftWindowsSystem. With the System key selected, right-click on any blank area of the right-side pane, and select New -> DWORD (32-bit) Value to create a new value.

Step 3: Name the new value as DontDisplayNetworkSelectionUI, and then double-click on this new value to change its value data.

Step 4: In the pop-up dialog, change the value data from 0 to 1, and click OK.

Step 5: Now, close the Registry Editor, and sign out or lock Windows 10 to check if the Network icon is removed from the login/lock screen.
If you want to display the Network icon on the login/lock screen, just delete the DontDisplayNetworkSelectionUI value from the Registry Editor.
The above is the detailed content of 2 Ways to Remove Network Icon from Windows 10 Login Screen. For more information, please follow other related articles on the PHP Chinese website!


