In this blog post, we'll guide you through the step-by-step process of incorporating FACEIO's face authentication into your Next.js application, from setting up your FACEIO account to implementing the integration within your codebase.
Prerequisites
Before we dive in, make sure you have the following in place:
Node.js and npm: Ensure you have Node.js and npm installed on your development machine. You can download the latest version from the official Node.js website.
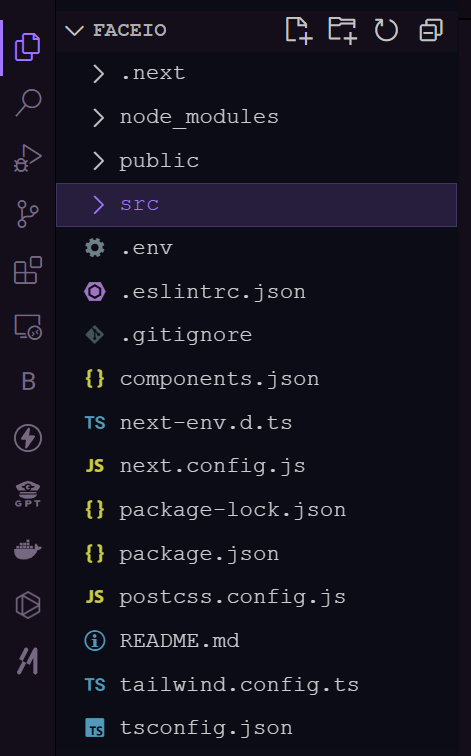
Next.js: You'll need to have a Next.js project set up. If you don't have one, you can create a new one:

Setting Up the FACEIO Application
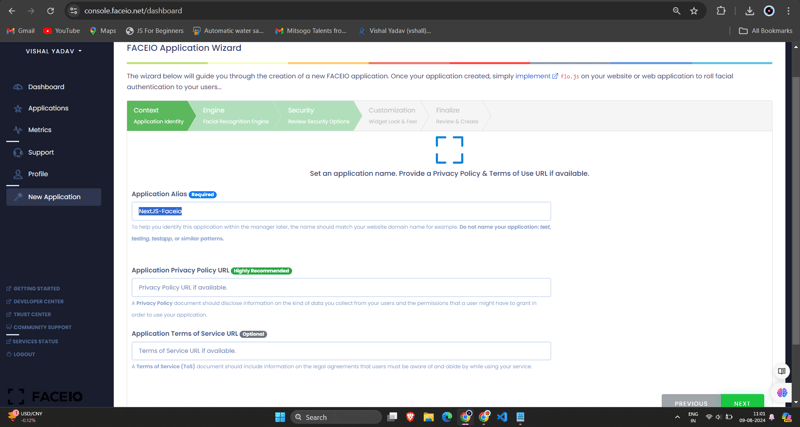
1.Create a New FACEIO Application: Log in to your FACEIO Console and click on the "Create New App" button.

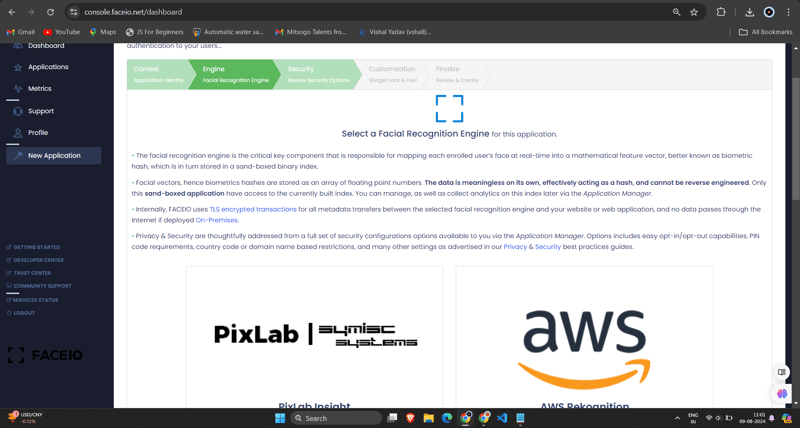
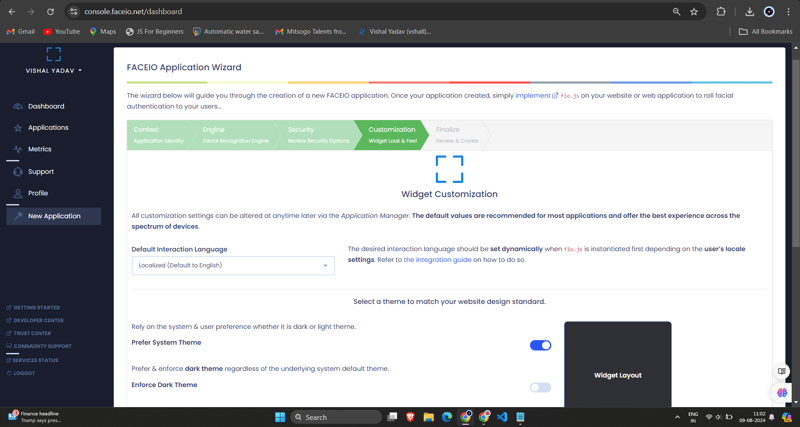
2.Configure the Application: Fill out the required information, such as the application name, description, and the callback URL (which will be the URL of your Next.js application). Once you've completed the form, click "Create App".

3.Obtain the FACEIO_APP_ID: After creating the application, you'll be provided with a unique FACEIO_APP_ID. This is the identifier you'll use to integrate FACEIO into your Next.js application.

Integrating FACEIO into Your Next.js Application
1.Install the FACEIO NPM Package: In your Next.js project, install the faceio-npm package using npm or yarn:

2.Create a Face Authentication Component: In your Next.js project, create a new file called Components/Dashboard.tsx (or any other name you prefer) with the following code:
// Dashboard.tsx
import React from "react";
import { Card, CardHeader, CardTitle, CardContent } from "@/components/ui/card";
import { Button } from "@/components/ui/button";
import { FaUserCircle, FaLock, FaCode, FaChartBar, FaSignOutAlt } from 'react-icons/fa';

interface DashboardProps {
  userEmail: string;
  onLogout: () => void;
}

const Dashboard: React.FC<DashboardProps> = ({ userEmail, onLogout }) => {
  return (
    <div className="max-w-7xl mx-auto p-4 md:p-6 space-y-6">
      <Card className="w-full bg-black text-white">
        <CardHeader className="flex flex-col sm:flex-row items-start sm:items-center justify-between space-y-4 sm:space-y-0">
          <div>
            <CardTitle className="text-2xl sm:text-3xl font-bold">Welcome to FaceIO</CardTitle>
            <p className="text-base sm:text-lg mt-2">Email: {userEmail}</p>
          </div>
          <Button
            variant="secondary"
            size="sm"
            onClick={onLogout}
            className="flex items-center w-full sm:w-auto justify-center mt-8"
          >
            <FaSignOutAlt className="mr-2" /> Logout
          </Button>
        </CardHeader>
        <CardContent>
          <p className="text-lg sm:text-xl mb-4">You have successfully logged in.</p>
        </CardContent>
      </Card>

      <h2 className="text-xl sm:text-2xl font-bold text-center my-6">Facial Authentication for the Web</h2>

      <div className="grid grid-cols-1 sm:grid-cols-2 gap-4 sm:gap-6">
        <Card>
          <CardHeader>
            <CardTitle className="flex items-center text-base sm:text-lg">
              <FaUserCircle className="mr-2" /> Secure & Easy
            </CardTitle>
          </CardHeader>
          <CardContent>
            <p className="text-sm sm:text-base">Cross-browser, secure & easy to implement. Passwordless Authentication SDKs powered by Face Recognition for Web Sites & Apps.</p>
          </CardContent>
        </Card>

        <Card>
          <CardHeader>
            <CardTitle className="flex items-center text-base sm:text-lg">
              <FaLock className="mr-2" /> Privacy-Focused
            </CardTitle>
          </CardHeader>
          <CardContent>
            <p className="text-sm sm:text-base">Your facial data is encrypted and securely stored. We prioritize user privacy and data protection.</p>
          </CardContent>
        </Card>

        <Card>
          <CardHeader>
            <CardTitle className="flex items-center text-base sm:text-lg">
              <FaCode className="mr-2" /> Developer-Friendly
            </CardTitle>
          </CardHeader>
          <CardContent>
            <p className="text-sm sm:text-base">Easy integration with clear documentation. Get started quickly and implement facial authentication in your projects.</p>
          </CardContent>
        </Card>

        <Card>
          <CardHeader>
            <CardTitle className="flex items-center text-base sm:text-lg">
              <FaChartBar className="mr-2" /> Analytics & Insights
            </CardTitle>
          </CardHeader>
          <CardContent>
            <p className="text-sm sm:text-base">Gain valuable insights into user authentication patterns and improve your applications security.</p>
          </CardContent>
        </Card>
      </div>

      <div className="flex flex-col sm:flex-row justify-center items-center space-y-4 sm:space-y-0 sm:space-x-4 mt-8">
        <Button variant="default" size="lg" className="w-full sm:w-auto">
          Get Started →
        </Button>
        <Button variant="outline" size="lg" className="w-full sm:w-auto">
          Integration Guide →
        </Button>
        <Button variant="secondary" size="lg" className="w-full sm:w-auto">
          FACEIO Console →
        </Button>
      </div>

      <Card className="mt-8 bg-gray-100">
        <CardContent className="text-center py-6">
          <p className="text-base sm:text-lg font-semibold">Ready to implement facial authentication in your project?</p>
          <p className="mt-2 text-sm sm:text-base">Check out our documentation and start securing your application today!</p>
        </CardContent>
      </Card>
    </div>
  );
};

export default Dashboard;
3.Import your Dashboard.tsx Component into Login.tsx Component:
/* eslint-disable react-hooks/exhaustive-deps */
"use client";
import {
  Card,
  CardContent,
  CardDescription,
  CardFooter,
  CardHeader,
  CardTitle,
} from "@/components/ui/card";
import { Terminal } from "lucide-react";
import { MailIcon, CheckCircleIcon } from "lucide-react";
import { Alert, AlertDescription, AlertTitle } from "@/components/ui/alert";
import { Input } from "@/components/ui/input";
import { Label } from "@/components/ui/label";
import { Button } from "./ui/button";
import faceIO from "@faceio/fiojs";
import { useEffect, useRef, useState } from "react";
import Link from "next/link";
import { toast } from "sonner";
import Dashboard from "./Dashboard";

type Props = {};

const Login: React.FC<Props> = ({}) => {
  const faceioRef = useRef<faceIO | null>(null);
  const [email, setEmail] = useState("");
  const [userLogin, setUserLogin] = useState("");
  const [isLoggedIn, setIsLoggedIn] = useState(false);

  const publicKey = process.env.NEXT_PUBLIC_FACEIO_PUBLIC_ID as string;

  const initialiseFaceio = async () => {
    try {
      faceioRef.current = new faceIO(publicKey);
      console.log("FaceIO initialized successfully");
    } catch (error) {
      console.log(error);
      handleError(error);
    }
  };

  useEffect(() => {
    initialiseFaceio();
  }, []);

  const handleRegister = async () => {
    try {
      if (!faceioRef.current) {
        console.error("FaceIO instance is not initialized");
        return;
      }

      await faceioRef.current?.enroll({
        userConsent: false,
        locale: "auto",
        payload: { email: `${email}` },
      });
      toast.success("Successfully Registered user.");
    } catch (error) {
      handleError(error);
      faceioRef.current?.restartSession();
    }
  };

  const handleLogin = async () => {
    try {
      const authenticate = await faceioRef.current?.authenticate();
      console.log("User authenticated successfully:", authenticate);
      setUserLogin(authenticate.payload.email);
      setIsLoggedIn(true);
      toast.success("Successfully logged in.");
    } catch (error) {
      console.log(error);
      handleError(error);
    }
  };

  const handleLogout = () => {
    setIsLoggedIn(false);
    setUserLogin("");
    toast.success("Successfully logged out.");
  };

  function handleError(errCode: any) {
    const fioErrs = faceioRef.current?.fetchAllErrorCodes()!;
    switch (errCode) {
      case fioErrs.PERMISSION_REFUSED:
        toast.info("Access to the Camera stream was denied by the end user");
        break;
      case fioErrs.NO_FACES_DETECTED:
        toast.info(
          "No faces were detected during the enroll or authentication process"
        );
        break;
      case fioErrs.UNRECOGNIZED_FACE:
        toast.info("Unrecognized face on this application's Facial Index");
        break;
      case fioErrs.MANY_FACES:
        toast.info("Two or more faces were detected during the scan process");
        break;
      case fioErrs.FACE_DUPLICATION:
        toast.info(
          "User enrolled previously (facial features already recorded). Cannot enroll again!"
        );
        break;
      case fioErrs.MINORS_NOT_ALLOWED:
        toast.info("Minors are not allowed to enroll on this application!");
        break;
      case fioErrs.PAD_ATTACK:
        toast.info(
          "Presentation (Spoof) Attack (PAD) detected during the scan process"
        );
        break;
      case fioErrs.FACE_MISMATCH:
        toast.info(
          "Calculated Facial Vectors of the user being enrolled do not matches"
        );
        break;
      case fioErrs.WRONG_PIN_CODE:
        toast.info("Wrong PIN code supplied by the user being authenticated");
        break;
      case fioErrs.PROCESSING_ERR:
        toast.info("Server side error");
        break;
      case fioErrs.UNAUTHORIZED:
        toast.info(
          "Your application is not allowed to perform the requested operation (eg. Invalid ID, Blocked, Paused, etc.). Refer to the FACEIO Console for additional information"
        );
        break;
      case fioErrs.TERMS_NOT_ACCEPTED:
        toast.info(
          "Terms & Conditions set out by FACEIO/host application rejected by the end user"
        );
        break;
      case fioErrs.UI_NOT_READY:
        toast.info(
          "The FACEIO Widget could not be (or is being) injected onto the client DOM"
        );
        break;
      case fioErrs.SESSION_EXPIRED:
        toast.info(
          "Client session expired. The first promise was already fulfilled but the host application failed to act accordingly"
        );
        break;
      case fioErrs.TIMEOUT:
        toast.info(
          "Ongoing operation timed out (eg, Camera access permission, ToS accept delay, Face not yet detected, Server Reply, etc.)"
        );
        break;
      case fioErrs.TOO_MANY_REQUESTS:
        toast.info(
          "Widget instantiation requests exceeded for freemium applications. Does not apply for upgraded applications"
        );
        break;
      case fioErrs.EMPTY_ORIGIN:
        toast.info("Origin or Referer HTTP request header is empty or missing");
        break;
      case fioErrs.FORBIDDDEN_ORIGIN:
        toast.info("Domain origin is forbidden from instantiating fio.js");
        break;
      case fioErrs.FORBIDDDEN_COUNTRY:
        toast.info(
          "Country ISO-3166-1 Code is forbidden from instantiating fio.js"
        );
        break;
      case fioErrs.SESSION_IN_PROGRESS:
        toast.info(
          "Another authentication or enrollment session is in progress"
        );
        break;
      case fioErrs.NETWORK_IO:
      default:
        toast.info(
          "Error while establishing network connection with the target FACEIO processing node"
        );
        break;
    }
  }

  if (isLoggedIn) {
    return <Dashboard userEmail={userLogin} onLogout={handleLogout} />;
  }

  return (
    <div className="min-h-screen bg-gradient-to-r from-cyan-500 to-blue-500 flex items-center justify-center p-4 w-full">
      <Card className="w-[400px] bg-white shadow-xl rounded-xl overflow-hidden">
        <CardHeader className="bg-gray-50 border-b p-6">
          <CardTitle className="text-2xl font-bold text-gray-800">
            Secure Workspace
          </CardTitle>
          <CardDescription className="text-sm text-gray-600">
            Authenticate to access your personalized work environment
          </CardDescription>
        </CardHeader>
        <CardContent className="p-6 space-y-4">
          <div className="space-y-2">
            <Label
              htmlFor="email"
              className="text-sm font-medium text-gray-700"
            >
              Work Email
            </Label>
            <Input
              id="email"
              type="email"
              placeholder="you@company.com"
              className="w-full px-3 py-2 border rounded-md"
              onChange={(e) => setEmail(e.target.value)}
            />
          </div>
          <div className="space-y-4">
            <Button
              className="w-full bg-blue-600 hover:bg-blue-700 text-white font-medium py-2 rounded-md transition duration-300 ease-in-out"
              onClick={handleLogin}
            >
              Access Workspace
            </Button>
            <Button
              className="w-full bg-gray-100 hover:bg-gray-200 text-gray-800 font-medium py-2 rounded-md transition duration-300 ease-in-out"
              onClick={handleRegister}
              disabled={!email.includes("@")}
            >
              Register New Account
            </Button>
          </div>
        </CardContent>
        <CardFooter className="bg-gray-50 border-t p-4">
          <div className="w-full text-center text-xs text-gray-500">
            Protected by FaceIO™ Technology.
            <Link
              href="https://faceio.net/security-policy"
              className="text-blue-600 hover:underline ml-1"
            >
              Learn about our security measures
            </Link>
          </div>
        </CardFooter>
      </Card>

      {userLogin && !isLoggedIn && (
        <div className="fixed bottom-4 right-4 bg-green-100 border-l-4 border-green-500 text-green-700 p-4 rounded-md shadow-lg">
          <div className="flex">
            <div className="flex-shrink-0">
              <CheckCircleIcon className="h-5 w-5 text-green-500" />
            </div>
            <div className="ml-3">
              <p className="text-sm font-medium">Workspace Access Granted</p>
              <p className="text-xs mt-1">Logged in as: {userLogin}</p>
            </div>
          </div>
        </div>
      )}
    </div>
  );
};

export default Login;
Remember to replace 'NEXT_PUBLIC_FACEIO_PUBLIC_ID' with the actual FACEIO_APP_ID you obtained from the FACEIO Console.

import { buttonVariants } from "@/components/ui/button";
import { cn } from "@/lib/utils";
import Link from "next/link";
import { FaUserShield, FaImage, FaCode, FaRobot } from 'react-icons/fa';

export default function Home() {
  const demos = [
    { title: "FACIO Web Authentication", href: "/faceio", icon: FaUserShield },
    { title: "Image Processing", href: "/imageprocessing", icon: FaImage },
    { title: "Code Generation", href: "/codegeneration", icon: FaCode },
    { title: "AI Assistant", href: "/aiassistant", icon: FaRobot },
  ];

  return (
    <div className="max-h-screen  bg-gradient-to-br from-purple-700 via-blue-600 to-teal-500 text-white p-8 w-full">
      <div className="max-w-6xl mx-auto">
        <h1 className="text-5xl md:text-7xl font-bold text-center mb-8 animate-fade-in-down">
          PixLab Faceio
        </h1>
        <p className="text-xl text-center mb-12 animate-fade-in-up">
          Explore cutting-edge technologies and innovative solutions
        </p>

        <div className="grid grid-cols-1 md:grid-cols-2 gap-8">
          {demos.map((demo, index) => (
            <Link
              key={demo.href}
              href={demo.href}
              className={cn(
                buttonVariants({ variant: "outline" }),
                "h-40 text-lg font-semibold flex flex-col items-center justify-center space-y-4 bg-white bg-opacity-10 backdrop-filter backdrop-blur-lg rounded-xl hover:bg-opacity-20 transition-all duration-300 animate-fade-in",
                { 'animate-delay-100': index % 2 === 1 }
              )}
            >
              <demo.icon className="text-4xl" />
              {demo.title}
            </Link>
          ))}
        </div>

        <div className="mt-16 text-center animate-fade-in-up animate-delay-300">
          <h2 className="text-3xl font-bold mb-4">Why Choose PixLab?</h2>
          <ul className="text-lg space-y-2">
            <li>✨ Cutting-edge technologies</li>
            <li>? High-performance solutions</li>
            <li>? Advanced security features</li>
            <li>? Seamless integrations</li>
          </ul>
        </div>

        <footer className="mt-16 text-center text-sm opacity-75 animate-fade-in-up animate-delay-500">
          © 2024 PixLab. All rights reserved. Empowering innovation through technology.
        </footer>
      </div>
    </div>
  );
}
That's it! You've now integrated FACEIO's face authentication into your Next.js application. When users click the "Authenticate with Face" button, the FACEIO widget will appear, guiding them through the authentication process.
Capturing the FACEIO Widget in Action - Register
To demonstrate the FACEIO widget's functionality, let's capture a GIF of the registration process:

This GIF showcases the user experience of the FACEIO face registration process within the Next.js application. The user can easily register their face, which will be used for seamless authentication in future logins.
Capturing the FACEIO Widget in Action
To demonstrate the FACEIO widget's functionality, let's capture a GIF of the authentication process:

This GIF showcases the user experience of the FACEIO face authentication process within the Next.js application.
Key Security Best Practices for FACEIO Applications
Eliminate Duplicate Registrations: Enable settings to stop the same user from enrolling multiple times, avoiding potential conflicts or misuse.
Enhance Anti-Spoofing Measures: Activate features to detect and block face spoofing attempts, ensuring the system only interacts with real, live users.
Guarantee PIN Uniqueness: Make sure each user's PIN is unique within the application to prevent unauthorized access.
Implement Geo-Restrictions: Limit the instantiation of the FACEIO widget to authorized domain names and countries for added security control.
Benefits of Using FACEIO in Your Next.js App
Integrating FACEIO into your Next.js application offers several benefits:
Improved User Experience: The FACEIO widget offers a seamless and intuitive authentication flow, making it easy for users to log in to your application.
Cross-Platform Compatibility: FACEIO works across various devices and browsers, ensuring a consistent user experience.
Easy Integration: The faceio-npm package simplifies the integration process, allowing you to quickly add face authentication to your Next.js application.
FACEIO Community Forum: You can get help for problems from the FACEIO Community.
Conclusion
In this blog post, you've learned how to integrate FACEIO's face authentication service into your Next.js application. By following the steps outlined here, you can now provide your users with a secure and user-friendly authentication experience, enhancing the overall quality of your web application.
If you have any further questions or need additional assistance, feel free to reach out to the FACEIO support team or explore the comprehensive FACEIO documentation.
Happy coding!
For the complete source code of this implementation, you can visit the GitHub repository and explore the project in detail.
The above is the detailed content of Seamless Face Authentication in Your Next.js App with FACEIO. For more information, please follow other related articles on the PHP Chinese website!


