

Warning: any and all content posted is intended to remind or maintain my knowledge and I hope it can help you on your journey through learning too. The idea is as you have time, add information related to this topic in the same post, making it complete and always up to date.
If you find any flaws in the post or notice that something was missing, help me improve :)
As I interact with and support developers on their journey, I notice technical debts and try to support the evolution of knowledge. I chose to focus on those points that cause the most pain and difficulty to developers on a daily basis, according to my humble perception.
One of these difficulties is about Angular's routing feature.
Therefore, let's talk a little about how Angular's navigation module works, in addition to some existing features.
A brief summary of the step-by-step process that Angular uses to route an application:
Under the hood, Angular, React or Vue use the History API.
History is a browser interface that allows you to manipulate the user's browsing history without reloading the page. It was introduced with the HTML5 specification and offers a set of methods for adding, modifying or removing entries from the browser history, as well as responding to changes in the browsing state.
See:


Note that with each change of route, the "history" object is populated and identifies the new route.
This occurs both when using Location and Router:
_import { Location } from "@angular/common"_
_import { Router } from "@angular/router"_
This occurs because every time we navigate to any route, the history.pushState method is invoked. Likewise, the history.replaceState method is invoked every time we use replaceUrl.
An important observation is that although the History API can meet the most basic needs, from the moment we move on to the topic of SPA monitoring, we see that it has some problems. To solve these problems, a new proposal to replace this API is underway, which is the Navigation API. It is still in the experimental phase and we will talk more about it in the post about SPA monitoring and performance.
SPAs frontends have 2 most common routing strategies:
HashLocationStrategy(Hash mode) and PathLocationStrategy(History mode).
For those who already work with SPAs on a daily basis, you know the most basic difference between the two strategies:
"Clean" URLs: The URLs follow the traditional web navigation pattern, without any #. For example, /home, /about.
Example URL: https://example.com/home.
Hashed URLs: URLs include a # followed by the path. What comes after the # is not sent to the server and is handled entirely by the browser.
Example URL: https://example.com/#/home.
There is some debate about the best use of each. Some comment on the strategy of using HashLocation only in SSR architecture and others who understand that it brings more simplicity and therefore use it in all scenarios, but I won't go into that detail. Here's a tip if you're interested in finding out more about the discussion.
Lembra do que comentamos lá em cima sobre a History API?
O que essa opção faz é garantir que o conteúdo seja renderizado na tela, mas sem acionar o método history.pushstate que é responsável por definir a URL do navegador. Só o status interno do Router que será atualizado.
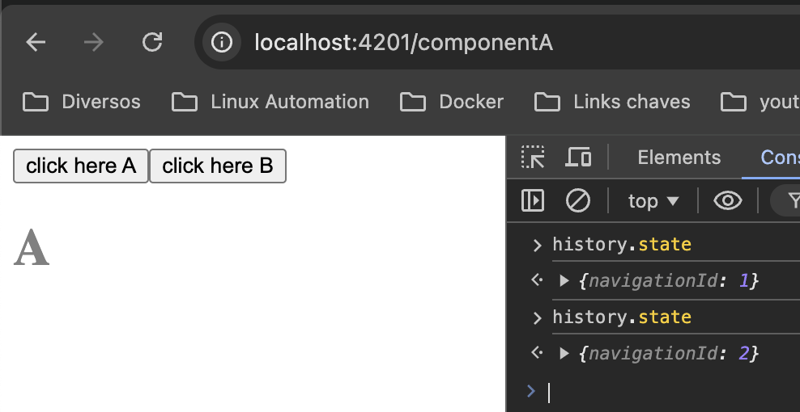
Repare que,
o history.state possui tamanho == 1

E quando navego para uma próxima rota com o skipLocation ativo(
this.router.navigate(['componentA'], {skipLocationChange: true});
), ele não altera a url e nem o estado da api de histórico

no entanto, quando acessamos os eventos que o router emite, é possível ver que o estado interno do Router está atualizado

Método disponibilizado para permitir executar uma determinada ação antes do componentes ser carregado. Na imagem abaixo, eu mostro que o resolver é carregado primeiro, depois o componente é carregado e a informação é lida:

Exemplo de código
Crie o resolver:
@Injectable({ providedIn: 'root' })
export class TestResolver implements Resolve<string> {

    resolve(): Observable<string> {
        return of('string retornada pelo resolver');
    }
}
Declare-o no arquivo de rotas:
  {path: 'componentB', component: ComponentB,
   resolve: { testResolve: TestResolver}
}
Receba os parâmetros no componente:
export class ComponentB {

  constructor(private router: Router, private activatedRoute: ActivatedRoute) {
    this.activatedRoute.data.subscribe(res => {
      console.log(res);
    })
  }
Há outras formas de lidar com o problema que os "resolvers" se propõem a sanar. Lembre-se que resolver atua de forma síncrona. Ou seja, para que o componente seja carregado, primeiro o resolver terá que finalizar seu processamento. Isso pode levar a segundos de espera por parte do cliente e a usabilidade da aplicação não ficar tão interessante. Há um tópico bem interessa sobre o uso de resolvers e que você pode conferir aqui.
define quando executar guards e resolvers. Você que utilizou algum guard ou resolver, já deve ter se perguntando se daria pra poder acioná-los só após uma mudança de parâmetros na rota ou de queryParams ou algum outro customizado. Saiba que é possível, utilizando o runGuardsAndResolvers.
Pode declarar direto no arquivo de rotas:
{
    path: 'example',
    component: ExampleComponent,
    resolve: { data: ExampleResolver },
    canActivate: [AuthGuard],
    runGuardsAndResolvers: 'paramsOrQueryParamsChange' // Define quando executar guards e resolvers
  }
Você possui essas opções:
'pathParamsChange' | 'pathParamsOrQueryParamsChange' | 'paramsChange' | 'paramsOrQueryParamsChange' | 'always' | ((from: ActivatedRouteSnapshot, to: ActivatedRouteSnapshot) => boolean);
O método forRoot() configura o roteador no nível raiz da aplicação e disponibiliza todas as funcionalidades de roteamento. Com essa configuração, o angula saberá como gerenciar as rotas definidas e as diretivas de roteamento. É com base na declaração do forRoot que routerOutlet, routerLink e outros ficam disponíveis dentro da aplicação.
routerLink é uma diretiva usada para definir links de navegação.
e permite a navegação programática entre as diferentes rotas da aplicação. Quando clicado, o link navega para a rota especificada sem recarregar a página inteira.
Sintaxe: [routerLink]="['/path']"
routerLinkActive é uma diretiva usada para adicionar uma classe CSS ao elemento quando a rota associada está ativa, facilitando a aplicação de estilos ou classes diferentes aos links de navegação que correspondem à rota atualmente ativa, permitindo destacar visualmente o link ativo.
Exemplo:
<style>
.classRouterLinkActive {
    color: blue;
}
</style>

<button class="color" routerLinkActive="classRouterLinkActive" [routerLink]="['/componentA']">click here A</button>
<button class="color" routerLinkActive="classRouterLinkActive"  routerLink='/componentB'>click here B</button>
<button class="color" routerLinkActive="classRouterLinkActive"  routerLink='/componentE'>click here E</button>
Veja que quando a rota está ativa, a classe é imediatamente aplicada:


serviço disponibilizado que sempre retorna os dados da rota ativa no momento.
Ao declarar dentro do componente, você vai sempre obter os dados atuais relativos a rota do componente em que está sendo importado:
  constructor(private router: Router, private activatedRoute: ActivatedRoute) {
      console.log(activatedRoute);
  }
O redirectTo, possui duas formas de realizar o roteamento: relativa e absoluta.
De acordo com a forma que você chama a rota:
a diferença é que ao usar um caminho absoluto, a busca pelo próximo objeto de configuração começará da raiz, ou seja, o primeiro array de rotas mais externo.
Enquanto que ao usar um caminho relativo, a pesquisa começará na primeira rota na matriz de onde a operação de redirecionamento começou.
relativo:
const routes: Routes = [
  {path: 'componentA', component: ComponentA},
  {path: 'componentB', component: ComponentB,
  children: [
      {
        path: 'componentC',
        redirectTo: 'componentA'
      },
      {
        path: 'componentA',
        component: ComponentA
      },

    ]
   }
];
Ao usar dessa forma, quando eu estou no componentB, ele direcionará pro componentA, filho de B, formando assim a rota: "componentB/componentA"

Absoluto:
const routes: Routes = [
  {path: 'componentA', component: ComponentA},
  {path: 'componentB', component: ComponentB,
  children: [
      {
        path: 'componentC',
        redirectTo: '/componentA'
      },
      {
        path: 'componentA',
        component: ComponentA
      },

    ]
   }
];
Já quando colocamos a barra("/"), ele começar a busca pelo raíz do arquivo de rotas e direcionará pro componentA da raíz:

Eu espero que tenha gostado e te ajudado a melhor a compreensão de algo ou até mesmo aberto caminhos para novos conhecimentos. Conto com você nas críticas e sugestões para irmos melhorando o conteúdo e mantendo sempre atualizado para a comunidade.
The above is the detailed content of Angular Router. For more information, please follow other related articles on the PHP Chinese website!
 Digital currency quantitative trading platform
 Regular expression space
 What is the impact of closing port 445?
 Firefox browser plug-in summary
 There are several types of php arrays
 How to retrieve Douyin flames after they are gone?
 Why does win10 activation fail?
 Advantages of spring boot framework


![[Web front-end] Node.js quick start](https://img.php.cn/upload/course/000/000/067/662b5d34ba7c0227.png)


