
 Backend Development
Python Tutorial
Mastering Django: Building a Secure User Authentication API from Scratch
Backend Development
Python Tutorial
Mastering Django: Building a Secure User Authentication API from Scratch
Mastering Django: Building a Secure User Authentication API from Scratch

``## Day 4
It's already four days into the #100daysofMiva coding challenge. ???
? Dive into Django: Building a Secure User Authentication API from Scratch!
Are you ready to take your Django skills to the next level? ? In this tutorial, I’ll be guiding you through creating a robust user authentication API using Django. Whether you're a seasoned developer or just starting, this step-by-step guide will walk you through setting up user registration, login, and token-based authentication.
By the end of this session, you'll have a solid understanding of how to:
- Setup a Django project and configure essential packages
- Create and customize serializers for user data
- Build views to handle user registration and authentication
- Implement token-based authentication for secure API access
- Join us as we transform a blank canvas into a powerful authentication system, and unlock new possibilities in your Django journey! ??
Let’s get coding! ?✨
Step 1: Set up your Django environment:
To do this you need to have python installed: Ensure Python is installed by running:
macOS/Linux:
Python is often pre-installed. You can check by running:

or

If needed, install Python via Homebrew (macOS) or package manager (Linux):

Windows:
- Download and install Python from python.org.
- Ensure you check the box to add Python to your PATH during installation.
Step 2. Set Up a Virtual Environment:
macOS/Linux:
Create and activate a virtual environment:

Windows:
Create and activate a virtual environment:

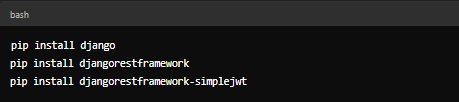
Step 3. Install Django and Packages
Now what is a framework without its packages?...let's install the packages we will need.?
With the virtual environment activated, the commands to install Django and additional packages are the same across all operating systems:
Explanation:
`
- djangorestframework: This is a powerful and flexible toolkit for building Web APIs with Django.
- djangorestframework-simplejwt: This package provides JSON Web Token (JWT) authentication, which is commonly used for secure API authentication.
Step 4. Create and Configure the Django Project
macOS/Linux/Windows:
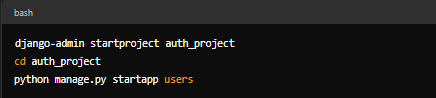
Create a Django project and app:
let us simplify the necessary things:
- startproject1: This command creates a new Django project. A project is a collection of settings for an instance of Django, including database configuration, Django-specific options, and application-specific settings.
- startapp: This creates a new app within the project. Apps are components of your project that handle specific functionality (e.g., user management).
Step 5. Update Project Settings
All OS:
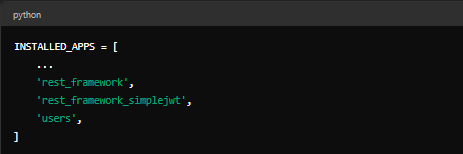
Modify settings.py to include your app and installed packages.
File: auth_project/settings.py
Explanation shall we?:
INSTALLED_APPS: This is where you register your apps and third-party packages. Here, you add rest_framework for the API functionality, rest_framework_simplejwt for JWT authentication, and users (the app you created) for managing user-related tasks.
It's okay not to know all the steps at once...it just takes practice, you'll get it right
I hope you're following...it's not hard it's complex?
(I don't know if that worked?)...
moving on...?
Keep your eyes up from here on guys?
Step 6. Creating Serializers
File: users/serializers.py

Explanation:
- **Serializers**: In Django REST Framework, serializers are used to convert complex data types (like Django models) into JSON, and vice versa.
- **RegisterSerializer**: This custom serializer handles user registration. It includes fields like username, password, email, etc.
- **validate_password**: Ensures the password meets certain security criteria.
- **validate method**: Custom validation to check if the two password fields match.
- **create** method: This method is responsible for creating and saving the new user.
Step 7: Creating Views
File: users/views.py
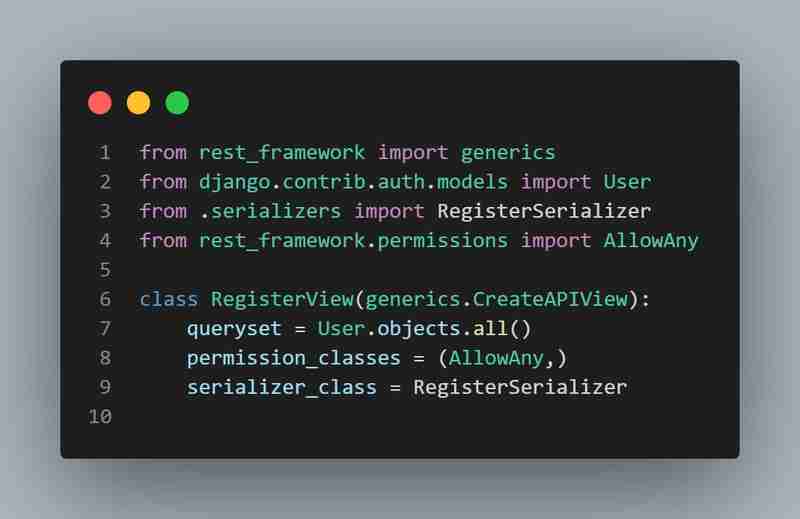
Explanation:
- **Views**: In Django, views handle the logic for processing user requests.
- **RegisterView**: This view handles user registration.
- **CreateAPIView**: A built-in view for handling the creation of new records. Here, it’s used to create a new user.
- **permission_classes**: AllowAny means that this endpoint is accessible to anyone, even unauthenticated users, which is necessary for registration.
Step 8: Setting Up URLs
File: users/urls.py
This code is written in the app's URL
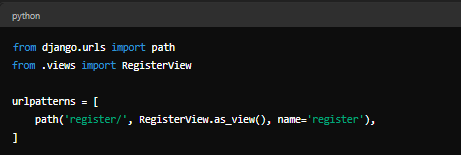
Explanation:
URL Patterns: These define the paths that map to the views.
**register/**: This URL will handle user registration.
Then go to your Project's File: **auth_project/urls.py**
and type this...?
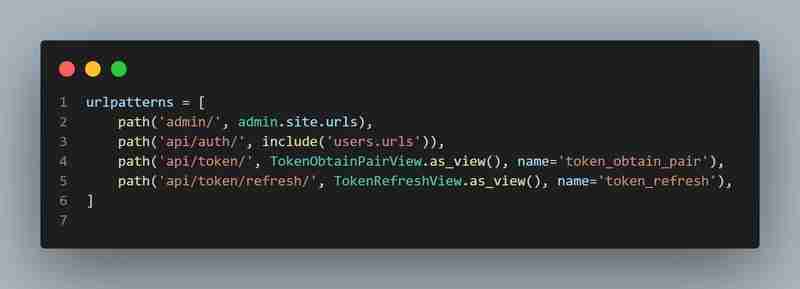
Explanation:
- **include('users.urls')**: This includes the users app's URLs.
- JWT Views: TokenObtainPairView: This view returns a pair of access and refresh tokens. TokenRefreshView: This view allows clients to refresh the access token using the refresh token.
- **TokenObtainPairView**: This view returns a pair of access and refresh tokens.
- **TokenRefreshView**: This view allows clients to refresh the access token using the refresh token.
Unto the next here you can rest well?...no pressure from here onward hehe..
Step 9: Running Migrations
Command:

The function/ purpose of doing this is that it applies changes to your database schema based on the models and fields you've defined in your project. the ones we've orchestrated above?
In other words, it keeps the project up to date
Step 10: Running the Server and Testing
Command:

This command starts the Django development server, making your project accessible locally. (your local port)
Now let's see what we've done so far...
Testing with Postman or cURL(you can download this extension from your IDE)
Using Postman
Open Postman (or any API testing tool you prefer).
Set up a new request
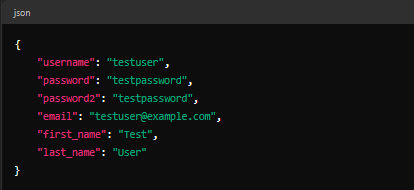
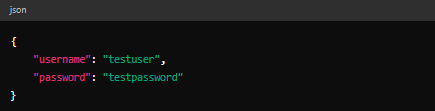
- 1. URL: http://127.0.0.1:8000/api/auth/register/
- 2. Method: POST
In the Body tab, select raw and JSON format.
Enter the following JSON data:
Body:
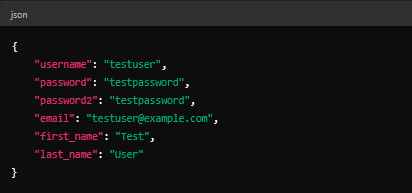
- Click Send.
For this part, the Django-Rest Framework has a friendly user interface so it's easier to navigate here than others
If successful, you should receive a response with HTTP status code 201 Created and a JSON response containing the user data.
Test the Token Authentication Endpoint
To ensure JWT authentication is working, test the token endpoint.
Using Postman:
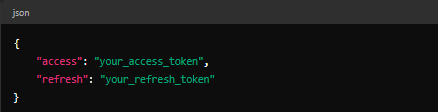
- Set up a new request: Method: POST URL: http://127.0.0.1:8000/api/token/
- In the Body tab, select raw and JSON format.
- Enter the following JSON data
4, Click Send.
You should receive a JSON response with access and refresh tokens:
**
Troubleshooting Tips
**
Server Not Starting: Ensure you're in the correct directory and have activated your virtual environment.
Endpoint Errors: Double-check your URL paths and ensure your Django app is correctly set up with the URLs.
Invalid Responses: Verify that your API endpoints and serializers are correctly configured.
By following these steps, you should be able to successfully run your Django development server, test the registration endpoint, and verify token-based authentication.
The above is the detailed content of Mastering Django: Building a Secure User Authentication API from Scratch. For more information, please follow other related articles on the PHP Chinese website!

Hot AI Tools

Undresser.AI Undress
AI-powered app for creating realistic nude photos

AI Clothes Remover
Online AI tool for removing clothes from photos.

Undress AI Tool
Undress images for free

Clothoff.io
AI clothes remover

Video Face Swap
Swap faces in any video effortlessly with our completely free AI face swap tool!

Hot Article
Hot Tools

Notepad++7.3.1
Easy-to-use and free code editor

SublimeText3 Chinese version
Chinese version, very easy to use

Zend Studio 13.0.1
Powerful PHP integrated development environment

Dreamweaver CS6
Visual web development tools

SublimeText3 Mac version
God-level code editing software (SublimeText3)
Hot Topics
 1664
1664
 14
1422
52
1316
25
1267
29
1239
24
14
1422
52
1316
25
1267
29
1239
24

 Python vs. C : Applications and Use Cases Compared
Apr 12, 2025 am 12:01 AM
Python vs. C : Applications and Use Cases Compared
Apr 12, 2025 am 12:01 AM
Python is suitable for data science, web development and automation tasks, while C is suitable for system programming, game development and embedded systems. Python is known for its simplicity and powerful ecosystem, while C is known for its high performance and underlying control capabilities.
 Python: Games, GUIs, and More
Apr 13, 2025 am 12:14 AM
Python: Games, GUIs, and More
Apr 13, 2025 am 12:14 AM
Python excels in gaming and GUI development. 1) Game development uses Pygame, providing drawing, audio and other functions, which are suitable for creating 2D games. 2) GUI development can choose Tkinter or PyQt. Tkinter is simple and easy to use, PyQt has rich functions and is suitable for professional development.
 The 2-Hour Python Plan: A Realistic Approach
Apr 11, 2025 am 12:04 AM
The 2-Hour Python Plan: A Realistic Approach
Apr 11, 2025 am 12:04 AM
You can learn basic programming concepts and skills of Python within 2 hours. 1. Learn variables and data types, 2. Master control flow (conditional statements and loops), 3. Understand the definition and use of functions, 4. Quickly get started with Python programming through simple examples and code snippets.
 Python vs. C : Learning Curves and Ease of Use
Apr 19, 2025 am 12:20 AM
Python vs. C : Learning Curves and Ease of Use
Apr 19, 2025 am 12:20 AM
Python is easier to learn and use, while C is more powerful but complex. 1. Python syntax is concise and suitable for beginners. Dynamic typing and automatic memory management make it easy to use, but may cause runtime errors. 2.C provides low-level control and advanced features, suitable for high-performance applications, but has a high learning threshold and requires manual memory and type safety management.
 How Much Python Can You Learn in 2 Hours?
Apr 09, 2025 pm 04:33 PM
How Much Python Can You Learn in 2 Hours?
Apr 09, 2025 pm 04:33 PM
You can learn the basics of Python within two hours. 1. Learn variables and data types, 2. Master control structures such as if statements and loops, 3. Understand the definition and use of functions. These will help you start writing simple Python programs.
 Python and Time: Making the Most of Your Study Time
Apr 14, 2025 am 12:02 AM
Python and Time: Making the Most of Your Study Time
Apr 14, 2025 am 12:02 AM
To maximize the efficiency of learning Python in a limited time, you can use Python's datetime, time, and schedule modules. 1. The datetime module is used to record and plan learning time. 2. The time module helps to set study and rest time. 3. The schedule module automatically arranges weekly learning tasks.
 Python: Automation, Scripting, and Task Management
Apr 16, 2025 am 12:14 AM
Python: Automation, Scripting, and Task Management
Apr 16, 2025 am 12:14 AM
Python excels in automation, scripting, and task management. 1) Automation: File backup is realized through standard libraries such as os and shutil. 2) Script writing: Use the psutil library to monitor system resources. 3) Task management: Use the schedule library to schedule tasks. Python's ease of use and rich library support makes it the preferred tool in these areas.
 Python: Exploring Its Primary Applications
Apr 10, 2025 am 09:41 AM
Python: Exploring Its Primary Applications
Apr 10, 2025 am 09:41 AM
Python is widely used in the fields of web development, data science, machine learning, automation and scripting. 1) In web development, Django and Flask frameworks simplify the development process. 2) In the fields of data science and machine learning, NumPy, Pandas, Scikit-learn and TensorFlow libraries provide strong support. 3) In terms of automation and scripting, Python is suitable for tasks such as automated testing and system management.
